When working with SQL, one of the most significant data types you'll come across is DateTime. DateTime, which represents dates and times, is critical for managing time-sensitive data such as event scheduling, transaction timestamps, and historical records. In this post, we will go deep into DateTime in SQL to help you become a professional SQL developer, looking at its features, functions, real-world examples, and recommended practices.
Understanding DateTime in SQL Server
DateTime is a SQL data type that combines date and time data into a single value. It is required for capturing temporal moments accurately. SQL databases provide a variety of DateTime data types, including DATE, TIME, DATETIME, and TIMESTAMP, each with its own function.
Date and Time Functions
With the help of SQL's DateTime methods, you have numerous options for handling and modifying date and time data. Understanding the syntax and breadth of applications for these functions is critical to realizing their full potential.
1. GETDATE() / CURRENT_TIMESTAMP
Retrieves the current date and time.
Syntax
GETDATE() | CURRENT_TIMESTAMP
Examples
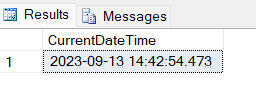
SELECT GETDATE() AS CurrentDateTime;
Output
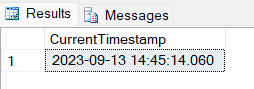
SELECT CURRENT_TIMESTAMP AS CurrentTimestamp;
Output
2. DATEADD()
Adds or subtracts a specified time interval to/from a DateTime value.
Syntax
DATEADD(interval, number, date)
interval: Specifies the unit of time (e.g., year, month, day) to add or subtract.
number: Represents the quantity of intervals to add (positive) or subtract (negative).
date: The starting date or time to which the operation is applied.
Example
SELECT DATEADD(year, 2, '2023-09-13') AS NewDate;In this example, we add 2 years to the given date, resulting in '2025-09-13'.
Example
SELECT DATEADD(day, -10, '2023-09-13') AS NewDate;
Output

Here, we subtract 10 days from the given date, resulting in '2023-09-03'.
Example
SELECT DATEADD(hour, 3, '2023-09-13 10:00:00') AS NewTime;
Output
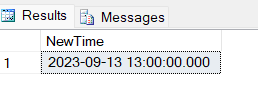
This adds 3 hours to the given time, resulting in '2023-09-13 13:00:00'. As per the above example of DateAdd, we can modify the datetime value in different ways.
3. DATEDIFF()
Calculates the difference between two DateTime values in a specified unit (e.g., years, months, days).
Syntax
DATEDIFF(interval, start_date, end_date)
interval: Specifies the unit of time (e.g., year, month, day) to calculate the difference in.
start_date: The beginning date or time.
end_date: The ending date or time.
Example
SELECT DATEDIFF(day, '2023-09-10', '2023-09-13') AS DaysDifference;
Output

In this example, we calculate the difference in days between '2023-09-10' and '2023-09-13', resulting in '3'.
Example
SELECT DATEDIFF(month, '2023-01-15', '2023-09-20') AS MonthsDifference;
Output
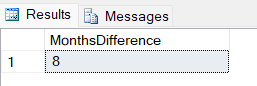
Here, we calculate the difference in months between '2023-01-15' and '2023-09-20', resulting in '8'.
Example
SELECT DATEDIFF(year, '1995-08-19', GETDATE()) AS AgeInYears;
Output
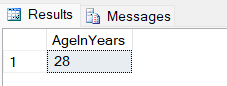
In this example, we determine the age of a person born on '1995-08-19' by calculating the difference in years between their birthdate and the current date using GETDATE(). The result is the person's age in years.
4. CONVERT()
Converts DateTime values between different formats.
Syntax
CONVERT(data_type, expression, style)
data_type: Specifies the target data type to which you want to convert the expression.
expression: The value or column to be converted.
style: Defines the format for the conversion (optional).
Example
SELECT CONVERT(DATE, GETDATE()) AS DateOnly;
Output
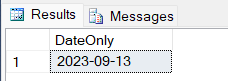
In this example, we convert the current date and time obtained using GETDATE() into a Date data type. This results in extracting only the date portion, like '2023-09-13'.
Example
SELECT CONVERT(DATETIME, '2023-09-13 15:16:00', 120) AS ConvertedDateTime;
Output
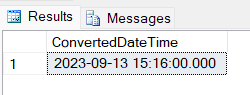
Here, we convert the string '2023-09-13 15:16:00' into a DateTime data type using style '120'. This results in a DateTime value like '2023-09-13 15:16:00.000'.
5. FORMAT()
Formats DateTime values into user-friendly strings.
Syntax
FORMAT(expression, format)
expression: The value or column you want to format, often a DateTime value.
format: Specifies the desired format for the expression.
Example
SELECT FORMAT(GETDATE(), 'd') AS ShortDate;
Output
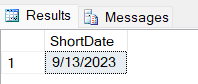
In this example, we format the current date and time obtained using GETDATE() into a short date format (MM/DD/YY or equivalent based on localization). The result could be something like '09/13/23'.
Example
SELECT FORMAT(GETDATE(), 'MMMM dd, yyyy HH:mm:ss') AS CustomFormattedDateTime;
output

Here, we take the current date and time and format it into a custom string that includes the full month name, day, year, and time in the 'MMMM dd, yyyy HH:mm:ss' format. The result might look like 'September 13, 2023 15:23:52'.
Example
SELECT FORMAT(GETDATE(), 'HH:mm:ss') AS TimeOnly;
Output
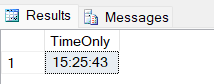
In this example, we format the current date and time into a time-only format (HH:mm:ss), showing only the hours, minutes, and seconds. The result could be something like '15:25:43'.
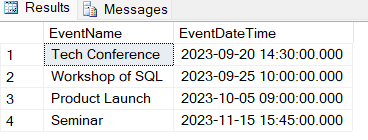
Upcoming Events
Retrieve events that are scheduled for the future.
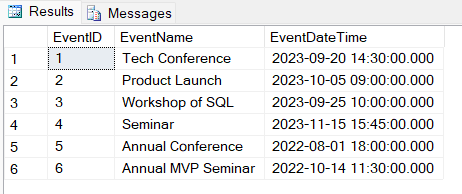
CREATE TABLE Events (
EventID INT PRIMARY KEY,
EventName VARCHAR(100),
EventDateTime DATETIME
);
INSERT INTO Events (EventID, EventName, EventDateTime)
VALUES
(1, 'Tech Conference', '2023-09-20 14:30:00'),
(2, 'Product Launch', '2023-10-05 09:00:00'),
(3, 'Workshop of SQL', '2023-09-25 10:00:00'),
(4, 'Seminar', '2023-11-15 15:45:00'),
(5, 'Annual Conference', '2022-08-01 18:00:00'),
(6, 'Annual MVP Seminar', '2022-10-14 11:30:00');
Select * From Events
SELECT EventName, EventDateTime
FROM Events WHERE EventDateTime > GETDATE() Order By EventDateTime;
Output
Best Practices
When working with DateTime functions in SQL, consider these best practices:
- Data Validation: Ensure that your DateTime values are valid to avoid unexpected results.
- Avoid Mixing Data Types: Be cautious when mixing different DateTime data types in calculations.
- Optimize Queries: Index DateTime columns for improved query performance, especially in large datasets.
- Handle Time Zones: Address time zone issues when dealing with international data.
Summary
DateTime type in SQL, enabling you to handle date and time-related data effectively. By understanding its properties, functions, and best practices, you can ensure data accuracy and precision in your SQL databases.
If you find this article valuable, please consider liking it and sharing your thoughts in the comments.
Thank you, and happy coding.
HostForLIFEASP.NET SQL Server 2022 Hosting
