European Windows 2019 Hosting BLOG

BLOG about Windows 2019 Hosting and SQL 2019 Hosting - Dedicated to European Windows Hosting Customer

European SQL Server 2022 Hosting :: Create FTP Task in SQL Server Integration Services

clock December 20, 2024 06:44 by author Peter

FTP tasks in SSIS (SQL Server Integration Services) are an important feature that is used to perform file operations across the server and client/local machine. FTP task in SSIS is used to automate the process of uploading and downloading files to/from the FTP server. This task ensures the secure transfer of files, automates data workflow, and improves its efficiency. FTP Task, when combined with other SSIS tasks, can integrate data from multiple sources, such as File System Task, Script Task, Execute SQL Task, etc.

Now, let’s see how to create an FTP Task.

FTP is basically a File Transfer Protocol; it’s basically transferring files from one server to another server or to a local machine.

In the SSIS package within the control flow, we can see the SSIS Toolbox, and there are numerous options. From there we can select FTP Task by drag and drop it on package.

Below is the screenshot, which shows what it looks like.

In the above screenshot, we can see a red sign popped up; it means the connection is empty.

Note: I have used a personal FTP server and hence you may not be able to access it, you can however check a few public FTP servers available online.

Now, let’s configure the FTP Task and establish a connection. We will go on the FTP task editor and do the following.

Add FTP Server to establish FTP connection: Enter the below credential to establish an FTP connection. (FTP server path: ftp://Peter:[email protected].
x.x)
Server Name: 192.168.x.x
User ID: Peter
PWD: ****

The connection has been established.

Now, enter the following details in file transfer and hit ok; the red sign will go away.

  • Add Operation as Send files
  • Add local path: C:\Users\Peter\Documents\FTP_Local
  • Add RemotePath: /

After hitting ok, you will see on the screen below that the red sign is gone. This means that both connections are established, and we can see this in Connection Manager.

The screenshot below shows that it was taken before executing the package, and you can see no files in the FTP Server are available currently.

Once step 2 is done, Execute the FTP Task by hitting the start button. The screenshot below shows packages executed successfully. Here, our objective is to see if the file moved from the source (local path) to the destination (FTP Server).

Now, I will check into the FTP server to see if the file moved to the destination or FTP Server. As you can see in the screenshot below, the file has indeed been moved to the FTP server.

Summary
There are several benefits of creating FTP Tasks in SSIS, for example.

  • Automates the data transfer and reduces the time-consuming manual efforts.
  • It helps integrate data from various sources by creating a workflow that automatically handles file transfers.
  • Enables creation of FTP tasks for regular data backups and enhances data transfer security.

HostForLIFEASP.NET SQL Server 2022 Hosting


European SQL Server 2022 Hosting :: Using Tablock to Unlock Faster INSERT Operations in SQL Server

clock December 18, 2024 07:17 by author Peter

Performance is frequently the main issue in any SQL Server system when working with big datasets. The INSERT operation is one frequent operation that occasionally turns into a bottleneck. The time required to input data increases with its size, which can have a major effect on system performance and user experience in general. The usage of the TABLOCK hint is one of the many methods and improvements that SQL Server offers to help speed up data insertions. When working with huge datasets or when parallelism is crucial, this straightforward yet effective method can significantly increase the pace of your INSERT operations.

Let’s explore how using the TABLOCK hint works, its benefits, and how you can apply it to your own operations, with examples from the HFL database.

What is the TABLOCK Hint?
The TABLOCK hint is a table-level lock hint that forces SQL Server to take a schema modification (Sch-M) lock on the target table when performing an INSERT, UPDATE, or DELETE operation. This hint ensures that the table is locked for the duration of the operation, which can help speed up data loading by minimizing logging and reducing contention.

A key benefit of the TABLOCK hint is that it reduces the amount of log space used during the operation, as the minimal logging mechanism is activated. This means that SQL Server does not have to log each individual row insertion, but rather just the metadata for the bulk operation. As a result, this significantly reduces the overhead and speeds up data loading.

Additionally, because the table is locked at the schema level, it allows SQL Server to parallelize the operation, leading to faster execution times. This is particularly useful for large-scale data-loading tasks.

When to Use TABLOCK Hint
The TABLOCK hint is ideal for scenarios where:

  • You are inserting a large number of rows into a table.
  • You can afford to lock the table for the duration of the operation (i.e., no other transactions need access to the table while the insert is in progress).
  • You want to reduce the logging overhead and speed up bulk insertions.
  • You want to use parallel insertions to take advantage of SQL Server's ability to use multiple threads for data loading.


It’s also important to note that the TABLOCK hint works well with temporary tables, so you can take advantage of these performance benefits when working with temp tables, often used in ETL processes or batch operations.

Benefits of Using TABLOCK

  • Improved Performance: The primary benefit of using the TABLOCK hint is the performance improvement during large INSERT operations. By reducing the amount of logging, SQL Server can insert rows much faster.
  • Parallel Insertion: With TABLOCK, SQL Server can use parallelism to load the data, speeding up the operation of systems with sufficient resources.
  • Reduced Logging Overhead: Since SQL Server logs less information, the system consumes less log space, which can be crucial when working with large datasets.
  • Works with Temp Tables: You can apply TABLOCK to temporary tables as well, giving you the same performance benefits for in-memory operations.


Example
Let’s consider a scenario where we need to insert a large number of rows from the Sales.SalesOrderDetail table into the Sales.SalesOrderDetailTemp table in the HFL database.
Create table script for Sales.SalesOrderDetailTem
USE [HFL]
GO

DROP TABLE IF EXISTS [Sales].[SalesOrderDetailTemp]
GO

SET ANSI_NULLS ON
GO

SET QUOTED_IDENTIFIER ON
GO

CREATE TABLE [Sales].[SalesOrderDetailTemp](
    [SalesOrderID] [int] NOT NULL,
    [SalesOrderDetailID] [int] NOT NULL,
    [CarrierTrackingNumber] [nvarchar](25) NULL,
    [OrderQty] [smallint] NOT NULL,
    [ProductID] [int] NOT NULL,
    [SpecialOfferID] [int] NOT NULL,
    [UnitPrice] [money] NOT NULL,
    [UnitPriceDiscount] [money] NOT NULL,
    [LineTotal]  [money] NULL,
    [rowguid] [uniqueidentifier] ROWGUIDCOL  NOT NULL,
    [ModifiedDate] [datetime] NOT NULL,
 CONSTRAINT [PK_SalesOrderDetailTemp_SalesOrderID_SalesOrderDetailTempID] PRIMARY KEY CLUSTERED
(
    [SalesOrderID] ASC,
    [SalesOrderDetailID] ASC
)WITH (PAD_INDEX = OFF, STATISTICS_NORECOMPUTE = OFF, IGNORE_DUP_KEY = OFF, ALLOW_ROW_LOCKS = ON, ALLOW_PAGE_LOCKS = ON, OPTIMIZE_FOR_SEQUENTIAL_KEY = OFF) ON [PRIMARY]
) ON [PRIMARY]
GO


Without the TABLOCK hint, this operation may take a considerable amount of time, especially when the table is large and the database is under load.

Here’s a basic example of how you can speed up the INSERT operation by using the TABLOCK hint.
USE HFL
GO

SET STATISTICS TIME, IO ON

SET NOCOUNT ON

INSERT INTO Sales.SalesOrderDetailTemp
SELECT *
FROM Sales.SalesOrderDetail;

Truncate the table.
USE HFL
GO

TRUNCATE TABLE Sales.SalesOrderDetailTemp


Now, let’s modify the query to use the TABLOCK hint.
USE HFL
GO

SET STATISTICS TIME, IO ON

SET NOCOUNT ON

INSERT INTO Sales.SalesOrderDetailTemp
WITH (TABLOCK)
SELECT *
FROM Sales.SalesOrderDetail;

Comparison
Execution 1 (without TABLOCK) took longer, with higher CPU and elapsed time (204 ms and 284 ms), indicating a slower operation. Execution 2 (with TABLOCK) performed better, completing in 125 ms CPU time and 157 ms elapsed time, making the TABLOCK version more efficient in this case.
Considerations When Using TABLOCK

While the TABLOCK hint can greatly improve performance, it’s important to be aware of some considerations:

  • Table Locking: The TABLOCK hint locks the entire table for the duration of the operation. This means that other transactions cannot access the table until the INSERT operation is complete, so be sure that this behavior aligns with your application’s requirements.
  • Transaction Log Growth: Although TABLOCK reduces the amount of logging, it still logs certain details of the operation. If you’re inserting a massive amount of data, you may need to monitor transaction log growth and ensure that you have enough log space available.
  • Not Suitable for OLTP Workloads: The TABLOCK hint is more suited to batch operations or bulk-loading scenarios. It may not be appropriate for transactional systems that require frequent concurrent access to the table.

Conclusion
If you are working with large datasets and want to speed up your INSERT operations in SQL Server, the TABLOCK hint can be a game-changer. By reducing logging overhead and enabling parallel insertions, it helps improve performance and can significantly reduce the time it takes to load data.

HostForLIFEASP.NET SQL Server 2022 Hosting


European SQL Server 2022 Hosting :: Understanding Triggers in SQL Server

clock December 10, 2024 06:17 by author Peter

Triggers in SQL Server are special types of stored procedures that automatically execute or “fire” when certain events occur in the database.

Types of Triggers
DML Triggers

These are triggers that fire in response to data manipulation events such as INSERT, UPDATE, or DELETE operations on a table or view.

  • AFTER Triggers: Execute after the associated DML operation is completed.
  • INSTEAD OF Triggers: Execute in place of the associated DML operation.

DDL Triggers
These fire in response to data definition language (DDL) events such as CREATE, ALTER, or DROP statements.

Real-Time Use Case Example
Scenario. Imagine a retail company that wants to maintain an audit trail for all changes made to the Orders table. Every time an order is inserted, updated, or deleted, the company wants to log the details of the operation in an OrderAudit table.

Setting Up the Example

First, let’s create the Orders table and the OrderAudit table.
CREATE TABLE Orders (
    OrderID INT PRIMARY KEY,
    CustomerID INT,
    OrderDate DATETIME,
    Amount DECIMAL(10, 2)
);

CREATE TABLE OrderAudit (
    AuditID INT IDENTITY(1,1) PRIMARY KEY,
    OrderID INT,
    Operation VARCHAR(10),
    OldCustomerID INT,
    NewCustomerID INT,
    OldOrderDate DATETIME,
    NewOrderDate DATETIME,
    OldAmount DECIMAL(10, 2),
    NewAmount DECIMAL(10, 2),
    ChangeDate DATETIME DEFAULT GETDATE()
);

Creating Triggers
AFTER INSERT Trigger
CREATE TRIGGER trg_AfterInsert_Orders
ON Orders
AFTER INSERT
AS
BEGIN
    INSERT INTO OrderAudit (OrderID, Operation, NewCustomerID, NewOrderDate, NewAmount)
    SELECT OrderID, 'INSERT', CustomerID, OrderDate, Amount
    FROM inserted;
END;

-- Insert a new order
INSERT INTO Orders (OrderID, CustomerID, OrderDate, Amount)
VALUES (1, 101, '2024-01-01', 100.00);

-- Check audit logs
select * from  OrderAudit


Result
We can see we have a record inserted into the audit log table, and when any record is inserted into the order table, we will know what operation was performed and at what time it was executed.

AFTER INSERT Trigger: When a new order is inserted into the Orders table, the trg_AfterInsert_Orders trigger fires. It captures the new order details from the inserted pseudo-table and inserts a corresponding record into the OrderAudit table with the operation type 'INSERT'.

2. AFTER UPDATE Trigger

CREATE TRIGGER trg_AfterUpdate_Orders
ON Orders
AFTER UPDATE
AS
BEGIN
    INSERT INTO OrderAudit (OrderID, Operation, OldCustomerID, NewCustomerID, OldOrderDate, NewOrderDate, OldAmount, NewAmount)
    SELECT
        i.OrderID,
        'UPDATE',
        d.CustomerID,
        i.CustomerID,
        d.OrderDate,
        i.OrderDate,
        d.Amount,
        i.Amount
    FROM inserted i
    INNER JOIN deleted d ON i.OrderID = d.OrderID;
END;

-- Update the order
UPDATE Orders
SET Amount = 120.00
WHERE OrderID = 1;

-- Audit log
SELECT * FROM OrderAudit;

Result

we can see at this time, we updated the record, and we can see details of updated records, this is very helpful in case when we want to track how many time a order has been updated etc.

AFTER UPDATE Trigger: When an existing order is updated, the trg_AfterUpdate_Orders trigger fires. It captures both the old and new values by joining the inserted and deleted pseudo-tables and inserts a record into the OrderAudit table with the operation type 'UPDATE'.

3. AFTER DELETE Trigger
CREATE TRIGGER trg_AfterDelete_Orders
ON Orders
AFTER DELETE
AS
BEGIN
    INSERT INTO OrderAudit (OrderID, Operation, OldCustomerID, OldOrderDate, OldAmount)
    SELECT
        OrderID,
        'DELETE',
        CustomerID,
        OrderDate,
        Amount
    FROM deleted;
END;

-- Delete the order
DELETE FROM Orders
WHERE OrderID = 1;

-- Reading audit table
SELECT * FROM OrderAudit;


Result. We can see that order data has been deleted, and we can check logs to see what time it was deleted.

AFTER DELETE Trigger: When an order is deleted, the trg_AfterDelete_Orders trigger fires. It captures the details of the deleted order from the deleted pseudo-table and inserts a corresponding record into the OrderAudit table with the operation type 'DELETE'.

Dropping a Trigger

Just use DROP triggername.

Instead of Trigger
Let’s consider a table of Employees where we want to restrict the insertion of records such that the Salary must be above a certain threshold (e.g., $30,000). If the Salary is below this threshold, the insertion should be rejected.

We can use it instead of Trigger in this case.
CREATE TABLE Employees (
    EmployeeID INT IDENTITY(1,1) PRIMARY KEY,
    Name VARCHAR(100),
    Position VARCHAR(50),
    Salary DECIMAL(10, 2)
);


CREATE TRIGGER trg_InsteadOfInsert_Employees
ON Employees
INSTEAD OF INSERT
AS
BEGIN
    IF EXISTS (SELECT * FROM inserted WHERE Salary < 30000)
    BEGIN
        -- Raise an error and roll back the transaction if the salary is below the threshold
        RAISERROR ('Salary must be at least $30,000', 16, 1);
        ROLLBACK TRANSACTION;
    END
    ELSE
    BEGIN
        -- Perform the actual insert if the condition is met
        INSERT INTO Employees (Name, Position, Salary)
        SELECT Name, Position, Salary
        FROM inserted;
    END
END;


--

--less than 90000
-- This insertion should  fail
INSERT INTO Employees (Name, Position, Salary)
VALUES ('peter scott', 'Developer', 89999);

Explanation

  • The trigger intercepts the insert operation and checks if any of the inserted rows have a Salary below $90,000.
  • If any rows do not meet the condition, an error is raised, and the transaction is rolled back, preventing the insertion.
  • If all rows meet the condition, the insertion proceeds by inserting the rows into the Employees table.

Thanks. We have learned triggers.

HostForLIFEASP.NET SQL Server 2022 Hosting


European SQL Server 2022 Hosting :: What is a CTE, and How Do You Write a CTE in SQL Server?

clock December 2, 2024 07:07 by author Peter

We will learn what CTE is, how to construct it in SQL Server, and its applications in this article.

CTE: What is it?

"Common Table Expressions" is what CTE stands for. SQL servers utilize it to specify a temporary name result. The common table expression (CTE) is a temporary named result set that can be referenced within a Select, Insert, Update, or Delete operation. It was first introduced in SQL Server 2005. Another crucial point is that, like any other table, CTE results can always be accessed within the query even when they are not saved anywhere.

Why do we need CTE on the SQL server?
CTE is a powerful SQL feature that helps simplify queries. CTEs act as virtual tables (with records and columns) that are created during query execution, used by the query, and deleted after the query executes.

Syntax
[ WITH <common_table_expression> [ ,...n ] ]

<common_table_expression>::=
    expression_name [ ( column_name [ ,...n ] ) ]
    AS
    ( CTE_query_definition )


Let’s try to understand CTE Syntax.

Arguments

There are three arguments in the above syntax.

  • expression_name.
  • column_name.
  • query_derfination.

Let’s understand one by one.

  • expression_name: It should be a valid identifier for a common table expression. The expression_name must be different from the names of other common table expressions defined in the same WITH clause.
  • column_name: Specifies a column name in the common table expression. Duplicate names are not allowed within a single CTE definition. There are two rules for column names. The first is the number of column names specified, which must match the number of columns in the result set of the query_definition, and the second one is The list of column names is optional only if distinct names for all resulting columns are supplied in the query definition.
  • query_defination: Specifies a SELECT statement whose result set satisfies a common table expression.

Some Examples
Before starting to explain some CTE examples, we need to create a database and some tables under the database, so run the following script in your SQL server.
USE [master]
GO

/****** Object:  Database [db_MyPractice]    Script Date: 06-10-2024 01:18:01 ******/
CREATE DATABASE [db_MyPractice]
    CONTAINMENT = NONE
    ON PRIMARY
    (
        NAME = N'db_MyPractice',
        FILENAME = N'C:\Program Files\Microsoft SQL Server\MSSQL15.SQLEXPRESS\MSSQL\DATA\db_MyPractice.mdf',
        SIZE = 8192KB,
        MAXSIZE = UNLIMITED,
        FILEGROWTH = 65536KB
    )
    LOG ON
    (
        NAME = N'db_MyPractice_log',
        FILENAME = N'C:\Program Files\Microsoft SQL Server\MSSQL15.SQLEXPRESS\MSSQL\DATA\db_MyPractice_log.ldf',
        SIZE = 8192KB,
        MAXSIZE = 2048GB,
        FILEGROWTH = 65536KB
    )
    WITH CATALOG_COLLATION = DATABASE_DEFAULT
GO

ALTER DATABASE [db_MyPractice] SET COMPATIBILITY_LEVEL = 150
GO

IF (1 = FULLTEXTSERVICEPROPERTY('IsFullTextInstalled'))
BEGIN
    EXEC [db_MyPractice].[dbo].[sp_fulltext_database] @action = 'enable'
END
GO


ALTER DATABASE [db_MyPractice] SET ANSI_NULL_DEFAULT OFF
GO
ALTER DATABASE [db_MyPractice] SET ANSI_NULLS OFF
GO
ALTER DATABASE [db_MyPractice] SET ANSI_PADDING OFF
GO
ALTER DATABASE [db_MyPractice] SET ANSI_WARNINGS OFF
GO
ALTER DATABASE [db_MyPractice] SET ARITHABORT OFF
GO
ALTER DATABASE [db_MyPractice] SET AUTO_CLOSE OFF
GO
ALTER DATABASE [db_MyPractice] SET AUTO_SHRINK OFF
GO
ALTER DATABASE [db_MyPractice] SET AUTO_UPDATE_STATISTICS ON
GO
ALTER DATABASE [db_MyPractice] SET CURSOR_CLOSE_ON_COMMIT OFF
GO
ALTER DATABASE [db_MyPractice] SET CURSOR_DEFAULT GLOBAL
GO
ALTER DATABASE [db_MyPractice] SET CONCAT_NULL_YIELDS_NULL OFF
GO
ALTER DATABASE [db_MyPractice] SET NUMERIC_ROUNDABORT OFF
GO
ALTER DATABASE [db_MyPractice] SET QUOTED_IDENTIFIER OFF
GO
ALTER DATABASE [db_MyPractice] SET RECURSIVE_TRIGGERS OFF
GO
ALTER DATABASE [db_MyPractice] SET DISABLE_BROKER
GO
ALTER DATABASE [db_MyPractice] SET AUTO_UPDATE_STATISTICS_ASYNC OFF
GO
ALTER DATABASE [db_MyPractice] SET DATE_CORRELATION_OPTIMIZATION OFF
GO
ALTER DATABASE [db_MyPractice] SET TRUSTWORTHY OFF
GO
ALTER DATABASE [db_MyPractice] SET ALLOW_SNAPSHOT_ISOLATION OFF
GO
ALTER DATABASE [db_MyPractice] SET PARAMETERIZATION SIMPLE
GO
ALTER DATABASE [db_MyPractice] SET READ_COMMITTED_SNAPSHOT OFF
GO
ALTER DATABASE [db_MyPractice] SET HONOR_BROKER_PRIORITY OFF
GO
ALTER DATABASE [db_MyPractice] SET RECOVERY SIMPLE
GO
ALTER DATABASE [db_MyPractice] SET MULTI_USER
GO
ALTER DATABASE [db_MyPractice] SET PAGE_VERIFY CHECKSUM
GO
ALTER DATABASE [db_MyPractice] SET DB_CHAINING OFF
GO
ALTER DATABASE [db_MyPractice] SET FILESTREAM (NON_TRANSACTED_ACCESS = OFF)
GO
ALTER DATABASE [db_MyPractice] SET TARGET_RECOVERY_TIME = 60 SECONDS
GO
ALTER DATABASE [db_MyPractice] SET DELAYED_DURABILITY = DISABLED
GO
ALTER DATABASE [db_MyPractice] SET ACCELERATED_DATABASE_RECOVERY = OFF
GO
ALTER DATABASE [db_MyPractice] SET QUERY_STORE = OFF
GO

USE [db_MyPractice]
GO

/****** Object:  Table [dbo].[Employees]    Script Date: 06-10-2024 01:18:01 ******/
SET ANSI_NULLS ON
GO
SET QUOTED_IDENTIFIER ON
GO
CREATE TABLE [dbo].[Employees] (
    [EmployeeID] [smallint] NOT NULL,
      NOT NULL,
      NOT NULL,
      NOT NULL,
    [DeptID] [smallint] NOT NULL,
    [ManagerID] [smallint] NULL,
    CONSTRAINT [PK_EmployeeID] PRIMARY KEY CLUSTERED
    (
        [EmployeeID] ASC
    ) WITH (
        PAD_INDEX = OFF,
        STATISTICS_NORECOMPUTE = OFF,
        IGNORE_DUP_KEY = OFF,
        ALLOW_ROW_LOCKS = ON,
        ALLOW_PAGE_LOCKS = ON,
        OPTIMIZE_FOR_SEQUENTIAL_KEY = OFF
    ) ON [PRIMARY]
) ON [PRIMARY]
GO

/****** Object:  Table [dbo].[tbl_book]    Script Date: 06-10-2024 01:18:01 ******/
SET ANSI_NULLS ON
GO
SET QUOTED_IDENTIFIER ON
GO
CREATE TABLE [dbo].[tbl_book] (
    [BookId] [bigint] IDENTITY(1,1) NOT NULL,
      NOT NULL,
      NOT NULL
) ON [PRIMARY]
GO

/****** Object:  Table [dbo].[Tbl_Bookissued]    Script Date: 06-10-2024 01:18:01 ******/
SET ANSI_NULLS ON
GO
SET QUOTED_IDENTIFIER ON
GO
CREATE TABLE [dbo].[Tbl_Bookissued] (
    [transaction_id] [bigint] IDENTITY(1,1) NOT NULL,
    [StudentID] [bigint] NULL,
    [TeacherID] [bigint] NULL,
    [BookID] [bigint] NOT NULL,
    [issueDate] [date] NOT NULL
) ON [PRIMARY]
GO

/****** Object:  Table [dbo].[tbl_student]    Script Date: 06-10-2024 01:18:01 ******/
SET ANSI_NULLS ON
GO
SET QUOTED_IDENTIFIER ON
GO
CREATE TABLE [dbo].[tbl_student] (
    [StudentID] [bigint] IDENTITY(1,1) NOT NULL,
      NOT NULL
) ON [PRIMARY]
GO

/****** Object:  Table [dbo].[tbl_teacher]    Script Date: 06-10-2024 01:18:01 ******/
SET ANSI_NULLS ON
GO
SET QUOTED_IDENTIFIER ON
GO
CREATE TABLE [dbo].[tbl_teacher] (
    [TeacherID] [bigint] IDENTITY(1,1) NOT NULL,
      NOT NULL
) ON [PRIMARY]
GO

-- Insert statements
INSERT [dbo].[Employees] ([EmployeeID], [FirstName], [LastName], [Title], [DeptID], [ManagerID]) VALUES
(1, N'Ken', N'Sánchez', N'Chief Executive Officer', 16, NULL),
(16, N'David', N'Bradley', N'Marketing Manager', 4, 273),
(23, N'Mary', N'Gibson', N'Marketing Specialist', 4, 16),
(273, N'Brian', N'Welcker', N'Vice President of Sales', 3, 1),
(274, N'Stephen', N'Jiang', N'North American Sales Manager', 3, 273),
(275, N'Michael', N'Blythe', N'Sales Representative', 3, 274),
(276, N'Linda', N'Mitchell', N'Sales Representative', 3, 274),
(285, N'Syed', N'Abbas', N'Pacific Sales Manager', 3, 273),
(286, N'Lynn', N'Tsoflias', N'Sales Representative', 3, 285)
GO

SET IDENTITY_INSERT [dbo].[tbl_book] ON
GO
INSERT [dbo].[tbl_book] ([BookId], [bookName], [className]) VALUES
(1, N'Maths', N'Class-1'),
(2, N'Maths', N'Class-2'),
(3, N'Maths', N'Class-3'),
(4, N'Maths', N'Class-4'),
(5, N'Maths', N'Class-5'),
(6, N'Maths', N'Class-6'),
(7, N'Hindi', N'Class-1'),
(8, N'Hindi', N'Class-2'),
(9, N'Hindi', N'Class-3'),
(10, N'Hindi', N'Class-4'),
(11, N'Hindi', N'Class-5'),
(12, N'Hindi', N'Class-6'),
(13, N'English', N'Class-1'),
(14, N'English', N'Class-2'),
(15, N'English', N'Class-3'),
(16, N'English', N'Class-4'),
(17, N'English', N'Class-5'),
(18, N'English', N'Class-6')
GO
SET IDENTITY_INSERT [dbo].[tbl_book] OFF


After running this script, you will have the following table. Following tables with data.
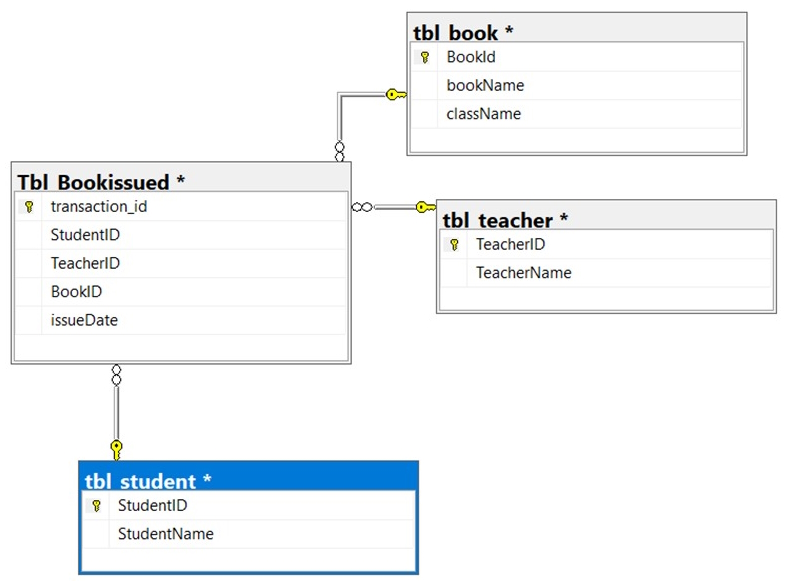
A. Create a common table expression: The following example shows the total number of books issued per year for each student during their all-academic years.
-- Define the CTE expression name and column list.
WITH book_Issue_CTE (StudentID, StudentName, BookID, AcademicYear)
AS
(
    -- Define the CTE query.
    SELECT
        BI.StudentID,
        StudentName,
        BookID,
        YEAR(issueDate) AS AcademicYear
    FROM
        Tbl_Bookissued BI
    JOIN
        tbl_student s ON BI.StudentID = s.StudentID
    WHERE
        BI.StudentID IS NOT NULL
)
-- Define the outer query referencing the CTE name.
SELECT
    StudentID,
    StudentName,
    COUNT(BookID) AS TotalBookIssued,
    AcademicYear
FROM
    book_Issue_CTE
GROUP BY
    AcademicYear, StudentID, StudentName
ORDER BY
    StudentID, AcademicYear;

B. Use a common table expression to limit counts and report averages: The following example shows the average number of books issued for all years for the students.
WITH Avg_book_Issue_CTE (StudentID, NumberOfBooks) AS
(
    SELECT StudentID, COUNT(*)
    FROM Tbl_Bookissued
    WHERE StudentID IS NOT NULL
    GROUP BY StudentID
)
SELECT AVG(NumberOfBooks) AS "Average book issued Per Student"
FROM Avg_book_Issue_CTE;

C. Use multiple CTE definitions in a single query: The following example shows how to define more than one CTE in a single query. Notice that a comma is used to separate the CTE query definitions.

In the example below, we are fetching records of books issued to teachers and students.
WITH book_issued_student_CTE (StudentID, BookIssued, IssueYear) AS
-- Define the first CTE query.
(
    SELECT StudentID, COUNT(BookID) AS BookIssued, YEAR(issueDate) AS IssueYear
    FROM Tbl_Bookissued
    WHERE StudentID IS NOT NULL
    GROUP BY StudentID, YEAR(issueDate)
),

-- Define the second CTE query, which returns sales quota data by year for each sales person.
book_issued_Teacher_CTE (TeacherID, BookIssued, IssueYear) AS
(
    SELECT TeacherID, COUNT(BookID) AS BookIssued, YEAR(issueDate) AS IssueYear
    FROM Tbl_Bookissued
    WHERE TeacherID IS NOT NULL
    GROUP BY TeacherID, YEAR(issueDate)
)

-- Define the outer query by referencing columns from both CTEs.
SELECT CTE.StudentID,
       StudentName,
       NULL AS TeacherID,
       '' AS TeacherName,
       BookIssued,
       IssueYear
FROM book_issued_student_CTE CTE
JOIN tbl_student s ON CTE.StudentID = s.StudentID

UNION ALL

SELECT '',
       '',
       CTE.TeacherID,
       TeacherName,
       BookIssued,
       IssueYear
FROM book_issued_Teacher_CTE CTE
JOIN tbl_teacher t ON CTE.TeacherID = t.TeacherID

ORDER BY CTE.StudentID, TeacherID;


D. Use a recursive common table expression to display multiple levels of recursion: The following example shows managers and the employees reporting to them. The number of levels returned is limited to two.

Create one more table to proceed with this example.
-- Create an Employee table.
CREATE TABLE dbo.Employees
(
    EmployeeID SMALLINT NOT NULL,
    FirstName NVARCHAR(30) NOT NULL,
    LastName NVARCHAR(40) NOT NULL,
    Title NVARCHAR(50) NOT NULL,
    DeptID SMALLINT NOT NULL,
    ManagerID SMALLINT NULL,

    CONSTRAINT PK_EmployeeID PRIMARY KEY CLUSTERED (EmployeeID ASC),
    CONSTRAINT FK_Employees_ManagerID_EmployeeID
        FOREIGN KEY (ManagerID) REFERENCES dbo.Employees (EmployeeID)
);
-- Populate the table with values.
INSERT INTO dbo.Employees
VALUES
    (1, N'Ken', N'Sánchez', N'Chief Executive Officer', 16, NULL),
    (273, N'Brian', N'Welcker', N'Vice President of Sales', 3, 1),
    (274, N'Stephen', N'Jiang', N'North American Sales Manager', 3, 273),
    (275, N'Michael', N'Blythe', N'Sales Representative', 3, 274),
    (276, N'Linda', N'Mitchell', N'Sales Representative', 3, 274),
    (285, N'Syed', N'Abbas', N'Pacific Sales Manager', 3, 273),
    (286, N'Lynn', N'Tsoflias', N'Sales Representative', 3, 285),
    (16, N'David', N'Bradley', N'Marketing Manager', 4, 273),
    (23, N'Mary', N'Gibson', N'Marketing Specialist', 4, 16);

After running this script we have the following data.
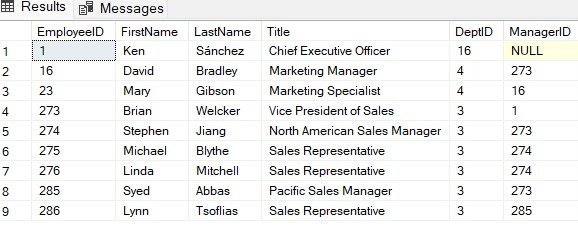
The following example shows the hierarchical list of managers and the employees who report to them.
WITH DirectReports(ManagerID, EmployeeID, Title, EmployeeLevel) AS
(
    SELECT
        ManagerID,
        EmployeeID,
        Title,
        0 AS EmployeeLevel
    FROM dbo.Employees
    WHERE ManagerID IS NULL

    UNION ALL

    SELECT
        e.ManagerID,
        e.EmployeeID,
        e.Title,
        EmployeeLevel + 1
    FROM dbo.Employees AS e
    INNER JOIN DirectReports AS d
        ON e.ManagerID = d.EmployeeID
)

SELECT
    ManagerID,
    EmployeeID,
    Title,
    EmployeeLevel
FROM DirectReports
ORDER BY ManagerID;

The output of this CTE will be.
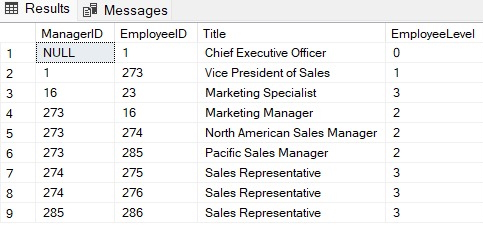
E. Use a recursive common table expression to display two levels of recursion: The following example shows managers and the employees reporting to them. The number of levels returned is limited to two.
WITH DirectReports (ManagerID, EmployeeID, Title, EmployeeLevel) AS
(
    SELECT ManagerID, EmployeeID, Title, 0 AS EmployeeLevel
    FROM dbo.Employees
    WHERE ManagerID IS NULL
    UNION ALL
    SELECT e.ManagerID, e.EmployeeID, e.Title, EmployeeLevel + 1
    FROM dbo.Employees AS e
    INNER JOIN DirectReports AS d
        ON e.ManagerID = d.EmployeeID
)
SELECT ManagerID, EmployeeID, Title, EmployeeLevel
FROM DirectReports
WHERE EmployeeLevel <= 2;


The result of this CTE will be.

HostForLIFEASP.NET SQL Server 2022 Hosting


About HostForLIFE

HostForLIFE is European Windows Hosting Provider which focuses on Windows Platform only. We deliver on-demand hosting solutions including Shared hosting, Reseller Hosting, Cloud Hosting, Dedicated Servers, and IT as a Service for companies of all sizes.

We have offered the latest Windows 2019 Hosting, ASP.NET 5 Hosting, ASP.NET MVC 6 Hosting and SQL 2019 Hosting.


Month List

Tag cloud

Sign in