European Windows 2019 Hosting BLOG

BLOG about Windows 2019 Hosting and SQL 2019 Hosting - Dedicated to European Windows Hosting Customer

SQL Server Hosting - HostForLIFE :: A Fix To PolyBase Issue In SQL Server 2019 Developer Edition

clock December 21, 2021 06:04 by author Peter

Usually, we install SQL Server by default, it works just fine. However, sometimes, we might face some problems in the new version installation. I got an issue when I installed the SQL Server Developer Edition 2019, that is related to a PolyBase issue.  This article will introduce the problem, the reason and the fix. (SQL Server 2019 Developer Edition Installation see here)

Once in 2020, after I installed an instance of SQL Server 2019 Developer Edition, I found my machine hard disk was eaten very fast. The following is what I met this situation again early this year, one can see the hard disk reduced close to 100 GB in just one day.

Reason
I am not SQL Server database administrator, I do not want to debug it, and I do not care about the real reason, I just want to have a fix on it. By online searching, I found the solution from one excellent article, in which one can get the real reason and debugging process, what I will introduce here is just the conclusion.

The problem is caused by, in our installation, we installed this component: PolyBase


and configure it like this:


I do not know what this component is for, and the installation is successfully completed:


However, there is an issue with this component.  If we open service, we can see that the PolyBase components are always in the starting status, which means they always cannot be started:


The issue is caused by that these components need to connect to SQL Server by TCP provider, however, the TCP/IP as a network protocol for SQL server is unable by default.  This can be seen by opening the Computer Management:

Therefore, the SQL server will report this problem automatically in log file, about every half an hour making a dump file that is about 400 MB, which will eat the hard disk 20~30 GB every day.

Fix
Simply make the SQL Server TCP/IP protocol enabled like this:


After restarting the SQL Server and the PolyBase service, you will see the PolyBase components are running.


Then there will be no more garbage dump files created in the SQL Server log folder. And, you probably need to manually delete the previous dump files to get the lost space back.

This bug is fixed and the main idea is from the article below in reference, thanks a lot for the Author. If anyone has an interest in the technical details for this issue, you can read this article.

HostForLIFEASP.NET SQL Server 2019 Hosting


SQL Server Hosting - HostForLIFE :: SQL Server INFORMATION_SCHEMA Views

clock December 14, 2021 06:11 by author Peter

Have you ever come across a situation where you need to check first if a table exists? Or have you come across a scenario where you need to check if the table's column exists?  Then alter the table by adding your desired column. If you have answered yes to any of these two, you came to the right place.

This post will explore the INFORMATION_Schema views, learn what it is, and show you some of its common usages.

By the way, I'll be using SQL Server 2016, but it can also be applied with other older and later versions of SQL Server.
What is INFORMATION_SCHEMA Database?

The INFORMATION_SCHEMA stores other databases' details on the server.

It gives you the chance to retrieve views/information about the tables, views, columns, and procedures within a database.

The views are stored in the master database under Views->System Views and will be called from any database you choose.

Let's see a screenshot below,

Benefits
As a database developer or administrator, understanding schema and what tables are in a specific database gives us a good idea what's the underlying structure, which can help you write SQL queries. It also allows us to check if everything is expected or on the database. Moreover, it also helps us avoid running queries multiple times to see if the schema name or column name is correct.

Common Usages
Before we start, we'll be using the Northwind database for all our examples. You can download it from here. Now, here are the steps we're going to take. First, get all the databases on our local SQL Server instance, get all the tables, third, let's search for a column, fourth search for constraints, and the last query some views.
Showing All Databases

Let's try to show first all of the databases on a current server instance that we're in.

Note that my result will differ from yours, but you'll see all the databases on your SQL Server instance once you run the query below.
SELECT * FROM sys.databases;
EXEC sp_databases;


Output


The syntax on how we were able to show the database isn't directly related to INFORMATION_Schema.

However, it is an excellent start for us as we go through from database to tables to columns to keys.
Showing All Tables

Now that we have an idea of getting the database on a SQL Server instance.

In this section, we will try to get all of the possible tables of the Northwind database.
USE [Northwind];
--show all table
SELECT * FROM INFORMATION_SCHEMA.Tables;
   

Querying Column of a Specific Table

In this example, we'll explore how to check a table and then a column if it exists.

Then add a new column to the categories table. Then let's set Tags as its column name and set its data type as NVARCHAR(MAX).

Let's try to see a sample query below.

USE [Northwind];

/*
 * Let's try to declare some variables here that we can use later when searching for them.
 */
DECLARE @TABLE_NAME NVARCHAR(50);
SET @TABLE_NAME = 'Categories';

DECLARE @COLUMN_NAME NVARCHAR(50);
SET @COLUMN_NAME = 'Tags';

IF EXISTS (SELECT * FROM INFORMATION_SCHEMA.TABLES WHERE
                    TABLE_NAME = @TABLE_NAME)
    BEGIN

        PRINT CONCAT('1. Categories table does exists.',
                    CHAR(13), '1.1 Let''s now create the Tags column.');

        IF EXISTS (SELECT * FROM INFORMATION_SCHEMA.COLUMNS
                    WHERE TABLE_NAME = @TABLE_NAME
                    AND COLUMN_NAME = @COLUMN_NAME)
            BEGIN
                PRINT '2. Dropping the Tags column of the Categories table.';
                ALTER TABLE [Categories]
                DROP COLUMN [Tags];
            END

        BEGIN
            PRINT '3. Creating the Tags column of the Categories table.';

            ALTER TABLE [Categories]
            ADD [Tags] NVARCHAR(MAX);

            DECLARE @ADDED_COLUMNS NVARCHAR(MAX);

            SET @ADDED_COLUMNS = CONCAT('4. Categories table columns: ',
                                        (SELECT STRING_AGG(COLUMN_NAME, ',')
                                        FROM INFORMATION_SCHEMA.COLUMNS WHERE TABLE_NAME = @TABLE_NAME));

            PRINT @ADDED_COLUMNS;
        END
    END
ELSE
    BEGIN
        PRINT 'CATEGORY TABLE DOESN''T EXISTS';
    END

Going to the example above, as you can see, we have to check if the Categories-table exists. Then from that, we did check if the Tags column does exist. If it does, we need to drop the existing column. And after that, we have re-created the Tags column. Lastly, we have shown all the Categories-table columns by a comma-separated list.

Just a note, the STRING_AGG function is a function that can be applied to SQL Server 2017 and later.

Output

Find Foreign Keys, Primary Key, and Check Constraint in a Table

Let's see how we can query the primary key, foreign key and check the constraint of a specific table.

In this case, we're just going to use the [Order Details] table and show the constraints such as primary key, foreign key, and check constraint.

Let's see the query below.

USE [Northwind];

SELECT CONSTRAINT_TYPE, CONSTRAINT_NAME
FROM INFORMATION_SCHEMA.TABLE_CONSTRAINTS
WHERE CONSTRAINT_TYPE IN ('PRIMARY KEY', 'FOREIGN KEY', 'CHECK')
AND TABLE_NAME = 'Order Details';


Querying Views
In this last section, we'll make a simple query that will show the Views inside the Northwind database.

Let's see the query below.

USE [Northwind];

SELECT TABLE_CATALOG AS 'Database Name',
       TABLE_NAME AS 'View Name',
       View_Definition as 'Query'
FROM INFORMATION_SCHEMA.VIEWS
WHERE TABLE_NAME  LIKE 'Products%'

HostForLIFEASP.NET SQL Server 2019 Hosting


SQL Server Hosting - HostForLIFE :: Cast() and Convert() Functions in SQL Server

clock December 13, 2021 06:07 by author Peter

In this article, we will see how to use the cast and convert functions in SQL Server 2012. The cast and convert functions provide similar functionality. They are used to convert a value from one data type to another. So let's take a look at a practical example. The example is developed in SQL Server 2012 using the SQL Server Management Studio.

Cast() Function in SQL Server

The Cast() function is used to convert a data type variable or data from one data type to another data type. The Cast() function provides a data type to a dynamic parameter (?) or a NULL value.

Syntax
CAST ( [Expression]
AS Datatype)

The data type to which you are casting an expression is the target type. The data type of the expression from which you are casting is the source type.

Example 1
     DECLARE @A varchar(2)  
    DECLARE @B varchar(2)  
    DECLARE @C varchar(2)  
    set @A=25  
    set @B=15  
    set @C=33  
    Select CAST(@A as int) + CAST(@B as int) +CAST (@C as int) as Result

Example 2
    DECLARE @Z char(30)  
    SELECT @Z=current_timestamp  
    select CAST (@Z as date) as result  


Convert() Function in SQL Server
When you convert expressions from one type to another, in many cases there will be a need within a stored procedure or other routine to convert data from a datetime type to a varchar type. The Convert function is used for such things. The CONVERT() function can be used to display date/time data in various formats.

Syntax
CONVERT(data_type(length), expression, style)
Style - style values for datetime or smalldatetime conversion to character data. Add 100 to a style value to get a four-place year that includes the century (yyyy).
 
Example 1
In this example we take a style value 108 which defines the following format:
hh:mm:ss
 
Now use the above style in the following query:
    select convert(varchar(20),GETDATE(),108)  

Convert() Function in SQL Server
When you convert expressions from one type to another, in many cases there will be a need within a stored procedure or other routine to convert data from a datetime type to a varchar type. The Convert function is used for such things. The CONVERT() function can be used to display date/time data in various formats.
Syntax

CONVERT(data_type(length), expression, style)
Style - style values for datetime or smalldatetime conversion to character data. Add 100 to a style value to get a four-place year that includes the century (yyyy).
 
Example 1
In this example we take a style value 108 which defines the following format:
hh:mm:ss
 
Now use the above style in the following query:
    select convert(varchar(20),GETDATE(),108)  

In this example we use the style value 107 which defines the following format:

Mon dd, yy

Now use that style in the following query:
    select convert(varchar(20),GETDATE(),107)

Example 2
In this example we see different style values which defines the following format.
    SELECT CONVERT(VARCHAR(15),GETDATE(),6)  
    go  
    SELECT CONVERT(VARCHAR(16),GETDATE(),106)  
    go  
    SELECT CONVERT(VARCHAR(24),GETDATE(),113)

    select convert(varchar(20),GETDATE(),108)  

Example 3
In this example we use the style value 107 which defines the following format:

Mon dd, yy

Now use that style in the following query:
    select convert(varchar(20),GETDATE(),107)

Example 4
In this example we see different style values which defines the following format.
    SELECT CONVERT(VARCHAR(15),GETDATE(),6)  
    go  
    SELECT CONVERT(VARCHAR(16),GETDATE(),106)  
    go  
    SELECT CONVERT(VARCHAR(24),GETDATE(),113)  

HostForLIFEASP.NET SQL Server 2019 Hosting


SQL Server Hosting - HostForLIFE :: How To Split A String In SQL?

clock December 6, 2021 05:56 by author Peter

I am going to take advantage of this time to write code for a split comma separated string without using functions. In general, we face this type of scenario in real working conditions, and we can expect this in interview questions. Now, I came up with different resolutions for this. We can use Recursive CTE to split a  comma-separated string in SQL. Instead of a string, we can use columns in our tables also. In my current project, I got raw data in a comma-separated string format, and I used it to split the string into rows and insert them into my tables.
    declare @a  varchar(100)  
      
    set @a = 'Peter,Hello,HI'  
      
      
    ;with cte as(select STUFF(@a,1,CHARINDEX(',',@a),'') as number,  
    convert(varchar(50),left(@a, CHARINDEX(',',@a)-1 )) col1  
    union all  
      
    select STUFF(number,1,CHARINDEX(',',number+','),'') number,  
    convert(varchar(50),left(number,(case when CHARINDEX(',',number) = 0 then len(number) else CHARINDEX(',',number)-1 end)) )col1  
      
    from cte where LEN(number) >0  
    )  
    select col1 from cte  

My string contains 4 words and is separated by a comma. I want to split 4 words into 4 rows. In the above code, I used Recursive CTE to achieve my goal. The first part was to hide the first word in a string in the Number column and the hidden word will appear in the Col1 column. The second part of the Cte was to use the output of the number column in the first part and split that string accordingly. After executing the above code we get results.

I have another approach to achieve the same result. If you are familiar with XML, the below command can be placed directly in your join and where conditions as well.
    declare @a  varchar(100)  
      
    set @a = 'peter,Hello,HI'   
      
    select   
        a.value('.', 'varchar(max)')   
    from  
        (select cast('<M>' + REPLACE(@a, ',', '</M><M>') + '</M>' AS XML) as col) as A  
        CROSS APPLY A.col.nodes ('/M') AS Split(a)  

After executing this code, you get the same result shown above. 

HostForLIFEASP.NET SQL Server 2019 Hosting


SQL Server Hosting - HostForLIFE :: SQL Server Difference Between Char, Nchar, Varchar and Nvarchar Data Types in SQL Server

clock December 3, 2021 07:12 by author Peter

This small article is intended for the audience stuck in their interview when asked for the differences among CHAR, VARCHAR, NCHAR and NVARCHAR data types. Actually it is simple but sometimes people get confused.

To store data as characters, numeric values and special characters in a database, there are 4 data types that can be used. So what is the difference among all 4 of these data types?

  • CHAR vs VARCHAR
  • NCHAR vs NVARCHAR

Considering an example, we will look into each one of them.
    DECLARE @string CHAR(20)  
   SET @string = 'Robin'  
   SELECT @string AS 'String', DATALENGTH(@string) AS 'Datalength' , LEN(@string) AS 'Len'  

Note: The LEN() method provides the length of a character excluding trailing blanks stored in the string expression whereas the DATALENGTH() method provides the number of byte spaces occupied by the characters in a string expression.
 
As you know we represent the character values within single quotes, for example 'Robin'. But do you know we can represent these same characters within double quotes similar to programming languages representing a string, for example “Robin”? This can be done by setting the value:
    SET QUOTED_IDENTIFIER OFF

By default, it is set to ON
 
CHAR vs VARCHAR
Talking about the CHAR data type:
    It is a fixed length data type
    Used to store non-Unicode characters
    Occupiers 1 byte of space for each character

If the value provided to a variable of CHAR data type is shorter than the length of a column of declared the size of the variable, then the value would be right-padded with blanks to match the size of column length.
    DECLARE @string CHAR(20)  
    SET @string = 'Robin'  
    SELECT @string AS 'String', DATALENGTH(@string) AS 'Datalength' , LEN(@string) AS 'Len'

As you can see above, the bytes occupied by the variable are 20 even though the length of the characters is 5. That means that irrespective of the character stored in the column, it will occupy all bytes to store the value.

About the VARCHAR data type:
    It is a variable length data type
    Used to store non-Unicode characters
    Occupies 1 byte of space for each character

    DECLARE @string VARCHAR(20)  
    SET @string = 'Robin'  
    SELECT @string AS 'String', DATALENGTH(@string) AS 'Datalength' , LEN(@string) AS 'Len'


As you can see above, it is showing DATALENGTH as 5 which means it will use only the number of bytes equal to the number of characters. This will allow me to avoid wasting database space.

Note:  If SET ANSI_PADDING is OFF when CREATE TABLE or ALTER TABLE is executed, a CHAR column defined as NULL is considered as VARCHAR.

When to use what?

If you are sure about the fixed length of the data that would be captured for any specific column then go for CHAR data type and if the data may vary then go for VARCHAR.
 
NCHAR vs NVARCHAR
Similar to CHAR data type, the NCHAR data type:
    Is a fixed length data type
    Used to store Unicode characters (for example the languages Arabic, German and so on)
    Occupies 2 bytes of space for each character

    DECLARE @string NCHAR(20)  
    SET @string = 'Robin'  
    SELECT @string AS 'String', DATALENGTH(@string) AS 'Datalength' , LEN(@string) AS 'Len'


As you can see above, the data length column shows 40 bytes even though the size declared is 20. It's because NCHAR holds 2 bytes of space for each character.

About the NVARCHAR data type:
    It is a variable-length data type
    Used to store Unicode characters
    Occupies 2 bytes of space for each character
    DECLARE @string NVARCHAR(20)  
    SET @string = 'Robin'  
    SELECT @string AS 'String', DATALENGTH(@string) AS 'Datalength' , LEN(@string) AS 'Len'

As in the output above, you will observe DATALENGTH column is showing only 10 as a value. That is because it occupies 2 bytes of space for each character and the data length is only 5 characters, therefore it will occupy 10 bytes of space in the database.

When to use what?

If your column will store a fixed-length Unicode characters like French, Arabic and so on characters then go for NCHAR. If the data stored in a column is Unicode and can vary in length, then go for NVARCHAR.
 
Querying to NCHAR or NVARCHAR is a bit slower then CHAR or VARCHAR. So don't go for NCHAR or NVARCHAR to store non-Unicode characters even though this data type supports that.

This small article is just to make you aware of the differences among the CHAR, VARCHAR, NCHAR and NVARCHAR data types since they are all used to store characters, numbers or special characters. I hope you like this small article and will that it will be helpful to you at some point of time. Leave your comments whether its good or bad. Sharing is valuable no matter what.

HostForLIFEASP.NET SQL Server 2019 Hosting


SQL Server Hosting - HostForLIFE :: SQL Server Log Shipping (Without Active Directory)

clock December 2, 2021 06:14 by author Peter

SQL Server Log Shipping is one of the basic levels of SQL Server High-Availability (HA) features. It is an automated system/way to keep backup & restore your database from one server/instance to another or more server/instances. The primary purpose of log shipping is to increase database availability by maintaining a backup server that can replace a production server quickly.

Limitation of Log Shipping

  • SQL Server Log Shipping is one of the basic level of SQL Server High-Availability (HA) features.
  • Here is the possibility of data loss in log shipping for a set of times you’ve set for log shipment to the primary server to the secondary server(s) when the primary server fails on a disaster.
  • Failover does not work for log shipping.
  • SQL Server Express edition does not support log shipping.

Benefits of Log Shipping

  • Easy setup and maintenance.
  • Provides both Disaster Recovery and High Availability solutions.
  • Low maintenance.
  • Multiple standby servers can be configured.
  • Standby databases can be available for read-only queries
  • From SQL Server 2008 Log Shipping technology is available in all later SQL Server Version except express edition.
  • Log Shipping allows the auto-update of the schema(table, views, etc.) on a secondary server.
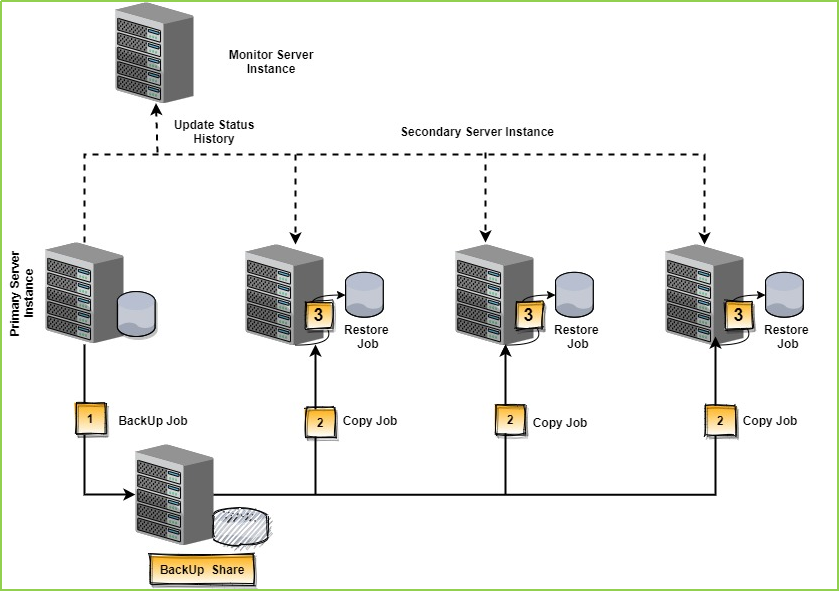
  • Let’s see how the log shipping technology works in the following diagram.
Development/Tested Environment Details

SL Item Name Details
01 Primary Server (OS) Windows 10 Pro, 64 bit
02 Secondary Server (OS) Windows 10 Pro, 64 bit
03 SQL Server in Primary Server Microsoft SQL Server 2016, Enterprise Edition (64-bit)
04 SQL Server in Secondary Server Microsoft SQL Server 2016, Developer Edition (64-bit)

Note
Though, Here we’ve used different editions of SQL Server (Enterprise & Developer) but it is good practice to keep the same version & same edition of SQL Server in both/all server(s).

Configure SQL Server Log Shipping(Without active directory)

Follow the steps one by one to configure SQL Server Log Shipping(Without active directory).

Step 1

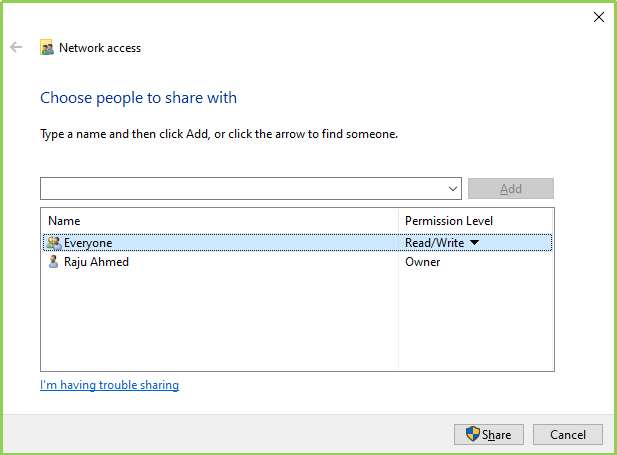
Create a folder on your Primary Server. Then go to Properties > Sharing Tab > Click On Share > Select Everyone > Click On Add > Give it Read/Write Permission > finally click on Share.
Step 2
Do the same thing on your Secondary Server as in Step 1.

Step 3
As we’re going to setup Log Shipping without using Active Directory (AD), To do that we need to create a user with the same name and password in both servers (Primary & Secondary), so that we can use them for SQL Server Service & SQL Server Agent Service read/write permission. First create a new user on your Primary Server.

To create a new User go to Start > Settings > Accounts
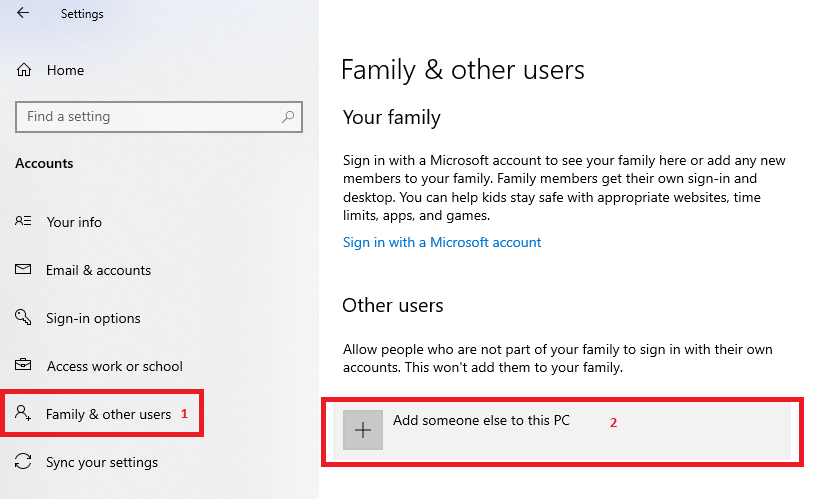
The following screen will appear. Then follow the following steps
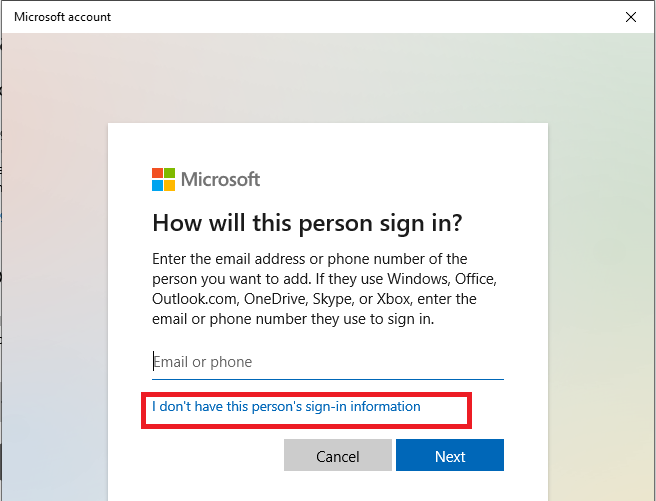
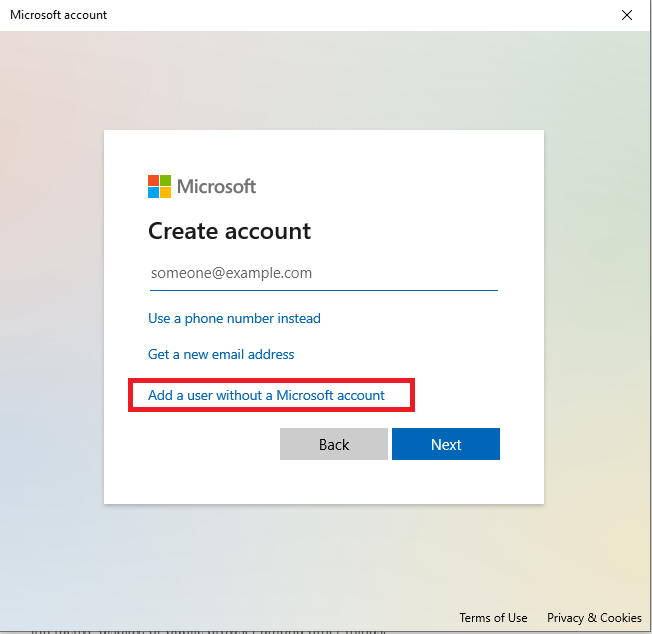
Now we’ll create a user without a Microsoft account.
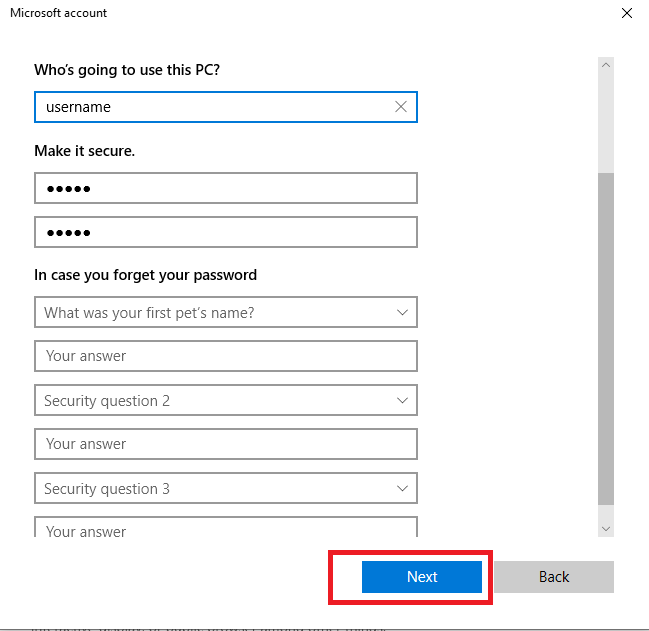
Provide the required field and click on Next Button. Hope User will be created.
Step 4
Do the same thing on your Secondary Server as in Step 3.

Note: Keep the user name & password the same as Primary Server you’ve saved.

Step 5
Now we’ll give MSSQLSERVER / SQL Server(Version) and SQL Server Agent (Version) permission/log on with our recently created user in both (primary & secondary) servers. For doing that follow the following steps. Go to Run (Windows Key + R) and Type services.msc as like the following image.
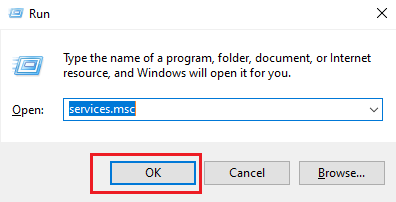
Then following window/screen will be arrived. Then Select SQL Server(MSSQLSERVER) > Right-click on that > Click On Properties as following image.
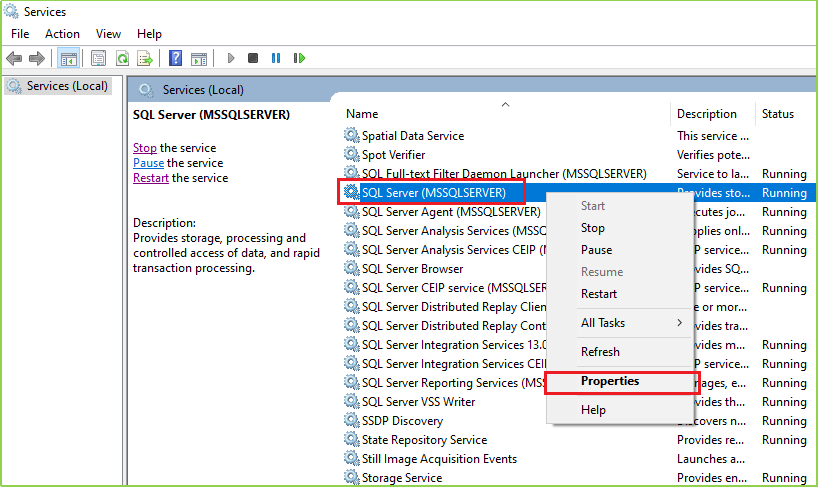
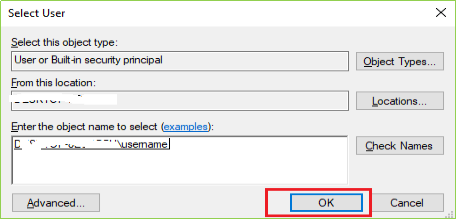
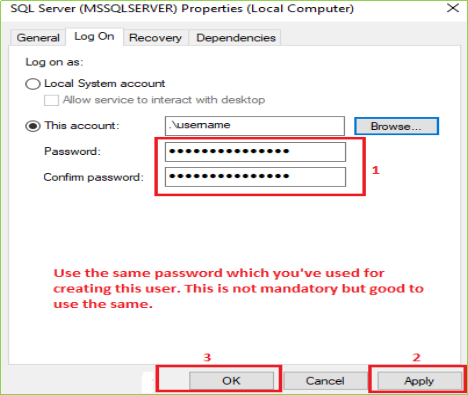
When you click on Properties following screen will come up on your screen. Click on Log On tab & then click on the Browse as per the following image(s).
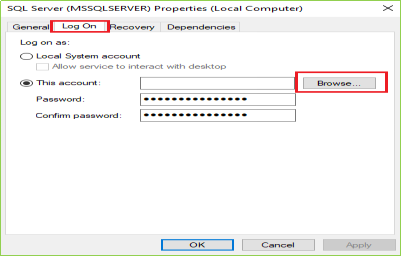
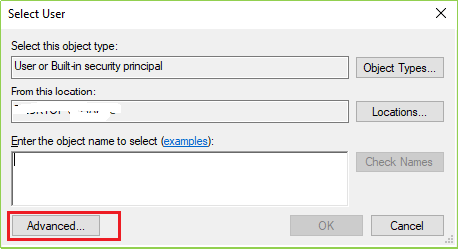


Step 6
Do the same thing on your Primary Server for SQL Server Agent as in Step 5.

Step 7
Do the same thing on your Secondary Server as Step 5 & Step 6.

Note: Keep the user name & password the same for SQL Server service log on as Primary Server you’ve saved. And also make sure MSSQLSERVER & SQL Server Agent Service is running on your both server. For confirmation, you may restart these services in primary

Step 8
We’re almost done with all other environment settings except SQL Server. Now log on your primary server(SQL Server) with a user(Like: user = ***** , Password= *****).
Note: Your login user must have the sysadmin role. Right Click on your desired Database and click on Properties.
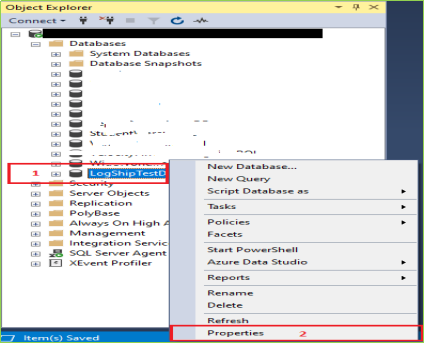
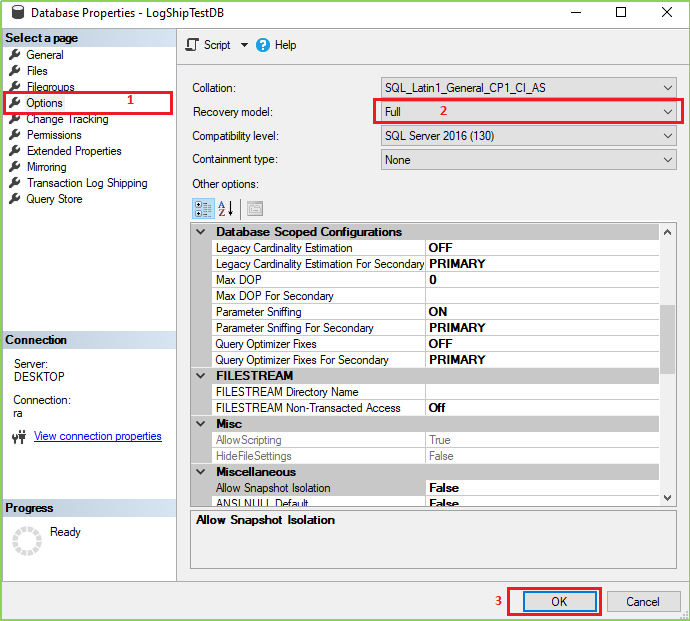
Step 9
Now take a full backup of that database. And take the backup file to the secondary server & restore it as the following image. Here I’m not showing the full backup process but after selecting the database (.bak) file, you’ve to go Option > Then select “RESTORE WITH NORECOVERY”.
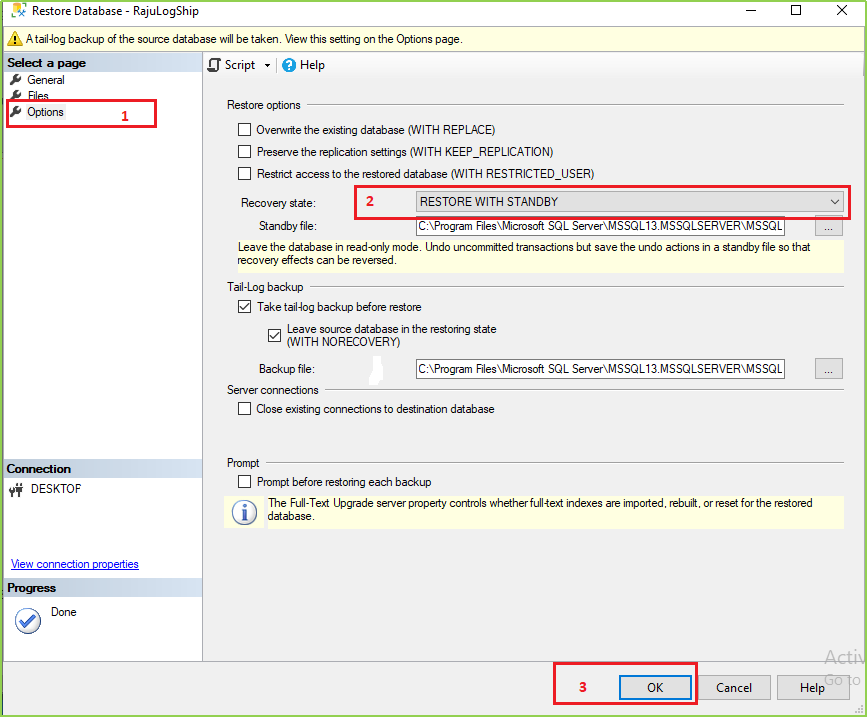
Step 10
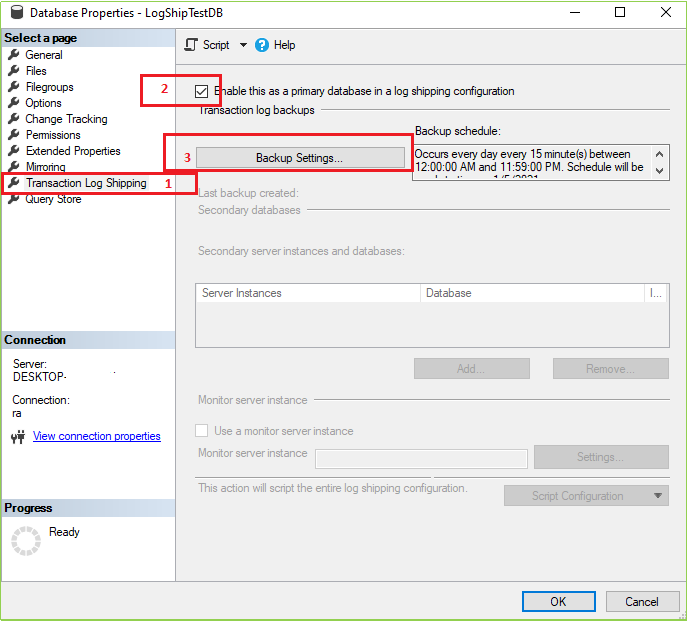
Now we’ll create the main things/configurations for our desired log shipping. Go to the primary server and select your database. Now follow these following images one by one.
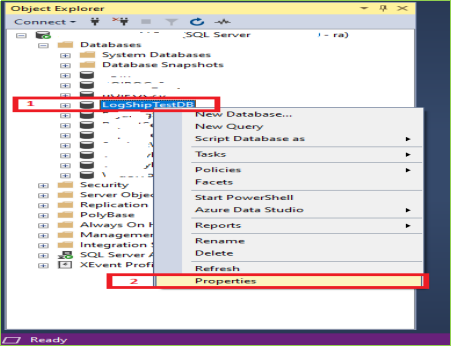
After clicking on Properties following screen will be open. Now follow the marked serial.
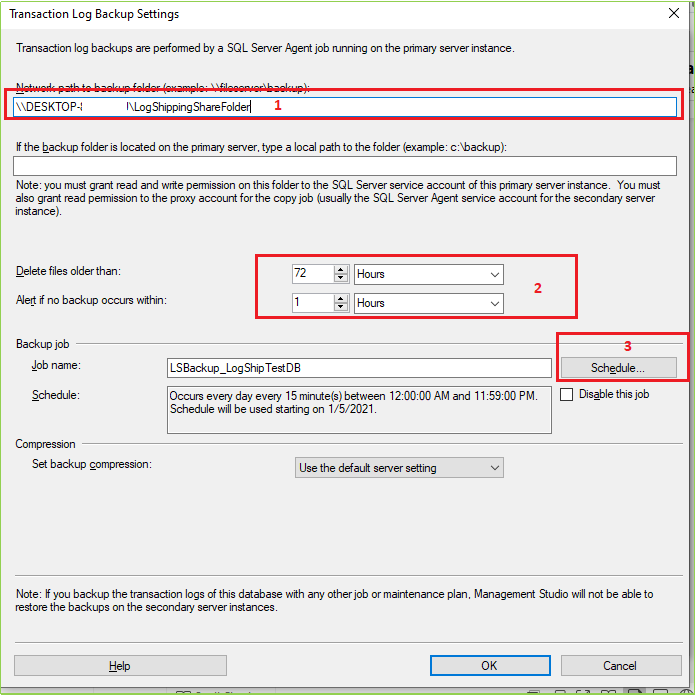
After Clicking on Backup Settings following screen will appear. Now follow the marked step one by one as a mentioned serial.
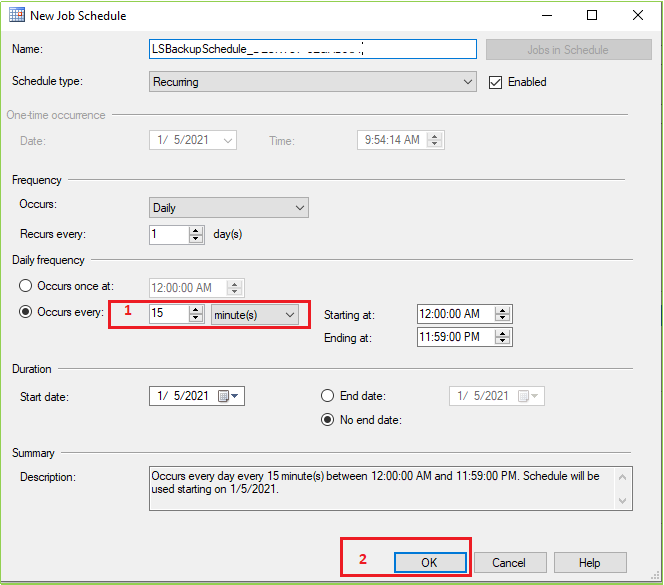
When you click on the Schedule button following screen will appear. Here you can set up the necessary configuration(s). Here we’ll change only the marked field value.
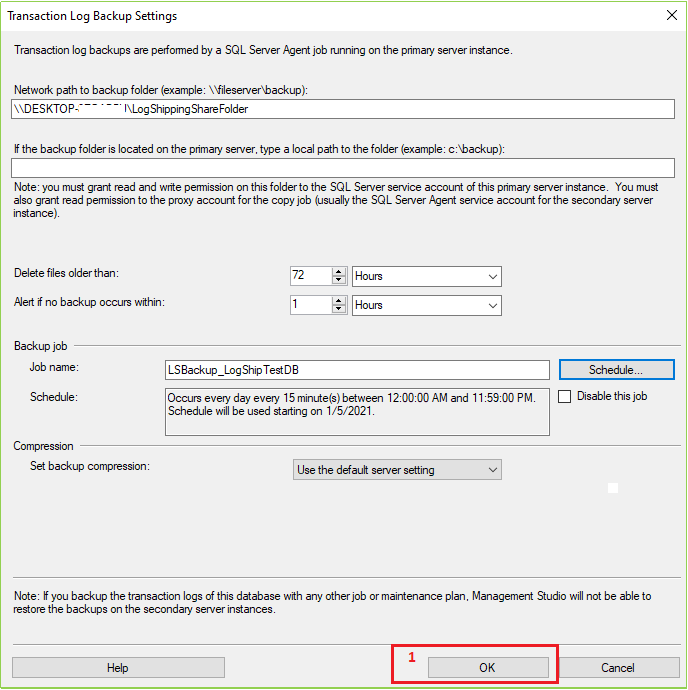
After setting(s) all changes/configurations click OK. Then the following screen will appear. Now click OK.
After clicking on OK from the previous screen the following screen will open. Now Click On Add as marked in the following screen.
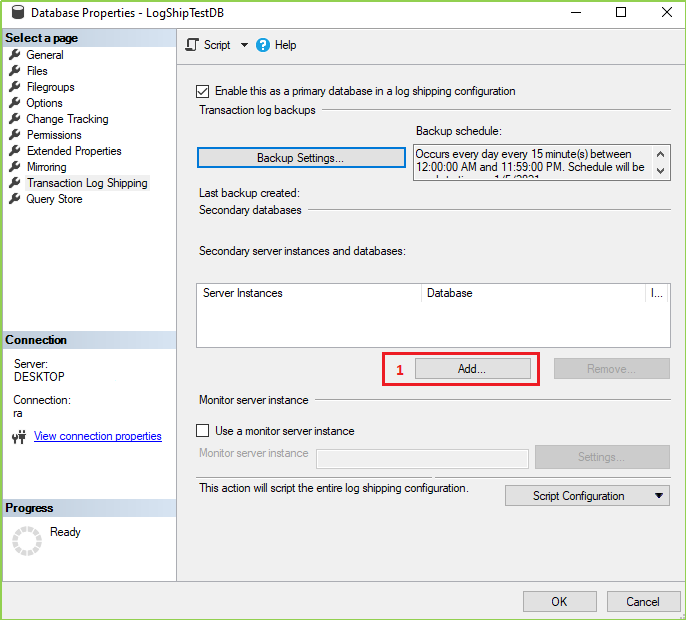
When you click on Add in the previous screen then the following screen will be come-up. Now it’s time to connect with your secondary server(s)/instance(s). Now follow the marked steps & provide the necessary data.

In the following image first tab, we’ll just work on the database restore/initialing process on our secondary server. You know, we’ve already restored our database in our secondary server at Step 9. So we’ll select “No, the secondary database is initialized.” Option and click OK.  Now go to the second tab named “Copy Files”, put your secondary server shared folder network path, And click on the Schedule… button

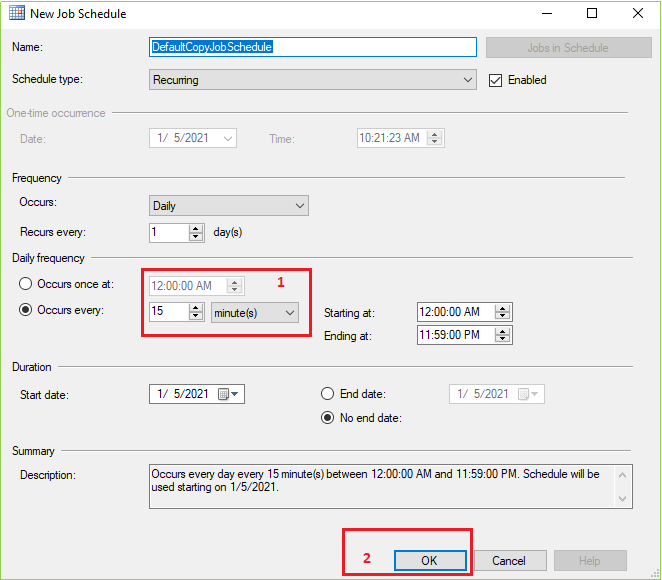
After clicking on the Schedule… from the Copy Files tab following screen will appear. Change the marked field value as your requirement and leave others as usual if it is not necessary for you. Then click OK.
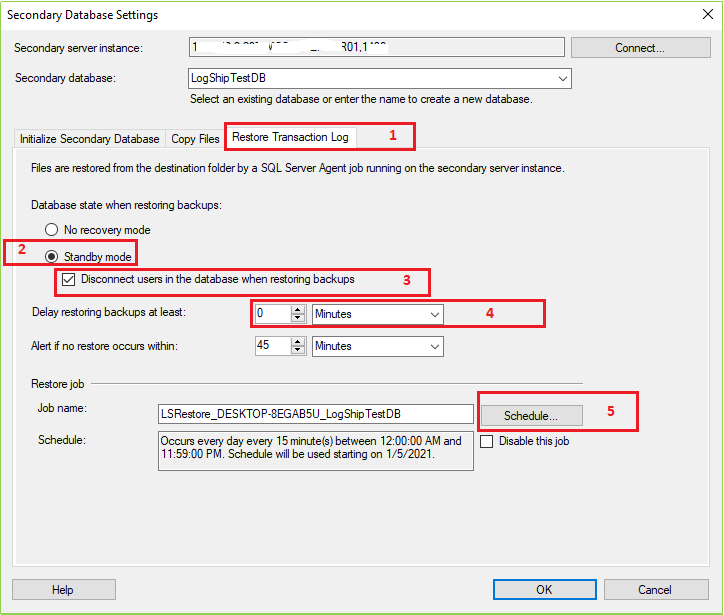
Now click on the Restore Transaction Log tab Select Standby Mode > Check on “Disconnect users in the database when restoring backups” > Put your delay restoring time (It is optional) > click on Schedule… button
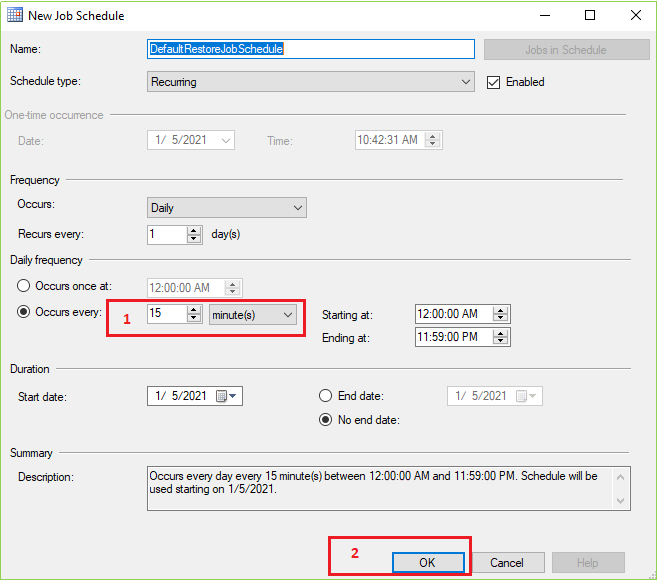
After clicking on Schedule… from the Restore Transaction Log tab following screen will appear. Change the marked field value as your requirement and leave others as usual if it is not necessary for you. Then click OK.
After clicking on OK from the previous screen following image will be open. Our secondary server instance was successfully added. Now click on OK from the following image.
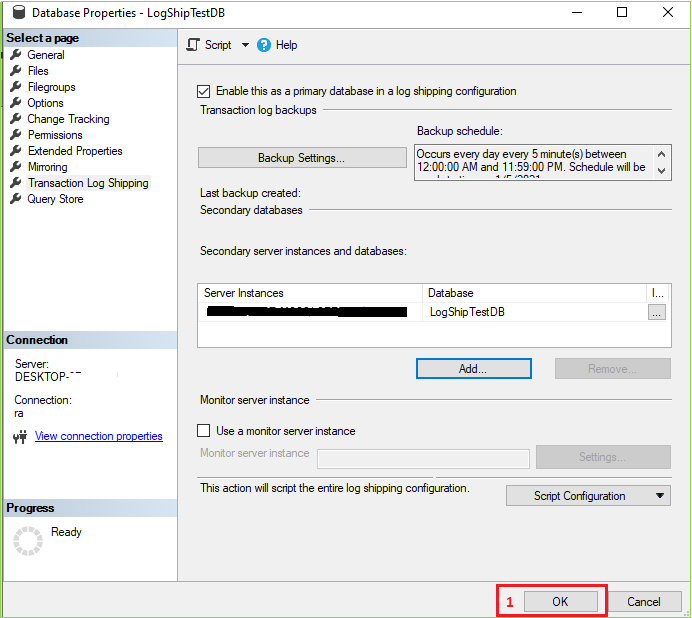
We’ve done all settings & configurations for our desired log shipping feature. When clicking OK from the previous screen then the following screen will open. If you’ve everything as our document, we hope you’ll be able to see the following screen with success a message. Click On the Close button.
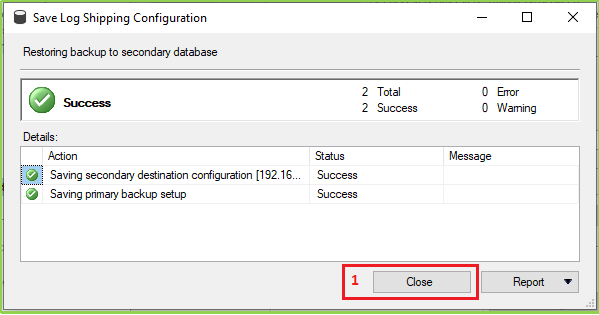
Step 11
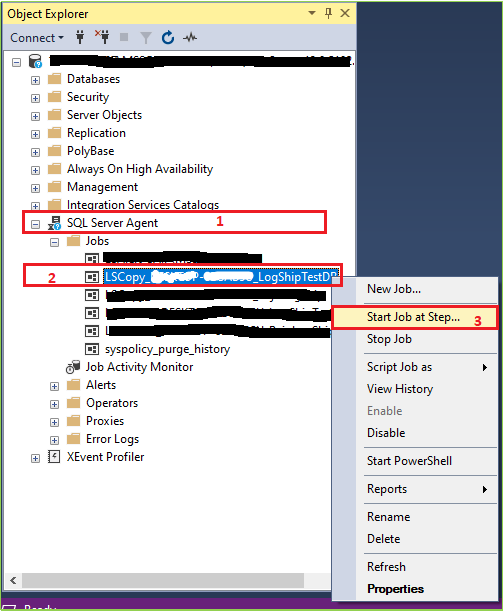
Congratulations, you’ve successfully configured log shipping. Now we’ll manually test, does our log shipping is working or not as our expectation. For manual testing first go to your Primary Server > Expand SQL Server Agent > Right-click on your Log Ship Backup Job > Click on Start Job at Step.
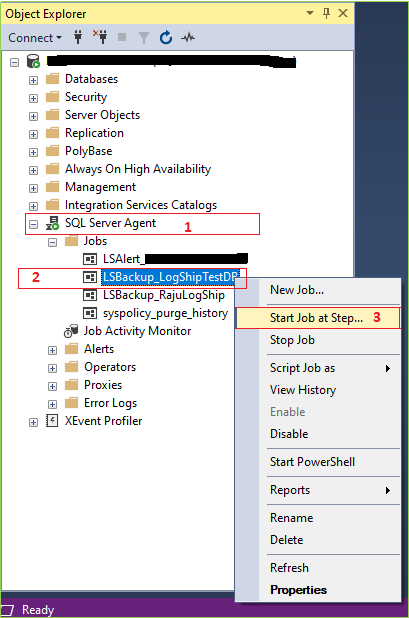
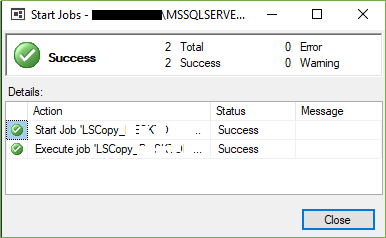
If everything is fine you’ll get a success message like the bellow image.
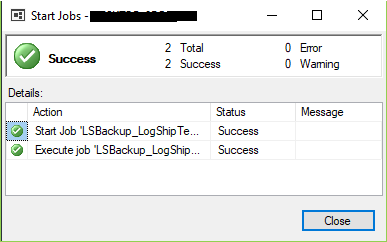
Now go to your secondary server. > Expand SQL Server Agent > Right-click on your Log Ship Copy Job > Click on Start Job at Step..
If everything is fine you’ll get a success message like the bellow image.
Tips: For testing data update, you may insert some data on your primary database and then you may follow the step (Step-11) for manual testing.

HostForLIFEASP.NET SQL Server 2019 Hosting


About HostForLIFE

HostForLIFE is European Windows Hosting Provider which focuses on Windows Platform only. We deliver on-demand hosting solutions including Shared hosting, Reseller Hosting, Cloud Hosting, Dedicated Servers, and IT as a Service for companies of all sizes.

We have offered the latest Windows 2019 Hosting, ASP.NET 5 Hosting, ASP.NET MVC 6 Hosting and SQL 2019 Hosting.


Month List

Tag cloud

Sign in