European Windows 2019 Hosting BLOG

BLOG about Windows 2019 Hosting and SQL 2019 Hosting - Dedicated to European Windows Hosting Customer

SQL Server 2014 Hosting - HostForLIFE.eu :: How to Find Error Records in A Table

clock September 28, 2015 17:10 by author Rebecca

SQL Server database files are organized in 8KB (8192 bytes) chunks, called pages. When we create the first row in a table, SQL Server allocates an 8KB page to store that row. Similarly every row in every table ends up being stored in a page.

Say one of the pages in your table is corrupt and while repairing the corrupt pages, you may eventually end up loosing some data. You may want to find out which records are on the page. To do so, use the following undocumented T-SQL %%physloc%% virtual column:

USE AdventureWorks2014
GO
SELECT *, %%physloc%% AS physloc
FROM Person.AddressType
ORDER BY physloc;

As you can see, the last column represents the record location. However the hexadecimal value is not in a human readable format. To read the physical record of each row in a human readable format, use the following query:

SELECT *
FROM Person.AddressType
CROSS APPLY sys.fn_PhysLocCracker(%%physloc%%)


The sys.fun_PhysLocCracker function takes the %%physloc%% and represents a human readable format fileid, pageid i.e. 880 and record number on the page 880.

If you are interested in knowing what’s inside the sys.fn_PhysLocCracker function, use sp_helptext as follows:

EXEC sp_helptext 'sys.fn_PhysLocCracker'
which display the definition of sys.fn_PhysLocCracker
-------------------------------------------------------------------------------
-- Name: sys.fn_PhysLocCracker
--
-- Description:
--    Cracks the output of %%physloc%% virtual column
--
-- Notes:
-------------------------------------------------------------------------------
create function sys.fn_PhysLocCracker (@physical_locator binary (8))
returns @dumploc_table table
(
    [file_id]    int not null,
    [page_id]    int not null,
    [slot_id]    int not null
)
as
begin
    declare @page_id    binary (4)
    declare @file_id    binary (2)
    declare @slot_id    binary (2)
    -- Page ID is the first four bytes, then 2 bytes of page ID, then 2 bytes of slot
    --
    select @page_id = convert (binary (4), reverse (substring (@physical_locator, 1, 4)))
    select @file_id = convert (binary (2), reverse (substring (@physical_locator, 5, 2)))
    select @slot_id = convert (binary (2), reverse (substring (@physical_locator, 7, 2)))
   
    insert into @dumploc_table values (@file_id, @page_id, @slot_id)
    return
end

The undocumented sys.fn_PhysLocCracker works on SQL Server 2008 and above.

HostForLIFE.eu SQL Server 2014 Hosting
HostForLIFE.eu is European Windows Hosting Provider which focuses on Windows Platform only. We deliver on-demand hosting solutions including Shared hosting, Reseller Hosting, Cloud Hosting, Dedicated Servers, and IT as a Service for companies of all sizes.


SQL Server 2014 Hosting - HostForLIFE.eu :: How to Check Database Size in SQL Server 2014?

clock September 22, 2015 11:26 by author Peter

Sometimes we'd like to understand how much space utilized by databases in SQL Server. There are multiple ways that to know the database size in SQL SERVER.
1. using Table Sys.master_files
2. using stored Proc sp_spaceused
3. using Manual option in SSMS

Using Table Sys.master_files
This is one option by that we will know database size. Below query uses 2 tables databases that contains database ID, Name etc and another table master_files which contains size columns holds size of database. By using Inner join(database ID) we are getting database size. each tables are present in master database.
SELECT     sys.databases.name, 
           CONVERT(VARCHAR,SUM(size)*8/1024)+' MB' AS [Total disk space] 
FROM       sys.databases  
JOIN       sys.master_files 
ON         sys.databases.database_id=sys.master_files.database_id 
GROUP BY   sys.databases.name 
ORDER BY   sys.databases.name


See the following picture after executing above code which gives all the databases with their sizes.

Using stored Proc sp_spaceused 

This  is second choice to recognize database size. Here we are going to call stored procedure sp_spaceused which is present in master database. This one helps to know size of current database.
exec sp_spaceused  

After calling above stored procedure it shows  below Image2 which contains column called database_size surrounded by red mark.

Using Manual Option in SSMS
This is another option to know database size. To know size Go to Server Explorer -> Expand it -> Right click on Database -> Choose Properties -> In popup window choose General tab ->See Size property which is marked(red) in Image3.

Image 3: Manual option to get Database size
Hope it helps you to get database size in SQL Server!

HostForLIFE.eu SQL Server 2014 Hosting
HostForLIFE.eu is European Windows Hosting Provider which focuses on Windows Platform only. We deliver on-demand hosting solutions including Shared hosting, Reseller Hosting, Cloud Hosting, Dedicated Servers, and IT as a Service for companies of all sizes.


SQL Server 2014 Hosting - HostForLIFE.eu :: How to Wrap a Long Text in SQL Server Reporting Service

clock September 17, 2015 11:37 by author Rebecca

In this blog post “Report Viewer wrap text”, we are going to learn an important trick of text wrapping in SSRS reports for long texts (without space and any separator) exceeding the width of a report column’s defined width and being rendered in a Report Viewer control of .NET Application.

Impact of text wrapping in report project and on report server

Lets start this too with some demo and sample codes. Follow these steps to create a sample application and produce this on your machine:

1. Create a report server project in SQL Server Data Tools (SSDT)

2. Add a Datasource and a Dataset in the report.

3. In query type of Dataset, select “Text”.

4. Add below as query in “Query” box of the Dataset. You can also write your own query.

SELECT 'ThisTextDoesNotContainAnySpace' AS Comment
UNION ALL
SELECT 'ThisTextDoesNotContainAnySpace' AS Comment
UNION ALL
SELECT 'ThisTextDoesNotContainAnySpace' AS Comment

5. In above query, we have a text string without any space as a column named “Comment”. Now add a “Table” control from Report Item’s tollbox on the report body and select this column named “Comment” in the table to display. Remember you have fixed the column width less than the above string’s length to produce the mentioned issue.

6. Click on “preview” button to check the output locally. The text should be wrapped to the next row if it exceeds the width of the column. Below is the screen shot:

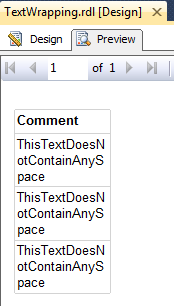
7. In above image you can see that this text could not be accommodated in one row in this column and has been wrapped in multiple rows. But the width of the column is constant as desired.Below i will show you the output of this report after deploying it on report server. I have deployed the same report on my local report server and executed from report server. Below is the screen shot:

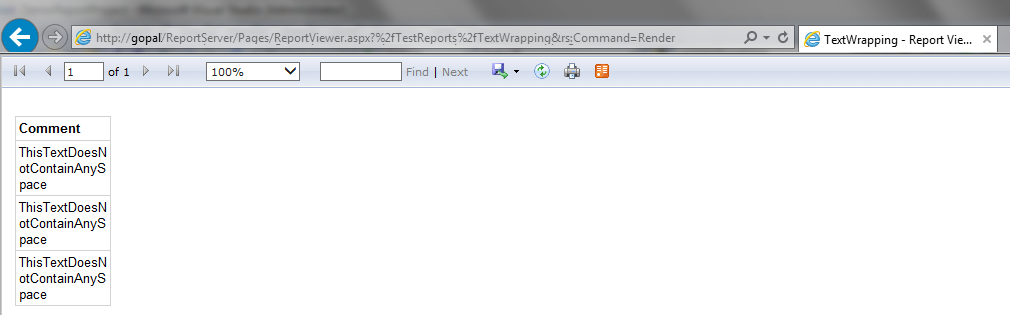
Again you can see that we have the desired output i.e. text wrapping is taken care as per the column width.

Impact of text wrapping in ReportViewer Control

Now we have to check the same report in a report viewer control. To do so, follow these steps:

1. Create a ASP.NET Web Application in Visual Studio.

2. Make appropriate changes in web.config file. What i did on my machine is below:

<system.webServer>
<handlers>
<add name="ReportViewerWebControlHandler" preCondition="integratedMode" verb="*" path="Reserved.ReportViewerWebControl.axd" type="Microsoft.Reporting.WebForms.HttpHandler, Microsoft.ReportViewer.WebForms, Version=11.0.0.0, Culture=neutral, PublicKeyToken=89845dcd8080cc91" />
</handlers>
</system.webServer>

3. Add an .aspx web form in the project and on this page register the report viewer control as below. Before that also add the reference of reportviewer assembly in project references.

<%@ Register Assembly="Microsoft.ReportViewer.WebForms, Version=11.0.0.0, Culture=neutral, PublicKeyToken=89845dcd8080cc91" Namespace="Microsoft.Reporting.WebForms" TagPrefix="rsweb" %>

4. Add a report viewer control on this page and a script manager too like below:

<form id="form1" runat="server">
<asp:ScriptManager ID="ScriptManager1" runat="server"></asp:ScriptManager>
<div>
<rsweb:ReportViewer ID="ReportViewer1" runat="server" Width="1000">
</rsweb:ReportViewer>
</div>
</form>

5. Write a code to display your report from this report viewer control in .cs file of this web page like below. You can modify the below code as per your need. I did not have any parameter in my report to keep this demo simple and to focus in main issue.

if (!IsPostBack)
{
ReportViewer1.ProcessingMode = Microsoft.Reporting.WebForms.ProcessingMode.Remote;
 
Microsoft.Reporting.WebForms.ServerReport serverReport = ReportViewer1.ServerReport;
 
// Set the report server URL and report path
serverReport.ReportServerUrl = new Uri("http://mymachine/reportserver");
serverReport.ReportPath = "/TestReports/TextWrapping";
}

6. Build your application and open the web page in your browser. You will have an output as below:

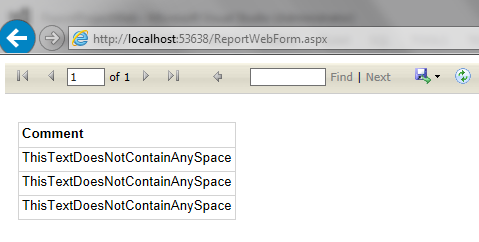
In above figure, you can see that the output of the same report has been changed. The text wrapping is not working as it worked in above cases which was desired too. In this case width of the column is expanding to accommodate the text instead of wrapping the text in more than one row.

Enable Text Wrapping in SQL Server Reporting Server rendered in report viewer control on web page

As of now and what i know, there is no any staright forward method to achieve this task and to do this we have to folk it as below:

1. To render this report with text wrapping, follow these steps;
2. To avoid rework, go to your report project and click on the textbox which holds this data inside the table and press ctrl + X to cut it from the table.
3. Drag and drop a rectangle control in the table’s cell from the Report Item’s toolbox.
4. Press ctrl + V to put the textbox inside the rectangle.
5. Set the border of the rectangle as your textbox has.
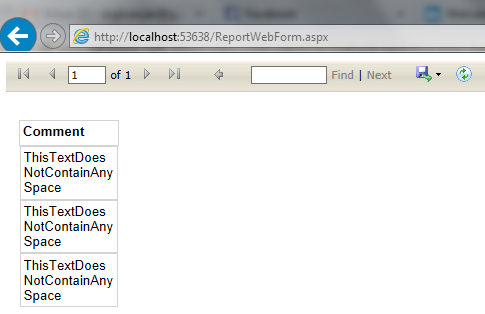
6. Deploy the report and see the output in your browser:

HostForLIFE.eu SQL Server 2014 Hosting
HostForLIFE.eu is European Windows Hosting Provider which focuses on Windows Platform only. We deliver on-demand hosting solutions including Shared hosting, Reseller Hosting, Cloud Hosting, Dedicated Servers, and IT as a Service for companies of all sizes.


SQL Server 2012 Hosting - HostForLIFE.eu :: How to Create a User Defined Error Message in SQL Server?

clock September 14, 2015 07:33 by author Peter

In this article I describe the way to produce a User defined error message in SQL Server 2012. we use SP_addmessage to add a custom message and after that we have a tendency to use a RAISERROR Statement to invoke the custom message. We use the SP_admessage stored Procedure to define a User defined Custom Error Message. This stored Procedure adds a record to the sys.message system view. A User defined message should have a message number of 50000 or higher with a severity of 1 to 25. And here is the code:
sp_addmessage [ @msgnum = ] msg_id ,
[ @severity = ] severity ,
[ @msgtext = ] 'msg'
[ , [ @lang = ] 'language' ]
[ , [ @with_log = ] 'with_log' ]
[ , [ @replace = ] 'replace' ]

Here mcg_id is that the id of the message which might be between 50000 and 2147483647. The severity is the level of the message which might be between one and twenty five. For User defined messages we are able to use it a value of 0 to 19. The severity level between 20 to 25 may be set by the administrator. Severity levels from 20 through 25 are considered fatal.

The actual error message is "msg", that uses a data type of nvarchar(255). the maximum characters limit is two,047. any more than that will be truncated. The language is used if you wish to specify any language. Replace is used once a similar message number already exists, however you wish to switch the string for that ID, you've got to use this parameter.

RAISERROR:
The RAISERROR statement generates an error message by either retrieving the message from the sys.messages catalog read or constructing the message string at runtime. it's used to invoke the the User defined error message. first we produce a User defined error message using SP_addmessage and after that we invoke that by the use of RAISERROR.
RAISERROR ( { msg_id  }
{ ,severity ,state }
[ ,argument [ ,...n ] ] )
[ WITH option [ ,...n ] ]


Example:
EXEC sp_addmessage
500021,
10,
'THis is error message'
go
RAISERROR (500021, 10, 1)


Replacement of Message.
EXEC sp_addmessage
500021,
10,
'Previous error message is replaced',
@lang='us_english',
@with_log='false',
@replace='replace'
GO
RAISERROR (500021, 10, 1)


Altering the message:
exec sp_altermessage 500021,@parameter='with_log', @parameter_value='true'

Droping the message:
exec sp_dropmessage 500021

HostForLIFE.eu SQL Server 2012 Hosting
HostForLIFE.eu is European Windows Hosting Provider which focuses on Windows Platform only. We deliver on-demand hosting solutions including Shared hosting, Reseller Hosting, Cloud Hosting, Dedicated Servers, and IT as a Service for companies of all sizes.


SQL Server 2016 Hosting - HostForLIFE.eu :: How to Create a Date List from a Date Range in SQL Server

clock September 14, 2015 07:07 by author Rebecca

In this post, we will convert a given date of range into list of dates as per the business requirement. Just have a look on as these three mentioned demo table below which has three columns CustomerID, StartDate and EndDate. So, we want to generate the date list for the given date range for each customer. For example if we have a entry as CustomerID – “1”, StartDate – “10-Dec-2012” and EndDate – “19-Mar-2013”, then this should return a date list for CustomerID 1 with 4 rows. First row for 10-Dec-12 to 31-Dec-12, Second row for 01-Jan-13 to 31-Jan-13, Third row for 01-Feb-13 to 28-Feb-13 and fourth row for 01-Mar-13 to 19-Mar-13.

Mind that in first row, we have started with the actual start date of the given date range and in the last row, we have put the end date as actual end date. But, if there is any more row between first row and last row, it has a date range as whole month.

Look at this table of date range below:

And we want the required output from this date range is as below:

How to Generate The Output

Step 1

Create a table as below:

CREATE TABLE DateRange
(
CustomerID INT,
StartDate DATE,
EndDate DATE
)

Step 2

Insert demo values for customer and date range

INSERT INTO DateRange
VALUES (1, '10-Dec-12', '19-Mar-13'),
(2, '20-Mar-14', '10-Jul-14')

Step 3

Create another table to hold Serial number so that we can apply a join with this table to generate the date list for given date range. You can also use a demo DateList table to get the desired output. In this demo, we are using serial numbers to generate the desired output:

CREATE TABLE TableSerialNumber
(
RowNumber INT
)

Step 4

Insert serial numbers up to 100 for this demo using sys.columns table. You can also use another way to insert this.

INSERT INTO TableSerialNumber
SELECT TOP 100 ROW_NUMBER() OVER(ORDER BY (SELECT 0)) FROM SYS.COLUMNS

Step 5

Now, write a SQL query to extract the output as required. You can also try with some different way using DateList table too. Here, we're gonna use a serial number to generate the rows and date list dynamically for the given date range.

SELECT A.CustomerID
,CONVERT(VARCHAR(20), (CASE WHEN B.RowNumber = 1 THEN A.StartDate
ELSE DATEADD(MONTH, B.RowNumber - 1, DATEADD(DD, -(DATEPART(DD, A.StartDate)) + 1, A.StartDate)) END), 106) AS FromDate
,CONVERT(VARCHAR(20), (CASE WHEN (DATEADD(DD, -(DATEPART(DD, A.StartDate)), DATEADD(MONTH, B.RowNumber, A.StartDate))) < A.EndDate THEN
DATEADD(DD, -(DATEPART(DD, A.StartDate)), DATEADD(MONTH, B.RowNumber, A.StartDate)) ELSE A.EndDate END), 106) AS ToDate
FROM DateRange A
INNER JOIN TableSerialNumber B ON B.RowNumber <= (DATEDIFF(MONTH, A.StartDate, A.EndDate) + 1)

And you're done! You can also generate it in some other way too. For example, you can achieve this with a demo DateList table too. It's your creativity to find your own way.

HostForLIFE.eu SQL Server 2016 Hosting
HostForLIFE.eu is European Windows Hosting Provider which focuses on Windows Platform only. We deliver on-demand hosting solutions including Shared hosting, Reseller Hosting, Cloud Hosting, Dedicated Servers, and IT as a Service for companies of all sizes.


SQL Server 2016 Hosting - HostForLIFE.eu :: Using Dynamic Data Masking in SQL Server 2016

clock September 10, 2015 12:08 by author Rebecca

There is a long list of new features getting introduced in SQL Server 2016. In this post, we would talk about one of the security feature called Dynamic Data Masking. How to Use it?

Whenever you access your account on your bank site, would you be comfortable in seeing your credit card or bank account number in clear text on the web page? There are multiple ways to do this at the application level, but as a human nature, it leaves room for error. One small mistake from the developer can leak sensitive data and can cost a huge loss. Wouldn’t it be great if a credit card number would be returned with only its last 4 digits visible – XXXX-XXXX-XXXX-1234 with no additional coding? Sounds interesting, read on!

Before experimenting this feature please remember that if you are using CTP2.0 then you need to turn on trace flags using below command.

DBCC TRACEON(209,219,-1)

If you don’t enable, then here is the error which you would receive while trying this sample script given later.

Msg 102, Level 15, State 1, Line 14
Incorrect syntax near ‘masked’.

Don't forget that this is SQL Server 2016 feature. Running the script on earlier version of SQL would cause below:

Msg 102, Level 15, State 1, Line 14
Incorrect syntax near ‘MASKED’.
Msg 319, Level 15, State 1, Line 14
Incorrect syntax near the keyword ‘with’. If this statement is a common table expression, an xmlnamespaces clause or a change tracking context clause, the previous statement must be terminated with a semicolon.

And here is the script to create objects (database, table, masked column):

SET NOCOUNT ON
GO

Drop database MaskingDemo, if already exists

USE [master]
GO
IF DB_ID('MaskingDemo') IS NOT NULL
BEGIN
ALTER DATABASE [MaskingDemo] SET SINGLE_USER WITH ROLLBACK IMMEDIATE
DROP DATABASE [MaskingDemo]
END

Create new database called MaskingDemo

CREATE DATABASE MaskingDemo
GO
USE MaskingDemo
GO

Create table with different data type columns

CREATE TABLE MyContacts (
ID INT IDENTITY(1, 1) PRIMARY KEY
,fName NVARCHAR(30) NOT NULL
,lName NVARCHAR(30) NOT NULL
,CreditCard VARCHAR(20) NULL
,SalaryINR INT NULL
,OfficeEmail NVARCHAR(60) NULL
,PersonalEmail NVARCHAR(60) NULL
,SomeDate DATETIME NULL
)

Insert a Row

INSERT INTO [dbo].[MyContacts]
([fName],[lName] ,[CreditCard],[SalaryINR],[OfficeEmail],[PersonalEmail], SomeDate)
VALUES('Rebecca','C','1234-5678-1234-5678',999999,'[email protected]','[email protected]', '31-March-2013')
GO

Apply Masking

ALTER TABLE MyContacts
ALTER COLUMN CreditCard ADD MASKED
WITH (FUNCTION = 'partial(2,"XX-XXXX-XXXX-XX",2)')
ALTER TABLE MyContacts
ALTER COLUMN SalaryINR ADD MASKED
WITH (FUNCTION = 'default()')      -- default on int
ALTER TABLE MyContacts
ALTER COLUMN SomeDate ADD MASKED
WITH (FUNCTION = 'default()')      -- default on date
ALTER TABLE MyContacts
ALTER COLUMN fname ADD MASKED
WITH (FUNCTION = 'default()')      -- default on varchar
ALTER TABLE MyContacts
ALTER COLUMN OfficeEmail ADD MASKED
WITH (FUNCTION = 'email()')
GO

Create a new user and grant select permissions

USE MaskingDemo
GO
CREATE USER WhoAmI WITHOUT LOGIN;
GRANT SELECT ON MyContacts TO WhoAmI;


As we can see above, those fields which are masked are showing obfuscated data based on masking rule.
For your information, versions after CTP2 release, the trace flag will not be needed. If you add trace flag, you would start getting “Incorrect syntax” error.

HostForLIFE.eu SQL Server 2016 Hosting
HostForLIFE.eu is European Windows Hosting Provider which focuses on Windows Platform only. We deliver on-demand hosting solutions including Shared hosting, Reseller Hosting, Cloud Hosting, Dedicated Servers, and IT as a Service for companies of all sizes.


HostForLIFE.eu Proudly Launches ASP.NET 4.6 Hosting

clock September 7, 2015 12:38 by author Peter

HostForLIFE.eu was established to cater to an underserved market in the hosting industry; web hosting for customers who want excellent service. HostForLIFE.eu – a cheap, constant uptime, excellent customer service, quality, and also reliable hosting provider in advanced Windows and ASP.NET technology. HostForLIFE.eu proudly announces the availability of the ASP.NET 4.6 hosting in their entire servers environment.

http://hostforlife.eu/img/logo_aspnet1.png

ASP.NET is Microsoft's dynamic website technology, enabling developers to create data-driven websites using the .NET platform and the latest version is 5 with lots of awesome features. ASP.NET 4.6 is a lean .NET stack for building modern web apps. Microsoft built it from the ground up to provide an optimized development framework for apps that are either deployed to the cloud or run on-premises. It consists of modular components with minimal overhead.

According to Microsoft officials, With the .NET Framework 4.6, you'll enjoy better performance with the new 64-bit "RyuJIT" JIT and high DPI support for WPF and Windows Forms. ASP.NET provides HTTP/2 support when running on Windows 10 and has more async task-returning APIs. There are also major updates in Visual Studio 2015 for .NET developers, many of which are built on top of the new Roslyn compiler framework. The .NET languages -- C# 6, F# 4, VB 14 -- have been updated, too.There are many great features in the .NET Framework 4.6. Some of these features, like RyuJIT and the latest GC updates, can provide improvements by just installing the .NET Framework 4.6.

HostForLIFE.eu hosts its servers in top class data centers that is located in Amsterdam (NL), London (UK), Paris (FR), Frankfurt(DE) and Seattle (US) to guarantee 99.9% network uptime. All data center feature redundancies in network connectivity, power, HVAC, security, and fire suppression. All hosting plans from HostForLIFE.eu include 24×7 support and 30 days money back guarantee. The customers can start hosting their ASP.NET 4.6 site on their environment from as just low €3.00/month only.

HostForLIFE.eu is a popular online ASP.NET based hosting service provider catering to those people who face such issues. The company has managed to build a strong client base in a very short period of time. It is known for offering ultra-fast, fully-managed and secured services in the competitive market.

HostForLIFE.eu offers the latest European ASP.NET 4.6 hosting installation to all their new and existing customers. The customers can simply deploy their ASP.NET 4.6 website via their world-class Control Panel or conventional FTP tool. HostForLIFE.eu is happy to be offering the most up to date Microsoft services and always had a great appreciation for the products that Microsoft offers.

Further information and the full range of features ASP.NET 4.6 Hosting can be viewed here http://hostforlife.eu/European-ASPNET-46-Hosting


SQL Server 2016 Hosting - HostForLIFE.eu :: Query Store Features in SQL Server 2016

clock September 7, 2015 09:46 by author Rebecca

In this article, I'm introducing you new feature in SQL Server 2016 CTP 2.0 named Query Store. This is a very useful feature for the DBA and developers from the performance point of view.

Query store feature allows to captures multiple query plan for a query and run time statistics. Query store can store multiple execution plans per query, it can force query processor to use a particular execution plan which is referred as plan forcing using USE PLAN query hint.

By default, Query Store is not active so you can enable it in two ways:

Step 1

First Using SSMS, Right Click on DatabaseName -> Go to properties -> Query Store options -> Enable -> True

Step 2

Second way to enable it by using ALTER Database script in this manner:

ALTER DATABSE  Database_name SET QUERY_STORE = ON;

Query store option is not enabled for master or tempdb database. If you try to enable it then you get below error:

Msg 12420, Level 16, State 1, Line 1

Cannot perform action because Query Store is not started up for this database.

Msg 5069, Level 16, State 1, Line 1

ALTER DATABASE statement failed.

Step 3

To determine the current options available for query store we can query the system view sys.database_query_store_options. Query stores contains two stores:

  1. Plan store – Stores execution plan information
  2. Running Stats store – Stores execution statistics information


HostForLIFE.eu SQL Server 2016 Hosting
HostForLIFE.eu is European Windows Hosting Provider which focuses on Windows Platform only. We deliver on-demand hosting solutions including Shared hosting, Reseller Hosting, Cloud Hosting, Dedicated Servers, and IT as a Service for companies of all sizes.


About HostForLIFE

HostForLIFE is European Windows Hosting Provider which focuses on Windows Platform only. We deliver on-demand hosting solutions including Shared hosting, Reseller Hosting, Cloud Hosting, Dedicated Servers, and IT as a Service for companies of all sizes.

We have offered the latest Windows 2019 Hosting, ASP.NET 5 Hosting, ASP.NET MVC 6 Hosting and SQL 2019 Hosting.


Month List

Tag cloud

Sign in