European Windows 2019 Hosting BLOG

BLOG about Windows 2019 Hosting and SQL 2019 Hosting - Dedicated to European Windows Hosting Customer

European SQL Server 2019 Hosting :: How To Bring Database Online From Suspect Mode In SQL Server?

clock October 31, 2022 08:35 by author Peter

In this article, we will cover how to bring a database online from the suspect mode in an SQL server. Along with that, we also explain the meaning of SQL database in suspect mode and the reasons for this issue. So, let us start the article.

First, let us understand what SQL suspect mode means.

When the SQL database shows the suspect mode instead of online, it resembles that the database has started to recover the corrupted file but is not finished yet. There are various reasons for this issue. Below we suggested a few common reasons for the error message.

Why Does This Error Occur?
The SQL database goes to suspect mode due to many reasons. However, some reasons are more prevalent than others. Therefore, before you bring the database online from the suspect mode in the SQL server, we discuss some common causes for the SQL server issue.

    Abrupt shutdown of the SQL server leads to various issues. SQL Suspect mode is also one of those problems.
    When the database is unable to access the location of the log files and other important files, it shows the SQL server in suspect mode.
    If the files required by the database are opened in any other third-party application or by antivirus software, you will also experience the same issue.
    Insufficient disk space is another main reason for SQL databases being in suspect mode.
    Server crash sent your SQL database in Suspect mode.
    Sometimes, the SQL server database file corruption also causes this issue.

The above are a few scenarios when your SQL database is in suspect mode. We will explain an effective method to fix the problem.
How to Bring Database Online from Suspect Mode in SQL Server?

You have understood what are the main reasons for your database to be in suspect mode. Now, it is time to learn how to recover SQL database from suspect mode. We discuss the most efficient and easy solution to fix the DBMS issue. To perform the steps you need the SSMS (SQL Server Management Studio).

Perform the below steps to repair database in suspect mode in SQL Server

First, launch the SSMS and connect it to the database.


Now, choose New Query and set the database to the emergency mode by passing the following command.
EXEC sp_resetstatus ‘db_name’;

ALTER DATABASE db_name SET EMERGENCY

After that, give the below command for Consistency Check. It helps you to identify whether the database files are corrupted or not.
DBCC CHECKDB (‘database_name’)

Enable Single-User Mode and execute the below command to roll back the last transaction.
ALTER DATABASE database_name SET SINGLE_USER WITH ROLLBACK IMMEDIATE

Take the backup of your database items to prevent data loss. give the following command to repair and rebuild the SQL database lost missing rows.
DBCC CHECKDB (‘database_name’, REPAIR_ALLOW_DATA_LOSS)


After that, deactivate the Single-User mode and enable the Multi-User Mode.
ALTER DATABASE database_name SET MULTI_USER

After performing the above steps, anyone can easily restore their corrupted database files and repair database in suspect mode in SQL server.

I hope after reading this article you will get a satisfactory solution to recover SQL database from suspect mode. We explained what are the main reasons behind the database issue and also explained a simple yet effective manual method. However, if the problem originates due to corrupted database files, we suggest you opt for any advanced professional approach.

HostForLIFEASP.NET SQL Server 2019 Hosting


European SQL Server 2019 Hosting :: How To Measure Execution Time Of Stored Procedures?

clock October 24, 2022 10:30 by author Peter

Don’t waste your time in anger, regrets, worries, and grudges. Life is too short to be unhappy. One of the most popular and important questions that people often ask in complex database performance checks is how to measure the execution time of a stored procedure when it contains many statements. Well, honestly, the solution is very straightforward. Today we will discuss the execution time of stored procedures.

It is very easy to measure the execution time of a stored procedure. It is not necessary to add up the entire execution time of the stored procedure. Before running the stored procedure, just run the following command and you will see the last line in the message section with the time required to run the execution plan for the stored procedures.

SET STATISTICS TIME ON
EXEC YourSPName


The output will look like this.
SQL Server Execution Times: CPU time = 450 ms, Elapsed time = 1150 ms.
SQL Server Execution Times: CPU Time = 50 ms, Elapsed Time = 100 ms.
SQL Server Execution Times: CPU time = 1450 ms, Elapsed time = 1950 ms.
SQL Server Execution Times: CPU time = 2150 ms, Elapsed time = 3250 ms.


If your stored procedure has three statements, the first three represent the execution time of a single query. However, the last line represents the addition or commutative time for all the query statements together.

I hope you like this.

Thanks.

HostForLIFEASP.NET SQL Server 2019 Hosting


European SQL Server 2019 Hosting :: Search A String Entire Database (SQL Server)

clock October 21, 2022 07:02 by author Peter

In this tutorial, I will tell you about How to search a string entire database on SQL Server.

--USE DATABASE_NAME
DECLARE @SearchStr nvarchar(100) = 'Class VIII'
DECLARE @Results TABLE (ColumnName nvarchar(370), ColumnValue nvarchar(3630))

SET NOCOUNT ON

DECLARE @TableName nvarchar(256), @ColumnName nvarchar(128), @SearchStr2 nvarchar(110)
SET  @TableName = ''
SET @SearchStr2 = QUOTENAME('%' + @SearchStr + '%','''')

WHILE @TableName IS NOT NULL

BEGIN
    SET @ColumnName = ''
    SET @TableName =
    (
        SELECT MIN(QUOTENAME(TABLE_SCHEMA) + '.' + QUOTENAME(TABLE_NAME))
        FROM     INFORMATION_SCHEMA.TABLES
        WHERE         TABLE_TYPE = 'BASE TABLE'
            AND    QUOTENAME(TABLE_SCHEMA) + '.' + QUOTENAME(TABLE_NAME) > @TableName
            AND    OBJECTPROPERTY(
                    OBJECT_ID(
                        QUOTENAME(TABLE_SCHEMA) + '.' + QUOTENAME(TABLE_NAME)
                         ), 'IsMSShipped'
                           ) = 0
    )

    WHILE (@TableName IS NOT NULL) AND (@ColumnName IS NOT NULL)

    BEGIN
        SET @ColumnName =
        (
            SELECT MIN(QUOTENAME(COLUMN_NAME))
            FROM     INFORMATION_SCHEMA.COLUMNS
            WHERE         TABLE_SCHEMA    = PARSENAME(@TableName, 2)
                AND    TABLE_NAME    = PARSENAME(@TableName, 1)
                AND    DATA_TYPE IN ('char', 'varchar', 'nchar', 'nvarchar', 'int', 'decimal')
                AND    QUOTENAME(COLUMN_NAME) > @ColumnName
        )

        IF @ColumnName IS NOT NULL

        BEGIN
            INSERT INTO @Results
            EXEC
            (
                'SELECT ''' + @TableName + '.' + @ColumnName + ''', LEFT(' + @ColumnName + ', 3630)
                FROM ' + @TableName + ' (NOLOCK) ' +
                ' WHERE ' + @ColumnName + ' LIKE ' + @SearchStr2
            )
        END
    END
END


For example, I will search the above mentioned string then the sample output is as follows:

HostForLIFEASP.NET SQL Server 2019 Hosting


European SQL Server 2019 Hosting :: ANSI_NULLS In SQL Server

clock October 18, 2022 08:53 by author Peter

ANSI_NULLS define the comparison rule for NULL values in SQL Server.
 
When SET ANSI_NULLS is OFF, the Equals (=) and Not Equal To (<>) comparison operators do not follow the ISO standard. A SELECT statement that uses WHERE column_name = NULL returns the rows that have null values in column_name.
 
Example

But when SET ANSI_NULLS is ON, a SELECT statement that uses WHERE column_name = NULL returns zero rows even if there are null values in column_name.
 
Example

HostForLIFEASP.NET SQL Server 2019 Hosting


European SQL Server 2019 Hosting :: SQL Server Primary Keys

clock October 14, 2022 08:51 by author Peter

Introduction
Hope you're familiar with the concepts of what's a primary key in a relational database management system like SQL Server. But, you need more details to better understand it, or you need some review or refresher for yourself, you have come to the right place.

This article will discuss a primary key, entity integrity, primary key constraint, composite keys, and the benefits of a primary key.

Let's get started.

What's A Primary Key?

A primary key is a logical concept where a column or field uniquely identifies each record inside a database table. Moreover, it has multiple attributes: it must not be null, and it must be unique.

Easy to remember, right? But if you're curious, we'll test and see what will happen when we try to pass a NULL and duplicate value in a primary column in the latter part of the article.
What's Entity Integrity?

Entity integrity is a rule for practical database construction, and this practice is widely used. It is a process of enforcing the primary key for each table in a database.

Therefore, it is implemented to uniquely identify each row inside the table by specifying a primary key inside our database table.
What's a Primary Key Constraint?

A primary key constraint is a restriction that basically ensures entity integrity.

Note: Unique constraint also ensures entity integrity.
Benefits of Primary Key and Entity Integrity

Proper usage and selection of a primary key and maintaining entity integrity prevent duplicate records and other issues that would indirectly compromise the integrity of the database.

Things to Remember About Primary Keys
    A primary key column cannot have NULL values.
    A primary key column cannot have duplicate values.
    A table can have only one primary key constraint.
    When multiple columns are used as primary keys, they are called composite keys.
    It is good to remember that a primary key is the default clustered index if a clustered index on the table does not exist.

Composite Keys
Now, you might ask why I see multiple primary keys in one table? Those are called composite keys.

Composite keys use two or more fields from a table to create a unique value.

Therefore, it guarantees uniqueness only when combined columns, but they don't guarantee uniqueness individually.

Creating A Primary Key on A Table
Let's show how we can define a column as a primary key.
CREATE TABLE EMPLOYEE(
[Id] int NOT NULL IDENTITY(1,1),
[FirstName] nvarchar(50),
[LastName] nvarchar(50),
[Age] int,
PRIMARY KEY (Id))


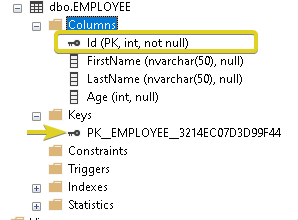
In the code sample above, we have seen that using the PRIMARY KEY then passing the column Id, we have defined the primary key of the EMPLOYEE table.

Let's try to see the result below.

Add a Primary Key on A Table
Let's recreate the table from the previous example, but we will not create the primary key.
We will create a primary key after we have created the table.
Let's try to see the code sample below.
IF EXISTS (SELECT * FROM  [INFORMATION_SCHEMA].[TABLES] WHERE [TABLE_NAME] ='EMPLOYEE')
BEGIN
    DROP TABLE EMPLOYEE;
END
GO
BEGIN
CREATE TABLE EMPLOYEE(
    [Id] int NOT NULL IDENTITY(1,1),
    [FirstName] nvarchar(50),
    [LastName] nvarchar(50),
    [Age] int);
END
GO
BEGIN
ALTER TABLE EMPLOYEE ADD PRIMARY KEY(Id);
END

Just a note, if you have removed the IDENTITY (1,1), everything will still be good and have no errors because it's an auto-incrementing column.

Although these two are used together, there's no requirement when defining a primary key column that it needs to be an identity column.

Let's try to see an example below.
IF EXISTS (SELECT * FROM  [INFORMATION_SCHEMA].[TABLES] WHERE [TABLE_NAME] ='EMPLOYEE')
BEGIN
    DROP TABLE EMPLOYEE;
END
GO
BEGIN
CREATE TABLE EMPLOYEE(
    [Id] int NOT NULL,
    [FirstName] nvarchar(50),
    [LastName] nvarchar(50),
    [Age] int);
END
GO
BEGIN
ALTER TABLE EMPLOYEE ADD PRIMARY KEY(Id);
END

Again, another note, if we have forgotten the NOT NULL that makes the Id column nullable, it will give you an error.

You'll probably see an error like this
    "Cannot define a PRIMARY KEY constraint on nullable column in table 'EMPLOYEE.'"

Let's try to see an example below.
IF EXISTS (SELECT * FROM  [INFORMATION_SCHEMA].[TABLES] WHERE [TABLE_NAME] ='EMPLOYEE')
BEGIN
    DROP TABLE EMPLOYEE;
END
GO
BEGIN
CREATE TABLE EMPLOYEE(
    [Id] int, -- NOT NULL REMOVED FOR YOU TO SEE THE ERROR MESSAGE
    [FirstName] nvarchar(50),
    [LastName] nvarchar(50),
    [Age] int);
END
GO
BEGIN
ALTER TABLE EMPLOYEE ADD PRIMARY KEY(Id);
END


Let's try to see the result below.


Delete Primary Key on A Table
In this section, let's try to recreate the table again, but after creating the table, let's make a primary key with the name of [PK_ON_EMPLOYEE_TABLE].
The reason for giving the primary key a custom name is so we won't have a hard time knowing its name when we need to drop the primary key.

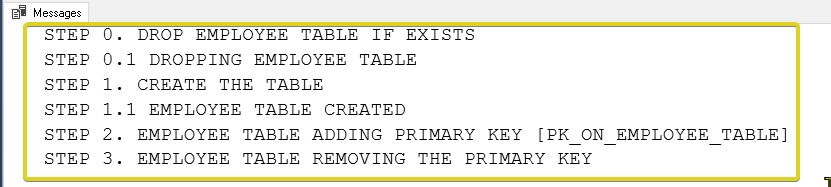
Let's try to see the example below.

PRINT 'STEP 0. DROP EMPLOYEE TABLE IF EXISTS'

IF EXISTS (SELECT * FROM  [INFORMATION_SCHEMA].[TABLES] WHERE [TABLE_NAME] ='EMPLOYEE')
BEGIN
    PRINT 'STEP 0.1 DROPPING EMPLOYEE TABLE'
    DROP TABLE EMPLOYEE;
END
GO

PRINT 'STEP 1. CREATE THE TABLE'

BEGIN
CREATE TABLE EMPLOYEE(
    [Id] int NOT NULL IDENTITY(1,1),
    [FirstName] nvarchar(50),
    [LastName] nvarchar(50),
    [Age] int);
PRINT 'STEP 1.1 EMPLOYEE TABLE CREATED'
END
GO

BEGIN
PRINT 'STEP 2. EMPLOYEE TABLE ADDING PRIMARY KEY [PK_ON_EMPLOYEE_TABLE]'
ALTER TABLE EMPLOYEE ADD CONSTRAINT [PK_ON_EMPLOYEE_TABLE] PRIMARY KEY(Id);
END
GO

BEGIN
PRINT 'STEP 3. EMPLOYEE TABLE REMOVING THE PRIMARY KEY'
ALTER TABLE EMPLOYEE
DROP CONSTRAINT [PK_ON_EMPLOYEE_TABLE];
END

Inserting NULL values into Primary Key Column
This obviously will show an error because we're violating the primary key constraint.
Still, we'll see how the SQL Server will react when inserting NULL values out of curiosity.

Let's try to see an example below.
IF EXISTS (SELECT * FROM  [INFORMATION_SCHEMA].[TABLES] WHERE [TABLE_NAME] ='EMPLOYEE')
BEGIN
    DROP TABLE EMPLOYEE;
END
GO
BEGIN

CREATE TABLE EMPLOYEE(
    [Id] int NOT NULL,
    [FirstName] nvarchar(50),
    [LastName] nvarchar(50),
    [Age] int);
END
GO

BEGIN
ALTER TABLE EMPLOYEE ADD PRIMARY KEY(Id) ;
END
GO

BEGIN
--LET'S INSERT NULL value and expect an error
INSERT INTO [dbo].[EMPLOYEE] ([Id],[FirstName],[LastName],[Age])
VALUES
(NULL, 'Jin', 'Necesario', 100)
END
GO


Let's try to see the result below.

Inserting Duplicate Values into Primary Key Column
Again, this will obviously show an error because we're violating the primary key constraint. Still, we'll see how the SQL Server will react when inserting duplicate values out of curiosity.

Let's try to see an example below.
IF EXISTS (SELECT * FROM  [INFORMATION_SCHEMA].[TABLES] WHERE [TABLE_NAME] ='EMPLOYEE')
BEGIN
    DROP TABLE EMPLOYEE;
END
GO
BEGIN

CREATE TABLE EMPLOYEE(
    [Id] int NOT NULL,
    [FirstName] nvarchar(50),
    [LastName] nvarchar(50),
    [Age] int);
END
GO

BEGIN
ALTER TABLE EMPLOYEE ADD PRIMARY KEY(Id) ;
END
GO

BEGIN
--LET'S INSERT SAME Id value of 1 and expect an error
INSERT INTO [dbo].[EMPLOYEE] ([Id],[FirstName],[LastName],[Age])
VALUES
(1, 'Jin', 'Necesario', 100),
(2, 'Vincent','Necesario', 100),
(1, 'Jin Vincent','Necesario', 100)
END
GO


Let's try to see the result below.

HostForLIFEASP.NET SQL Server 2019 Hosting


European SQL Server 2019 Hosting :: Easily Improve Your .NET Code Quality With NDepend

clock October 4, 2022 08:31 by author Peter

NDepend is a static code analyzing tool which will help us to improve the source code quality by reducing the issues in our code. Patrick Smacchia introduced NDepend in 2007. This tool will likely find hundreds or even thousands of issues affecting our code base. Stopping all work to try and fix all issues for weeks would be quite unproductive. This is the only tool that proposes to focus on progress from a baseline. The tool estimates the technical debt evolution since the baseline.

Recent code smells that should be fixed before committing any code to source control are highlighted in the code just edited. NDepend is the only .NET tool that can tell the developer that over the past hour, the code just written has introduced debt that would cost for example about 30 minutes should it have to be repaid later. Knowing this, the developer can fix the code before even committing it to the source control.

In this post, we can see all the steps to download and install NDepend in our Windows machine and analyze our source code.  

Please refer to NDepend official site for more information.  

This tool can be useful for developers, architects, and DevOps people. This is integrated with all Visual Studio versions from 2010 to 2022. All features are available side-by-side with Visual Studio Code and Rider thanks to the standalone app VisualNDepend.exe

We can use this tool to analyze .NET 6.0, .NET 5.0, (and soon .NET 7), .NET Core and other versions, .NET Fx 4.x, ASP.NET Core, Blazor, Xamarin, Unity and UWP applications.
Download and Install NDepend on Windows machine.

NDepend is giving a 14-day fully functional trial version. We can use this trial version to explore all the features and once we are satisfied, we can buy the professional version.

We can extract the Zip file in any folder except '%ProgramFiles%\NDepend'. This might provoke problems because of Windows protection.

The Zip file includes four main executable files. 
NDepend.Console.exe is a console application which is used for registering and unregistering the license of NDepend.  It can also be used from your CI/CD to generate HTML+js reports about the health of your code base (see some sample reports here)


NDepend.PowerTools.exe is another console application which will help us to perform various operations via command line. Notice that power-tools are Open-Source and relies on the NDepend.API.

Currently, this tool has 18 various usages. We can choose any of these choices and hit enter key to continue.

I have chosen ‘r’.  This power tool analyzed the .NET 5.0 and 6.0 public APIs.  

NDepend.VisualStudioExtension.Installer.exe is an installer file. This file will install the NDepend extension in our Visual Studio version.

I am using Visual Studio 2022 on my machine. We can choose our respective versions.

You must agree to the license terms. It may take some time to complete the entire extension installation.
After successful installation, we can open Visual Studio. 

We can see the new extension under the Extensions menu. We can choose the New Project option from the menu.

We can give a valid Project Name. We are going to analyze one .NET 6.0 project. I have already written one project for JWT Authentication. We can use this project to analyze with NDepend.

We can click Add VS Solution or Project button and add our existing .NET 6.0 project. 

We can choose our existing project by clicking on the Browse button. We can also select multiple projects by clicking on the Check All button. It will select all the compatible projects that exist in our system. 


We can click the play button on the left top corner to start the analysis.  
After analysis (it just takes a few seconds), we can see new menus in the NDepend toolbar. 

We can click Dashboard option. 


We can see the elaborated analysis in the dashboard page. Total 355 lines in our project. Among the 355 lines, 24 lines are comments. We got an exceptionally good A rating. Still there are 5 rules violation and 15 issues in the code. 

We can click on 5 violated rules and see the details below.

Same way, we can click on the single issue with priority High and see more details of the issue.
Dependency Graph is another option in the tool. We can choose this option from the menu. See a 6 minutes intro video about the graph on youtube here.

Dependency Matrix is another good option in this tool. See a 5 minutes intro video about the matrix on youtube here.


Code Metrics View is also one of the good features in this tool. See a 4 minutes intro video about this metric view on youtube here.


VisualNDepend.exe is a standalone tool which can be used to analyze the .NET projects without Visual Studio.


We can create a new project or open an existing NDepend project and analyze using this Visual tool.

All the features like Dashboard, Dependency Graph, Dependency Matrix, and Code Matrics View are available in this tool as well.

Once we have bought the professional license, we can update the license using  NDepend Console tool.  

Conclusion

In this post, we have seen the introduction of NDepend tool which is a static code analysis tool that can be used for improving the code quality of our .NET or .NET Core source code. We have installed the NDepend extension in Visual Studio 2022 and analyzed one existing .NET 6.0 project using this tool. We have seen various features like Dashboard, Dependency Graph, Dependency Matrix, and Code Matrics View in this tool. I have just given an introduction about NDepend tool in this post. We can see more information about this tool in an upcoming post later. Please feel free to give your valuable feedback about this article.

HostForLIFEASP.NET SQL Server 2019 Hosting


About HostForLIFE

HostForLIFE is European Windows Hosting Provider which focuses on Windows Platform only. We deliver on-demand hosting solutions including Shared hosting, Reseller Hosting, Cloud Hosting, Dedicated Servers, and IT as a Service for companies of all sizes.

We have offered the latest Windows 2019 Hosting, ASP.NET 5 Hosting, ASP.NET MVC 6 Hosting and SQL 2019 Hosting.


Month List

Tag cloud

Sign in