European Windows 2019 Hosting BLOG

BLOG about Windows 2019 Hosting and SQL 2019 Hosting - Dedicated to European Windows Hosting Customer

SQL Server 2021 Hosting - HostForLIFE :: Another Way To Implement The Incremental Load

clock April 22, 2022 08:06 by author Peter

In this article I'll discuss one of the functionalities of SQL SERVER: CDC (Change Data Capture). This feature has been present since the 2008 version. This presentation will be about the 2012 version.

What is the CDC?
The CDC Control task is used to control the life cycle of change data capture (CDC) packages. It handles CDC package synchronization with the initial load package, the management of Log Sequence Number (LSN) ranges that are processed in a run of a CDC package. In addition, the CDC Control task deals with error scenarios and recovery. [Microsoft Documentation]

The objective of the CDC is to optimize the integration of data (of the ETL process) by directly requesting the modifications made to a table instead of working on the entire table and thereby increasing processing times. Among other things, it allows basic auditing and synchronization between two databases.

Change data capture is a concept that is not specific to SQL Server (it's present in other DBMS such as Postgres, Oracle…), and which consists of tracking and recovering changes to data in a table.

The CDC was implemented at the SQL Server 2008 level, but only at the database engine level, and the concept of the Log Sequence Number (LSN) was used, which makes the implementation of the CDC under SSIS more complex.

The log sequence number (LSN) value is a three-part, uniquely incrementing value. It is used for maintaining the sequence of the transaction log records in the database. This allows SQL Server to maintain the ACID properties and to perform appropriate recovery actions.

Starting from SQL Server 2012, Microsoft goes further in its approach and introduced 3 main components to use the CDC directly in SSIS:

A CDC Control Task: managing the life cycle of CDC packages, and in particular all the mechanics of LSNs.

A Source CDC:  reads the information from a data capture exchange table

A CDC Splitter: redirects the rows according to whether they need to be inserted, updated, or deleted.

Setup Change Data Capture on the source database
On this table, I activate the CDC. Here it is the same as under SQL Server 2008, we find the same commands.

EXEC sp_changedbowner 'sa'

/* Activate the CDC */
EXEC sp_cdc_enable_db

/* Verify if the CDC is activated */
SELECT name, is_cdc_enabled
FROM sys.databases
WHERE name LIKE 'LearningDatabase'

/* Parametrize the CDC for the table STG.Employee  */
EXEC sys.sp_cdc_enable_table
@source_schema = N'SRC'
, @source_name = N'Employee'
, @role_name = NULL
, @supports_net_changes = 1


It is important to note that, there is no necessity for tables in the source database to include a column that indicates the date and time of the last modification. This means that no structural changes are needed in order to enable CDC for extraction.

Make sure that SQL Server Agent is running as a SQL Server Agent Job is used to capture CDC data.
Change Data Capture Control Flow Task in SSIS

Starting from SSIS 2012, the CDC Control Task was introduced as the new control flow task to implement the change data capture working with the CDC enabled databases and tables.

This new feature works on controlling the life cycle of change set for both CDC marked database and table :
    it enables the SSIS package to use CDC change set
    it applies the transfer of data as required, and finally
    it marks the change set as accomplished, or in case of an error it retains the change set for further analysis.

 The CDC Control Task holds the state of CDC into a package variable (defined when configuring the component), used later in CDC Data Flow components.

1. Starting the CDC for a table
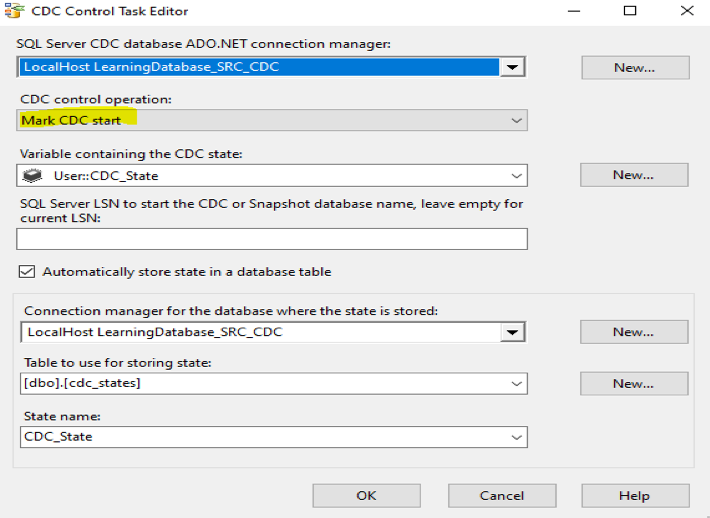
Let’s start by configuring the CDC Control Task where we need to Mark CDC for Start.
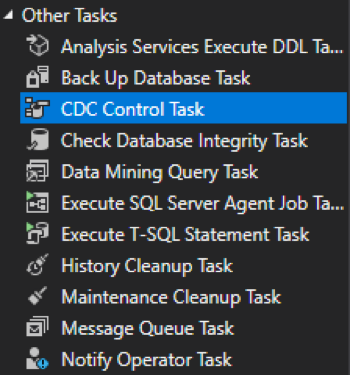
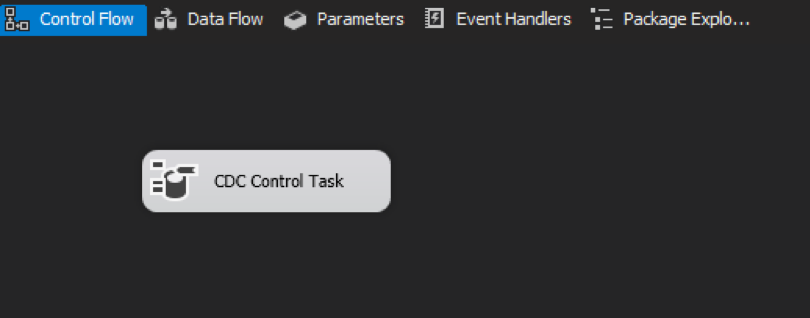
Drag and drop a CDC Control Task into the package.

And follow the configuration like below:


  1. Set a connection manager (ADO.NET Connection Manager) to the source database.
  2. Set CDC Control Operation as: Mark CDC Start
  3. Set a variable of type string for CDC State.
  4. Set the connection for the database contains state data.
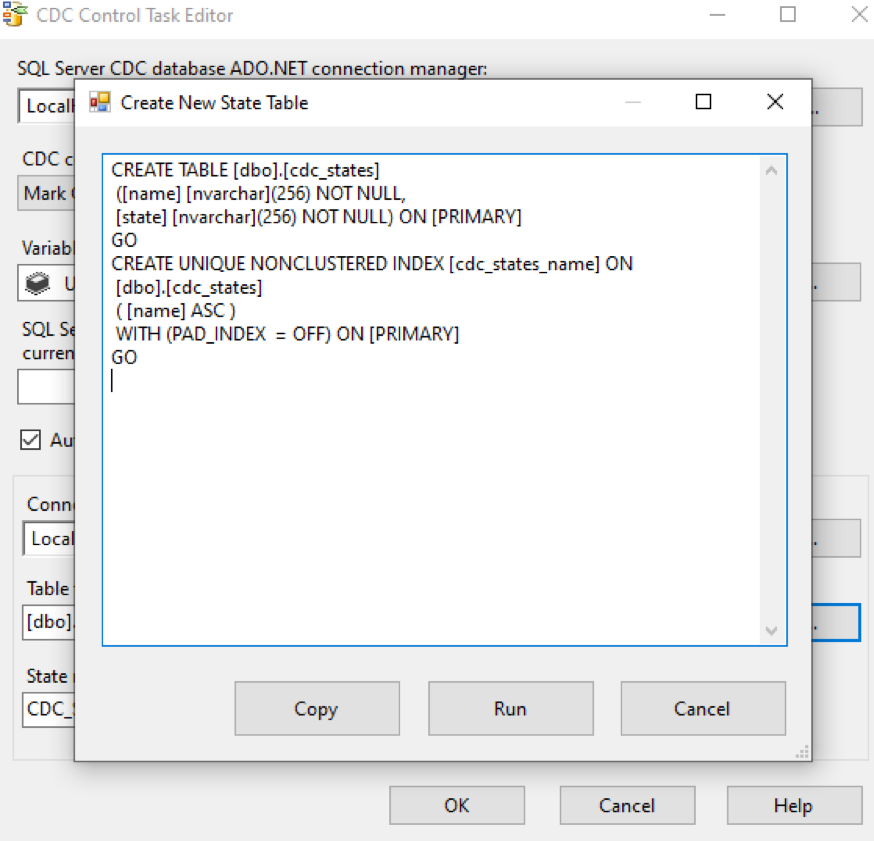
  5. Set the table for storing CDC state. You can create a new table here if you don’t have any table for it already : 

CREATE TABLE [dbo].[cdc_states]
([name] [nvarchar](256) NOT NULL,
 [state] [nvarchar](256) NOT NULL) ON [PRIMARY]
GO
CREATE UNIQUE NONCLUSTERED INDEX [cdc_states_name] ON
 [dbo].[cdc_states]
 ( [name] ASC )
 WITH (PAD_INDEX  = OFF) ON [PRIMARY]
GO

Verify or Set the State Name values.

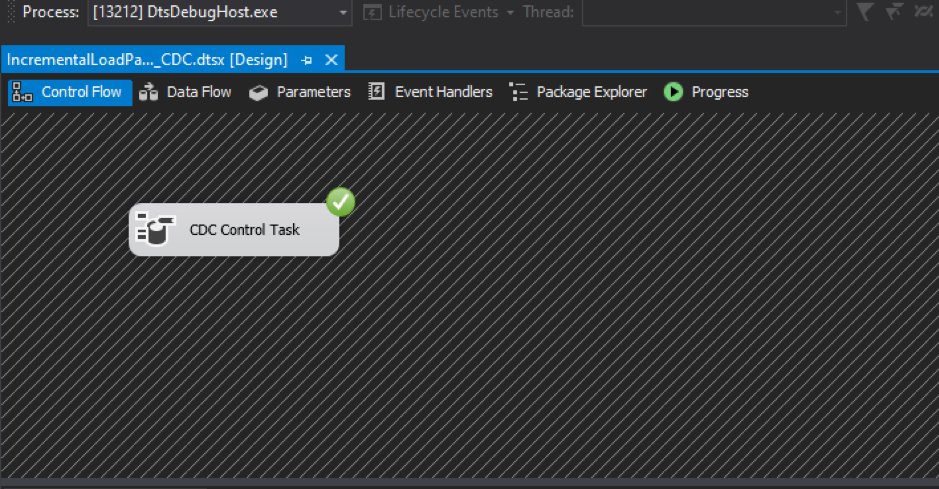
We can now run the package. But what happens if the task is run successfully?
Actually since we didn’t set any actions for the change set, no data will be transferred.

The aim of this task is to set the CDC state in cdc_state table. Note that this task with the above configuration needs to be run one and only once.

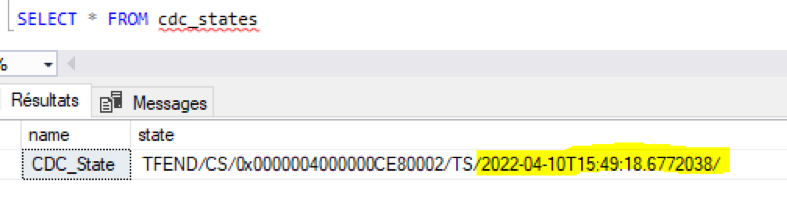
If we query the cdc_states table, we can see that the state has a timestamp portion showing the data and time of the state storage.
By definition, this state represents the state of table stored so the SSIS can recognize the very first state of the Change Data Capture, and get the range of changes afterwards.

We will disable the task, as we don’t want to run it again.

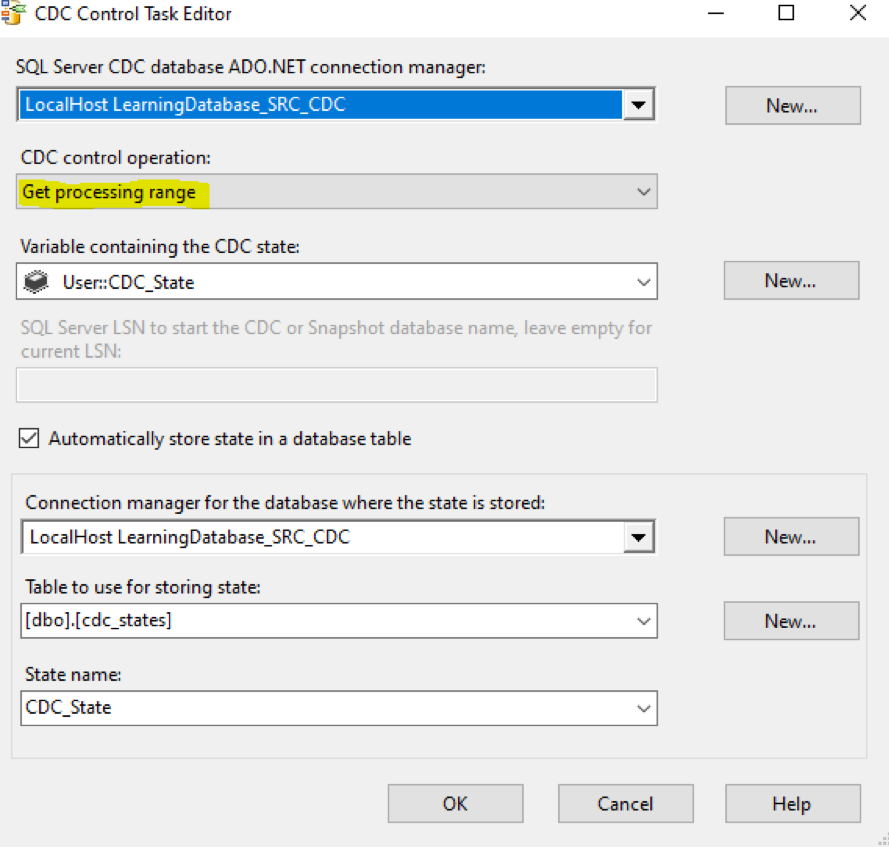
2. Working with the Range of changes with CDC Control Task

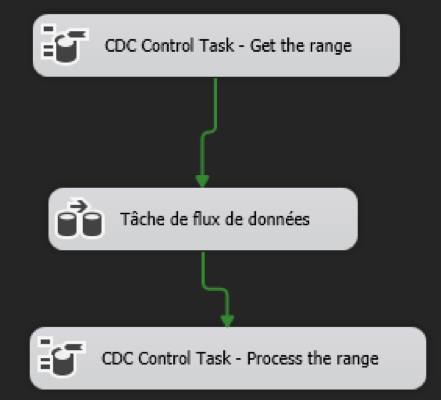
The next step is creating two CDC control tasks: one for getting the range and the other for marking it. To better explain it, we need to retrieve the range of data that has updates and then mark it as processed.

    We need to create a new CDC Control Task and configure it exactly as we did for the CDC Control Task – Start, with changing the CDC control operation as “Get Processing Range”.

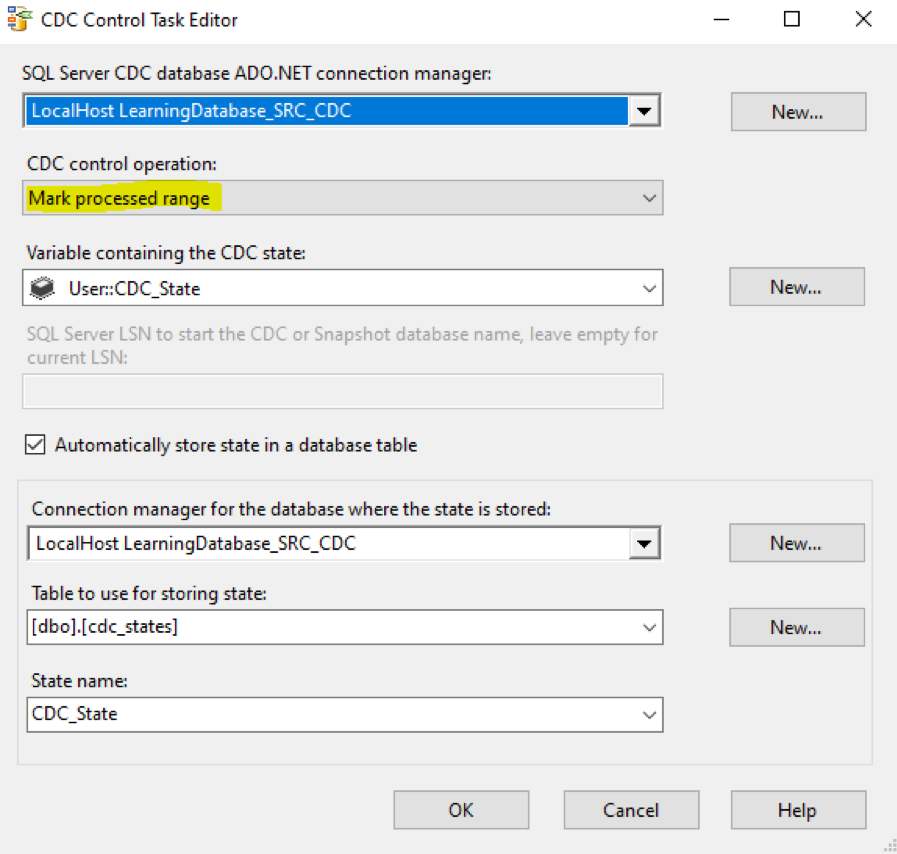
We need to create another CDC Control task same as previous one and set the CDC control operation as Mark Processed.

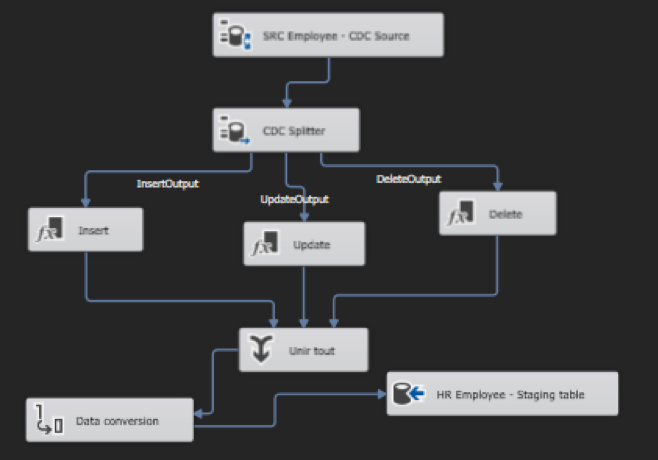
We need to place a Data Flow Task between these two tasks. We will leave the data flow empty as we should fill it in the next stage. The aim of using the Data Flow is to read the change set and execute the appropriate action based on the ETL load actions (delete, insert, or update)


3. Reading the Changed Set with CDC Source and CDC Splitter

In the data flow task we have to read the changed set with the help of CDC change set table, CDC data flow components (CDC Source, and CDC Splitter), and CDC state (stored by CDC Control Tasks). CDC Source is a component that read the change set and provide it as the main output so it can be used for CDC splitter. CDC Splitter split the change set into three data set: Inserted, Deleted, and Updated outputs. For this example, I’ve used a stage table as the destination of this step to be able to write result sets into it. my state table is exactly same as the source table plus single column for Status. I’ll fill the status column in Derived Column depends on the change happened on the data row.

Moving to the data flow task, we need to read the changed set using :

    the CDC change set table
    the CDC data flow components (CDC Source, and CDC Splitter)
    the CDC state (stored by CDC Control Tasks)

The CDC Source reads the change set and supply it as the input which will be used by the CDC Splitter

The CDC Splitter splits the change set into 3 branchs: Inserted - Updated - Deleted

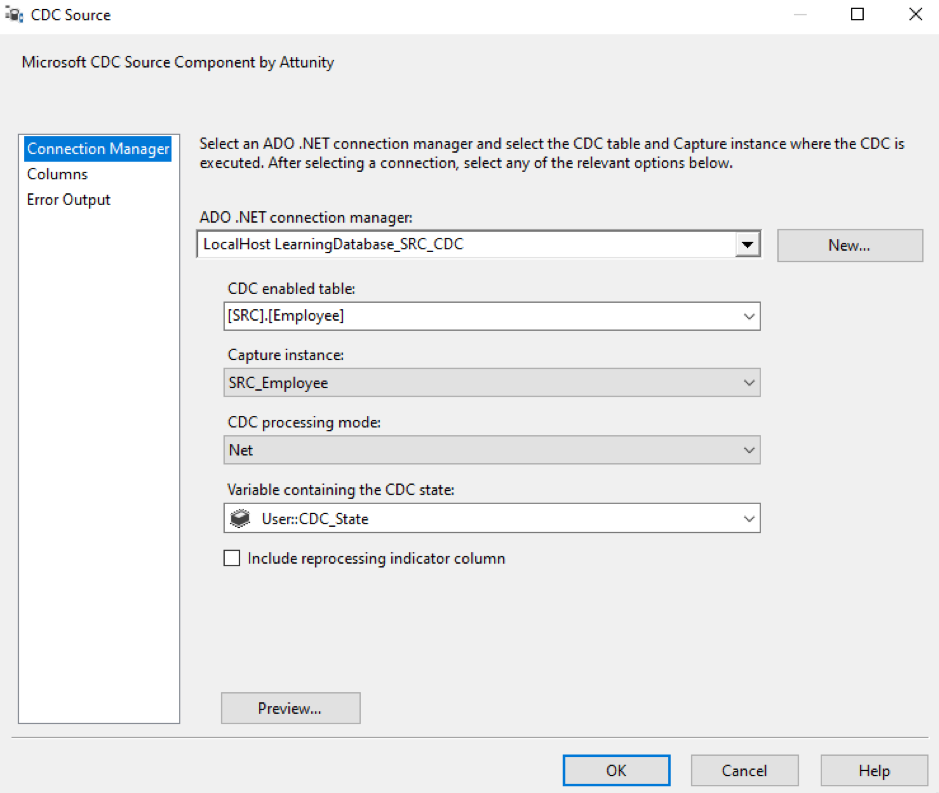
    Create a CDC Source component in the data flow.
    Set ADO.NET connection manager to the source database which has CDC enabled.
    Set CDC enabled table name
    Verify the CDC processing mode to be Net :  the CDC processing mode is set to Net in order to capture the net changes rather than capturing all records
    Set CDC state variable the same variable that we’ve used in CDC Control Tasks.

After that, we created a CDC Splitter component after the CDC Source. (it doesn’t require any configuration, we need just to connect the CDC source to it)

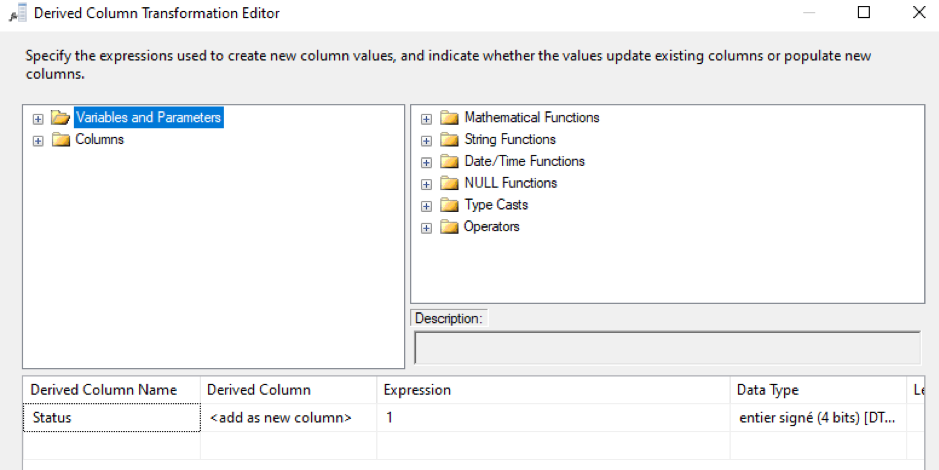
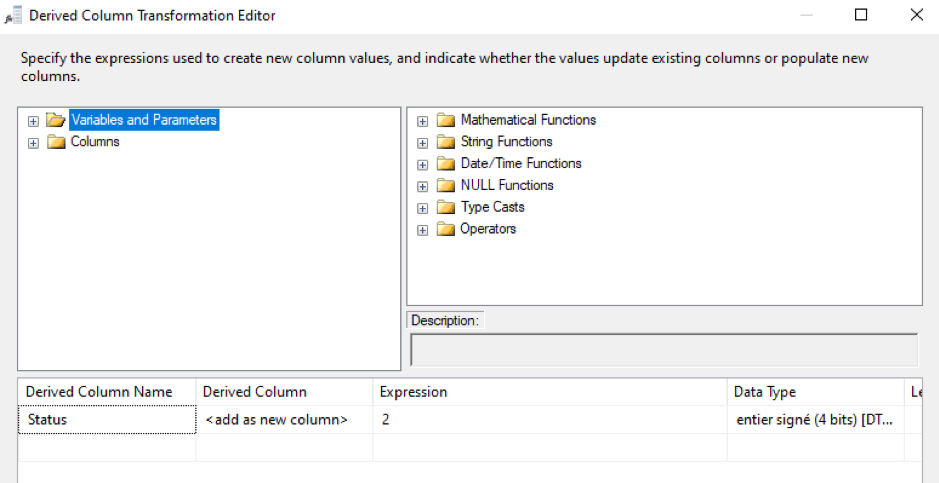
We need to create a Derived Column transformation and connect InsertOutput/ UpdateOutput/ DeleteOutput of the CDC Splitter to it.

In each one of it, we need to create a Status Column in Derived Column and set its value as :

    0 for InsertOutput
    1 for UpdateOutput
    2 for DeleteOutput


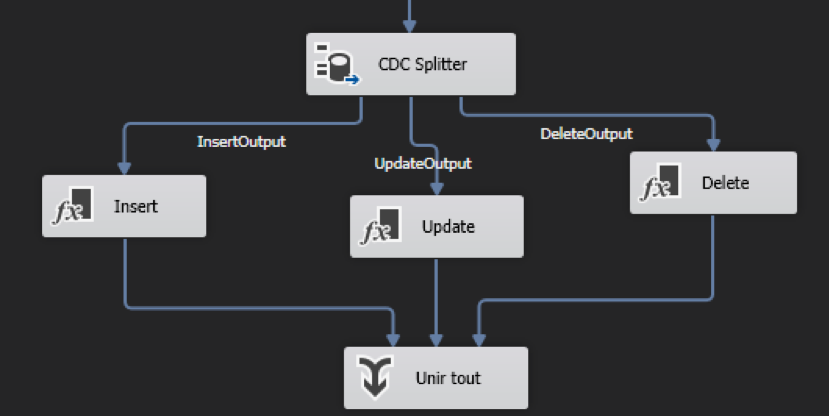
Then we use a Union All transformation to integrate all three data outputs together, so we can load them into the staging table using an OLE DB Destination. Please note that we may encounter Data conversion issues between the source and the destination, in this case we may use a Data Conversion component.


HostForLIFEASP.NET SQL Server 2021 Hosting


SQL Server 2021 Hosting - HostForLIFE :: Examples Of DATE/DATETIME Conversion

clock April 12, 2022 09:50 by author Peter

I've noticed a bit of confusion when it comes to date conversion in T-SQL; recurring questions on how to strip the TIME part from a DATETIME variable, or how to convert between locales. Here we will see a fast method to split a DATETIME from its sub-parts DATE and TIME and how to reset the TIME part in a DATETIME.
 
We'll also see a method to quickly retrieve a list of all the possible conversion formats, applied to a certain date.
Let's consider the following script:

    DECLARE @myDateTime DATETIME  
    SET @myDateTime = '2015-05-15T18:30:00.340'  
      
    SELECT @myDateTime   
      
    SELECT CAST(@myDateTime AS DATE)  
    SELECT CAST(@myDateTime AS TIME)  
    SELECT CAST(CAST(@myDateTime AS DATE) AS DATETIME)   


I've created a DATETIME variable, named @myDateTime, and assigned to it the value "2015-05-15T18:30:00.340".

With the first SELECT, we simply print out that value.
 
But look at the three SELECTs that follow the first. We'll use the CAST function to convert between data types, asking, in the first case, to output our DATETIME as a DATE and in the second one, add a TIME type variable.
 
That will have the effect of suppressing the part of the DATETIME that we haven't asked for. Casting toward DATE will produce a variable from which the TIME part will be stripped, whereas converting towards TIME, we are asking to take away the DATE part from the DATETIME.


In the preceding example, we can see the result of those queries. Applying the logic seen a few lines ago, when we need to mantain a DATETIME, resetting (or setting to zero) its TIME part, we could use a double casting, as you can see in the fourth SELECT. First, we cast our DATETIME to a DATE (the internal cast of the two). That will produce a DATE-only variable. Then, with the second cast, we restore the type of the variable to its original one. But since the TIME part is now gone, the result will be in DATETIME format, with a zero TIME part.

Convert a Date in all possible formats
Sometimes we need to format a date depending on the specific locale, without remembering its conversion code. The following script will help us print all the conversion styles we can impose to a given date. It loops from a range of 0 - 255 (with many of those values not used for conversion that will be skipped thanks to the TRY/CATCH block), indicating which of those values return a valid conversion.

    DECLARE @myDateTime DATETIME    
    SET @myDateTime = '2015-05-15T18:30:00.340'   
      
    DECLARE @index INT  
    SET @index = 0  
    WHILE @index < 255  
    BEGIN  
      
       BEGIN try  
          DECLARE @cDate VARCHAR(25)  
          SET @cDate = CONVERT(NVARCHAR, GETDATE(), @index)  
          PRINT CAST(@index AS VARCHAR) + '   ' + @cDate  
       END try  
       BEGIN catch   
       END catch  
       SET @index = @index + 1  
    END 

We can insert an arbitrary value into the @myDateTime variable and run the script. We'll then obtain output like the following: 

Executing the code, we will print each CONVERT style, with its representation of our date. A quick reference to spot what we need in a specific context. I hope this helps!

HostForLIFEASP.NET SQL Server 2021 Hosting


SQL Server 2021 Hosting - HostForLIFE :: Using OPENJSON Function In SQL Server

clock April 5, 2022 08:37 by author Peter

In this article, let’s learn how to convert SQL Server data to JSON format. JSON format has become a standard way to represent data objects into strings. JSON format is commonly used in APIs to transfer data from one application to other via APIs.

You can convert a SQL query results in JSON format in SQL Server by simply adding FOR JASON clause to the query. FOR JASON is used with PATH and AUTO
SELECT name, surname
FROM emp
FOR JSON AUTO;


Here is a simple SQL query on Northwind database that returns 10 orders from the Orders table.
SELECT TOP (10) [OrderID]
      ,[OrderDate]
      ,[ShipName]
      ,[ShipAddress]
      ,[ShipCity]
      ,[ShipPostalCode]
      ,[ShipCountry]
  FROM [Northwind].[dbo].[Orders]


The output in SSMS looks like this.

Now, let’s add FOR JASON PATH clause at the end of the SQL query.

SELECT TOP (10) [OrderID]
      ,[OrderDate]
      ,[ShipName]
      ,[ShipAddress]
      ,[ShipCity]
      ,[ShipPostalCode]
      ,[ShipCountry]
  FROM [Northwind].[dbo].[Orders]
  FOR JSON PATH;

The new output looks like this -- that is a JSON object.

[{"OrderID":10248,"OrderDate":"1996-07-04T00:00:00","ShipName":"Vins et alcools Chevalier","ShipAddress":"59 rue de l'Abbaye","ShipCity":"Reims","ShipPostalCode":"51100","ShipCountry":"France"},{"OrderID":10249,"OrderDate":"1996-07-05T00:00:00","ShipName":"Toms Spezialitäten","ShipAddress":"Luisenstr. 48","ShipCity":"Münster","ShipPostalCode":"44087","ShipCountry":"Germany"},{"OrderID":10250,"OrderDate":"1996-07-08T00:00:00","ShipName":"Hanari Carnes","ShipAddress":"Rua do Paço, 67","ShipCity":"Rio de Janeiro","ShipPostalCode":"05454-876","ShipCountry":"Brazil"},{"OrderID":10251,"OrderDate":"1996-07-08T00:00:00","ShipName":"Victuailles en stock","ShipAddress":"2, rue du Commerce","ShipCity":"Lyon","ShipPostalCode":"69004","ShipCountry":"France"},{"OrderID":10252,"OrderDate":"1996-07-09T00:00:00","ShipName":"Suprêmes délices","ShipAddress":"Boulevard Tirou, 255","ShipCity":"Charleroi","ShipPostalCode":"B-6000","ShipCountry":"Belgium"},{"OrderID":10253,"OrderDate":"1996-07-10T00:00:00","ShipName":"Hanari Carnes","ShipAddress":"Rua do Paço, 67","ShipCity":"Rio de Janeiro","ShipPostalCode":"05454-876","ShipCountry":"Brazil"},{"OrderID":10254,"OrderDate":"1996-07-11T00:00:00","ShipName":"Chop-suey Chinese","ShipAddress":"Hauptstr. 31","ShipCity":"Bern","ShipPostalCode":"3012","ShipCountry":"Switzerland"},{"OrderID":10255,"OrderDate":"1996-07-12T00:00:00","ShipName":"Richter Supermarkt","ShipAddress":"Starenweg 5","ShipCity":"Genève","ShipPostalCode":"1204","ShipCountry":"Switzerland"},{"OrderID":10256,"OrderDate":"1996-07-15T00:00:00","ShipName":"Wellington Importadora","ShipAddress":"Rua do Mercado, 12","ShipCity":"Resende","ShipPostalCode":"08737-363","ShipCountry":"Brazil"},{"OrderID":10257,"OrderDate":"1996-07-16T00:00:00","ShipName":"HILARION-Abastos","ShipAddress":"Carrera 22 con Ave. Carlos Soublette #8-35","ShipCity":"San Cristóbal","ShipPostalCode":"5022","ShipCountry":"Venezuela"}]

Now, you can use this same return value from SQL query in your application to read JSON objects in your code.

Using the same method, you can convert a SQL Server Table to JSON by using a SELECT * or SELECT column names query on the entire table. The following SQL query converts all rows of a SQL Server table to a JSON string.

SELECT [OrderID]
      ,[OrderDate]
      ,[ShipName]
      ,[ShipAddress]
      ,[ShipCity]
      ,[ShipPostalCode]
      ,[ShipCountry]
  FROM [Northwind].[dbo].[Orders]
  FOR JSON PATH;


Here is a detailed article on JSON in SQL Server with various options.

HostForLIFEASP.NET SQL Server 2021 Hosting


SQL Server Hosting - HostForLIFE :: Table As Input Parameters For Stored Procedure

clock April 4, 2022 09:13 by author Peter

This article was initially written in 2021, we try to make it done now.  The content is mainly based on the MS article Table-Valued Parameters with some understanding and explanation, and with some examples to demo the results.

Introduction

Table-valued parameters were introduced to SQL Server in 2008. Table-valued parameters provide an easy way to marshal multiple rows of data from a client application to SQL Server without requiring multiple round trips or special server-side logic for processing the data.

This is the structure of this article,
    Introduction
    A - Passing Multiple Rows in Previous Versions of SQL Server
    B - What Table-Parameters is
    C - Passing a user-defined table type to a Stored Procedure in SQL Server
    D - Passing a user-defined table type to a Stored Procedure from C# Code

A - Passing Multiple Rows in Previous Versions of SQL Server
Before table-valued parameters were introduced to SQL Server 2008, the options for passing multiple rows of data to a stored procedure or a parameterized SQL command were limited. A developer could choose from the following options for passing multiple rows to the server:

    Use a series of individual parameters to represent the values in multiple columns and rows of data.
    Bundle multiple data values into delimited strings or XML documents and then pass those text values to a procedure or statement.
    Create a series of individual SQL statements for data modifications that affect multiple rows, such as those created by calling the Update method of a SqlDataAdapter.
    Use the bcp utility program or the SqlBulkCopy object to load many rows of data into a table.

The disadvantages of all methods above at least include one that the server side processing is necessary for them.

B - What Table-Parameters is

Table-valued parameters provide an easy way to marshal multiple rows of data from a client application to SQL Server without requiring multiple round trips or special server-side logic for processing the data. You can use table-valued parameters to encapsulate rows of data in a client application and send the data to the server in a single parameterized command. The incoming data rows are stored in a table variable that can then be operated on by using Transact-SQL.

Column values in table-valued parameters can be accessed using standard Transact-SQL SELECT statements. Table-valued parameters are strongly typed and their structure is automatically validated. The size of table-valued parameters is limited only by server memory.

There are several limitations to table-valued parameters:

  • You cannot pass table-valued parameters to CLR user-defined functions.
  • Table-valued parameters can only be indexed to support UNIQUE or PRIMARY KEY constraints. SQL Server does not maintain statistics on table-valued parameters.
  • Table-valued parameters are read-only in Transact-SQL code. 
  • You cannot use ALTER TABLE statements to modify the design of table-valued parameters.

C - Passing a user-defined table type to a Stored Procedure in SQL Server
1. Creating Table-Valued Parameter Types

Table-valued parameters are based on strongly typed table structures that are defined by using Transact-SQL CREATE TYPE statements. You have to create a table type and define the structure in SQL Server before you can use table-valued parameters in your client applications. We use database Northwind.
Use Northwind

CREATE TYPE dbo.CategoryTableType AS TABLE
    ( CategoryID int, CategoryName nvarchar(50) )

In the Microsoft SQL Server Management Studio, we can see the created type:
Database->Programmability->Types->User Define Table Types:


2. Creating Stored Procedures in SQL Server using the Table-valued Parameters Type
Table-valued parameters can be used in set-based data modifications that affect multiple rows by executing a single statement.

Update
CREATE PROCEDURE usp_UpdateCategories
    (@tvpEditedCategories dbo.CategoryTableType READONLY)
AS
BEGIN
    SET NOCOUNT ON
    UPDATE dbo.Categories
    SET Categories.CategoryName = ec.CategoryName
    FROM dbo.Categories INNER JOIN @tvpEditedCategories AS ec
    ON dbo.Categories.CategoryID = ec.CategoryID;
END


Note: that the READONLY keyword is required for declaring a table-valued parameter.

3. Run the Stored Procedure with Table-Valued Parameters (Transact-SQL)
Table-valued parameters can be used in set-based data modifications that affect multiple rows by executing a single statement.

Table Categories --- Before:

Run the Stored Procedure with Table-Valued Parameters:

DECLARE @tvpUpdateCategories AS dbo.CategoryTableType
INSERT INTO @tvpUpdateCategories([CategoryID], [CategoryName]) VALUES(8,'SeaFood1')
EXEC  dbo.usp_UpdateCategories @tvpUpdateCategories

Table Categories --- After

D - Passing a Table-Valued Parameter to a Stored Procedure from C# Code
We will skip this part, you may see the detailed implementation from the bottom on Table-Valued Parameters.

Note [ref]:
Normally we provide DbType of SqlParameter for a normal parameter like varchar, nvarchar, int, and so on as in the following code.
SqlParameter sqlParam= new SqlParameter();
sqlParam.ParameterName = "@StudentName";
sqlParam.DbType = DbType.String;
sqlParam.Value = StudentName;


But in the case of a Table parameter, we do not need to provide a DbType as the parameter data type. We need to provide SqlType rather than DbType, such as
SqlParameter Parameter = new SqlParameter;
Parameter.ParameterName = "@PhoneBook";
Parameter.SqlDbType = SqlDbType.Structured;
Parameter.Value = PhoneTable;

HostForLIFEASP.NET SQL Server 2019 Hosting


About HostForLIFE

HostForLIFE is European Windows Hosting Provider which focuses on Windows Platform only. We deliver on-demand hosting solutions including Shared hosting, Reseller Hosting, Cloud Hosting, Dedicated Servers, and IT as a Service for companies of all sizes.

We have offered the latest Windows 2019 Hosting, ASP.NET 5 Hosting, ASP.NET MVC 6 Hosting and SQL 2019 Hosting.


Month List

Tag cloud

Sign in