European Windows 2019 Hosting BLOG

BLOG about Windows 2019 Hosting and SQL 2019 Hosting - Dedicated to European Windows Hosting Customer

SQL Server Hosting - HostForLIFE :: CROSS JOIN In SQL

clock July 27, 2021 08:12 by author Peter

In this blog, we will see how to use 'CROSS JOIN In SQL'. When each row of Table 1 is merged within each row of Table 2, then it's called a CROSS JOIN or Cartesian Join or in simple words, we can say that like CROSS JOIN it always returns the Cartesian product of the sets of the record from (another two or more tables) joined table.

We can write it with a comma-separated table name in order to achieve the same result or we can just write CROSS JOIN just like INNER JOIN without where clause,
SELECT TABLE1.Name, TABLE1.Age, TABLE2.ProjectName,TABLE2.DoA
FROM [EmpTable] AS TABLE1, [Projects] AS TABLE2
OR
SELECT TABLE1.Name, TABLE1.Age, TABLE2.ProjectName, TABLE2.DoA
FROM [EmpTable] AS TABLE1 CROSS JOIN [Projects] AS TABLE2


Let's consider the following two tables,
Table 1 - EmpTable


Table 2 - Projects
Now it's time to see the result. As we already know in CROSS JOIN, each row from Table 1 merged (joins/combined) with all rows of Table 2 (other tables / joined tables ) if Table 1 is having X number of rows and Table 2 having some Y number of rows then the result will be X * Y number of rows.

Now it's time to see the result. As we already know in CROSS JOIN, each row from Table 1 merged (joins/combined) with all rows of Table 2 (other tables / joined tables ) if Table 1 is having X number of rows and Table 2 having some Y number of rows then the result will be X * Y number of rows.

HostForLIFEASP.NET SQL Server 2019 Hosting


SQL Server Hosting - HostForLIFE :: SQL Server Express - Database Backup Scheduler

clock July 26, 2021 08:09 by author Peter

In this article, we will learn how to create a database backup scheduler in the SQL Express version as it has no built-in auto backup tool like SQL Server. With the help of Task Scheduler (Windows OS) and batch file, we will create a schedular to take the database backup from the SQL Express version in the specified folder.

Requirement

Batch File
Stored Procedure (Database Backup) which is not available in SQL Express version
Configuration on Windows Task Scheduler

Let's get started,

Batch File

Create a batch file as below,

Open notepad and paste the below code and change the parameters as per your configuration and save this file as a .bat extension.
sqlcmd -S .\SQLEXPRESS_Instance_Name -E -Q "EXEC sp_BackupDatabases @backupLocation='D:\Backup\', @databaseName='DatabaseName', @backupType='F'"

ActionScript

In the above statement, sp_BackupDatabases is a stored procedure name that we will create in the next step.

Stored Procedure (Database Backup)

In SQL Express we have to add the below-stored procedure in the default Master database as SQL Express does not provide built-in auto back feature.

We will create the below-stored procedure in the Master database which is a default database provided by SQL Express.

Note
The below-stored procedure is written by Microsoft.

Copied from https://raw.githubusercontent.com/microsoft/mssql-support/master/sample-scripts/backup_restore/SQL_Express_Backups.sql
USE [master]
GO
/****** Object:  StoredProcedure [dbo].[sp_BackupDatabases]    Script Date: 17/07/2021 11:35:01 ******/
SET ANSI_NULLS ON
GO
SET QUOTED_IDENTIFIER ON
GO
-- =============================================
-- Author: Microsoft
-- Create date: 2010-02-06
-- Description: Backup Databases for SQLExpress
-- Parameter1: databaseName
-- Parameter2: backupType F=full, D=differential, L=log
-- Parameter3: backup file location
-- =============================================
ALTER PROCEDURE [dbo].[sp_BackupDatabases]
        @databaseName sysname = null,
        @backupType CHAR(1),
        @backupLocation nvarchar(200)
AS
   SET NOCOUNT ON;
        DECLARE @DBs TABLE
        (
              ID int IDENTITY PRIMARY KEY,
              DBNAME nvarchar(500)
        )
         -- Pick out only databases which are online in case ALL databases are chosen to be backed up
         -- If specific database is chosen to be backed up only pick that out from @DBs
        INSERT INTO @DBs (DBNAME)
        SELECT Name FROM master.sys.databases
        where state=0
        AND name= ISNULL(@DatabaseName ,name)
        ORDER BY Name
        -- Filter out databases which do not need to backed up
        IF @backupType='F'
              BEGIN
              DELETE @DBs where DBNAME IN ('tempdb','Northwind','pubs','AdventureWorks')
              END
        ELSE IF @backupType='D'
              BEGIN
              DELETE @DBs where DBNAME IN ('tempdb','Northwind','pubs','master','AdventureWorks')
              END
        ELSE IF @backupType='L'
              BEGIN
              DELETE @DBs where DBNAME IN ('tempdb','Northwind','pubs','master','AdventureWorks')
              END
        ELSE
              BEGIN
              RETURN
              END
        -- Declare variables
        DECLARE @BackupName varchar(100)
        DECLARE @BackupFile varchar(100)
        DECLARE @DBNAME varchar(300)
        DECLARE @sqlCommand NVARCHAR(1000)
        DECLARE @dateTime NVARCHAR(20)
        DECLARE @Loop int
        -- Loop through the databases one by one
        SELECT @Loop = min(ID) FROM @DBs
  WHILE @Loop IS NOT NULL
  BEGIN
-- Database Names have to be in [dbname] format since some have - or _ in their name
  SET @DBNAME = '['+(SELECT DBNAME FROM @DBs WHERE ID = @Loop)+']'
-- Set the current date and time n yyyyhhmmss format
  SET @dateTime = REPLACE(CONVERT(VARCHAR, GETDATE(),101),'/','') + '_' +  REPLACE(CONVERT(VARCHAR, GETDATE(),108),':','')
-- Create backup filename in path\filename.extension format for full,diff and log backups
  IF @backupType = 'F'
        SET @BackupFile = @backupLocation+REPLACE(REPLACE(@DBNAME, '[',''),']','')+ '_FULL_'+ @dateTime+ '.BAK'
  ELSE IF @backupType = 'D'
        SET @BackupFile = @backupLocation+REPLACE(REPLACE(@DBNAME, '[',''),']','')+ '_DIFF_'+ @dateTime+ '.BAK'
  ELSE IF @backupType = 'L'
        SET @BackupFile = @backupLocation+REPLACE(REPLACE(@DBNAME, '[',''),']','')+ '_LOG_'+ @dateTime+ '.TRN'
-- Provide the backup a name for storing in the media
  IF @backupType = 'F'
        SET @BackupName = REPLACE(REPLACE(@DBNAME,'[',''),']','') +' full backup for '+ @dateTime
  IF @backupType = 'D'
        SET @BackupName = REPLACE(REPLACE(@DBNAME,'[',''),']','') +' differential backup for '+ @dateTime
  IF @backupType = 'L'
        SET @BackupName = REPLACE(REPLACE(@DBNAME,'[',''),']','') +' log backup for '+ @dateTime
-- Generate the dynamic SQL command to be executed
   IF @backupType = 'F'
              BEGIN
           SET @sqlCommand = 'BACKUP DATABASE ' +@DBNAME+  ' TO DISK = '''+@BackupFile+ ''' WITH INIT, NAME= ''' +@BackupName+''', NOSKIP, NOFORMAT'
              END
   IF @backupType = 'D'
              BEGIN
           SET @sqlCommand = 'BACKUP DATABASE ' +@DBNAME+  ' TO DISK = '''+@BackupFile+ ''' WITH DIFFERENTIAL, INIT, NAME= ''' +@BackupName+''', NOSKIP, NOFORMAT'
              END
   IF @backupType = 'L'
              BEGIN
           SET @sqlCommand = 'BACKUP LOG ' +@DBNAME+  ' TO DISK = '''+@BackupFile+ ''' WITH INIT, NAME= ''' +@BackupName+''', NOSKIP, NOFORMAT'
              END
-- Execute the generated SQL command
   EXEC(@sqlCommand)
-- Goto the next database
SELECT @Loop = min(ID) FROM @DBs where ID>@Loop
END


Windows Task Scheduler Configuration

Now we will create a windows scheduler to run the batch file to run the above-stored procedure to create an automated backup which is a final step.

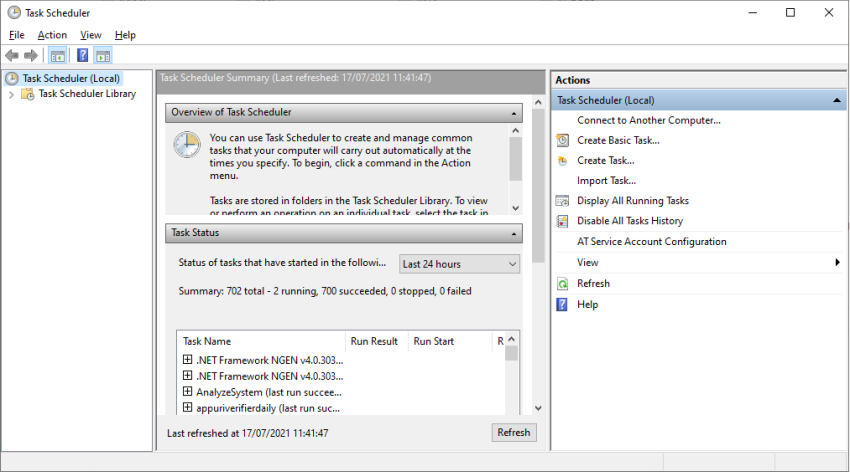
Open Task Scheduler as below (type task scheduler from the search bar of windows 10 and press enter).

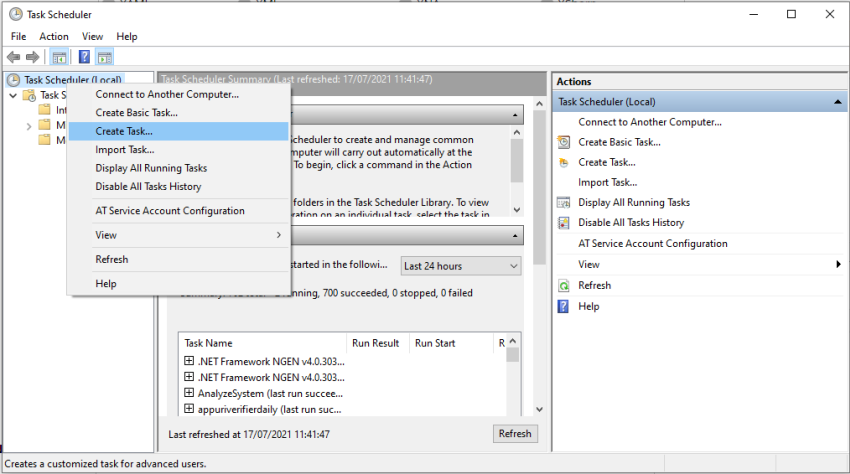
Create a new task as below,


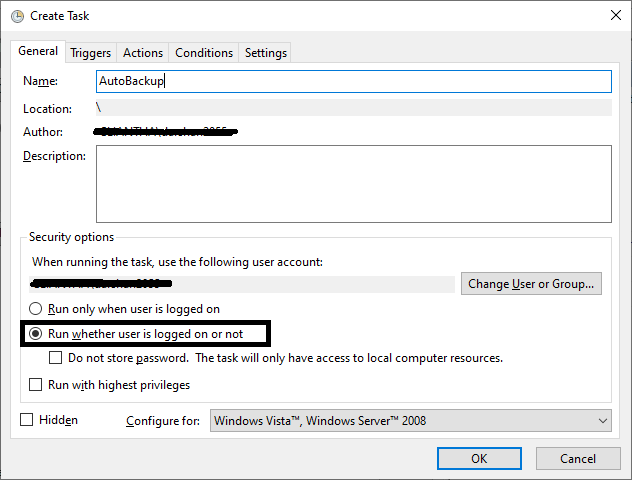
We will give the name to our scheduler task and select the appropriate option as below. We need to run this scheduler all time so we select this selected option shown below screen.

Now we will set our scheduler - when to run this task using the Trigger tab as below screen and then click on the new button.

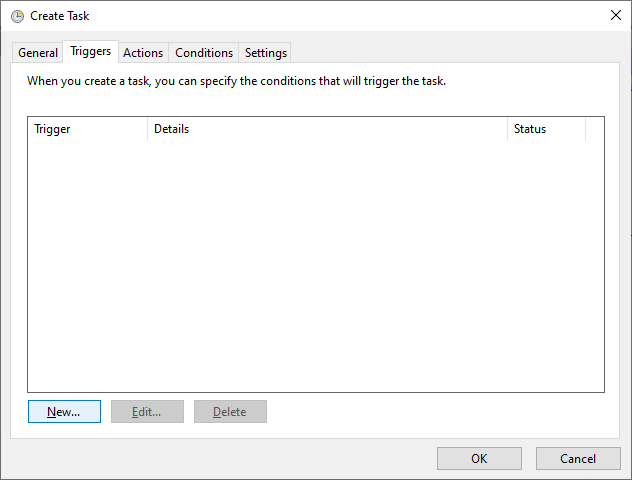
Now will create a new trigger to tell the system when to run this task as below. Please configure it as per your requirement.


Once the trigger is set we will now configure the action tab and then click the new button to setup our above-created batch file. We will call our batch file with the help of the action tab as below,

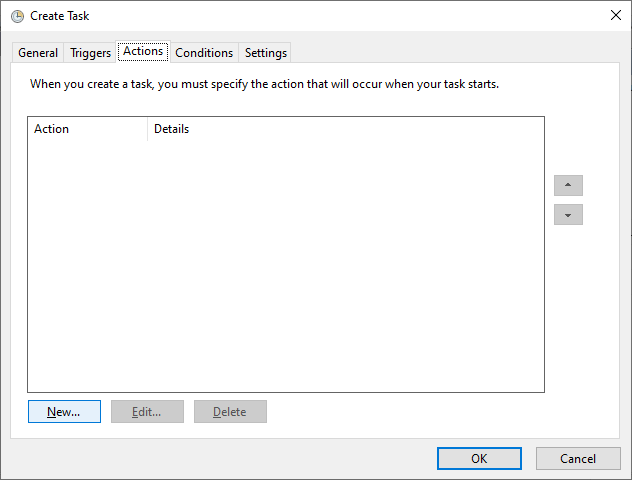
Click on the new button to set the path of our batch file as below,

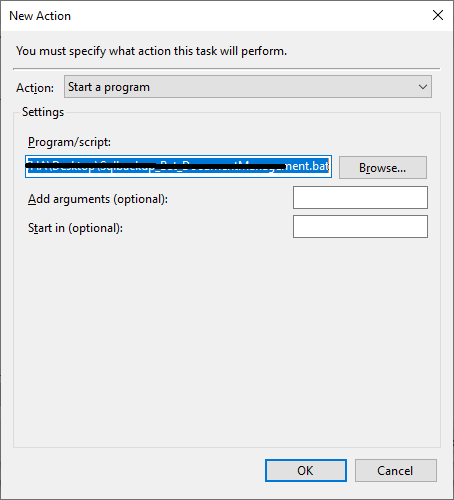
Once we browse and select the created batch file then click the ok button. And then click on the condition tab to configure it. We will keep default settings as below,


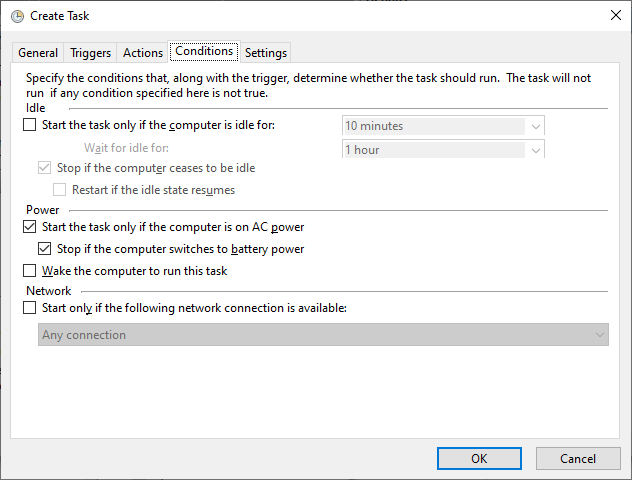
And now final configuration, click on the settings tab as below. Again we will keep default settings as below,

Click the ok button will create your task and will run this task as per your configuration. Note: It will ask to enter windows credentials which have admin rights if you do not have enough rights to create such a task.

Once all set, the scheduler will run the task to call the batch file and that batch file will call the stored procedure to get the backup of mentioned database in the batch file.

Note

Please make sure that the information you mention in the batch is correct.
Happy Coding!!


HostForLIFEASP.NET SQL Server 2019 Hosting


SQL Server Hosting - HostForLIFE :: Get All Columns in a Table Schema Information In One Click

clock July 23, 2021 07:46 by author Peter

In this article, we will learn how to get all the column information of a table with one click, including Column Name, DataType, Data Length, Column Description, etc. I found this technique very useful when I had to share the table column information along with some sample data into an Excel sheet with other clients.

Sample Script

In this script, we need to pass only the table name and schema name.

set @TableSchema ='dbo' --Schema name table 'Item' set @TableName= 'Item' -- Name of table.
declare @TableSchema varchar(50)
declare @TableName varchar(50)

set @TableSchema ='dbo' --Edit as per your table schema
set @TableName= 'Item' --Edit as per your table name

select @TableSchema +'.' +@TableName TableName

SELECT ORDINAL_POSITION AS [SNo],

COLUMN_NAME AS [Column Name],

DATA_TYPE AS [Data Type],

CASE
    WHEN DATA_TYPE ='decimal'  THEN  '(' + convert(varchar(20),NUMERIC_PRECISION) + ','  + convert(varchar(20),NUMERIC_SCALE) + ')'
    WHEN CHARACTER_MAXIMUM_LENGTH IS NULL THEN ''
    WHEN CHARACTER_MAXIMUM_LENGTH ='-1' then 'MAX'
    ELSE CONVERT(varchar(50), CHARACTER_MAXIMUM_LENGTH)
End  AS [Length],

CASE WHEN COL.IS_NULLABLE = 'No' THEN 'Y' ELSE 'Yes' End [Is Mandatory],

ISNULL(prop.value,'') [Description]

FROM INFORMATION_SCHEMA.TABLES AS tbl
INNER JOIN INFORMATION_SCHEMA.COLUMNS AS col
ON col.TABLE_NAME = tbl.TABLE_NAME
AND tbl.TABLE_SCHEMA=col.TABLE_SCHEMA
AND tbl.table_schema=@TableSchema
AND tbl.TABLE_NAME = @TableName
INNER JOIN sys.columns AS sc
ON sc.object_id = object_id(tbl.table_schema + '.' + tbl.table_name)
AND sc.NAME = col.COLUMN_NAME
AND tbl.TABLE_SCHEMA=@TableSchema
AND tbl.TABLE_NAME = @TableName
LEFT JOIN sys.extended_properties AS prop
ON prop.major_id = sc.object_id
AND prop.minor_id = sc.column_id
AND prop.NAME = 'MS_Description'
WHERE tbl.table_schema=@TableSchema and tbl.TABLE_NAME = @TableName
order by ORDINAL_POSITION


When you execute this script, it shows the column information like the following screenshot,


How to Prepare Excel Sheet With Sample Data

Step 1
Copy this result data with Headers information. Right click on the first cell -> click on the menu [Copy with Headers] and paste it into your excel sheet.

Step 2

Now, we have to paste few sample data into this excel sheet. For this, I will execute the following script.
Select top 2 * From dbo.Item  --

Step 3

Now copy the result and data without header columns.

Step 4

Now paste this copied data into another excel sheet.

Step 5
Now again copy this data from the excel sheet where you have pasted it.

Step 6
Now transpose this data into the first sheet where you have pasted column information.

Note
In Excel paste options, you can find this transpose option which will paste your records in column format.

Finally, it will look like the following screenshot,


HostForLIFEASP.NET SQL Server 2019 Hosting


Europe SQL Hosting - HostForLIFEASP.NET :: Triggers in SQL Server

clock July 13, 2021 08:32 by author Peter

A SQL trigger is a database object which fires when an event occurs in a database. We can execute a SQL query that will "do something" in a database when a change occurs on a database table such as a record is inserted or updated or deleted. For example, a trigger can be set on a record insert in a database table. For example, if you want to increase the count of blogs in the Reports table when a new record is inserted in the Blogs table, we can create a trigger on the Blogs' table on INSERT and update the Reports table by increasing blog count to 1.

Types of Triggers
There are two types of triggers:
    DDL Trigger
    DML Trigger

DDL Triggers
The DDL triggers are fired in response to DDL (Data Definition Language) command events that start with Create, Alter and Drop, such as Create_table, Create_view, drop_table, Drop_view and Alter_table.

Code of a DDL Trigger

create trigger saftey
on database
for
create_table,alter_table,drop_table
as
print'you can not create ,drop and alter table in this database'
rollback;

When we create, alter or drop any table in a database then the following message appears:


DML Triggers
The DML triggers are fired in response to DML (Data Manipulation Language) command events that start with Insert, Update, and Delete. Like insert_table, Update_view and Delete_table.

create trigger deep
on emp
for
insert,update,delete
as
print'you can not insert,update and delete this table i'
rollback;

When we insert, update or delete in a table in a database then the following message appears,

There are two types of DML triggers
 
AFTER Triggers
AFTER triggers are executed after the action of an INSERT, UPDATE, or DELETE statement.

create trigger insertt
on emp
after insert
as
begin
insert into empstatus values('active')
end


INSTEAD Of Triggers

It will tell the database engine to execute the trigger instead of executing the statement. For example an insert trigger executes when an event occurs instead of the statement that would insert the values in the table .
CREATE TRIGGER instoftr
ON v11
INSTEAD OF INSERT
AS
BEGIN
INSERT INTO emp
SELECT I.id, I.names
FROM INSERTED I

INSERT INTO emp1values
SELECT I.id1, I.name1
FROM INSERTED I
END

When we insert data into a view by the following query then it inserts values in both tables :
insert into v11 values(1,'d','dd')

You can see both tables by the folowing query:
select * from emp
select * from emp1values


In this article, I described triggers in SQL Server. I hope this article has helped you in understanding this topic. Please share it. If you know more about this, your feedback and constructive contributions are welcome.

Continue learning more, Trigger in SQL


SQL Server Hosting - HostForLIFE :: Insert Data Into SQL Server Table Using PowerShell

clock July 7, 2021 06:30 by author Peter

In this blog, we will create a PowerShell script that inserts the data into a SQL table. In this scenario, we have one SQL table of student details. We insert the Student name, standard, and division into the ‘Student’ table. Here we have the ‘Student’ table in SQL Server. We have two different columns ‘Name’, ‘STD’. We will enter the 5 static details of students.

Let’s get started!
We will define the variables. We have 5 variables ‘serverName’, ‘databaseName’, ‘tableName’, ‘studentName’ and ‘standard’. 

$serverName = "HostForLIFE"
$databaseName = "StudentDetails"
$tableName = "dbo.Student"
$studentName = 'John','Debo','Carry','Mini'
$standard = '5'

We will establish a new connection for the SQL Server database using the below code. We will use the ‘ServerName’ and ‘databaseName’ for establishing the connection string.
$Connection = New-Object System.Data.SQLClient.SQLConnection
$Connection.ConnectionString = "server='$serverName';database='$databaseName';trusted_connection=true;"
$Connection.Open()
$Command = New-Object System.Data.SQLClient.SQLCommand
$Command.Connection = $Connection


We will apply for each student’s name and execute the command for inset into the SQL table. Here we use into query command and execute the command. This query will insert the employee name and standard field in the student table.

foreach($Name in $studentName){
  $insertquery="
  INSERT INTO $tableName
      ([Name],[STD])
    VALUES
      ('$Name','$standard')"
  $Command.CommandText = $insertquery
  $Command.ExecuteNonQuery()
}


Close the connection of SQL.
$Connection.Close();

Here is the whole code for inserting the data into the table.
$serverName = "HostForLIFE"
$databaseName = "StudentDetails"
$tableName = "dbo.Student"
$studentName = 'John','Debo','Carry','Mini'
$standard = '5'
$Connection = New-Object System.Data.SQLClient.SQLConnection
$Connection.ConnectionString = "server='$serverName';database='$databaseName';trusted_connection=true;"
$Connection.Open()
$Command = New-Object System.Data.SQLClient.SQLCommand
$Command.Connection = $Connection
foreach($Name in $studentName){
  $insertquery="
  INSERT INTO $tableName
      ([Name],[STD])
    VALUES
      ('$Name','$standard')"
  $Command.CommandText = $insertquery
  $Command.ExecuteNonQuery()
}
$Connection.Close();


Output

HostForLIFEASP.NET SQL Server 2019 Hosting


About HostForLIFE

HostForLIFE is European Windows Hosting Provider which focuses on Windows Platform only. We deliver on-demand hosting solutions including Shared hosting, Reseller Hosting, Cloud Hosting, Dedicated Servers, and IT as a Service for companies of all sizes.

We have offered the latest Windows 2019 Hosting, ASP.NET 5 Hosting, ASP.NET MVC 6 Hosting and SQL 2019 Hosting.


Month List

Tag cloud

Sign in