European Windows 2019 Hosting BLOG

BLOG about Windows 2019 Hosting and SQL 2019 Hosting - Dedicated to European Windows Hosting Customer

European Windows 2012 Hosting - France :: Look Further Windows 2012 Powershell 3.0

clock September 24, 2013 08:34 by author Scott

Now that Windows 8 and Windows Server 2012 is available, the same is true for Windows PowerShell 3.0 since it is included in the operating system. Windows PowerShell will also be available for down level operating systems (Windows 7, Windows Server 2008 and Windows Server 2008 R2) shortly, as part of the Windows Management Framework (WMF). In addition to PowerShell, new versions of Windows Management Instrumentation (WMI) and Windows Remote Management (WinRM) is included in the WMF.

What is new?

PowerShell 2.0 brought a whole set of new features including background jobs, remoting and the PowerShell ISE. In PowerShell 3.0 there have been made a great number to these features as well as many new ones. I will go through some of the major news:

Workflows – Based on the Windows Workflow Foundation the PowerShell team have brought workflows into PowerShell. A workflow is a sequence of automated steps or so called activities which performs tasks or receives data from managed devices. This makes it possible for IT Professionals to perform automated tasks against a wide variety of devices, for example software installation. A practical example is the installation and configuration of a Windows Server Failover Cluster, where installation and configuration can be orchestrated from a workflow. Among the feature set of a workflow is the ability to suspend and resume execution, no matter if the reason is planned or a temporary network outage. You can see examples and read more about this feature in this article on the PowerShell team blog.

Enhancements to PowerShell Remoting - Robust sessions is a new feature in PowerShell Remoting which makes it possible for a PowerShell Remoting session, a so-called “PSSession”, to survive a temporary network outage. Delegated administration is another new feature in remoting, where a RunAsAccount can be configured on a remoting endpoint. This makes it possible to delegate tasks to for example helpdesk user, without needing to delegate tasks on the backbone application itself.

Simplified syntax – Especially for beginners, the syntax for various parts of PowerShell might be hard to remember and understand. An example of this is the syntax for the –FilterScript parameter of Where-Object and the –Process parameter of Foreach-Object, which both accepts a so-called script block. In version 1.0 and 2.0 of PowerShell we had to use the $_.propertyname syntax inside this scriptblock. For example Get-Service | Where-Object {$_.Status –eq ‘Running’}. In version 3.0, this still works, but there is an alternate more user friendly syntax as well: Get-Service | Where-Object Status –eq ‘Running’. Here we can see that we did not have to use the curly brackets or the $_. syntax. You should note that you have to use the existing syntax if you are doing more than one comparison, however, this makes it much easier for beginners who are likely to do a single comparison in the beginning. Also experienced users will enjoy this feature since it requires less typing.

More user friendly – A lot of enhancements have been made to make PowerShell more user friendly. A common mistake for new users is not loading the required module for the cmdlet they want to run. For example, if you run Get-ADUser without first running Import-Module ActiveDirectory, you would get an error message stating that Get-ADUser is not recognized. In PowerShell 3.0 there is a new feature called module autoloading, which automatically loads the required module for the cmdlet which is being run. Another features in terms of user friendliness is the new cmdlet Show-Command, as well as the Intellisense feature in PowerShell ISE. You can read more about these two features in this and this article on the PowerShell team blog.

Windows PowerShell Web Service – makes it possible to expose a set of PowerShell cmdlets as a Restful Endpoint via OData (Open Data Protocol). This makes it possible to run PowerShell cmdlets from both Windows and non-Windows devices. Note that this feature is more targeted against advanced users and developers.

Windows PowerShell Web Access – If you have used Microsoft Exchange Server`s webmail functionality, OWA, this feature will look familiar. The sign in page for PowerShell Web Access looks very similar to the OWA sign in page. When logged in, you will be presented with a PowerShell session. This makes it easy to use PowerShell both from a web browser on your computer as well as from mobile devices such as an Iphone or Windows Phone. Note that this feature requires Windows Server 2012. You can find instructions on how to configure this feature in this article on Microsoft TechNet.

Updateable help – Until PowerShell 3.0 the help files that is parsed when you are using the Get-Help cmdlet has been a part of the installation. Updating these files have not been possible, since rolling out help files through the channels for updating the operatingsystem (Windows Update, WSUS) could not be justified. Due to this reason, it was not possible for the PowerShell team to correct errors and enhance the help files after the product had shipped. To overcome this limitation, a new feature named updateable help has been added in version 3.0. There is a new cmdlet called Update-Help you can execute in order to update the help files. If you need to download the files in order to bring them over to a computer not connected to the internet you can use the Save-Help cmdlet. You can read more about updateable help in this article by PowerShell MVP Don Jones.

Microsoft Script Explorer – Technically this is not a part of PowerShell 3.0, but rather a standalone download released in the same timeframe as PowerShell 3.0. Using Script Explorer you can search for scripts and other resources on both Microsoft TechNet as well as 3rd party repositories and local UNC-paths, for example a company repository. Script Explorer can either be run as a standalone application or integrated into the PowerShell ISE as an add-on. By integrating it to the ISE you can copy scripts you find directly in to the editor. Script Explorer will also support Windows PowerShell 2.0.

In addition to the above mentioned features, there has been made a great number of bug fixes and enhancements based on feedback from Microsoft Connect.


European Windows 2008 R2 Hosting - Spain :: How to Determine I/O Usage on the Server?

clock September 18, 2013 11:29 by author Scott

Have you ever imagine what process that consume I/O usage on our server? I searched on on forums but I cant find definitely the answer. I still doubt about the answer. I try to find myself and make some experience.  In this post, I will show some analysis how can we determine the I/O usage on our server.

The easiest way to get a quick view into your I\O usage is to use Task Manager.  I will show you how to find that information.  First you need to open up Task Manager.  To do this, right click the task bar and choose Start Task Manager.  When you have it running, click the Processes tab.  Then from the menu choose View -> Select Columns… 

This will bring up the Select Process Page Columns.  Scroll down to the bottom and put a check beside I/O Reads, I/O Writes, I/O Read Bytes, and I/O Write Bytes. 

Click OK when you are finished and the columns will be added to Task Manager.  You should note that the numbers listed in Task Manager are totals for each of those items since the last boot of the system. 

Here is a description of the columns of the counters that were added to Task Manager above.

I/O Reads -  The number of read input/output operations generated by a process, including file, network, and device I/Os. I/O Reads directed to CONSOLE (console input object) handles are not counted.

I/O Writes – The number of write input/output operations generated by a process, including file, network, and device I/Os. I/O Writes directed to CONSOLE (console input object) handles are not counted.

I/O Read Bytes – The number of bytes read in input/output operations generated by a process, including file, network, and device I/Os. I/O Read Bytes directed to CONSOLE (console input object) handles are not counted.

I/O Write Bytes – The number of bytes written in input/output operations generated by a process, including file, network, and device I/Os. I/O Write Bytes directed to CONSOLE (console input object) handles are not counted.

You can look at the new columns that are showing up in Task Manager and see the processes that have used the most I/O since the last reboot of the server.  Often this is all the information you need to narrow down the top I/O usage per process.

Sometimes using Task Manager is not enough to help you narrow down the usage.  Maybe you need to know what is using the I\O right now or want to paint a picture of I\O usage over the next 7 days.  That is a good job for Performance Monitor.  Before we look at how to add the counters to Performance Monitor, here is the mapping of the Task Manager Columns that were described above and their corresponding Performance Monitor Counters:

Task Manager

Performance Monitor

I/O Reads

Process\I/O Read Operations/sec

I/O Writes

Process\I/O Write Operations/sec

I/O Read Bytes

Process\I/O Read Bytes/sec

I/O Write Bytes

Process\I/O Write Bytes/sec

To start up Performance Monitor click the Start button.  In the 'Search programs and files' text box enter perfmon. 

Select perfmon that shows up in the results to open up Performance Monitor.  Once you have it open, select Performance Monitor from the left menu so that it is highlighted.  That will start allowing Performance Monitor to collect information.  Next click the green Plus icon to add a counter. 

When the Add Counters dialog window comes up, look for the Process object and click the plus to the right of it.  That will expand the counters that are under the Process object.  Based on the information that you got from Task Manager above, you can now add the appropriate counter.  You will notice that when you select a counter it also wants to know if you want the _Total (the total amount from all processes for that counter), 'all instances' which will add all the instances to Performance Monitor, or a specific process.  I recommend that you set the counter up for one or more specific processes that you previously found with the total highest I/O listed in Task Manager.  Choosing 'all instances' will make it hard to read the results and might cause some additional resource usage on your server. 

Using this information you should now be able to track down what is using the most I/O on your system.

NOTE:  The step by step instructions in this article are based on Windows 2008 R2.  The I/O information pertains to earlier Operating Systems as well but the actual steps might be different.


European SQL 2008 Hosting - Amsterdam :: Tips to Improve SQL Server Database Design and Performance

clock September 17, 2013 11:13 by author Ronny

Best performance is the main concern to develop a successful application. Focus of some key points which keeping in mind we can improve the database performance and tune it accordingly. A good database design provides best performance during data manipulation which results into the best performance of an application. During database designing and data manipulation we should consider the following key points:
Don’t have to type out the columns
If you’re using SQL Server Management Studios (SSMS) 2008 or higher, you can tell SSMS to script out select statements for you. To do this, right-click the table, go to Script Table As – Select To – New Query Editor Window . You can alternatively script to the clipboard if you already have a script open and just want to paste in there . This will open up a new window with your select statement.

A bonus (or down side) is that SQL Server automatically wraps each column with brackets, so if your column names have odd characters (such as spaces) this will always work. Another bonus is consistency. Using this method you will always be sure to have all of the columns in the table, so if you’re forgetful this method is perfect for you.

Fine Tune SSMS Options
SQL Server Management Studios has a lot of options to play with. One option that I have disabled is the “Use [database]” statement that you get whenever you script out a table. To change this I went to Tools – Options. Then went to SQL Server Object Explorer – Scripting, and changed “Script USE [database]” to false.

Use EXISTS instead of IN
Does practice to use EXISTS to check existence instead of IN since EXISTS is faster than IN.

 -- Avoid
SELECT Name,Price FROM tblProduct
where ProductID IN (Select distinct ProductID from tblOrder)
--Best practice
SELECT Name,Price FROM tblProduct
where ProductID EXISTS (Select distinct ProductID from tblOrder)


Create Clustered and Non-Clustered Indexes

Does practice to create clustered and non clustered index since indexes helps in to access data fastly. But be careful, more indexes on a tables will slow the INSERT,UPDATE,DELETE operations. Hence try to keep small no of indexes on a table.

Choose Appropriate Data Type

Choose appropriate SQL Data Type to store your data since it also helps in to improve the query performance. Example: To store strings use varchar in place of text data type since varchar performs better than text. Use text data type, whenever you required storing of large text data (more than 8000 characters). Up to 8000 characters data you can store in varchar.

Avoid NULL in Fixed-Length Field
Does practice to avoid the insertion of NULL values in the fixed-length (char) field. Since, NULL takes the same space as desired input value for that field. In case of requirement of NULL, use variable-length (varchar) field that takes less space for NULL.

Avoid * in SELECT Statement
Does practice to avoid * in Select statement since SQL Server converts the * to columns name before query execution. One more thing, instead of querying all columns by using * in select statement, give the name of columns which you required.

-- Avoid
SELECT * FROM tblName
--Best practice
SELECT col1,col2,col3 FROM tblName

Keep Clustered Index Small
Does practice to keep clustered index as much as possible since the fields used in clustered index may also used in nonclustered index and data in the database is also stored in the order of clustered index. Hence a large clustered index on a table with a large number of rows increase the size significantly.

Use Schema name before SQL objects name
Does practice to use schema name before SQL object name followed by "." since it helps the SQL Server for finding that object in a specific schema. As a result performance is best.
 
--Here dbo is schema name
SELECT col1,col2 from dbo.tblName
-- Avoid
SELECT col1,col2 from tblName


SET NOCOUNT ON

Does practice to set NOCOUNT ON since SQL Server returns number of rows effected by SELECT,INSERT,UPDATE and DELETE statement. We can stop this by setting NOCOUNT ON like as:

CREATE PROCEDURE dbo.MyTestProc
AS
SET NOCOUNT ON
BEGIN
.
.
END


Summary
Expose some key point to improve your SQL Server database performance. Hope after reading this article you will be able to use these tips with in your SQL Server database designing and manipulation.


European SQL 2008 Hosting - Amsterdam :: Tips to Improve SQL Server Database Design and Performance

clock September 17, 2013 11:13 by author Administrator

Best performance is the main concern to develop a successful application. Focus of some key points which keeping in mind we can improve the database performance and tune it accordingly. A good database design provides best performance during data manipulation which results into the best performance of an application. During database designing and data manipulation we should consider the following key points:

Don’t have to type out the columns
If you’re using SQL Server Management Studios (SSMS) 2008 or higher, you can tell SSMS to script out select statements for you. To do this, right-click the table, go to Script Table As – Select To – New Query Editor Window . You can alternatively script to the clipboard if you already have a script open and just want to paste in there . This will open up a new window with your select statement.

A bonus (or down side) is that SQL Server automatically wraps each column with brackets, so if your column names have odd characters (such as spaces) this will always work. Another bonus is consistency. Using this method you will always be sure to have all of the columns in the table, so if you’re forgetful this method is perfect for you.

Fine Tune SSMS Options
SQL Server Management Studios has a lot of options to play with. One option that I have disabled is the “Use [database]” statement that you get whenever you script out a table. To change this I went to Tools – Options. Then went to SQL Server Object Explorer – Scripting, and changed “Script USE [database]” to false.

Use EXISTS instead of IN
Does practice to use EXISTS to check existence instead of IN since EXISTS is faster than IN.

 -- Avoid
SELECT Name,Price FROM tblProduct
where ProductID IN (Select distinct ProductID from tblOrder)
--Best practice
SELECT Name,Price FROM tblProduct
where ProductID EXISTS (Select distinct ProductID from tblOrder)


Create Clustered and Non-Clustered Indexes

Does practice to create clustered and non clustered index since indexes helps in to access data fastly. But be careful, more indexes on a tables will slow the INSERT,UPDATE,DELETE operations. Hence try to keep small no of indexes on a table.

Choose Appropriate Data Type

Choose appropriate SQL Data Type to store your data since it also helps in to improve the query performance. Example: To store strings use varchar in place of text data type since varchar performs better than text. Use text data type, whenever you required storing of large text data (more than 8000 characters). Up to 8000 characters data you can store in varchar.

Avoid NULL in Fixed-Length Field
Does practice to avoid the insertion of NULL values in the fixed-length (char) field. Since, NULL takes the same space as desired input value for that field. In case of requirement of NULL, use variable-length (varchar) field that takes less space for NULL.

Avoid * in SELECT Statement
Does practice to avoid * in Select statement since SQL Server converts the * to columns name before query execution. One more thing, instead of querying all columns by using * in select statement, give the name of columns which you required.

-- Avoid
SELECT * FROM tblName
--Best practice
SELECT col1,col2,col3 FROM tblName

Keep Clustered Index Small
Does practice to keep clustered index as much as possible since the fields used in clustered index may also used in nonclustered index and data in the database is also stored in the order of clustered index. Hence a large clustered index on a table with a large number of rows increase the size significantly.

Use Schema name before SQL objects name
Does practice to use schema name before SQL object name followed by "." since it helps the SQL Server for finding that object in a specific schema. As a result performance is best.
 
--Here dbo is schema name
SELECT col1,col2 from dbo.tblName
-- Avoid
SELECT col1,col2 from tblName


SET NOCOUNT ON

Does practice to set NOCOUNT ON since SQL Server returns number of rows effected by SELECT,INSERT,UPDATE and DELETE statement. We can stop this by setting NOCOUNT ON like as:

CREATE PROCEDURE dbo.MyTestProc
AS
SET NOCOUNT ON
BEGIN
.
.
END


Summary
Expose some key point to improve your SQL Server database performance. hope after reading this article you will be able to use these tips with in your Sql Server database designing and manipulation.


European Ms. Visual Studio LightSwitch Hosting - France :: Tips How to Build App in LightSwitch Application

clock September 10, 2013 08:20 by author Administrator

LightSwitch is a Rapid Development environment that will allow technical and somewhat-technical people the ability to create light weight Line of Business applications. While many developers don’t think LightSwitch will be useful for creating apps, we think it can be very beneficial to use in the right circumstances.

Microsoft® Visual Studio® LightSwitch™ is a new streamlined development environment for designing data-centric business applications and helps you to build data-centric applications quickly, through visual means. LightSwitch business applications are multi-tiered, featuring a client application and a combination of LINQ, WCF RIA Services and the Entity Framework to implement the application services tier.

Benefits of using LightSwitch?
There are many benefits of using LightSwitch as shown in the below list

  • You can create an application with just few clicks and no code or coding only in the data models or substantial code within all parts of the application.
  • Based on permission, LightSwitch support distinct audiences end-users (View & Edit Data), administrative (maintain certain master data) and Super-users (granted access to most or all of the data and functionality).
  • Support built-in Business Types include like (Email, PhoneNumber, money,..etc), and partners can create new Business Types.
  • Enable Debug mode, and allows the screen to be edited interactively while the application is running.
  • Enable adding custom business rules to any field in the screen.
  • ou can create custom controls and embed sophisticated behaviors there.
  • LightSwitch produces desktop applications or pulls down and executed implicitly by navigating to a URL.
  • Enables you to deploy your LightSwitch on Cloud and Azure as simple as running a wizard.

Start building the App
Now let’s start building our application, I am going to list every thing in details starting from opening Visual studio 2012 until running the application. we will go throw the following steps.

Step 1 : Creating the Application

Creating new LightSwitch application is very simple, if you’re familiar with any old version of Visual Studio as follows:

Open VS 2012 –> New project –> Select LightSwitch from project Template list –> Select LightSwitch application (c#), and finally we will write the project name LighSwitchsubscriptionApp –> press Ok

Step 2 : Creating & Defining Data tables and relationships

The start point to LightSwitch application is creating Data Table and you can do this task through four ways:

  • Click the Create new table link in the start up project page “Start with data” which called [you project name] Designer
  • Go to Visual Studio menu bar Select Project –> Add table
  • Right click Project Name in solution explorer then select Add table
  • Connect to an exist data source published on (Database, Sharepoint, OData Services, WCF RIA Service) as mentioned in step 2 and 3, but select Add data source instead of Add Table option, and create Subscriber table as shown in below figure

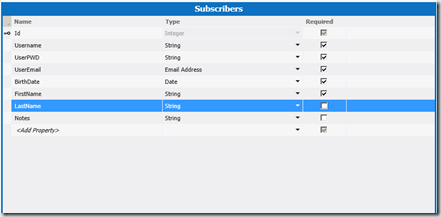
The above picture, it contains Useremail field with Data type Email, this is one of the new features of LightSwitch , that you can create new field with new Business Types like (Email, Money, Phone, web address).

- In addition, you can add New filed of static choice list by selecting choicelist link from right side properties of any string field, for example, we will create choicelist for Gender(male, female).
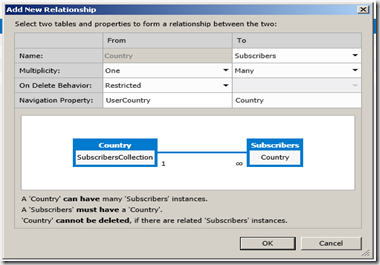
- Usually any registration module needs dropdown list of country field, but using LightSwitch makes the difference for you, we are not going to create new control and write code to bind this control from database, we are going to create new table of countries and link it to our Subscriber table and link these two tables, by following the below steps:

  • Create new table called Country with one columns(contryDesc).
  • Then click Relationshin, button in the toolbar.
  • Finally build the relation between the subscriber and country tables as shown below.

Step 3 : Building Screens & Running the Application

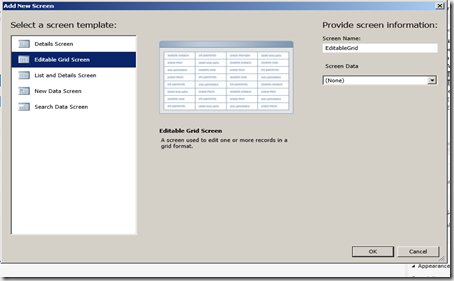
Now, we are getting ready to Build the screens corresponding to Entities, simply you click the Screen button from the toolbar on the subscriber & Countries Table Design forms, this will open Add ‘New screen’ Dialog then select the highlighted option showing in figure below, and finally press Ok button.

- Repeat same process above for country entity.
- Finally, we can run the application by pressing f5 key, we will see screen as shown in figure below:

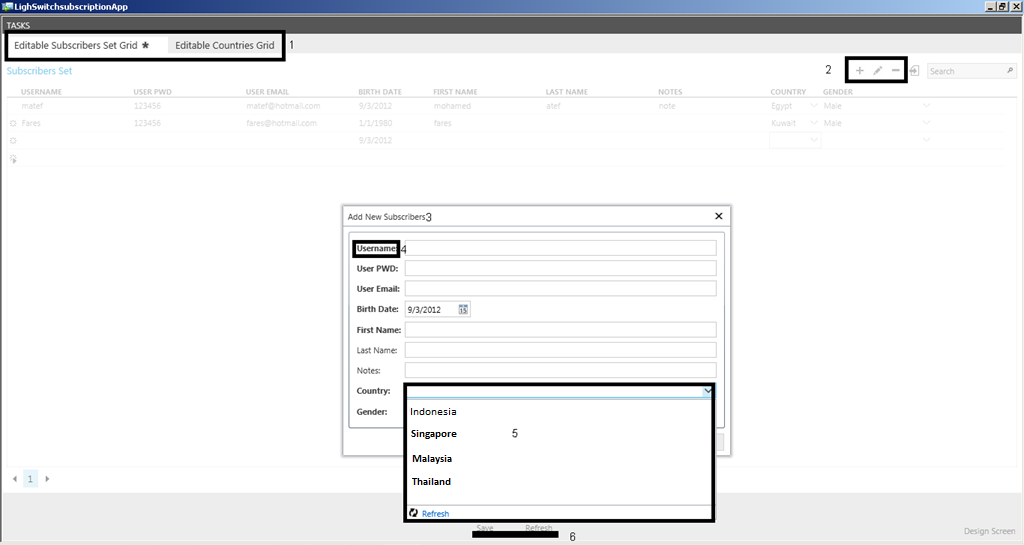
- Now, let’s go a head and review above screen as listed below:

Box 1 ,represent two tabs for all entity screens we have created .
Box 2 ,represent all actions available for this gridview Add, Delete, Edit, Search .
Box 3, represent the Dialog screen that opens when you select Add button.
Box 4, Showing Required fields marked as Bold.
Box 5, Showing Country list that I have entered in country entity.
Box 6, includes main actions for this screen ( Save , Refresh).

- There is another very important feature here, as you can see on right bottom of the screen link [Design Screen], this link allows you to edit the screen Design on the execution mode, if and only if, you have run the application in Debug mode.
- Eventually, we did not finish all features of LightSwitch, but we have other features that I will list them soon in other posts, I was just trying to show the power of using Lightswitch without writing any line of code.


About HostForLIFE

HostForLIFE is European Windows Hosting Provider which focuses on Windows Platform only. We deliver on-demand hosting solutions including Shared hosting, Reseller Hosting, Cloud Hosting, Dedicated Servers, and IT as a Service for companies of all sizes.

We have offered the latest Windows 2019 Hosting, ASP.NET 5 Hosting, ASP.NET MVC 6 Hosting and SQL 2019 Hosting.


Month List

Tag cloud

Sign in