European Windows 2019 Hosting BLOG

BLOG about Windows 2019 Hosting and SQL 2019 Hosting - Dedicated to European Windows Hosting Customer

SQL Server Hosting - HostForLIFE :: Create New Database From Existing Database In Same Microsoft SQL Server

clock February 18, 2022 06:50 by author Peter

In this article, we will learn about how to create a new database with the help of an existing database in same Microsoft SQL Server through the help of Procedure in Local Database.

In this article, I explain the process to create the procedure by two methods.

    HardCode
    Dynamically

The below code is of Stored Procedure for creating New Copy Database with New Name in the same server,
SET ANSI_NULLS ON
GO
SET QUOTED_IDENTIFIER ON
GO
CREATE PROCEDURE [dbo].[sp_post_new_database]
     (
   @DatabaseName varchar(100) = 'CopyDatabase',  --Name of New Database which we going to create
   @CopyDatabase varchar(100) = 'OriginalDatabase'    --Name of Database
)
AS
BEGIN
DECLARE  @BackupDataFileNameAndPath VARCHAR(MAX)=''
DECLARE  @OpenDataFileNameAndPath VARCHAR(MAX)=''
DECLARE  @PathBackUpDatabase VARCHAR(MAX) = 'D:\db\'  -- We also make it dynamic ,for dynamic we need pass parameter to Our Store Procedure
DECLARE  @OpenPathDatabase VARCHAR(MAX) = 'D:/db/' -- We also make it dynamic ,for dynamic we need pass parameter to Our Store Procedure
DECLARE  @fileExtenion_mdf VARCHAR(MAX)=''
DECLARE  @fileExtenion_ldf VARCHAR(MAX)=''
DECLARE  @Open_ldf VARCHAR(MAX)=''
SET @BackupDataFileNameAndPath = @PathBackUpDatabase+@DatabaseName+'.bak'  --for dynamic  | for HardCode --> 'D:\db\CopyDatabase.bak'
--Open BackUpdataBase
SET @OpenDataFileNameAndPath = @OpenPathDatabase+@DatabaseName+'.bak'   --for dynamic
SET @fileExtenion_mdf=@PathBackUpDatabase+@DatabaseName+'_Data.mdf' --for dynamic   | for HardCode -->  'D:\db\CopyDatabase_Data.mdf'
SET @fileExtenion_ldf=@PathBackUpDatabase+@DatabaseName+'_Log.ldf'  --for dynamic   | for HardCode -->  'D:\db\CopyDatabase_Data_Log.ldf'
SET @Open_ldf=@CopyDatabase+'_Log'  --for dynamic
--BackUp Our database which name of Our New Created Database
BACKUP DATABASE @CopyDatabase  -- <- for dynamic | for HardCode -->  BACKUP DATABASE 'OriginalDatabase'
   TO DISK =@BackupDataFileNameAndPath    -- <- for dynamic | for HardCode -->  TO DISK = 'D:\db\CopyDatabase.bak'
   WITH FORMAT,
      MEDIANAME = 'MyServerDatabaseBackups',
      NAME = 'Full Backup of My  OriginalDatabase';
  --Used for View the Name Of .mdf and .ldf which are in CopyDatabase.bak
   RESTORE FILELISTONLY
   FROM disk =@OpenDataFileNameAndPath;    -- <- for dynamic | for HardCode -->  FROM disk ='D:/db/CopyDatabase.bak';
-- Restore the files for BackupDataBase.
RESTORE DATABASE @DatabaseName
   FROM disk=@OpenDataFileNameAndPath   -- <- for dynamic | for HardCode -->  FROM disk='D:/db/CopyDatabase.bak'
   WITH RECOVERY,
   -- Below two line Move .mdf and .ldf file from  CopyDatabase.bak and restore in Your Server with
   --Our Given new Database name and Your Desire location in You local Disk
   MOVE @CopyDatabase TO @fileExtenion_mdf,  -- <- for dynamic | for HardCode -->    MOVE 'OriginalDatabase' TO 'D:\db\CopyDatabase_Data.mdf' ,
   MOVE @Open_ldf TO @fileExtenion_ldf;    -- <- for dynamic | for HardCode -->     MOVE 'OriginalDatabase_Log' TO 'D:\db\CopyDatabase_Data_Log.ldf' ;
   --For Delete .bak File From Disk
   --Create BackUp Device "sp_addumpdevice" Procedure set Path of Our CopyDatabase.bak file for delete
   EXEC sp_addumpdevice 'disk', @CopyDatabase, @BackupDataFileNameAndPath ;   -- <- for dynamic | for HardCode -->  EXEC sp_addumpdevice 'disk', 'OriginalDatabase','D:\db\CopyDatabase.bak' ;
   --"sp_dropdevice" Procedure  delete CopyDatabase.bak file from our Local Disk because we already restore new created database in Server
   EXEC sp_dropdevice @CopyDatabase, 'delfile' ;    -- <- for dynamic | for HardCode -->  EXEC sp_dropdevice 'OriginalDatabase', 'delfile' ;
END
GO

HostForLIFEASP.NET SQL Server 2019 Hosting


SQL Server Hosting - HostForLIFE :: SQL IS NULL And IS NOT NULL Operators

clock February 15, 2022 07:22 by author Peter

When dealing with NULLs, most beginners think it has some value, but it means unknown.

This article will explore what's NULL is and SQL's NULL conditional operators.

These operators are IS NULL and IS NOT NULL.

What is NULL?

It is used to specify that a particular data value does not exist.

That's why you'll hear from other SQL developers or administrators; NULL represents a missing or unknown value. And from that statement, I think it can be easily remembered and understood.

Moreover, the ANSI behavior for NULL values any expression containing a NULL value is NULL.

Let's see some examples below.
Examples

1. Let's try to add a number to a NULL value.
SELECT (NULL + 1) [Sum of NULL and 1] -- NULL

Output

2. Let's try to concatenate a string to a NULL value.
SELECT (NULL + 'C# Corner Rocks') [Concat NULL to a word] -- NULL

IS NULL and IS NOT NULL
I still remember learning TSQL when I wanted to check a column for NULL. I used the equal (=) or the not (<>) operator.

Let's see an example below.
SELECT * FROM [tblSomething] WHERE name = NULL
SELECT * FROM [tblSomething] WHERE name <> NULL

Note: the example code above won't be behaving as expected. You won't see any results!

Checking for NULL values is impossible with comparison operators such as =, < or <>.

It is because this is not the default behavior of it.

That's why instead of using these equal and or not operators, we can use IS NULL or IS NOT NULL instead.

Let's see an example below.

DROP TABLE IF EXISTS temp.dbo.#tempFruits;

CREATE TABLE #tempFruits
(Id INT IDENTITY,
 [Name] NVARCHAR(10) NOT NULL,
 [Description] NVARCHAR(50) NULL);

 INSERT INTO #tempFruits (Name, Description)
 VALUES
 ('Apple', 'The domesticated tree Malus'),
 ('Kiwifruit', NULL),
 ('Pineapple', NULL),
 ('Papaya', 'Also called papaw or pawpaw'),
 ('Cherry', NULL)

 SELECT * FROM #tempFruits WHERE [Description] = NULL -- 0 result
 SELECT * FROM #tempFruits WHERE [Description] IS NULL -- 3 results

 SELECT * FROM #tempFruits WHERE [Description] <> NULL -- 0 result
 SELECT * FROM #tempFruits WHERE [Description] IS NOT NULL -- 2 results


As you can see, in our code sample above, we have combined the equal and the not operator with their NULL operators' counterparts.

Let's try to see the differences.

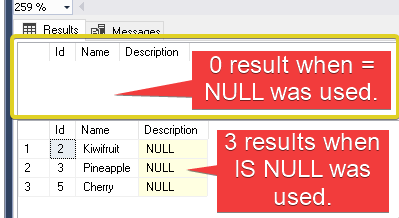
First, instead of = operator, we used the IS NULL operator to check whether a column is NULL.
SELECT * FROM #tempFruits WHERE [Description] = NULL -- 0 result
SELECT * FROM #tempFruits WHERE [Description] IS NULL -- 3 results


Output

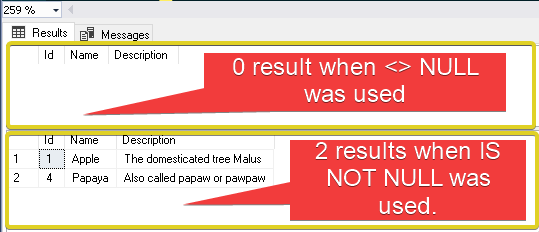
Second, instead of the <> operator, we used the IS NOT NULL operator to check whether a column is not NULL.
SELECT * FROM #tempFruits WHERE [Description] <> NULL -- 0 result
SELECT * FROM #tempFruits WHERE [Description] IS NOT NULL -- 2 results


Output

SET ANSI_NULLS ON or OFF
Hopefully, now you understand that by default, you can't use the equality operators when dealing with NULLs and instead use IS NULL or IS NOT NULL operators.

However, this default ANSI behavior can be turned off by adding this line of instruction SET ANSI_NULLS OFF before executing the previous entire code.

Let's add the SET ANSI_NULLS OFF on our previous example and see the output.

SET ANSI_NULLS OFF; -- LET'S TURN OFF THE DEFAULT ANSI BEHAVIOR!

DROP TABLE IF EXISTS temp.dbo.#tempFruits;

CREATE TABLE #tempFruits
(Id INT IDENTITY,
 [Name] NVARCHAR(10) NOT NULL,
 [Description] NVARCHAR(50) NULL);

 INSERT INTO #tempFruits (Name, Description)
 VALUES
 ('Apple', 'The domesticated tree Malus'),
 ('Kiwifruit', NULL),
 ('Pineapple', NULL),
 ('Papaya', 'Also called papaw or pawpaw'),
 ('Cherry', NULL)

 SELECT * FROM #tempFruits WHERE [Description] = NULL -- 3 result
 SELECT * FROM #tempFruits WHERE [Description] IS NULL -- 3 result

 SELECT * FROM #tempFruits WHERE [Description] <> NULL -- 2 result
 SELECT * FROM #tempFruits WHERE [Description] IS NOT NULL -- 2 result


Output


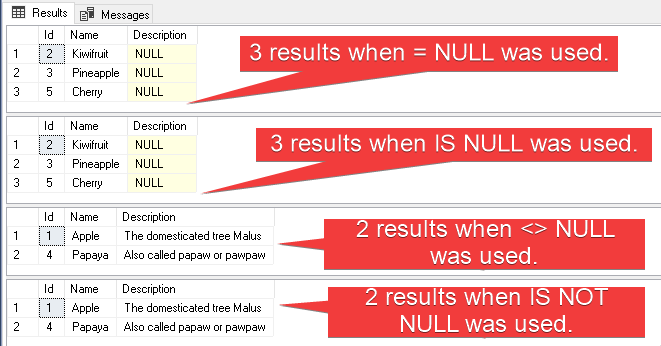
As you can see from the output, when you turn set ANSI_DEFAULT off, the equality operators will eventually be acceptable and work as expected.

So, in incase you experienced this, there's a higher chance that the ANSI_DEFAULT is turned off.
Avoid Changing Default ANSI_NULLS

Turning off the ANSI_NULLS option is not recommended unless you're just trying something or making some quick fixes.

Moreover, it is safer to use the IS NULL and IS NOT NULL operators for the NULL value comparison because it will work in all cases irrespective of the ANSI_NULLS option setting.

HostForLIFEASP.NET SQL Server 2019 Hosting


SQL Server Hosting - HostForLIFE :: SQL CAST And CONVERT Function

clock February 9, 2022 07:12 by author Peter

If you're one of those confused about the difference between the CAST and CONVERT functions, you have come to the right place.

That's why in this article, we'll explore the CAST and CONVERT functions of SQL Server and see their difference.

OK, let's get started then.

What is the SQL CAST function?

Basically, this function converts data from one data type to another. For example, it can convert numeric data into character or string data.
Things to Remember about SQL Cast Function

    Transforms the expression data from one data type to another.
    The transformation lasts only for the life of the query.
    It is an ANSI standard (ANSI SQL-92 compliant), portable to other DBMS.
    So if you're comfortable with the CAST function, you'll be able to use it on other SQL-related databases.
    If in case the conversion fails, it will return an error. Otherwise, it returns the converted value.
    Doesn't have a parameter that accepts optional style for formatting. That's why you can use the SQL FORMAT function.

Syntax
CAST([Expression] as DataType (length))

    [Expression] – defines the valid expression argument.
    DataType – the target data type for conversion.
    Length (optional) – the specified length of the target data type.

Examples

Example 1
Let's try to convert a string to DateTime data type.
--Let's declare a type
DECLARE  @YOUR_BIRTHDAY NVARCHAR(10) = '01/29/2000';

--SYNTAX: CAST([Expression] AS DataType)
SELECT @YOUR_BIRTHDAY AS [Data To Convert],
CAST(@YOUR_BIRTHDAY AS DATETIME) AS [BirthDate - Data Converted];


Output

Example 2
Let's add two or more random numbers and convert them into money data type.
--Let's declare two numbers
DECLARE @NUM1 INT = 100, @NUM2 BIGINT = 854775808

--Let's add them together and convert to money and format a bit so it would look like a genuine $. :-)
SELECT FORMAT(CAST ((@NUM1 + @NUM2) AS MONEY), '$ #,##0.00') [Sum];

Example 3
Let's convert two random char data type to int data type and multiply it together.

--Let's declare 2 char with random number assigned to it
DECLARE @char1 CHAR(3) = '100', @char2 CHAR(3) = '569';

--Let's multiply the two char data-type and see the product of those two numbers.
SELECT CAST(@char1 AS INT) * CAST(@char2  AS INT) [Product of Two Numbers]


Output

What is SQL CONVERT function?
This function converts an expression from one data type to another, just like the CAST function. Another good thing about the SQL CONVERT function is that it gives you the option to format your converted data. That's why we can say that it is more powerful compared to the CAST function.
Things to Remember about SQL Convert Function

    A non-ANSI SQL-92 compliant function converts the expression data type to another data type with a formatting option.
    This function is specific to Microsoft's TSQL and will not be portable to other DBMS.

Syntax
CONVERT (DataType, (length), expression, style)

    DataType – target data type to which you want to convert.
    Length – the specified length of the target type.
    Expression – the target data type for conversion.
    Style – optional integer value to specify the style format of the output. Cool right?

Example
Let's create a temp table, insert the data of this year's Chinese New Year, convert it into VARCHAR, and pass some formatting options.
DROP  TABLE IF EXISTS temp.dbo.#CONVERT_FUNCTION_STYLES

CREATE TABLE #CONVERT_FUNCTION_STYLES
(Id int,
 [Name] varchar(10),
 [ConvertedDate] varchar(20))

 DECLARE @CHINISE_NEWYEAR DATETIME = '02/01/2022 12:00:00 AM';

 INSERT INTO #CONVERT_FUNCTION_STYLES
 (Id, Name, [ConvertedDate])
 VALUES
 (1, 'Default', CONVERT(VARCHAR,@CHINISE_NEWYEAR, 100)),
 (2, 'US',      CONVERT(VARCHAR, @CHINISE_NEWYEAR, 101)),
 (3, 'ANSI',    CONVERT(VARCHAR, @CHINISE_NEWYEAR, 102)),
 (4, 'German',  CONVERT(VARCHAR, @CHINISE_NEWYEAR, 104)),
 (4, 'Japan',  CONVERT(VARCHAR, @CHINISE_NEWYEAR, 111));

 SELECT @CHINISE_NEWYEAR [Date and Time To Be Converted],
       Name [Country],
       ConvertedDate [Country Standard Converted Date]

 FROM #CONVERT_FUNCTION_STYLES;


Output

HostForLIFEASP.NET SQL Server 2019 Hosting


SQL Server Hosting - HostForLIFE :: Everywhere JSON So Why Not In SQL Server - New Feature In SQL Server

clock February 7, 2022 07:49 by author Peter

If you are a developer then surely you must have used JSON (JavaScript Object Notation) but if not, then don’t worry, you'll use it sooner rather than later. JSON is a kind of ecosystem that is most popular in various areas for exchanging data. If you talk about charting solutions, AJAX, Mobile services, or any 3rd party integration then generally JSON is the first choice of the developers.

Nowadays most of the NoSQL databases like Microsoft Azure Document DB, MongoDB, etc. also use JSON ecosystem and some of them are based on JSON.

As it is such a popular growing system, why not in SQL SERVER?

In SQL SERVER 2016 JSON was introduced. This was step or bridge between NON-relational databases and relational databases by Microsoft SQL SERVER.

SQL Server 2016 provides the following capabilities when you are using JSON

    Parse JSON by relation query
    Insert & update JSON using the query
    Store JSON in the database

If you see it then conceptually it is similar to an XML data type which you might use in SQL SERVER.

The good thing in SQL SERVER 2016 for JSON is there is no Native data type. This will help in migration from any NoSQL to SQL SERVER.

SQL Server provides bidirectional JSON formatting which you can utilize in various ways. Suppose data is coming from the external source in the JSON format then you can parse it and store it in table structure (if required) in another case external source requires data in JSON format while data in SQL SERVER in tabular format so both the purpose can easily solve with SQL SERVER’s JSON feature.

Now, let’s jump directly to the practical to check JSON capabilities in SQL SERVER

1) FOR JSON AUTO
It is similar to FOR XML AUTO. It will return JSON object of selected column where column name is treated as a Key or in other words we can say it will format the query result in JSON.


when you run the above command the result will be like as shown in the below figure.

2) FOR JSON PATH
It’s exactly like JSON auto, the only difference is instead of SQL SERVER we have full control over the format. JSON Auto takes predefined column schema while with JSON path we can create a complex object.

For example, we are using the AdventureWorks Sales order table and joining that with the product table to get a sub-node. As you see below the image we have added a Root node as well. This root Node can be added in JSON auto as well if required.

Now, when you run the above query we can get complex JSON object as follows

3) IsJSON function
By the name, it is clear that this is a validating function.
To cross-check whether the provided string is a valid JSON or not we can run ISJSON.

4) JSON_VALUE
By the name, it is clear that if you want to get the value of the particular key of JSON then you can use this beautiful function which is JSON_VALUE.

5) OPENJSON function
This is a very beautiful function that you can use to parse external schema. Suppose, you got a JSON string from a mobile service that you will directly pass to SQL Server, and the SQL SERVER stored procedure will do the rest of the operation to parse it. The parsing and other operation can be easily handled by OPENJSON. The only tweak here is that it required database compatibility level 130 which you need to do (if not compatible with level 130)


There are many other interesting things which we will cover later.

HostForLIFEASP.NET SQL Server 2019 Hosting


SQL Server Hosting - HostForLIFE :: Email Notification On SQL Job Failure

clock February 3, 2022 07:25 by author Peter

In this article, we will discuss how to send email notifications when our SQL job fails. The purpose to configure is to intimate the user to take care of failed jobs. We will cover how to configure Database Mail, Email profile, SMTP Configuration, Operator to send email, notification, and SQL Server Agent configuration.

We know to perform a series of actions automatically on SQL server side, we need to configure jobs. A task that is configured will be run one or more times and monitored for success or failure. Some examples of SQL jobs are daily, weekly, monthly and quarterly reports, sending auto emails, newsletters, writing log files, and audit logs to be sent automatically on local or remote locations.

Why Configure Email Configuration?

When our job is running and we can face any issue while executing the script. Such issues occurred when working with files, simultaneously data insertion, working with SSDT (SQL Server Data Tools), and many more scenarios. SQL job get stuck and take more time as expected and finally fails. On job failure, we need to know on an immediate basis to get rid of the problem.

Steps to Configure Email Notification on Failure
These are steps to be performed to configure email notification on SQL job failure:

Step 1
Under Management, Configure Database Main. Right click on Database Mail and select the first option (Configure Database Mail)


Step 2
We are creating a new profile, so select the first option and click on Next.

Step 3
Write the profile name and description then click on Add button to add SMTP settings.

Step 4
I am using Gmail SMTP configuration; you can use according to your settings. From email address is used to send email notifications.


Step 5
When profile is ready then click Next to proceed.

Step 6
Configure your system level parameters like retry mechanism, attached files size, and allowed/prohibited extensions. Click on Next. On next screen shows all the details of your account simply select Finish. Your all configuration is successfully built.

Step 7

Create an Operator
Now we have to make an operator to whom you want to send email when the SQL job is failed
Expand SQL Server agent
Right-click on Operators and select new operator


Step 8
In the following screen enter your Operator name and E-mail name to whom you want to send emails. If you want to send email to more than one person just separate the email address with ';'

After that click OK and operator is ready to send emails.


Step 9
Create a New SQL Job

Step 10
Select Notifications and check on email and select operator which we define previously.
It helps to send email when the jobs fail. After that click on OK.


HostForLIFEASP.NET SQL Server 2019 Hosting


About HostForLIFE

HostForLIFE is European Windows Hosting Provider which focuses on Windows Platform only. We deliver on-demand hosting solutions including Shared hosting, Reseller Hosting, Cloud Hosting, Dedicated Servers, and IT as a Service for companies of all sizes.

We have offered the latest Windows 2019 Hosting, ASP.NET 5 Hosting, ASP.NET MVC 6 Hosting and SQL 2019 Hosting.


Month List

Tag cloud

Sign in