European Windows 2019 Hosting BLOG

BLOG about Windows 2019 Hosting and SQL 2019 Hosting - Dedicated to European Windows Hosting Customer

Node.js Hosting - HostForLIFE.eu :: Node.js Proxy Configurations on Windows

clock December 13, 2016 10:12 by author Peter

In this article, let me show you how to setup Node.js proxy configurations on Windows. It is often required to work with Node.JS and NPM package installer behind the proxy. When trying to install npm packages behind the proxy, you may come across the error, given below:

To resolve exceptions, shown above, http_proxy and https_proxy configurations needs to be done for NPM. The step by step guidance is given below to perform the configuration on Windows machine.

  • Go to C:\User\{User} directory.
  • If .npmrc file exists then open it in notepad editor else create .npmrcfile.
  • Add the lines, given below to the file for your valid AD domain user. proxy=http://domain\\username:password@ip:port
  • Add the lines, given below for Non AD user proxy=http://username:password@ip:port
  • Save .npmrc file
  • Try to use npm install now. It should work without any error.

The sample contents of .npmrc file are shown below:


European Windows 2016 Hosting - HostForLIFE.eu :: Top Security Features in Windows Server 2016

clock December 9, 2016 07:19 by author Scott

Most of the press surrounding the release of Windows Server 2016 has focused primarily on new features such as containers and Nano Server. While these new capabilities are undeniably useful, the bigger story with the Windows Server 2016 release is Microsoft's focus on security.

Admittedly, it is easy to dismiss claims of enhanced operating system security as being little more than marketing hype. After all, every new Windows release boasts improved security. In Windows Server 2016, however, Microsoft has implemented a number of new security mechanisms that are designed to work together to provide better overall security.

This article discusses virtual secure mode, which serves as the foundation for several new Windows Server 2016 security features, and three of the more innovative new features.

Microsoft's Virtual Secure Mode

Microsoft's latest security-related buzz phrase is Virtual Secure Mode. The idea behind virtual secure mode is that the Windows operating system can be made more secure by offloading some of its security functions to the hardware, rather than performing those functions solely at the software level.

There are two important things to understand about virtual secure mode. First, virtual secure mode doesn't really provide any security by itself. Instead, virtual secure mode is more of an infrastructure- level component of the operating system, and is the basis for other security features which will be discussed later on.

The other thing that must be understood about virtual secure mode is that the word virtual is there for a reason. As you probably know, modern CPUs include on-chip virtualization extensions. Historically, these virtualization extensions have been the basis of server virtualization. The hypervisor sits on top of the CPU and acts as an intermediary between the virtual machines and the hardware.

One of the big advantages to using this approach to server virtualization is that the hypervisor is able to ensure that virtual machines are truly isolated from one another. Virtual secure mode uses a similar technique to create a virtualized space on top of the hypervisor. Sensitive operations can be securely performed within this space, without being exposed to the host operating system.

Feature No. 1: Credential Guard

As previously noted, virtual secure mode is not a security feature itself, but rather a platform that can be used by other security features. Credential Guard is one of the security features that relies on virtual secure mode. As its name implies, Credential Guard is designed to prevent user credentials from being compromised.

The authentication process used by the Windows operating system is a function of the Local Security Authority (LSA). Not only does the LSA provide interactive authentication services, but it also generates security tokens, manages the local security policy and manages the system's audit policy. Credential Guard works by moving the LSA into Isolated User Mode, the virtualized space created by virtual secure mode.

Although the operating system must be able to communicate with the LSA in order to perform authentication services, Microsoft has designed the operating system to protect the integrity of the LSA. First, the memory used by the LSA is isolated, just as a virtual machine's memory is isolated. Microsoft also limits the LSA to running only the bare minimum binaries, and strict signing of those binaries is enforced. Finally, Microsoft prevents other code, such as drivers, from running in Isolated User Mode.

Feature No. 2: Device Guard

Device Guard is another operating system feature that leverages virtual secure mode. Device Guard isn't really a feature per se, but rather a collection of three security features that fall collectively under the Device Guard label. These three features include Configurable Code Integrity, VSM Protected Code Integrity, and Platform and UEFI Secure Boot (which has been around since Windows 8). Collectively, these three features work together to prevent malware infections.

The Device Guard component that is designed to work with virtual secure mode is VSM Protected Code Integrity. This component ensures the integrity of code running at the kernel level. Although moving kernel mode code integrity into virtual secure mode goes a long way toward protecting the operating system, the Configurable Code Integrity feature is equally noteworthy. This feature is designed to ensure that only trusted code is allowed to run. Administrators can use the PowerShell New-CIPolicy cmdlet to create integrity policies that essentially act as whitelists for applications.

In case you are wondering, these policies are based on application signatures. Since not all applications are signed, Microsoft provides a tool called SignTool.exe that can create a catalog (a signature) for unsigned applications.

Feature No. 3: Host Guardian and Shielded Virtual Machines

Although server virtualization has been proven to be relatively secure, it has always had one major Achilles heel: virtual machine portability. Today, there is little to prevent a virtualization administrator, or even a storage administrator for that matter, from copying a virtual machine's virtual hard disk to removable media.

The rogue administrator would then be able to take the media home, mount the virtual hard disks on his own computer and gain full access to the virtual hard disk's contents. If necessary, the administrator could even go so far as to set up their own host server and actually boot the stolen virtual machine. Microsoft's Host Guardian Service is designed to prevent this from happening by allowing the creation of shielded virtual machines.

The Host Guardian Service is a Windows Server 2016 attestation and key protection service that allows a Hyper-V host to be configured to act as a guarded host. A guarded host must be positively identified on the network and attested at the Active Directory and/or TPM level. If TPM trusted attestation is being used, then Windows goes so far as to verify the host's health by comparing its configuration against a known good baseline configuration. It is worth noting, however, that Active Directory trusted attestation does not support host configuration verification.

The Host Guardian Service enables the use of shielded virtual machines. A shielded virtual machine is a virtual machine whose virtual hard disks are encrypted via virtual TPM. This encryption prevents a shielded virtual machine from running on any Hyper-V server other than a designated guarded host. If a virtual hard disk is removed from the organization, its contents cannot be accessed and the virtual machine cannot be run.

Shielded virtual machines are BitLocker encrypted. BitLocker makes use of a virtual TPM device, residing on the host server. The virtual TPM is encrypted using a transport key, and the transport key is in turn protected by the Host Guardian Service.


Windows Server 2012 Hosting - HostForLIFE.eu :: How to Resolve .NET Installation Error In Windows Server 2012?

clock December 6, 2016 08:10 by author Peter

In this post you will learn how to resolve dotnet not getting installed error in Windows Server 2012. For the first time when I faced this issue, it took a long time for me to troubleshoot it. So when you try to install .NET Framework 3.5 features using Add or Remove features in Server Manager of Windows Server 2012, You may get the following error.

Here are the steps to resolve this issue:

Firstly, mount DVD or ISO image of OS on Windows Server on which you are trying to install .NET Framework 3.5.

Open Server Manager Console, Go to Manage and Add or Remove features and select .NET Framework 3.5 and click next.

And now you will see the following screenshot and at bottom of the screen you can see the option which states “specify an alternate source path”.

After clicking on Specify Alternate Source Path, give the path of DVD or ISO like the following and make sure you give exact path and click OK.

For eg: If your DVD drive is D drive as mine then the path should be the following,

D:\sources\sxs

After clicking OK click install and your installation should get completed without any error.


European SQL 2016 Hosting - HostForLIFE.eu :: Using SQL Server 2016 Query Store to Force Query Execution

clock December 5, 2016 10:44 by author Scott

Many a time we come across a scenario where suddenly in production without any release or changes some query which was working perfectly alright till yesterday is taking too long to execute or consuming lot of resources or timing out.

Most of the times such issue are related to execution plan change (commonly referred as Plan Regression). Till yesterday the query was running fine as it was running with good cached execution plan and today a bad plan is generated and cached. Because of this bad cached plan the query which was executing perfectly alright suddenly starts misbehaving.

To identify and fix such performance problems due to the execution plan change the Query Store feature introduced in Sql Server 2016 will be very handy.

Query Store basically captures and stores the history of query execution plans and its performance data. And provides the facility to force the old execution plan if the new execution plan generated was not performing well.

What’s Interesting with SQL Query Store

The SQL Server Query Store consists of two main store parts; the Plan Store, where the execution plans information stored, and the Runtime State Store, where the execution statistics will be stored. The query execution statistics and plans are stored first in memory, and flushed to the disk after a specific interval of time. In this way, the Query Store information will not be lost when the SQL Server service is restarted, as the data is hardened to the disk. The default flush to disk configurable database option DATA_FLUSH_INTERNAL_SECONDS value is 15 minutes, this means that, the executed queries information will be written to the disk from the Query Store every 15 minutes. The smaller flush interval, the more frequent write-to-disk operations, the worst SQL performance. The Query Store data will be flushed automatically to the disk to release the memory for other processes if there is a memory pressure. For proper memory and space usage for the Query Store, the execution information is aggregated in the memory first over fixed interval of time, and then flushed to the disk in aggregated form. The max_plans_per_query option can be used to control the number of plans that will be stored for review.

SQL Server Query Store provides you with an easy way to troubleshoot query performance, where you can identify the top CPU, Memory and IO consuming queries, with full execution history for these queries in addition to find which and when the query performance regressed and fix it directly by forcing the best plan, preventing the SQL Server Query Optimizer from using the less efficient new plan. It also can be used to draw a general image about the workload of your environment, with the query text, execution plans, the number of executions and SQL Server resources utilization, which can help you in evaluating how much resources required by your SQL Server database.

When the query is executed for its first time, the query execution plan with full query properties and statistics will be stored in the Query Store internal tables. If you run the query again and the SQL Server Query Optimizer decides to recompile the query and create a new execution plan, this plan will be added to the Query Store, in addition to the old one, with the plan and query execution statistics. Query Store allows you to track the queries execution plans and performance changes, and enforce the plan that the query behaves better when you execute the query with it. When a query is compiled, the SQL Server Query Optimizer will take the latest plan in the plan cache if it is still useful, unless a PLAN HINT is used, or another plan is forced by the Query Store. In this case, the Query Optimizer will recompile the query and use that new plan. No change is required from the application side to perform that, as this is performed transparently from the users.

To start using the new Query Store feature, you need to enable it at the database level, then it will start capturing the queries execution statistics and plans automatically. The below ALTER DATABASE statement is used to enable the Query Store feature on the SQLShackDemo database , which is disabled by default, and specify the operation mode for that feature:

USE [master]
GO
ALTER DATABASE [SQLShackDemo] SET QUERY_STORE = ON
GO
ALTER DATABASE [SQLShackDemo] SET QUERY_STORE (OPERATION_MODE = READ_WRITE)
GO

You can also use the SQL Server Management Studio to enable the Query Store, from the Database Properties window below, where you can find the new Query Store tab introduced when you use the SQL Server 2016 version:
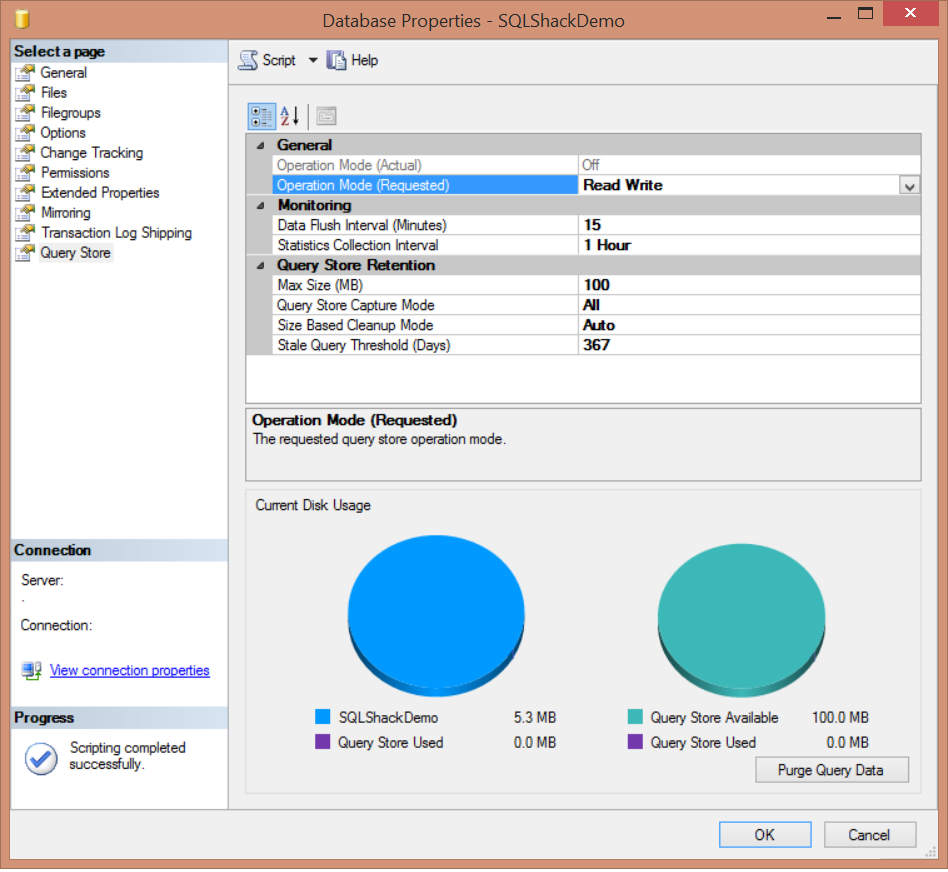
As you can see from the previous image, SQL Server Query Store can be run in two operation modes; Read-Onlymode, where you can only use the persisted statistics to analyze the queries , without capturing any new data. This occurrs when the Query Store reaches its maximum allocation space. In Read-Write mode, the Query Store will capture the execution statistics for the current workload and store it, to be used for analyzing the queries execution performance. The DATA_FLUSH_INTERVAL_SECONDS option determines how frequent the Query Store data stored in the memory will be asynchronously transferred to the disk. By default, SQL Server will write the in-memory Query Store statistics to the disk every 15 minutes, or 900 seconds. You can also flush the Query Store data manually from the memory to the disk by executing the below query:

USE SQLShackDemo
GO
EXEC sys.sp_query_store_flush_db

The maximum size of data that can be stored in the Query Store can be controlled by the MAX_STORAGE_SIZE_MB option. As mentioned previously, exceeding that limit will change the Query Store operation mode to Read-Only mode automatically. By default, the Query Store can keep up to 100 MB of query statistical data before transferring to the Read-Only operation mode. You can make sure that the Query Store will activate the cleanup process if the execution data exceeds the MAX_STORAGE_SIZE_MB value by setting the SIZE_BASED_CLEANUP_MODE to AUTO, which is the default value, or turn it OFF to stop the automatic cleanup process.

The QUERY_CAPTURE_MODE option specifies if the Query Store will capture ALL queries, or ignore the queries that are not running frequently or running on a very small time with AUTO capture mode or stop capturing any new query using the NONE capture mode. The number of days to keep the Query Store data is specified by the STALE_QUERY_THRESHOLD_DAYS parameter.

As mentioned previously in this article, query execution statistics data is aggregated in memory and later flushed to Query Store internal tables to optimize the space usage. The aggregation process is performed over a fixed time interval that is controlled by the INTERVAL_LENGTH_MINUTES parameter, which is 60 minutes by default.

You can also find other useful information in the Query Store page under the Database Properties window, such as the Query Store disk usage in the current database and disk space used by the Query Store internal tables. This page allows you to delete or purge the Query Store data by clicking on the Purge Query Data at the right bottom part of the window:
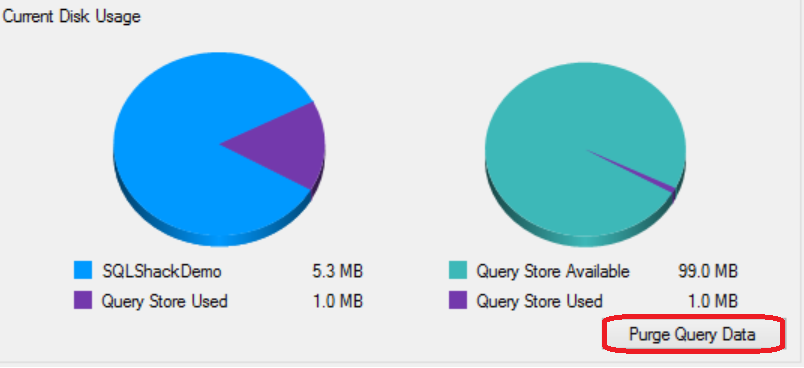
Or use the below ALTER statement to purge the content of the Query Store:

ALTER DATABASE [SQLShackDemo] SET QUERY_STORE CLEAR

SQL Server introduced 6 new system stored procedures and 7 new system views to check the Query Store feature information and deal with it. These system objects can be listed by querying the sys.all_objects system table as below:

USE master
GO
SELECT Name as ObjectName , type_desc as ObjectType
FROM sys.all_objects
WHERE name LIKE '%query_store%'
or name= 'query_context_settings'

The result will be like:
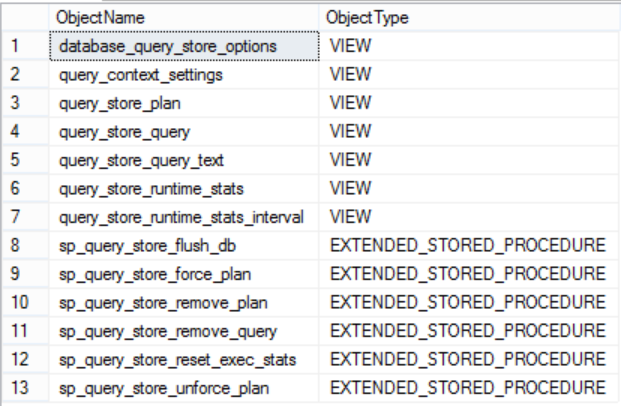
The sys.query_store_plan, sys.query_store_query, and sys.query_store_query_text system tables can be used to get the current query plans in the Query Store. To show you up-to-date statistics, the data stored in the disk and the current data in the memory will be merged together to provide toy with full image as follows:

SELECT QST.query_text_id,
QST.query_sql_text,
QSP.plan_id,
QSRS.first_execution_time,
QSQ.last_execution_time,
QSQ.count_compiles,
QSQ.last_compile_duration,
QSQ.last_compile_memory_kb,
QSRS.avg_rowcount,
QSRS.avg_logical_io_reads,
QSRS.avg_logical_io_writes
FROM sys.query_store_plan AS QSP  
JOIN sys.query_store_query AS QSQ  
    ON QSP.query_id = QSQ.query_id  
JOIN sys.query_store_query_text AS QST  
    ON QSQ.query_text_id = QST.query_text_id
JOIN sys.query_store_runtime_stats  QSRS
   ON QSP.plan_id =QSRS.plan_id

The result will be like:

The SQL Server Query Store has no direct impact on SQL Server performance, but you need to take into consideration the disk space required to store the aggregated query execution data, where the data will be stored in the Primary database filegroup and consume the configurable MAX_STORAGE_SIZE_MB disk amount as described previously. Also the Query Store capture the execution data asynchronously as it writes the data to the memory first and flush it later to the disk. Query Store avoids consuming the CPU and Memory resources in the way it uses to capture the new plans and the executions statistics.

Once the Query Store is enabled on your database, you can query the sys.database_query_store_options system object to check the Query Store settings you configured as follows:

USE SQLShackDemo
GO
SELECT  actual_state_desc,
                                flush_interval_seconds,  
                                interval_length_minutes,
                                max_storage_size_mb,
                                stale_query_threshold_days,
                                max_plans_per_query,
                                query_capture_mode_desc,
                                size_based_cleanup_mode_desc    
FROM sys.database_query_store_options;  

The result in our case will be like:

Refresh your database node from the Object Explorer to ensure that the new Query Store node that is added in SQL Server 2016, is enabled as below:
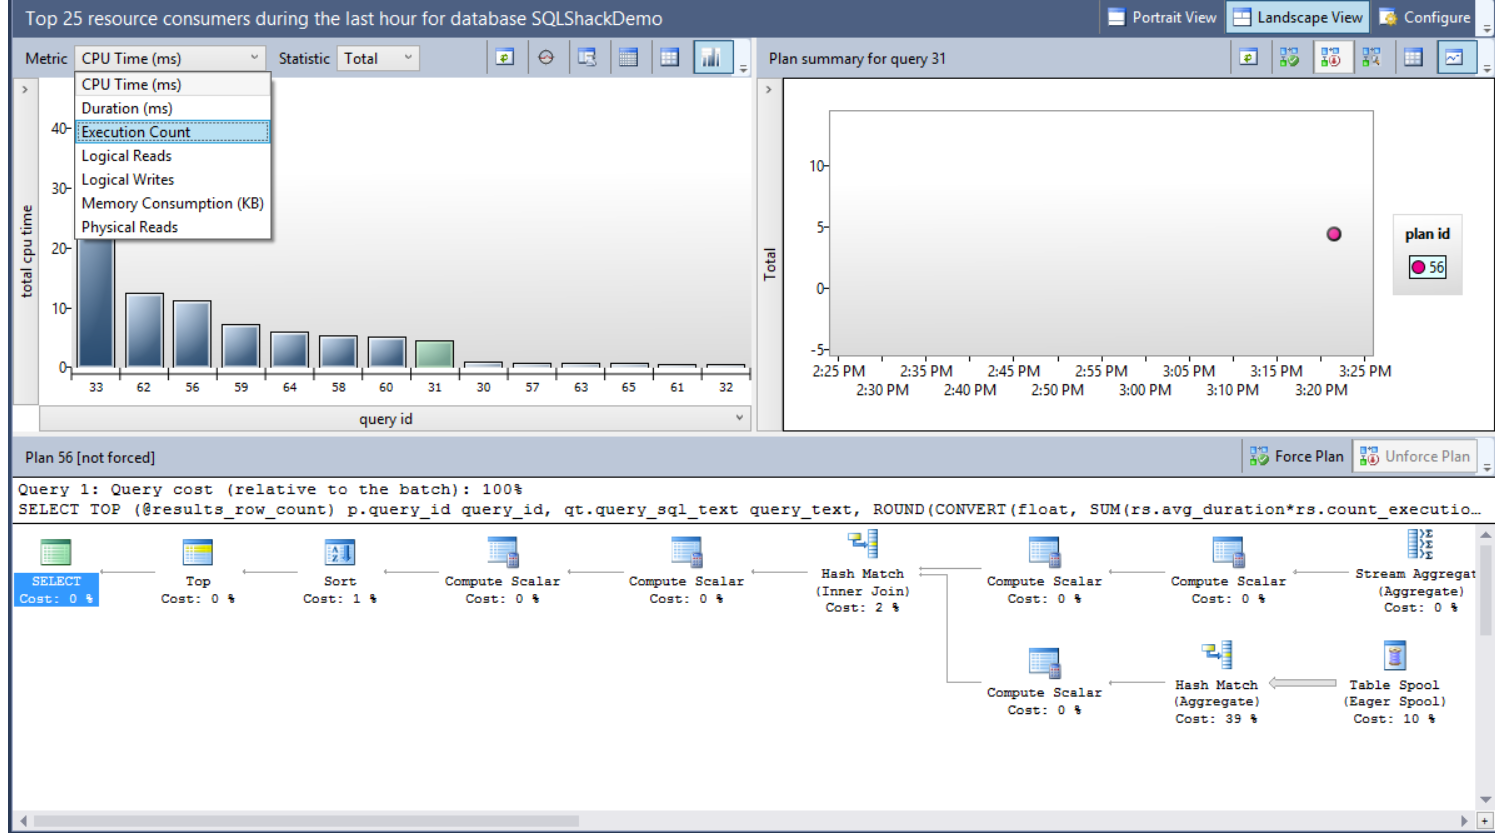
Four nodes will be displayed, from where you can check and track the changes in the queries execution statistics and performance. Choose the Regressed Queries node that will show you the queries execution plans with all related statistics:
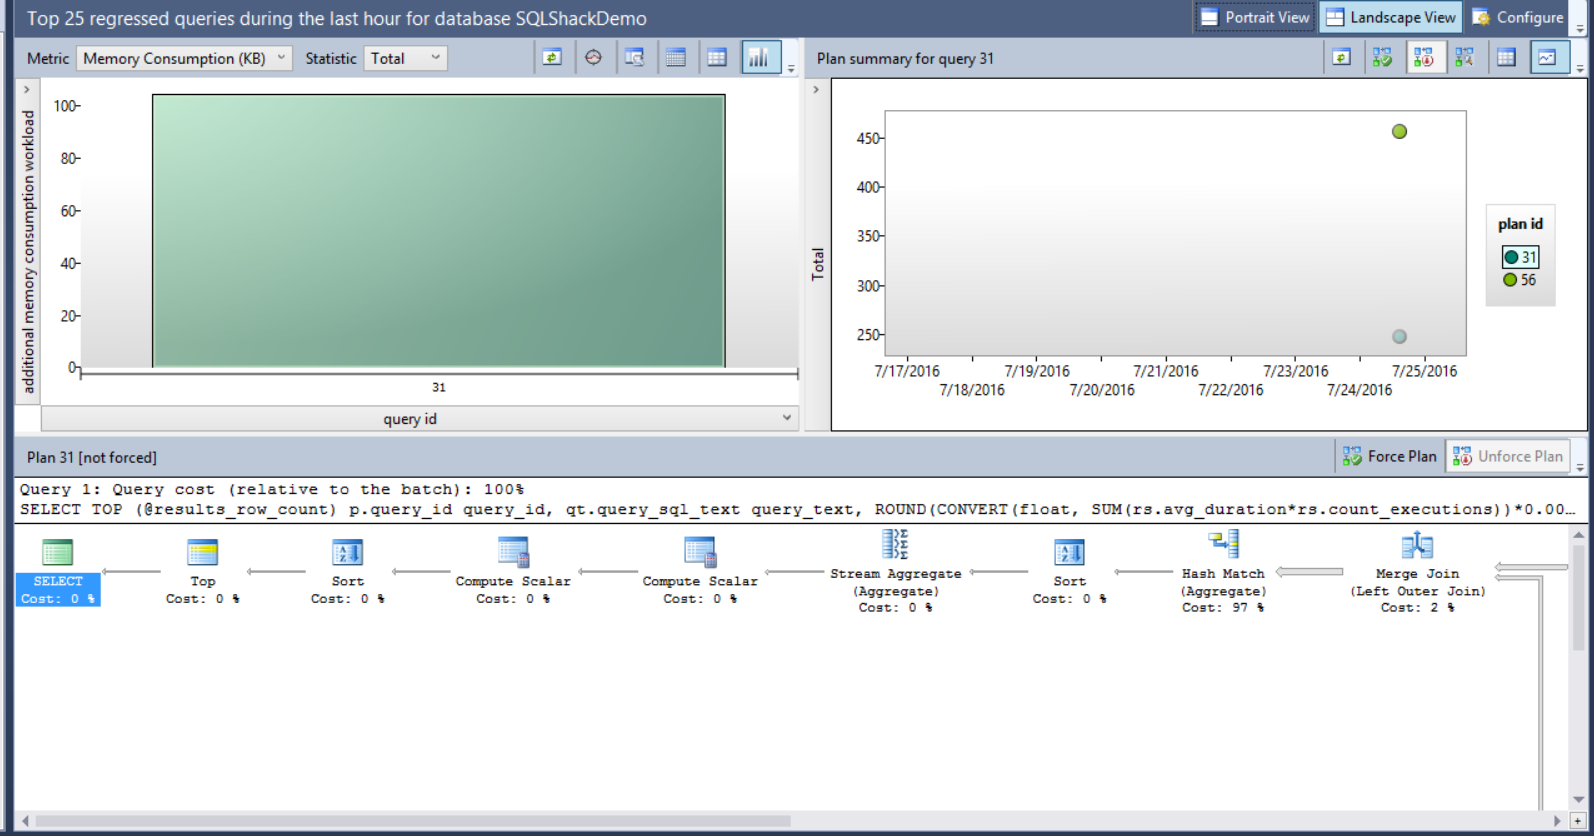
From the previous window, you can use the Metric drop-down list to choose the criteria that will be used to compare the execution plans performance, with the Statistic drop-down list to select the aggregation function used in the comparison. You can also view the graphical plan for the queries, the query text and the available plans for the query to force the best plan if requested.

Assume that we faced a memory consumption performance issue recently with one of our queries, and we arrange to force the Query Optimizer to use the old plan. Using the Query Store feature, select the Memory Consumption (KB) metric, the query and the plan as in the below window:

<image>

It is clear that the memory consumption for plan 56 is double the memory consumption of plan 31, so we will force the plan 31 for that query. The size of the bubbles shown in the right chart of the window depends on the total number of executions for each plan. The plans data can be displayed in grid form or as bubbles depends in the view you choose. Choose plan 31 in the previous window and click on Force Plan button.

A message will be displayed to confirm that you need to force the selected plan for that query as follows:
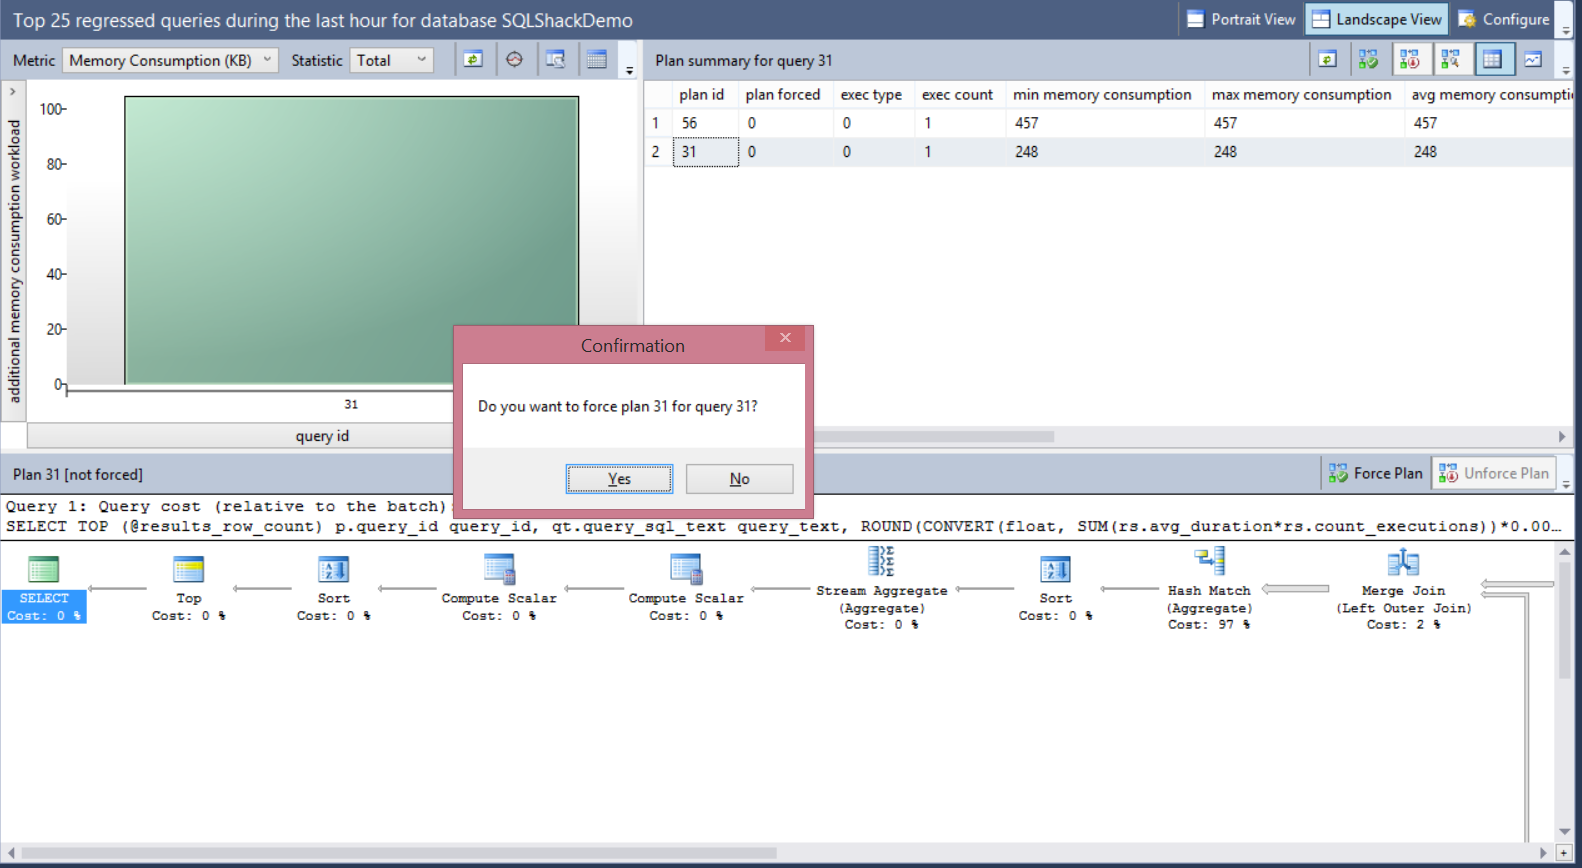
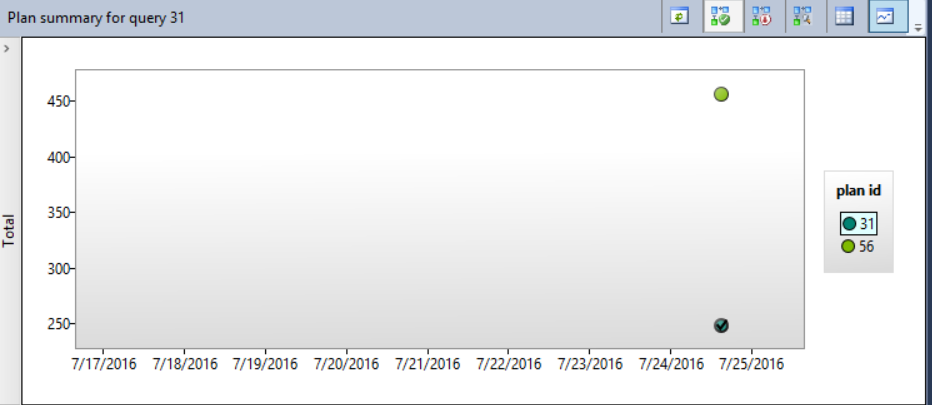
This action will force the SQL Server Query Optimizer to recompile that query in the next run using the forced plan. The selected plan will be shown with tick inside it, indicating that this plan is forced now for that query as below:
You can also use the sp_query_store_force_plan SP to enforce a specific plan for the query as follows:

EXEC sp_query_store_force_plan @query_id = 31, @plan_id = 31;

Conclusion:

The SQL Server Query Store is a nice feature introduced in SQL Server 2016, which certainly merits your time and attention, although it will take few minutes from you to configure and learn. This feature is a simple way that can be used to track performance changes and troubleshoot any degradation in the queries performance by comparing the execution plans for the same query and force the best one by overriding the one saved in the plan cache and used by the Query Optimizer. The SQL Server Query Store has no major impact on SQL Server performance due to the way that is used in capturing and saving the queries execution statistics and plans to be viewed later.


HostForLIFE.eu Proudly Launches Visual Studio 2017 Hosting

clock December 2, 2016 06:51 by author Peter

European leading web hosting provider, HostForLIFE.eu announces the launch of Visual Studio 2017 Hosting

HostForLIFE.eu was established to cater to an underserved market in the hosting industry; web hosting for customers who want excellent service. HostForLIFE.eu - a cheap, constant uptime, excellent customer service, quality, and also reliable hosting provider in advanced Windows and ASP.NET technology. HostForLIFE.eu proudly announces the availability of the Visual Studio 2017 hosting in their entire servers environment.

The smallest install is just a few hundred megabytes, yet still contains basic code editing support for more than twenty languages along with source code control. Most users will want to install more, and so customer can add one or more 'workloads' that represent common frameworks, languages and platforms - covering everything from .NET desktop development to data science with R, Python and F#.

System administrators can now create an offline layout of Visual Studio that contains all of the content needed to install the product without requiring Internet access. To do so, run the bootstrapper executable associated with the product customer want to make available offline using the --layout [path] switch (e.g. vs_enterprise.exe --layout c:\mylayout). This will download the packages required to install offline. Optionally, customer can specify a locale code for the product languages customer want included (e.g. --lang en-us). If not specified, support for all localized languages will be downloaded.

HostForLIFE.eu hosts its servers in top class data centers that is located in Amsterdam (NL), London (UK), Paris (FR), Frankfurt(DE) and Seattle (US) to guarantee 99.9% network uptime. All data center feature redundancies in network connectivity, power, HVAC, security, and fire suppression. All hosting plans from HostForLIFE.eu include 24×7 support and 30 days money back guarantee. The customers can start hosting their Visual Studio 2017 site on their environment from as just low €3.00/month only.

HostForLIFE.eu is a popular online ASP.NET based hosting service provider catering to those people who face such issues. The company has managed to build a strong client base in a very short period of time. It is known for offering ultra-fast, fully-managed and secured services in the competitive market.

HostForLIFE.eu offers the latest European Visual Studio 2017 hosting installation to all their new and existing customers. The customers can simply deploy their Visual Studio 2017 website via their world-class Control Panel or conventional FTP tool. HostForLIFE.eu is happy to be offering the most up to date Microsoft services and always had a great appreciation for the products that Microsoft offers.

Further information and the full range of features Visual Studio 2017 Hosting can be viewed here http://hostforlife.eu/European-Visual-Studio-2017-Hosting

About Company
HostForLIFE.eu is European Windows Hosting Provider which focuses on Windows Platform only. HostForLIFE.eu deliver on-demand hosting solutions including Shared hosting, Reseller Hosting, Cloud Hosting, Dedicated Servers, and IT as a Service for companies of all sizes.

HostForLIFE.eu is awarded Top No#1 SPOTLIGHT Recommended Hosting Partner by Microsoft. Their service is ranked the highest top #1 spot in several European countries, such as: Germany, Italy, Netherlands, France, Belgium, United Kingdom, Sweden, Finland, Switzerland and other European countries. Besides this award, they have also won several awards from reputable organizations in the hosting industry and the detail can be found on their official website.


About HostForLIFE

HostForLIFE is European Windows Hosting Provider which focuses on Windows Platform only. We deliver on-demand hosting solutions including Shared hosting, Reseller Hosting, Cloud Hosting, Dedicated Servers, and IT as a Service for companies of all sizes.

We have offered the latest Windows 2019 Hosting, ASP.NET 5 Hosting, ASP.NET MVC 6 Hosting and SQL 2019 Hosting.


Month List

Tag cloud

Sign in