European Windows 2019 Hosting BLOG

BLOG about Windows 2019 Hosting and SQL 2019 Hosting - Dedicated to European Windows Hosting Customer

SQL Server Hosting - HostForLIFEASP.NET :: Quickly Blocking Inbound Connections To SQL Server

clock March 29, 2021 07:32 by author Peter

Sometimes the brilliance of a solution is lost in its simplicity. Full disclaimer, this was Joey D ’Antoni’s (B|T) idea, however, he has given me permission to blog about it.  Recently, I were helping a client to reconfigure their production SQL Server instances to have a new and improved TempDB configuration. We knew that this would require an outage to ensure the changes had correctly taken affect.
 
Of course, we ran into a snag. The current configuration had 30 plus tempdb data files and any attempts to delete the files were blocked because they were actively being used. Nothing we tried would give us the ability to delete the excess files.
 
We even tried to restart the instance into single user mode, however, every time that happened something else would take the connection before we could get into the instance. We eventually restarted the SQL Server instance to normal operation so that we could investigate why we could not get a connection when in single user mode.
 
Turns out that with the production nature of the instance, the clients large farm of application servers was connecting to it faster than we could. This was discovered by using sp_who2, however, you could use the DMV sys.dm_exec_connections to see what is connecting to the instance if you desired. So, we needed a way to block incoming connections while not being evasive like shutting down the application servers or a large network change.
 
This is where the brilliance comes in.
 
Disable TCP/IP as a network protocol to SQL Server. BOOM. Instant firewall.
 
How To
If you open SQL Server Configuration Manager, you will probably see something like this. If you have more facets installed or multiple named instances installed, your list on the right-hand side might look a bit larger but for the most part it should be similar.

Expand SQL Server Network Configuration in the left-hand menu and select Protocols for the instance you want wish to block connections to. In this case, I just have the default instance installed on my laptop.

On the right hand side, notice that the TCP/IP protocol is correctly enabled. You can disable that by double clicking on TCP/IP and then changing the Enabled option to reflect No.

An alternative method is that you can also simply right click on the protocol and choose to enable or disable it.


With either method, you will acknowledge that the changes will not take effect until the service has been stopped and restarted.

 
Go ahead and restart the service. Once back online, the TCP/IP protocol will be disabled and any servers wishing to connect will be effectively denied. Keep in mind that we had local access to the server itself and retained connectivity to it even though SQL Server no longer allowed TCP/IP connections. Utilizing the shared memory protocol (it was the only thing enabled), we were able to restart into single user mode, get connected, and successfully remove the extraneous tempdb data files.

Once the tempdb work was completed, we re-enabled the TCPIP protocol, and then restarted the instance back into normal operations. Double checking sp_who2, we also verified that all the application servers had resumed connectivity to the SQL Server instance.

Summary

This is an example of a quick and effortless way to block all inbound connections to the SQL Server instance. This method required zero intervention from any engineers to stop application servers or implement firewall changes. A few simple clicks of the mouse and we were back in business.

Sometimes it is the simple things that are astonishing and brilliant.

HostForLIFEASP.NET SQL Server Hosting


SQL Server Hosting - HostForLIFEASP.NET :: Change Data Capture (CDC) In SQL Server

clock March 23, 2021 07:26 by author Peter

Every developer who has worked with SQL SERVER sooner or later has come across this problem, where he or she has to take a copy of the row/s before performing any DML operations, and the table in which it is copied is generally marked as ‘tablename_history’ or ‘tablename_backup’ and this is achieved by writing an insert query in a stored procedure or trigger whichever found appropriate.
 
Recently I stumbled upon a system function in the SQL SERVER called Change Data Capture (CDC in short), which does the above function(if enabled) asynchronously by default and is supported by all versions higher than SQL Server 2008.
 
Enabling Change Data Capture
To implement CDC we first need to enable CDC on a database, this is done by executing the stored procedure "sys.sp_cdc_enable_db" as given below.
    -- To Enable CDC  
    USE [CDC_TEST]  
    GO  
    EXEC sys.sp_cdc_enable_db  
    GO  


Now to enable CDC on the table, we need to do the stored procedure "sys.sp_cdc_enable_table" with its input parameters as given below
    USE [CDC_TEST]  
    EXEC sys.sp_cdc_enable_table     
      @source_schema = 'dbo', -- Is the name of the schema to which the source table belongs.  
      @source_name = 'Customer', -- Is the name of the source table on which to enable change data capture    
      @role_name     = NULL -- Is the name of the database role used to gate access to change data, we can mention null if we want all the users having access to the database to view the CDC data  


Once the stored procedure executes successfully some table with schema "cdc" is generated under the System Tables folder.


The tables include the following
    cdc.captured_columns table that contains the list of captured columns
    cdc.change_tables table that contains the list of tables that are enabled for capture
    cdc.ddl_history table that records the history of all the DDL changes since capture data enabled
    cdc.index_columns table that contains all the indexes that are associated with change table
    cdc.lsn_time_mapping table that is used to map the LSN number with the time and finally one change table for each CDC enabled table that is used to capture the DML changes on the source table
    cdc.dbo_Customer_CT table that contains the actual data before any DML operation is executed and some additional metadata like the operation, affected columns count, etc. The name of the table may vary depending on the name of the primary table on which the CDC is applied, but in general, it will be "NameOfSchema_TableName_CT" hence the name "dbo_Customer_CT".

With the tables, two SQL Agent Jobs are also created for given below
    cdc.CDC_TEST_capture job is responsible to push the DML changes into change tables
    cdc.CDC_TEST_cleanup job is responsible to clean up the records from the change tables. This job is created automatically by SQL Server to minimize the number of records in the change tables, failing this job execution will be resulting in a larger change table.

Detect Changes
So now that we have implemented CDC on the database and table, let's perform some DML operations given below
    INSERT INTO [dbo].[Customer]  
               ([CustName]  
               ,[CustMobNo]  
               ,[Address]  
               ,[SubAreaId])  
         VALUES  
               ('test cdc'  
               ,'9876543215'  
               ,'Home Address'  
               ,1)  
      
    UPDATE [dbo].[Customer]  
    SET  
        CustName = 'test cdc 2',  
        CustMobNo = '9876543216',   
        [Address] = 'Address updated',  
        SubAreaId = 2   
    WHERE CustId = 1  
      
    DELETE [dbo].[Customer] WHERE CustId = 1  


The results of the executed DML queries are populated in the table [cdc].[dbo_Customer_CT] table as shown in the image below.


The first five columns are metadata to the rows updated. The column '__$operation' is of significance as the column is used to identify the DML operation.
    __$operation = 1 denotes deleted rows
    __$operation = 2 denotes new inserted rows
    __$operation = 3 denotes row before the updation
    __$operation = 4 denotes row after the updation

But quering the cdc table is not advisable by Microsoft, hence we have to use table valued functions that were created while enabling CDC on the table. In this case, we have a table valued function called "fn_cdc_get_all_changes_dbo_Customer" which can be used as given below
    DECLARE @from_lsn binary (10), @to_lsn binary (10)  
    SET @from_lsn = sys.fn_cdc_get_min_lsn('dbo_Customer') -- scheme name with table  
    SET @to_lsn = sys.fn_cdc_get_max_lsn()  
      
    SELECT *  
    FROM cdc.[fn_cdc_get_all_changes_dbo_Customer](@from_lsn, @to_lsn, 'all')  
    ORDER BY __$seqval  


Disable CDC
Once the CDC is enabled we cannot change the Primary Key of the table, truncate the table, and in case we have to add or remove a column the corresponding CD table doesn't get updated and hence won't detect any changes for the newly added column. In these cases, we will have to disable the CDC make appropriate changes and re-enable CDC on the table. Below is a stored procedure that can be used to remove CDC on a table.
    EXEC sys.sp_cdc_disable_table     
      @source_schema = 'dbo' ,     
      @source_name = 'Customer',  
      @capture_instance ='all'  

Note

  • The SQL Agent should be up and running all the time
  • cdc_jobs configurations are very important to set correctly.Overestimating/underestimating the configurations will have a detrimental impact on you application performance. You may need to genuinely configure as per your workload, a performance test can be carried out as per your workload to reach out your optimal values
  • Cleanup job is scheduled by default to run at 02:00 AM every day
  • Capture job is scheduled as “Start automatically when SQL Server Agent starts”. As it uses continuous parameter further, you may not need to make any change for “Schedule type”.

HostForLIFEASP.NET SQL Server Hosting


SQL Server Hosting - HostForLIFE :: Handle JSON Data In SQL

clock March 15, 2021 07:25 by author Peter

In today's development world we are exposed to both SQL and No-SQL database operations. At some point we may need to map a JSON data to SQL table . Here is an article to parse JSON in SQL. Let's start.
 
Suppose front-end /client sends JSON data in string format. Define a variable to store the JSON string as below.
    DECLARE @json nvarchar(max) ;  
    //input from client  
    set @json = N'[{ \"mid\": \"/m/01dvt1\", \"description\": \"Joint\", \"score\": 0.975906968,   
    \"topicality\": 0.975906968 }, { \"mid\": \"/m/0dzf4\", \"description\": \"Arm\", \"score\": 0.9426941, \"topicality\": 0.9426941 },   
    { \"mid\": \"/m/01ssh5\", \"description\": \"Shoulder\", \"score\": 0.936277151, \"topicality\": 0.936277151 },    
    { \"mid\": \"/m/035r7c\", \"description\": \"Leg\", \"score\": 0.925112, \"topicality\": 0.925112 },  
    { \"mid\": \"/m/01d40f\", \"description\": \"Dress\", \"score\": 0.920576453, \"topicality\": 0.920576453 },   
    { \"mid\": \"/m/02p0tk3\", \"description\": \"Human body\", \"score\": 0.8836405, \"topicality\": 0.8836405 },  
    { \"mid\": \"/m/062581\", \"description\": \"Sleeve\", \"score\": 0.8722252, \"topicality\": 0.8722252 },   
    { \"mid\": \"/m/019swr\", \"description\": \"Knee\", \"score\": 0.8650081, \"topicality\": 0.8650081 },  
    { \"mid\": \"/m/01j04m\", \"description\": \"Thigh\", \"score\": 0.858148634, \"topicality\": 0.858148634 },    
    { \"mid\": \"/m/01vm1p\", \"description\": \"Elbow\", \"score\": 0.834722638, \"topicality\": 0.834722638 }]';  


This is a JSON data in string format (equivalent to JSON.stringify() in JavaScript). Before proceeding to map data, first we should generate a valid JSON object out of the string input. We can do that by replacing "/" and "\" with space. Here is the code.
    set @json = REPLACE(@json,'\','');  
    set @json = REPLACE(@json,'/','');  


SQL has in-built method "OPENJSON" to convert a JSON object to row and column format. Let's see the output.
    select * from OPENJSON ( @json ) ;   

Output


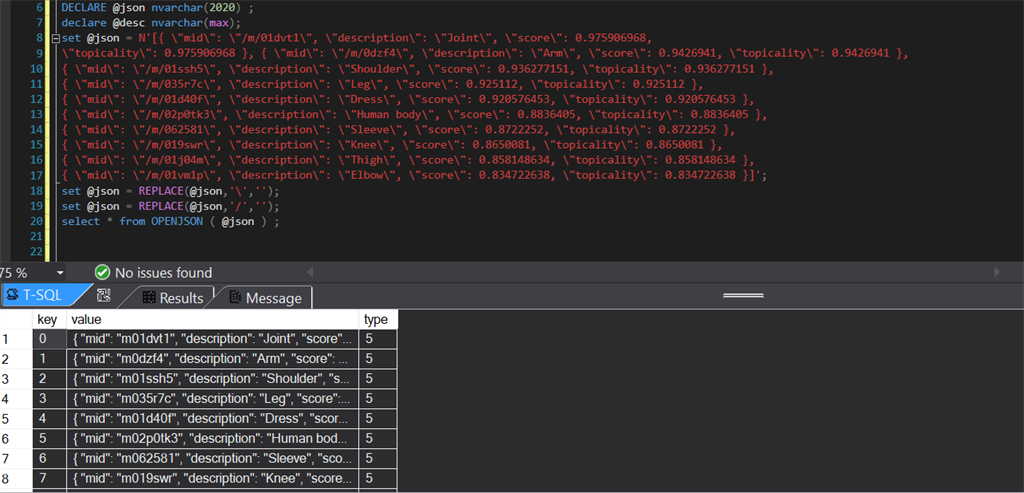
Here "type" refers to data type of JSON data. For more info about OPENJSON, here is a link MSDN.
 
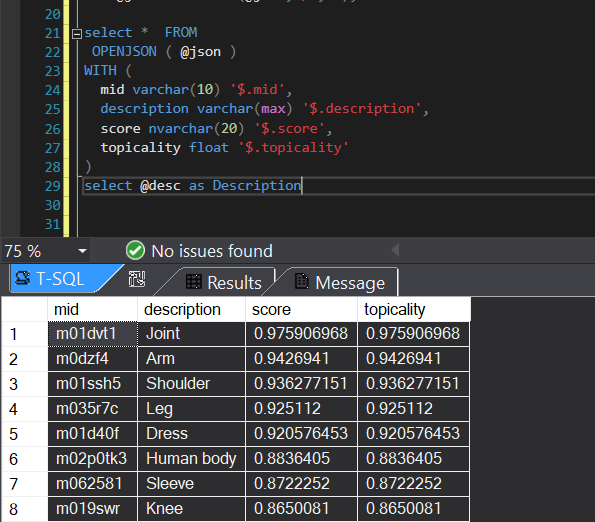
Now, we have to parse value column into SQL column. We can do so by using below query.
    select *  FROM    
     OPENJSON ( @json )    
    WITH (  
      mid varchar(10) '$.mid',  
      description varchar(max) '$.description',  
      score nvarchar(20) '$.score',  
      topicality float '$.topicality'  
    )  
    select @desc as Description  


Here $.mid,$.description, $.score and $.topicality are JSON properties. Based on your JSON property name , you need to replace it.
 
Output


We can copy these records to a SQL table as below.

    insert into jsondata (mid,description,score,topicality)   
    select mid,description,score,topicality  
    FROM    
     OPENJSON ( @json )    
    WITH (  
      mid varchar(10) '$.mid',  
      description varchar(max) '$.description',  
      score nvarchar(20) '$.score',  
      topicality float '$.topicality'   
    );  
    select * from jsondata;  

Here, i am trying to insert JSON data to an existing SQL table records.
 
Output

We can map No-SQL data to a SQL data table using SQL predefined method , that is "OPENJSON". I hope this article is helpful for you. Thanks you for spending time to read it. I am always open for any input or suggestion. Thank you!

HostForLIFEASP.NET SQL Server 2019 Hosting


SQL Server 2019 Hosting - HostForLIFEASP.NET :: RAND Function In SQL

clock March 12, 2021 11:17 by author Peter

In this blog, we will learn about how to use RAND() function based on our business requirement.
So here we will cover the following things:
    Definition
    Random Decimal Number
    Random Integer Range
    Real example
    Summary

Definition
As the name suggests the RAND function can be used to return any random number which can be decimal or integer.
 
The syntax for the RAND function would be:
    SELECT RAND()  

This function will return any random number like this image.

 
We can create any random decimal number between two given numbers, so for that, we can use this formula.
    SELECT RAND()*(b-a)+a;  

Here in this formula, you will use b for greater number and a for a lower number, so this formula will return a number between this.
 
Random Integer Range
 
We can create any random integer number between two given numbers, so for that, we can use this formula.
    SELECT FLOOR(RAND()*(b-a+1))+a;  

Here in this formula, you will use b for greater number and a for a lower number, so this formula will return a number between this.
 
Note
This RAND() function we can use on the following SQL version, SQL Server 2017, SQL Server 2016, SQL Server 2014, SQL Server 2012, SQL Server 2008 R2, SQL Server 2008, SQL Server 2005.
 
Real example
 
Now let's see the real example on this function, Here I am using multiple examples so that you can differentiate among them.
 
--//---1- Random Decimal-----//

    SELECT RAND()  
    SELECT RAND(7);  
    SELECT RAND(-7);  
    SELECT RAND()*(7-1)+1;  
    SELECT RAND(8)*(7-1)+1;  
    SELECT RAND(-4)*(7-1)+1;  

--//---2- Random Integer-----//


    SELECT FLOOR(RAND()*(8-4+1))+4;  
    SELECT FLOOR(RAND(6)*(8-5+1))+5;  
    SELECT FLOOR(RAND(123456789)*(10-5+1))+5;  


See this image for result,

HostForLIFEASP.NET SQL Server 2019 Hosting


SQL Server Hosting - HostForLIFEASP.NET :: Deploy SSIS Package To SQL Server

clock March 8, 2021 06:41 by author Peter

Before going next, first make sure you have SQL Server Integration Services installed. Open Visual Studio SSIS package project and right click on project and hit Deploy to deploy all packages, if you want to install individual packages then right click on the package and hit deploy.


First window is introduction windows click Next button.

We have two deployment targets,

    SSIS in SQL Server
    SSIS in Azure Data Factory

As in this article we are going to deploy on SQL Server, so we must select SSIS in SQL Server and click Next.


Select destination, Enter SQL Server name, Authentication type, Username and password and click Connect. Once connect Browse project folder path if available, if not available create a directory in SSISDB and create a new project and hit Next.

You can review all given changes and hit Deploy.

You can check the deployment result in last windows. If all results are passed, then click close.


Above screenshot shows that all results are passed and successfully deployed.


Go to SQL Server and expand Integration Services Catalogs and go to SSISDB the you can see the created folder and project and deployed packages there.

HostForLIFEASP.NET SQL Server Hosting


SQL Server Hosting - HostForLIFE :: Merge Statement In SQL

clock March 1, 2021 06:14 by author Peter

We use merge statement  when we have to merge data from the source table to the target table. Based on the condition specified it will Insert, Update and Delete rows in the targeted table all within the same statement. Merge statement is very useful when we have large data tables to load, especially when specific actions to be taken when rows are matching and when they are not matching.
 
The statement has many practical uses in both online transaction processing (OLTP) scenarios and in data warehousing ones. As an example of an OLTP use case, suppose that you have a table that isn’t updated directly by your application and instead, you get a delta of changes periodically from an external system. You first load the delta of changes into a staging table and then use the staging table as the source for the merge operation into the target.
 
The below diagram shows the source table and target table with corresponding actions: Insert, Delete and Update


It shows three use cases,
    When the source table has some rows matching that do not exist in the target table, then we have to insert these rows to the target table.
    When the target table has some rows that do not exist in the source table, then we have to delete these rows from the target table.
    When the source table has some keys matching keys with the target table, then we need to update the rows in a targeted table with the values coming from the source table.

Below is the basic structure of the Merge statement,
    MERGE INTO <target_table> AS TGT USING <source_table> AS SRC    
    ON <merge_condition>    
    WHEN MATCHED    
        THEN update_statement    -- When we have a key matching row
    WHEN NOT MATCHED    
        THEN insert_statement    -- when row exists in the source table and doesn't exist in the target table
    WHEN NOT MATCHED BY SOURCE    
        THEN DELETE;             -- Row doesn't exist in the source table


Consider the below example,
It is very easy to understand the merging concept here. We have two tables, the source table and a target table. The Source table has a new price for fruits [ex: Orange rate changed from 15.00 to 25.00] and also new fruits arrived at the store. When we merge we are deleting a few rows which do not exist in the source table.

 
Merge Statement In SQL
Code to merge tables.
    MERGE INTO Fruits WITH(SERIALIZABLE) f
    USING source s
    ON (s.id = f.id)
    WHEN MATCHED
    THEN UPDATE SET
    f.name= s.name,
    f.amount = s.amount
    WHEN NOT MATCHED BY TARGET
    THEN INSERT (id, name, amount) VALUES (s.id, s.name, s.amount)
    WHEN NOT MATCHED BY SOURCE
    THEN DELETE;

    SELECT @@ROWCOUNT;
    GO


Important Merge Conflict
Suppose that a certain key K doesn’t yet exist in the target table. Two processes, P1 and P2, run a MERGE statement such as the previous one at the same time with the same source key K. It is normally possible for the MERGE statement issued by P1 to insert a new row with the key K between the points in time when the MERGE statement issued by P2 checks whether the target already has that key and inserts rows. In such a case, the MERGE statement issued by P2 fails due to a primary key violation. To prevent such a failure, use the hint SERIALIZABLE or HOLDLOCK (both have equivalent meanings) against the target as shown in the previous statement. This hint means that the statement uses a serializable isolation level to serialize access to the data, meaning that once you get access to the data, it’s as if you’re the only one interacting with it.
 
In this article, we learned how a Merge statement improves performance by reading and processing data in a single query. There is no need to write three different statements. This will avoid multiple I/O operations from the disk for each of three statements individually because now data is read only once from the source table.

HostForLIFEASP.NET SQL Server 2019 Hosting


About HostForLIFE

HostForLIFE is European Windows Hosting Provider which focuses on Windows Platform only. We deliver on-demand hosting solutions including Shared hosting, Reseller Hosting, Cloud Hosting, Dedicated Servers, and IT as a Service for companies of all sizes.

We have offered the latest Windows 2019 Hosting, ASP.NET 5 Hosting, ASP.NET MVC 6 Hosting and SQL 2019 Hosting.


Month List

Tag cloud

Sign in