European Windows 2019 Hosting BLOG

BLOG about Windows 2019 Hosting and SQL 2019 Hosting - Dedicated to European Windows Hosting Customer

SQL Server Hosting - HostForLIFE :: Configure Named Pipe And TCP/IP Settings Of SQL Server

clock October 29, 2021 07:30 by author Peter

In this article, we are going to configure Microsoft SQL Server on a Windows machine to listen to a specific TCP port. We will enable TCP/IP and Named Pipe and configure firewall rules so that other network computers can communicate with SQL Server instances.

Pre-requisites
Microsoft SQL Server installed on the machine (please check my article to install SQL Server here).

Configure Named pipe and TCP/IP protocols

Let us first configure Named Pipe and TCP/IP for SQL Server. I have installed SQL Server 2019 on my local machine.

Step 1
Open SQL Server Configuration Manager from the Start menu.

Step 2
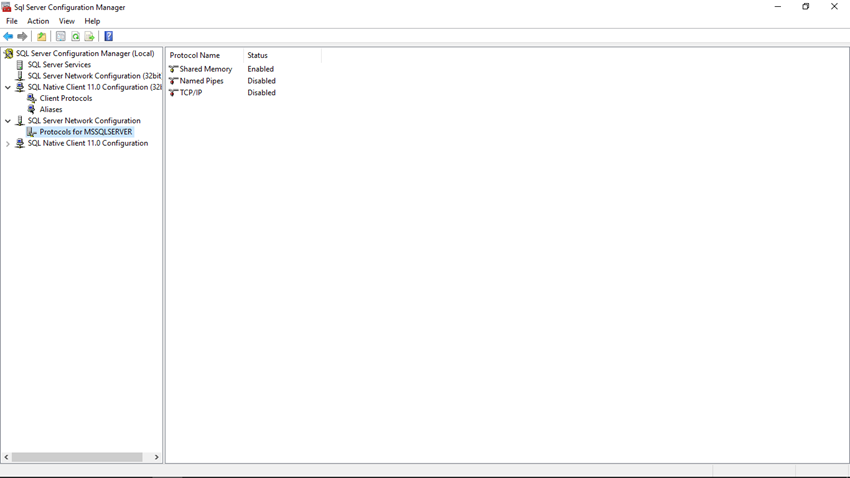
Let's first enable Named Pipe for the SQL Server Instance (in my case MSSQLSERVER). Go to SQL Server Network Configuration (in Console pane) and click on the Protocols for MSSQLSERVER.

Step 3
In the details pane (right panel), right-click on the Named Pipes protocol, and then click Enable to enable the named pipe for that particular SQL instance.
Configure Named Pipe and TCP/IP Settings of SQL Server

Step 4
Next, we will enable TCP/IP connection for the SQL Server Instance. So right-click on the TCP/IP protocol and click on the Enable option.


Step 5
Now again right-click on TCP/IP protocol, and then click the Properties option.

Step 6
Now you can see the TCP/IP Properties window, click on the Protocol tab, select Yes in Listen All property.


Step 7
Now click on the IP Addresses tab, scroll down to the IPALL section. Now change the value of the TCP Dynamic Ports property to blank. If its value is zero, the Database Engine will listen on dynamic ports. Next, in the TCP Port property, enter the port number you want this IP address to listen on (in my case 1717), and then click the OK button. You can also specify multiple ports by separating them with a comma.

Note
If you want to use individual IP addresses (IPn sections), please set Listen to All property to No in the Protocol tab. Here, I want to use IPAll section, for that reason, I have set Listen All property to Yes in the Protocol tab.

Step 7
The above configurations will only take effect after we restart SQL Server Instance services. So now select the SQL Server Services option from the Console Pane.

Step 8
Now, right-click on the SQL Server (MSSQLSERVER) from the Details Pane and then click the Restart button to restart the SQL Server service.

We have successfully configured an instance of the SQL Server Database Engine to listen on a specific fixed port by using the SQL Server Configuration Manager. Next, we need to configure a firewall so that our specified port (in my case 1717) can be opened in the firewall.
Firewall configurations to allow SQL port

Now that we have configured SQL Server to listen on a specific port, we need to open that particular port in the firewall. Let us see how to configure the firewall.

Step 1

Open Windows Defender Firewall from the Start menu.

Step 2
You will see the Windows Defender Firewall window from Control Panel. Click on the Advanced Settings link from the left panel.


Step 3
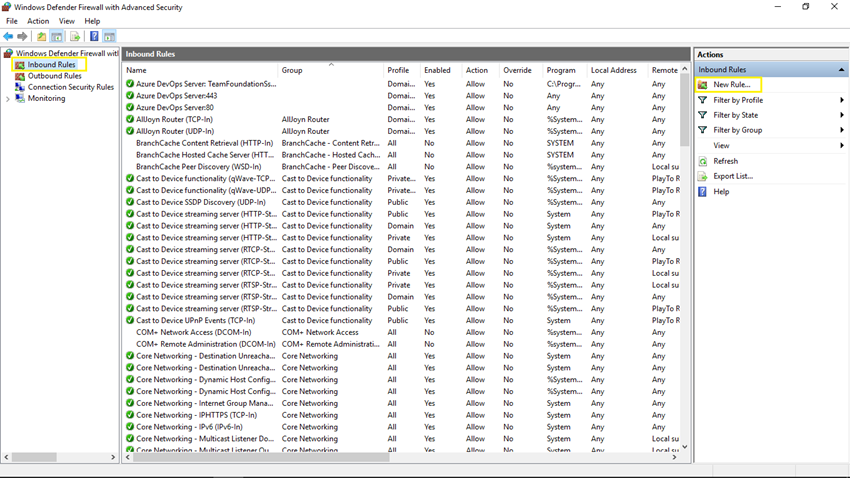
Now you will see Windows Defender Firewall with Advanced Security window. Click on the Inbound Rules from the left panel and then click on the New Rule button from the right panel.


Step 4
Now you will see the New Inbound Rule Wizard window. In the Rule Type step, select Port because we want to allow SQL port 1717 from the firewall and click on the Next button.

Step 5
In Protocol and Ports step, select Specific local ports and enter our SQL port 1717 in the textbox and click the Next button.


Step 6
In the Action step, select Allow the connection and click on the Next button.


Step 7
In the Profile step, check all the checkboxes and click on the Next button.


Step 8
In the Name step, specify a meaningful name for the rule and provide a description and click on the Finish button.

Step 9
Now you can see our new rule is listed in the Inbound Rules list.

Excellent! We have successfully configured a firewall to open the SQL port for the database instance connection from outside.

Expected errors/issues
Sometimes you can face some issues/errors in connectivity with SQL Server instances from outside even after the above configurations. Please make sure:

    In SQL Server Configuration Manager, in the console pane, click on the SQL Server Services, make sure SQL Server Browser service is running.
    If you have assigned an SQL port other than 1433, you have to specify the port number in the server name at the time of the SQL connection. For example, cloude-desire-01, 1717 in my case.

HostForLIFEASP.NET SQL Server 2019 Hosting


SQL Server Hosting - HostForLIFE :: Installation Of Microsoft SQL Server On Windows System

clock October 13, 2021 07:19 by author Peter

In this article, we are going to install Microsoft SQL Server on windows machines step by step. In this tutorial, we are going to use SQL Server 2019 Developer edition and Windows Server 2019.

Pre-requisites
    Windows machine having 2 core and 4 GB RAM configuration

Download SQL Server 2019 Developer Edition
First, let’s download SQL Server installation media from the official website.

Step 1
Download installation media from this link.

Step 2
Run the downloaded file and you will see the below screen. Now select the third option – Download Media.

Step 3
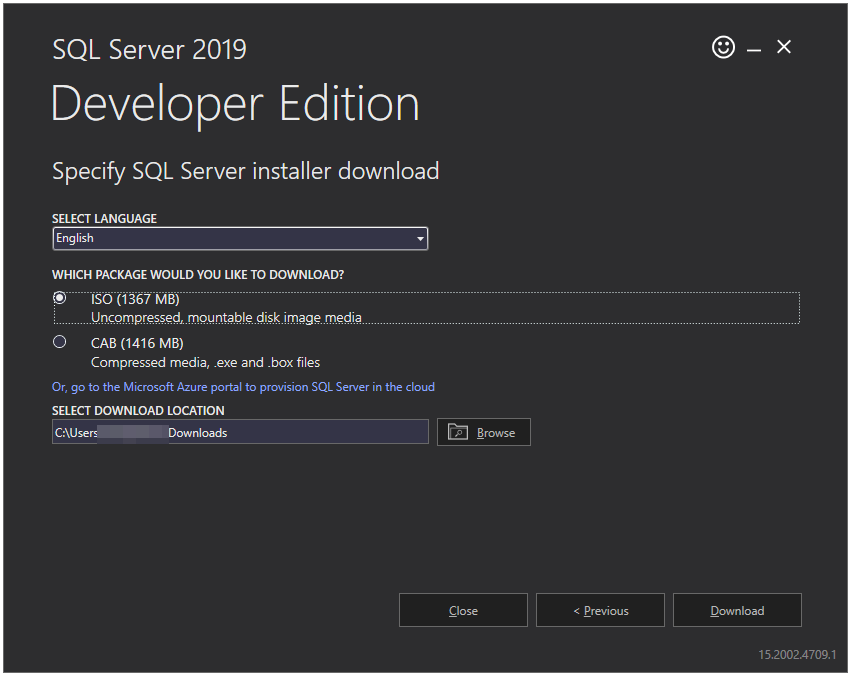
Now you will see the below screen. Please select the language you prefer and select the ISO radio button to download the ISO file. In addition, select the download location of your choice. I will go with the default location. Now press the Download button.
 

Step 4
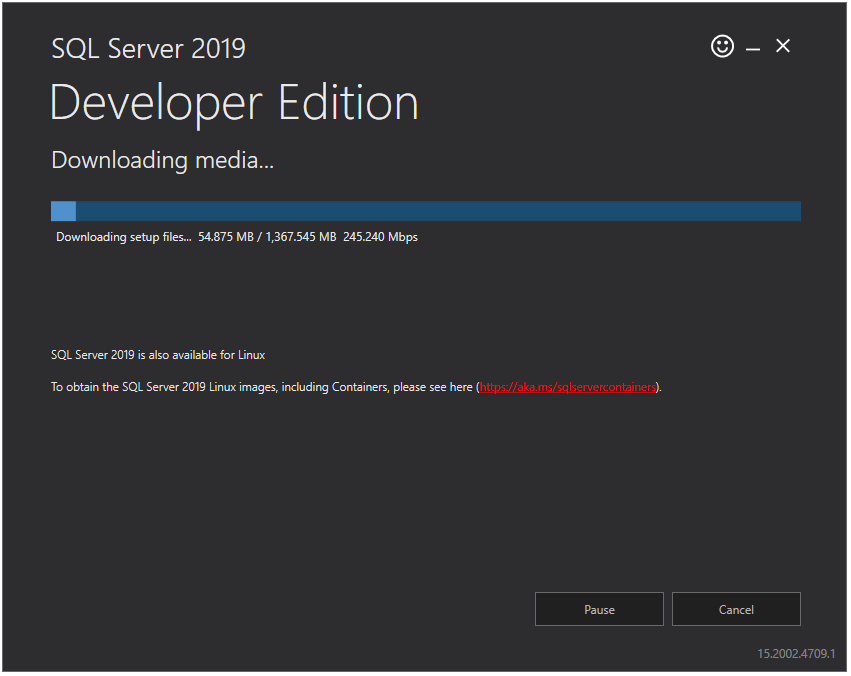
Now it will start downloading SQL Server installation media. It will take some time based on your internet connection speed.
Step 5
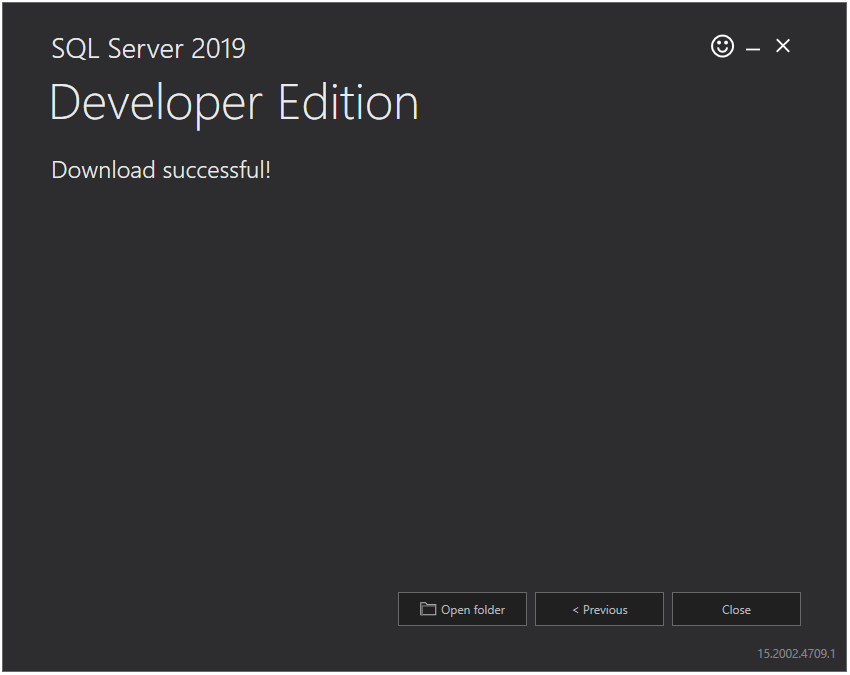
After successful download of installation media, you will see the below screen. Click the Close button.


Install SQL Server 2019 Developer Edition
Now that we have installation media, we can start the installation of the SQL Server. Let’s see how to install SQL Server step by step.

Step 1
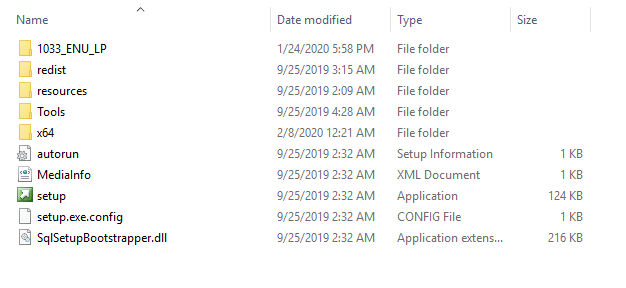
Run install media file (ISO file) downloaded in above section by double-clicking on it. It will extract/mount all the contents in a new temporary drive.

Step 2
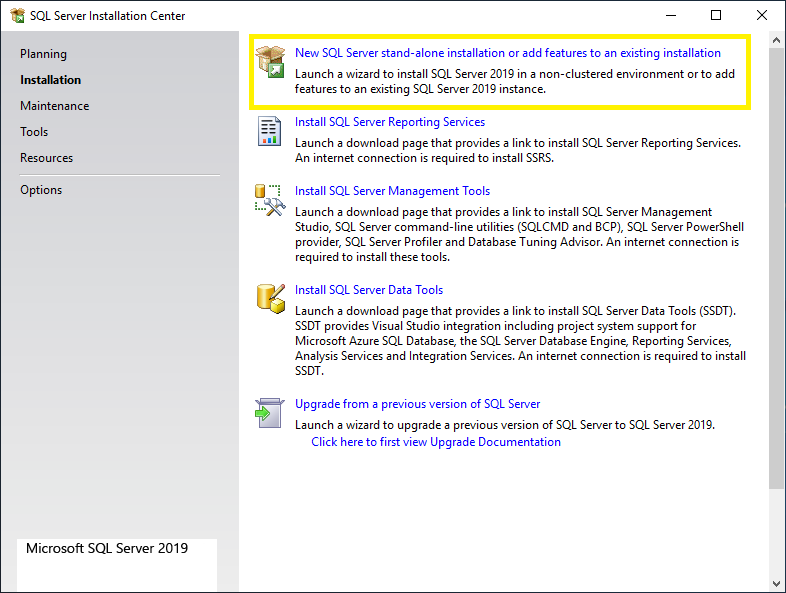
Once extraction is completed, double click on the setup.exe file and you will see the below screen. Click on the Installation option in the left panel and then click on New SQL Server stand-alone installation or add features to an existing installation option from the right panel.
 

Step 3
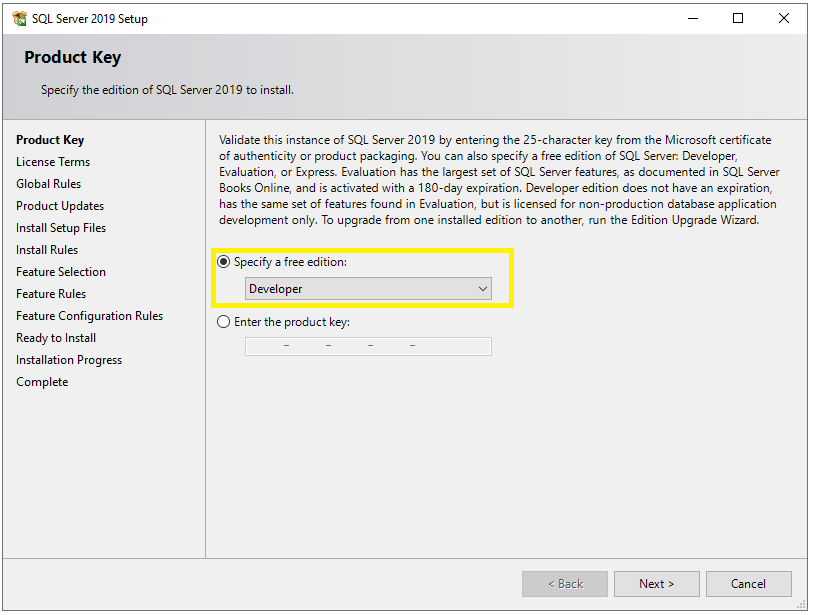
Now you will see the Product Key window. Select the Developer option from the dropdown and click on the Next button.
Step 4
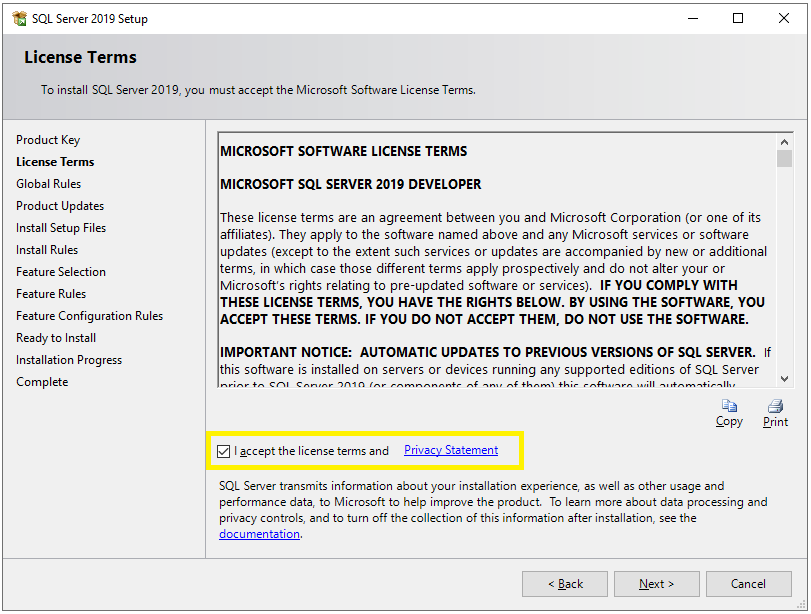
Now you will see the License Terms window. Just select the checkbox and click on the Next button.
Step 5
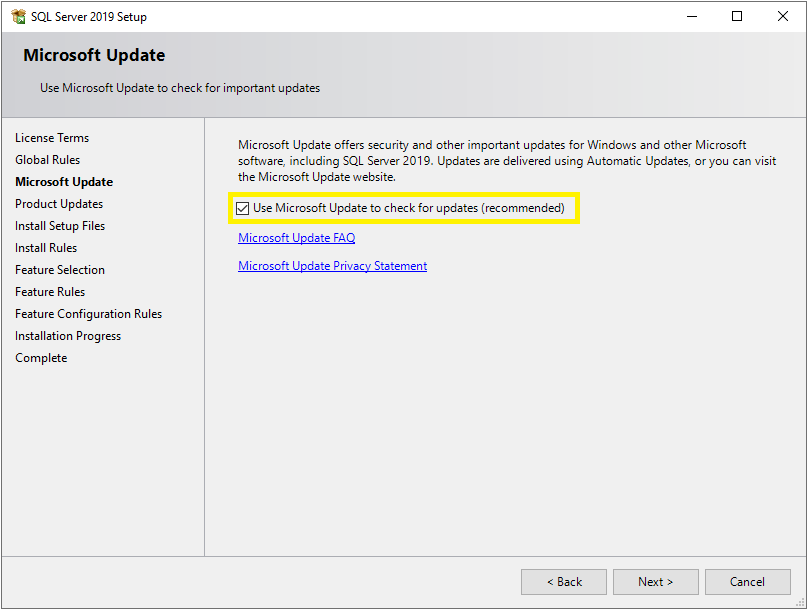
Now you will see the Microsoft Update window. It is not compulsory to check for the latest updates but it is recommended. So, select the checkbox and click the Next button.
 

Step 6
Now it will check for updates and install them if any.
Step 7
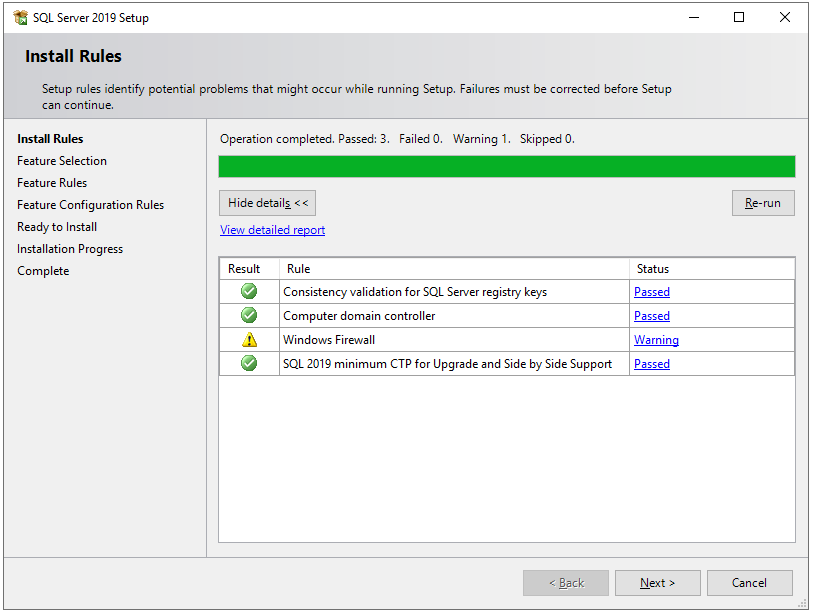
After that, it will check some rules or prerequisites for the installation of SQL Server. Once all the rules passed, click on the Next button. Sometimes you may face an error at this stage. You can find some known errors at the end of this article.
Step 8
On the Feature Selection window, select features as shown in the below screenshot. You can also change the location for SQL Server instance installation but I will go with the default location. After feature selection please click the Next button.
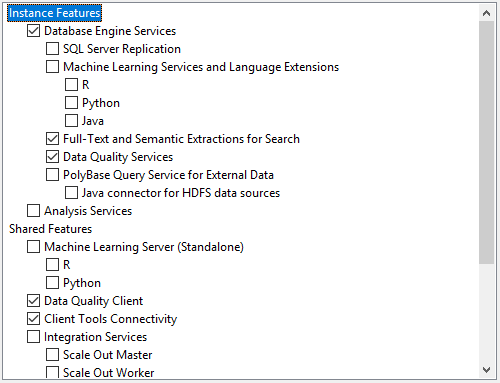
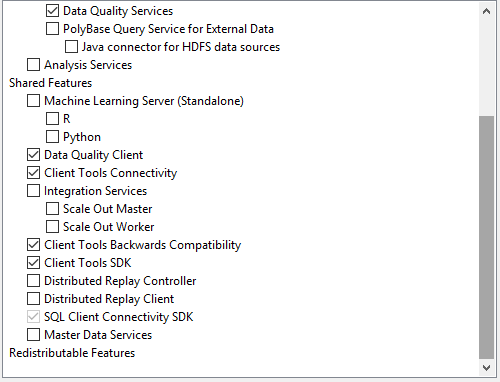
        Image 1 – Features selection Image 2 - Features selection

Step 9
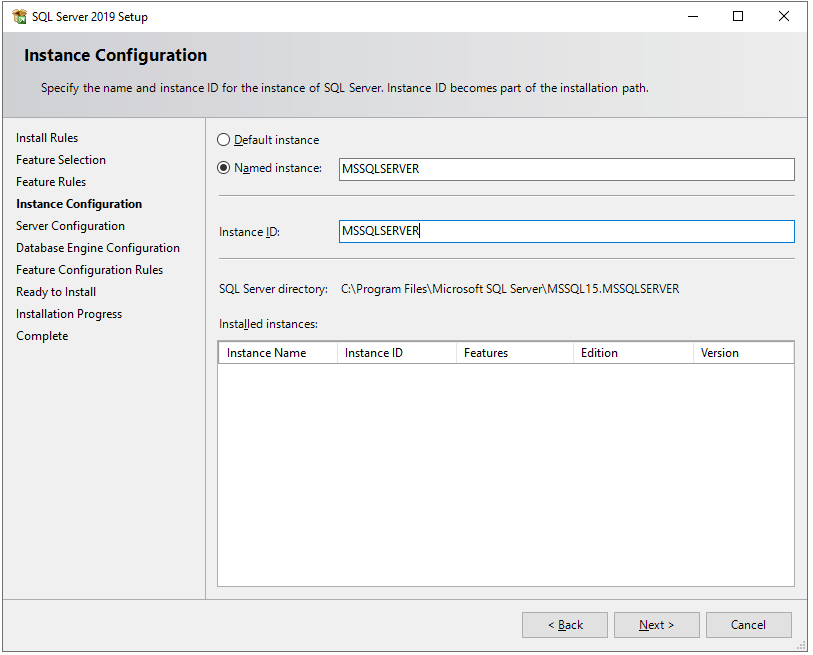
It will check some feature rules/prerequisites and then you will see the Instance Configuration screen. Here you can choose between Default Instance and Named Instance. Here I will go with Named Instance.
Note
Default Instance
When SQL Server is installed in the default instance, it does not require a client to specify the name of the instance to make a connection. The client only has to know the server name. For example, HARDIK-PC.

Named Instance
A named instance is identified by the network name of the computer plus the instance you specify during the installation. The client must specify both the server name and the instance name when connecting. For example, HARDIK-PC/MSSQLSERVER.

Step 10
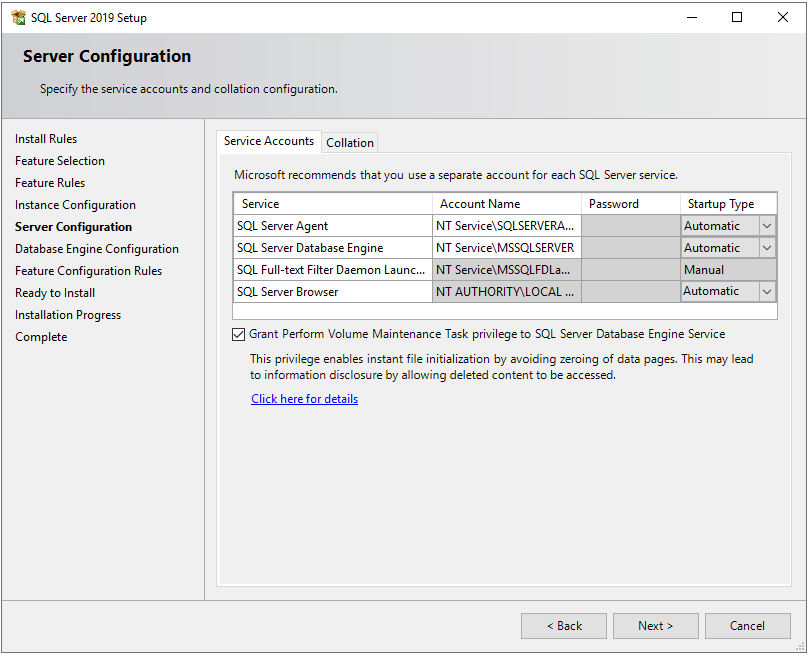
Next, you will see the Server Configuration window. In Service Accounts tab, select Automatic in Startup Type for SQL Server Agent, SQL Server Database Engine, and SQL Server Browser services.

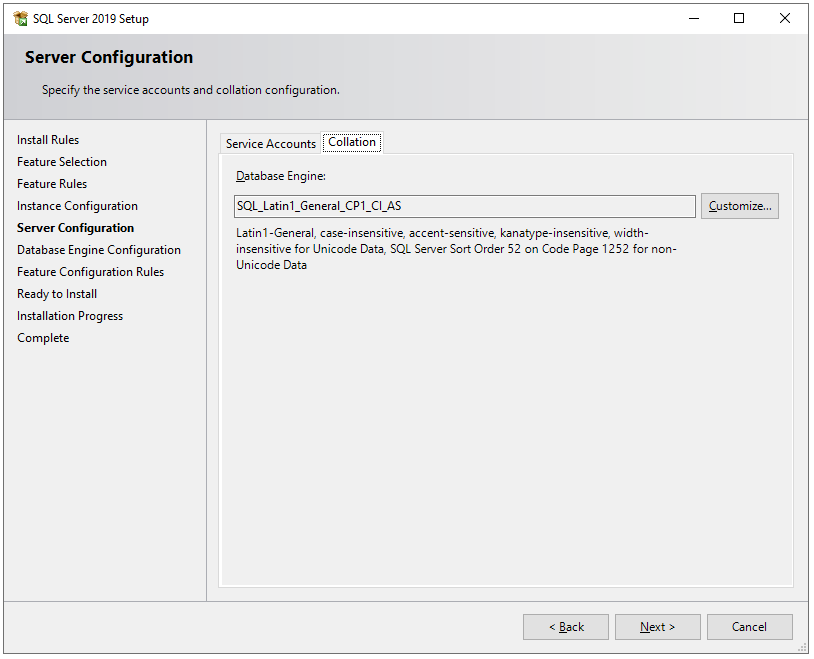
In the Collation tab, select collation as per your preference.
“Collations in SQL Server provide sorting rules, case, and accent sensitivity properties for your data. Collations that are used with character data types, such as char and varchar, dictate the code page and corresponding characters that can be represented for that data type.” – Microsoft.
Step 11
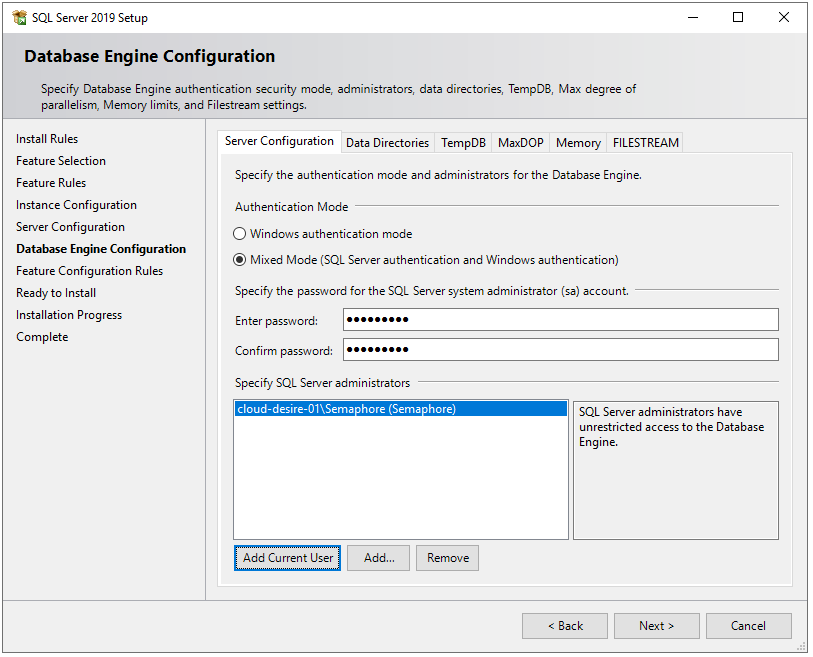
Next, you will see the Database Engine Configuration window. In the Server Configuration tab, choose Mixed Mode in the authentication mode section and enter a strong password. In Specify SQL Server administrators section, your current windows user should already be added automatically. If not, click on Add Current User button.
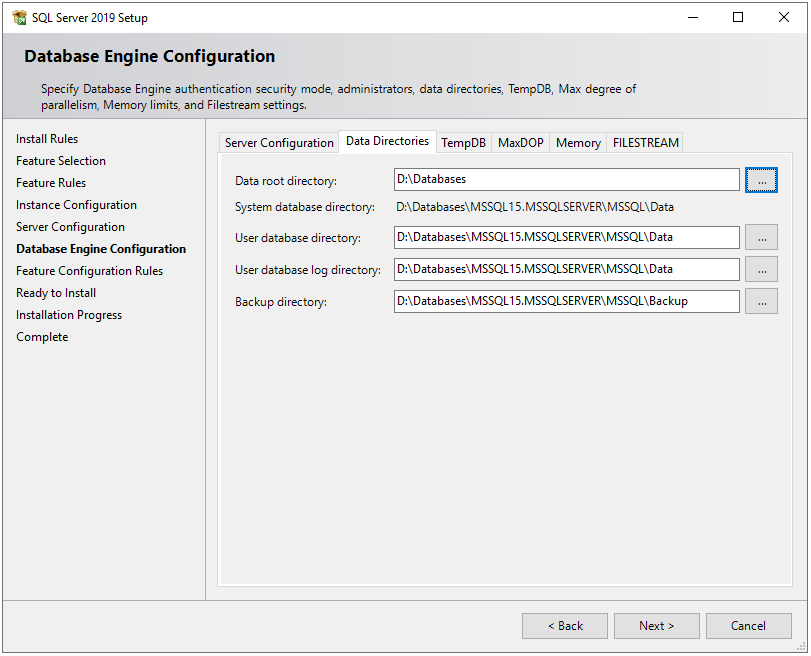
In the Data Directories tab, specify locations for database files and backup files. By default, it saves all the files on a C drive but it is not recommended to store database files on an OS drive because if any OS-related issue occurs then we may lose our data. Therefore, I choose D drive on my local machine.
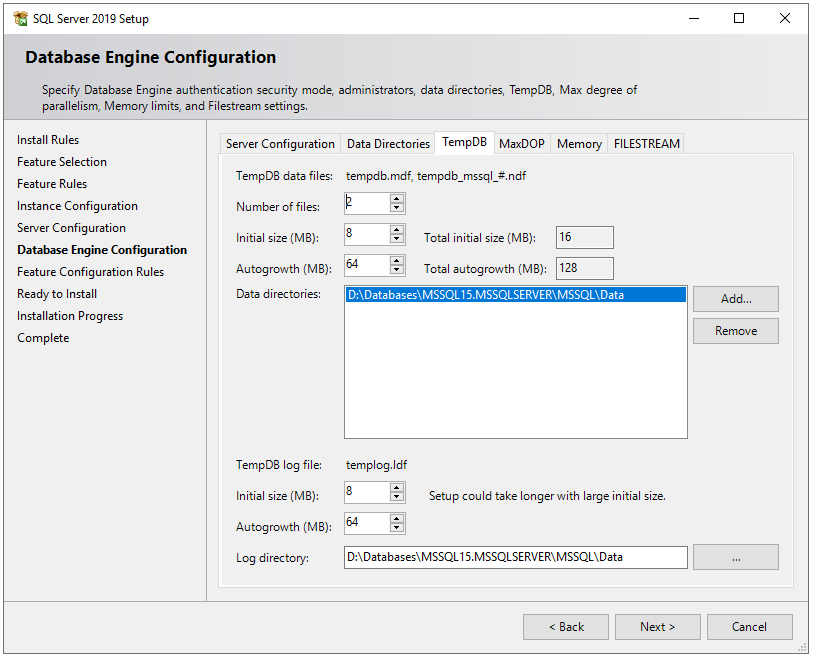
In the TempDB tab, there are configurations for the temporary database file(s). There are some best practices on how to configure temporary database files locations, the number of files, and their file sizes. Ideally, the number of the TempDB data files should match the number of logical processors. So I have a number of files to 2. If you are interested in deep dive into TempDB best practices, here is a very good article on it.
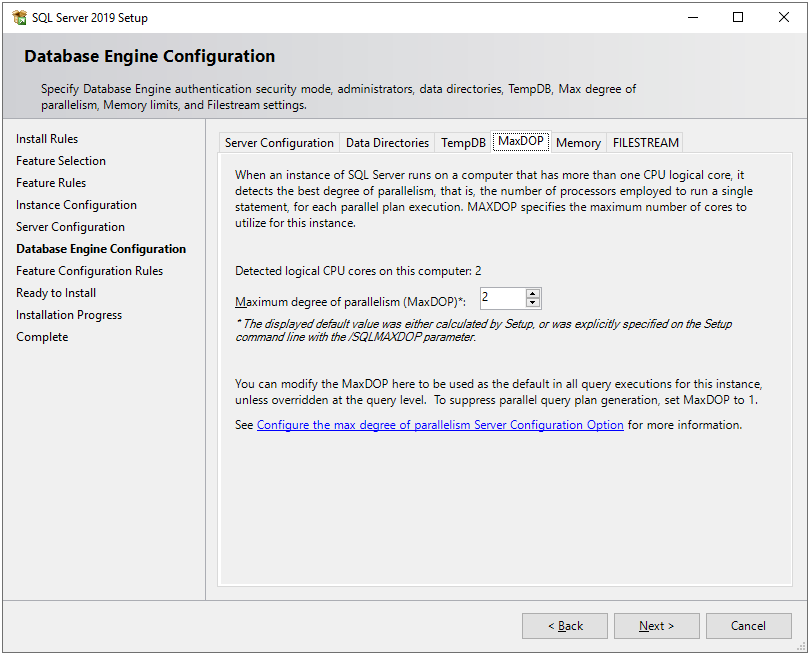
Next, in the MaxDOP tab, the maximum degree of parallelism (MAXDOP) is a server configuration option for running SQL Server on multiple CPUs. It controls the number of processors used to run a single statement in parallel plan execution. By default, the setup will suggest value based on the system configuration.
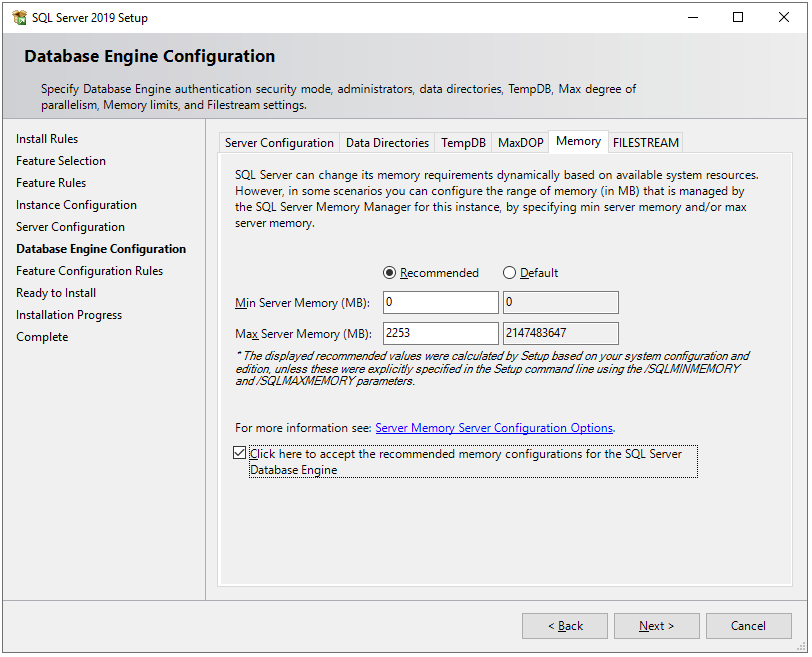
Next, in the Memory tab, we can configure how much memory SQL Server instance can consume. By default, the installation process will recommend you min and max memory allocation based on the system configuration on which it is going install. However, you can change it. Here you can find best practices for SQL Server memory configurations.
In the FILESTREAM tab, leave the checkbox unchecked because we are not going to enable this feature. FILESTREAM, in SQL Server, allows storing these large documents, images, or files onto the file system itself.
Click on the Next button.

Step 12
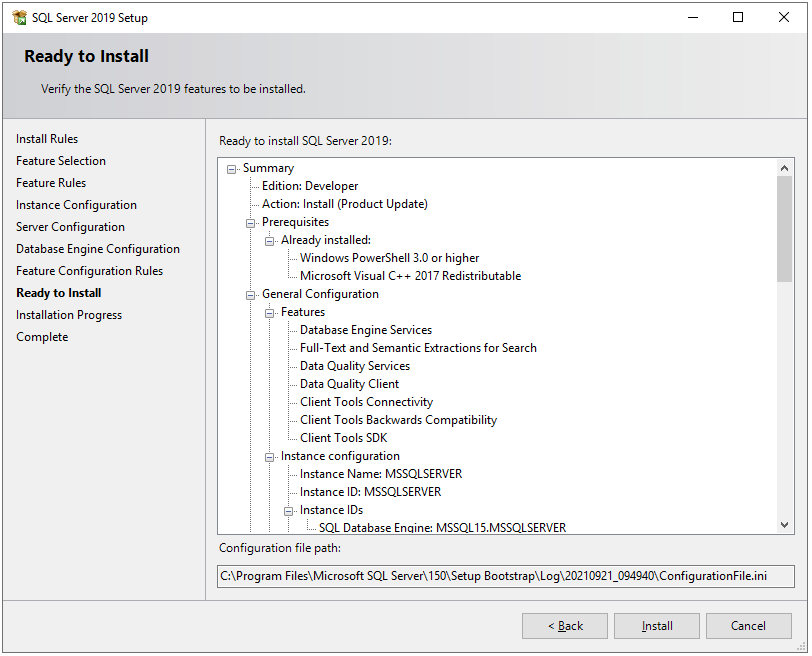
Next, the setup will check some feature configuration rules, and then the Ready to Install window will appear. This window shows the summary of all the features and configurations which we have done in the above steps. Once review the summary and click on the Install button.

Step 13
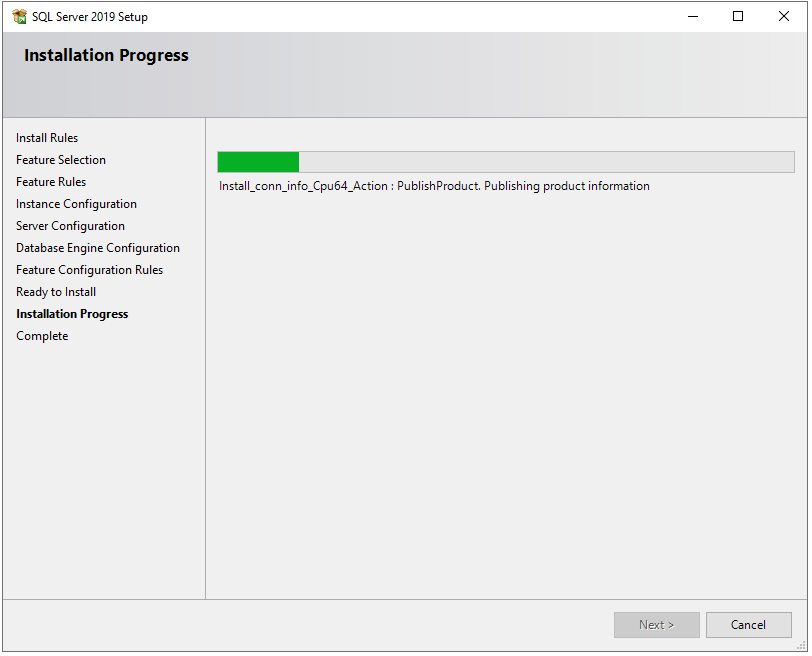
Now, the installation will start and it may take some time based on our configurations.

Step 14
After installation, it will show you the list of features and their installation status. If any error occurred, it will show here.
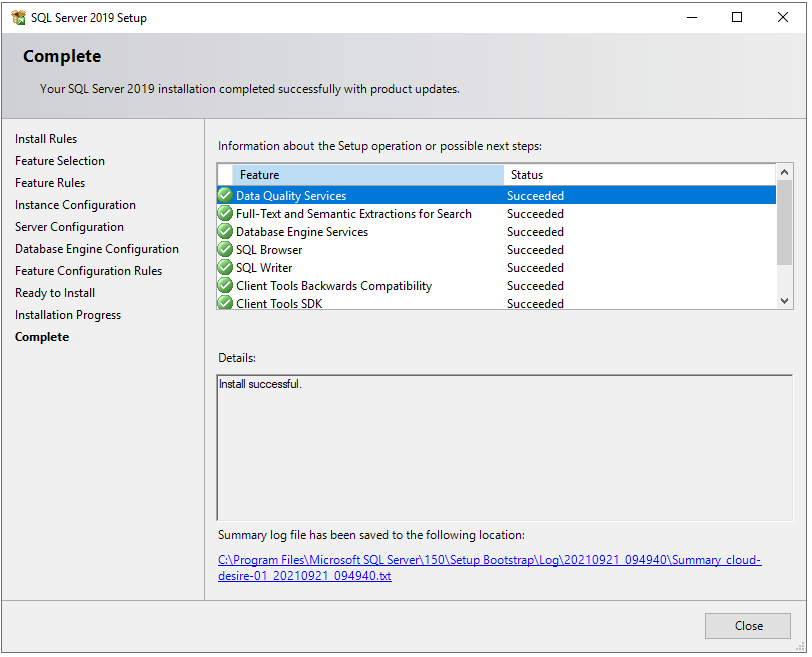
Congratulations! We have successfully installed SQL Server 2019 Developer edition on Windows machines. Next, you can install SQL Server Management Studio to connect SQL Server and query SQL databases. Please check my blog to – Step by step installation of SQL Server Management Studio.

HostForLIFEASP.NET SQL Server 2019 Hosting


SQL Server Hosting - HostForLIFE :: Enabling SQL Server Optimizer Hotfixes

clock October 5, 2021 07:19 by author Peter

There are a number of knobs and switches that are available to database administrators that can be used to enable better performance. There are three options in particular that this blog will be discussing, trace flag 4199, the database scoped configuration QUERY_OPIMIZER_HOTFIXES and the qeury hint.
 
ENABLE_QUERY_OPTIMIZER_HOTFIXES. Understanding how these options function will give you a hand up on ensuring the query optimizer is running as optimally as possible.
 
Let’s take a look at the three options.
 
Trace Flag4199
In dealing with any trace flag, it is vital that you understand as to what the trace flag will enable or disable and how it pertains to your individual workloads. Some trace flags are benign, such as TF3226 which removes successful backup messages from the log, others can be quite intrusive and cause havoc. Make sure you review any documentation on the respective trace flag prior to implementation.
 
The official verbiage from Microsoft on trace flag 4199 is,
 
“Enables Query Optimizer (QO) fixes released in SQL Server Cumulative Updates and Service Packs.
 
QO changes that are made to previous releases of SQL Server are enabled by default under the latest database compatibility level in a given product release, without trace flag 4199 being enabled.”
 
What this really implies is that if your database is at the most current compatibility level for your version of SQL server, then the query optimizer will utilize all of the QO hotfixes up to the release to market (RTM) version but nothing beyond the RTM version.
 
For example, if you are running SQL Server 2017 CU20 the database is set at the appropriate compatibility level (140), and TF4199 is disabled, the query optimizer will only utilize any hotfixes for it up to 2017 RTM. Any query optimizer hotfix that was delivered in subsequent cumulative updates will not be utilized.
 
If you enable trace flag 4199, this instructs SQL Server to implement any query optimizer hotfix that was delivered after the RTM version. Note that enabling this trace flag will be applied across all databases. It’s an all or nothing trace flag as most trace flags are.

The table below (from Microsoft documentation explains the matrix of outcomes when dealing with trace flag enabled or disabled.

Database Engine (DE) version
Database Compatibility Level
TF 4199
QO changes from all previous Database Compatibility Levels
QO changes for DE version post-RTM
13 (SQL Server 2016 (13.x))
100 to 120
Off
Disabled
Disabled
On
Enabled
Enabled
130 (Default)
Off
Enabled
Disabled
On
Enabled
Enabled
14 (SQL Server 2017 (14.x))
100 to 120
Off
Disabled
Disabled
On
Enabled
Enabled
130
Off
Enabled
Disabled
On
Enabled
Enabled
140 (Default)
Off
Enabled
Disabled
On
Enabled
Enabled
15 (SQL Server 2019 (15.x)) and 12 (Azure SQL Database)
100 to 120
Off
Disabled
Disabled
On
Enabled
Enabled
130 to 140
Off
Enabled
Disabled
On
Enabled
Enabled
150 (Default)
Off
Enabled
Disabled
On
Enabled
Enabled

If you are running in Azure SQL Database, you don’t have the ability to enable this particular trace flag, which is where the database scoped configuration becomes useful. If you are running on Azure SQL Managed Instances, you can enable the trace flag just like you would if on-premises.
Enabling this trace flag would also require a restart of the SQL Server services if you want to persist it upon a restart. You can enable this trace flag by setting up a startup parameter in the SQL Server Configuration Manager. You can check for the existence of trace flags by using DBCC TRACESTATUS().
 
Database Scoped Configuration QUERY_OPIMIZER_HOTFIXES
Enabling trace flag 4199 is a global trace flag for the entire instance. This means that it’ll apply the configuration across all databases. What if you have a mixture of databases that may or may not be able to take advantage of any hotfixes? Enabling the trace flag could cause issues. This is where the QUERY_OPIMIZER_HOTFIXES database scoped configuration comes in to play.
 
This configuration allows you to enabled query optimizer hotfixes post the release to market version for any specific database. This also allows you to enable it for Azure SQL Database since we don’t have the ability to enable the trace flag within that product.

    ALTER DATABASE SCOPED CONFIGURATION QUERY_OPTIMIZER_HOTFIXES = ON;  

The query above has to be executed within the context of the individual database. You can also enable this configuration in Azure SQL Managed Instances databases.
 
Enabling_QUERY_OPTIMIZER_HOTFIXES for Queries
If you didn’t want to enable these hotfixes at the instance level or the database level, there’s a third option. You can also enable it as a query hint. Keep in mind that the query optimizer will want to pick the best execution plan possible. Use query hints as sparingly as possible and make sure to ask yourself if you are really smarter than the optimizer. If the answer is no, you aren’t smarter than the optimizer then don’t use a query hint. So, it goes without saying that my recommendation is to not use query hints unless that’s the only way to solve an issue.
    SELECT * FROM Person.Address   
    WHERE City = 'SEATTLE' AND PostalCode = 98104  
    OPTION ( USE HINT ('ENABLE_QUERY_OPITMIZER_HOTFIXES'));  
    GO  
 

In this post I’ve shown three methods on how to implement the most recent query optimizer hot fixes. Before putting any of them into production, make sure that you verify your respective workloads again them. Make sure to also review all of the cumulative updates or service packs since initial release to see what query optimizer issues were fixed. You might be missing out of a fix that will help solve a performance problem.

HostForLIFEASP.NET SQL Server 2019 Hosting


About HostForLIFE

HostForLIFE is European Windows Hosting Provider which focuses on Windows Platform only. We deliver on-demand hosting solutions including Shared hosting, Reseller Hosting, Cloud Hosting, Dedicated Servers, and IT as a Service for companies of all sizes.

We have offered the latest Windows 2019 Hosting, ASP.NET 5 Hosting, ASP.NET MVC 6 Hosting and SQL 2019 Hosting.


Month List

Tag cloud

Sign in