We can import the .NET DLL or group of DLLs into SQL Server. Once the DLL is imported then, we can access the methods in the DLL inside the Stored Procedure, User-Defined function, or executed via TSQL. It is called CLR Assembly. In this article, we are going to explore how to create a custom CLR assembly and how to access it in the SQL Server.
CLR Assembly
An assembly is DLL files that are written by one of the managed code languages hosted by the Microsoft.NET Framework common language runtime (CLR) and it can be used in the stored procedures, triggers, user-defined functions, etc.
An assembly is a good option to expand the native functionality of the SQL server.
How to Create CLR Assembly
Create the Class Library using C#
Create Assembly from File
Create User-Defined Function for Access the Assembly
Invoke User-Defined Function
Create the Class Library using C#
Consider the below "DateConvertion" class which has the "DateConvert" function. It is used to convert date strings to the required format.
Both class and function are static and public.
I have used .NET Framework 4.5 and SQL server 2012. Because each Microsoft SQL Server is statically linked to a particular version of the CLR (not to a particular version of the .NET Framework).
SQL Server 2005, 2008, and 2008 R2 are linked to CLR version 2.0 which handles .NET Framework versions 2.0, 3.0, and 3.5, while SQL Server 2012 and 2014 are linked to CLR version 4.0 which handles .NET Framework versions 4.0, 4.5.x, 4.6.x, etc.
using System;
using System.Globalization;
namespace CLRDateConvertAssembly
{
public static class DateConvertion
{
public static string DateConvert(string date, string format)
{
try
{
CultureInfo provider = new CultureInfo("en-US");
string[] inputFormats = {
"MM/dd/yyyy", "M/d/yyyy", "M/dd/yyyy","dd/MM/yyyy",
"MM/d/yyyy", "M/d/yyyy h:mm:ss tt", "MM/d/yyyy h:mm:ss tt",
"M/d/yyyy h:mm tt", "MM/dd/yyyy hh:mm:ss", "M/d/yyyy h:mm:ss",
"M/d/yyyy hh:mm tt", "M/d/yyyy hh tt", "M/d/yyyy h:mm", "M/d/yyyy h:mm",
"MM/dd/yyyy hh:mm", "M/dd/yyyy hh:mm",
"MM-dd-yyyy", "M-d-yyyy", "M-dd-yyyy","dd-MM-yyyy",
"MM-d-yyyy", "M-d-yyyy h:mm:ss tt", "MM-d-yyyy h:mm:ss tt",
"M-d-yyyy h:mm tt", "MM-dd-yyyy hh:mm:ss", "M-d-yyyy h:mm:ss",
"M-d-yyyy hh:mm tt", "M-d-yyyy hh tt", "M-d-yyyy h:mm", "M-d-yyyy h:mm",
"MM-dd-yyyy hh:mm", "M-dd-yyyy hh:mm"};
DateTime dt = DateTime.ParseExact(date, inputFormats, provider, DateTimeStyles.None);
return dt.ToString(format);
}
catch
{
return string.Empty;
}
}
}
}
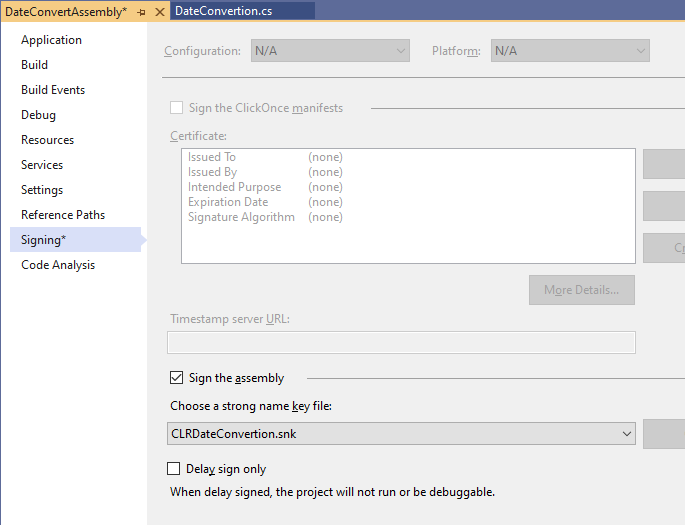
Sign the project using an asymmetric key.
Right, Click the Project -> Properties.
Go to the "Signing" Tab.
Check the "Sign the assembly" check box.
Select the "New" option in the "strong name key file" drop-down.
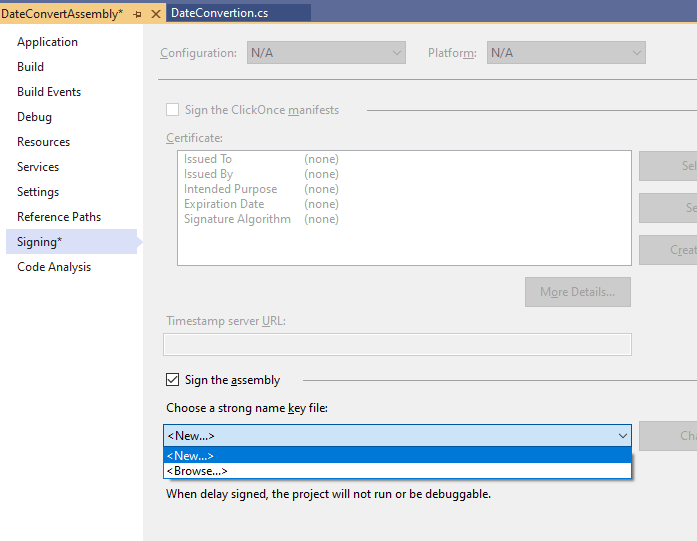
Enter the key file name and uncheck the password option and click "OK".

Build the project and copy the "CLRDateConvertAssembly.dll" file into the required folder.
Create Assembly from File
To create an assembly, we need to follow the below steps. Execute steps 1,2,3 queries are in the "master" database and step 4 and 5 in our database.
Step 1
Create Asymmetric Key from Assembly File.
USE master;
GO
CREATE ASYMMETRIC KEY CLRDateConvertionKey FROM EXECUTABLE FILE = 'D:\GC\Blog\Content\Assembly\DLL\CLRDateConvertAssembly.dll';
GO
Step 2
Create SQL Server Login linked to the Asymmetric Key.
USE master;
GO
CREATE LOGIN CLRDateConvertionKeyLogin FROM ASYMMETRIC KEY CLRDateConvertionKey;
GO
Step 3
Grant UNSAFE assembly permission to the login created.
USE master;
GO
GRANT UNSAFE ASSEMBLY TO CLRDateConvertionKeyLogin;
GO
Step 4
Create a SQL Server database user for the SQL Server login created.
USE TestDB;
GO
CREATE USER CLRDateConvertionKeyLogin FOR LOGIN CLRDateConvertionKeyLogin;
GO
Step 5
Create CLR Assembly.
USE TestDB;
GO
CREATE ASSEMBLY DateConvertAssembly FROM 'D:\GC\Blog\Content\Assembly\DLL\CLRDateConvertAssembly.dll' WITH PERMISSION_SET = SAFE;
GO
When creating an assembly in the MS SQLServer database, you can specify one of three different levels of security.
SAFE
EXTERNAL_ACCESS
UNSAFE
SAFE is the default permission set and works for the majority of scenarios.
EXTERNAL_ACCESS addresses scenarios in which the code needs to access resources outside the server, such as files, network, registry, and environment variables.
UNSAFE code permission is for those situations in which an assembly is not verifiably safe or requires additional access to restricted resources, such as the Microsoft Win32 API.
Any one of the below conditions must be met for creating an EXTERNAL_ACCESS or UNSAFE assembly.
The assembly is a strong name signed or Authenticode signed with a certificate. This strong name (or certificate) is created inside SQL Server as an asymmetric key (or certificate), and has a corresponding login with EXTERNAL ACCESS ASSEMBLY permission (for external access assemblies) or UNSAFE ASSEMBLY permission (for unsafe assemblies).
The database owner (DBO) has EXTERNAL ACCESS ASSEMBLY (for EXTERNAL ACCESS assemblies) or UNSAFE ASSEMBLY (for UNSAFE assemblies) permission, and the database has the TRUSTWORTHY Database Property set to ON.
We have created the assembly with SAFE permission. So no need to disable the CLR Strict Security feature and enable the Database Trustworthy feature in the MS SQL Server.
Create User-Defined Function for Access the Assembly
Create the user-defined function for consuming the above assembly. I have created below "dbo.DateConvert" function.
CREATE FUNCTION dbo.DateConvert (@date NVARCHAR(100), @format NVARCHAR(100))
RETURNS NVARCHAR(100)
AS
EXTERNAL NAME [DateConvertAssembly].[CLRDateConvertAssembly.DateConvertion].[DateConvert];
GO
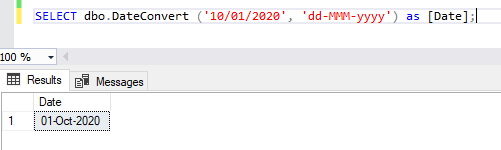
Invoke User-Defined Function
Call the above user-defined function to consume the assembly for date conversion.
SELECT dbo.DateConvert ('10/01/2020', 'dd-MMM-yyyy') as [Date];
If you want to drop an assembly, run the below query.
Use TestDB;
GO
Drop ASSEMBLY DateConvertAssembly;
GO
I hope you have liked this article and know about CLR assembly in MS SQL Server.
HostForLIFEASP.NET SQL Server 2019 Hosting
