European Windows 2019 Hosting BLOG

BLOG about Windows 2019 Hosting and SQL 2019 Hosting - Dedicated to European Windows Hosting Customer

SQL Server Hosting - HostForLIFE :: STUFF() And REPLACE() In SQL Server

clock November 30, 2021 06:58 by author Peter

Introduction
In this article, we are going to discuss STUFF and REPLACE functions in SQL Server. Also, we will discuss the differences between both of them and in which scenario it will be used.

We will cover,
    Use Case
    STUFF Function
    Replace Function
    Differences between STUFF and REPLACE

USE CASE
First, let's discuss the below use case,
Suppose we have a requirement to replace part of the string with a new string what you will do?

Your answer would be, REPLACE Function. Right?
Let me make this scenario more complex, suppose you have a string that has multiple words that are the same and you want to replace a word from a specific position. I mean only one word not all. How will you do that?

The answer would be, STUFF function.

Replace function will replace all the words so it will not fit in this case.

This is a difference between STUFF and REPLACE. REPLACE function replace all words from the text and STUFF will Replace word from a specific place.
STUFF Function in SQL Server

In SQL Server, the STUFF function deletes the sequence of the characters from the source string first and then inserts another string, starting at a given position.

Syntax
STUFF( source_string, start_position, length, another_string)

SQL
Source_string

The source string we will modify.
start_position

The start position is to delete characters from the source string.

Length

Number of characters to delete from the source string.

another_string
new string which will insert into the source string

Example 1 – Delete old string and insert a new string
Suppose I have a string "Hello All. Welcome and Nice to see you All in this article", I want to replace first ‘All’ with ‘World’.
SELECT  STUFF('Hello All. Welcome and Nice to see you All in this article',7,3,'World')

OUTPUT

Example 2 – Insert new string
I want to add a new string after "Hello" in the below example hence we have given 0 for length.
SELECT  STUFF('Hello . Welcome and Nice to see you All in this article',7,0,'World')

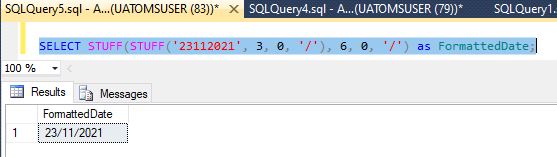
Example 3 – Format Date
We will change the date format from DDMMYYYY to DD/MM/YYYY using the STUFF function. This will teach you how to add nested STUFF.
SELECT STUFF(STUFF('23112021', 3, 0, '/'), 6, 0, '/') as FormattedDate;

REPLACE Function in SQL Server
The Replace function replace all occurrence within the string with a new string.

Syntax
REPLACE(original string, old_string, new_string)

Original string
This is the original string.

old_string
The string is to be replaced.

new_string
The new replacement string.

Example 4
We have replaced ‘All’ with ‘’world’.
SELECT REPLACE('Hello All. Welcome and Nice to see you All in this article','All','World')

Difference between STUFF and REPLACE
To understand the difference please see example 1 and example 4 or see below code,
SELECT  STUFF('Hello All. Welcome and Nice to see you All in this article',7,3,'World') as STUFFRESULT
SELECT REPLACE('Hello All. Welcome and Nice to see you All in this article','All','World') as REPLACERESULT


OUTPUT

In the above example, you can notice that REPLACE function replaces all the occurrences in the original string, but the STUFF function deletes a substring from the original string and inserts a new string at a given position.

I hope you enjoyed this article and find it useful.

HostForLIFEASP.NET SQL Server 2019 Hosting


SQL Server Hosting - HostForLIFE :: How To Install Microsoft SQL Server Management Studio (SSMS)?

clock November 25, 2021 06:02 by author Peter

SQL Server Management Studio (SSMS) is an integrated environment for managing any SQL infrastructure, from SQL Server to Azure SQL Database. SSMS provides tools to configure, monitor, and administer instances of SQL Server and databases. Use SSMS to deploy, monitor, and upgrade the data-tier components used by your applications, and build queries and scripts.

Use SSMS to query, design, and manage your databases and data warehouses, wherever they are – on your local computer, or in the cloud.

In this article, will see how to install Microsoft SQL Server Management Studio (SSMS) on your PC.

Follow the below steps for the same.

Step 1
Click here to navigate to SQL Server Downloads web page.

Step 2
Click on Download SQL Server Management Studio (SSMS).

Step 3
You can see the latest version of the SSMS here.
Under the Download SSMS section, Click on Free Download for SQL Server Management Studio (SSMS) 18.10 to download the executable file.
Note: SSMS version will be changed based on the new releases by Microsoft. Download the latest SSMS as shown in the Download SSMS section.

SSMS-Setup-ENU.exe will be downloaded to your PC.

Step 4
Double click on SSMS-Setup-ENU.exe executable file to start the SSMS installation.

Step 5
Click on Change, if you wish to change the location of the SQL Server.
Otherwise, go to Next Step.

Step 6
Click on Install.

Installation steps are in progress.

SSMS Installation completed successfully.

Step 7
Click on Microsoft button and Search for SSMS. Click on Open.


Microsoft SQL Server Management Studio will be launched on your PC.


Step 8
Provide all the required details and Click on Connect to open your required Database.

Hope you have successfully Downloaded, Installed and Connected to your database in SSMS on your PC.

HostForLIFEASP.NET SQL Server 2019 Hosting


SQL Server Hosting - HostForLIFE :: Execute Stored Proc Using SQL Job

clock November 8, 2021 07:24 by author Peter

First, let’s create a sample database table, this table should have only one column date. So the scenario is, let’s insert current datetime in table using stored procedure in every one-minute duration from SQL Job.
 
Here is table script,
    USE [AdventureWorks2017]  
    GO  
    /****** Object:  Table [dbo].[SampleDateTime]    Script Date: 10/1/2019 9:08:22 PM ******/  
    SET ANSI_NULLS ON  
    GO  
    SET QUOTED_IDENTIFIER ON  
    GO  
    CREATE TABLE [dbo].[SampleDateTime](  
        [id] [int] IDENTITY(1,1) NOT NULL,  
        [CurrentDateTime] [datetime] NULL,  
     CONSTRAINT [PK_SampleDateTime] PRIMARY KEY CLUSTERED   
    (  
        [id] ASC  
    )WITH (PAD_INDEX = OFF, STATISTICS_NORECOMPUTE = OFF, IGNORE_DUP_KEY = OFF, ALLOW_ROW_LOCKS = ON, ALLOW_PAGE_LOCKS = ON) ON [PRIMARY]  
    ) ON [PRIMARY]  
    GO  
    Store Proc:  
    SET ANSI_NULLS ON  
    GO  
    SET QUOTED_IDENTIFIER ON  
    GO  
    CREATE PROCEDURE PROC_InsertDateTime  
    AS  
    BEGIN  
        -- SET NOCOUNT ON added to prevent extra result sets from  
        -- interfering with INSERT statements.  
        SET NOCOUNT ON;  
        INSERT INTO dbo.SampleDateTime (CurrentDateTime) VALUES (GETDATE())  
    END  
    GO 

Let’s set up the SQL job now to run this process and schedule it for every 1 minute.
 
Why SQL Job?
A job is a specified series of operations performed sequentially by SQL Server Agent. A job can perform a wide range of activities, including running Transact-SQL scripts, command prompt applications, Microsoft ActiveX scripts, Integration Services packages, Analysis Services commands and queries, or Replication tasks.
 
Create a SQL Job
 
Step 1
Expand the SQL Server Agent and right click on Jobs and click on New Job

In General tab, Enter job name, owner, category and description.


In Steps tab, click New and enter step name, select Type as Transact-SQL script (T-SQL) and select database and put EXEC procedure name in command area.

From schedules tab, click new button and put schedule name, frequency, daily frequency and duration.
In my job, I have scheduled it for every 1 minute.


Now we are done here with job part, let’s start the job. Right click on job and hit Start Job at Step


As you can see job has been successfully run, now let’s check in database table.
Our expectation is one record will insert in table on every minute.


Here you go, as you can see one datetime entry in inserting in table.
In this article, we have learned how to create a SQL Job and schedule it and run stored procedure.

HostForLIFEASP.NET SQL Server 2019 Hosting


About HostForLIFE

HostForLIFE is European Windows Hosting Provider which focuses on Windows Platform only. We deliver on-demand hosting solutions including Shared hosting, Reseller Hosting, Cloud Hosting, Dedicated Servers, and IT as a Service for companies of all sizes.

We have offered the latest Windows 2019 Hosting, ASP.NET 5 Hosting, ASP.NET MVC 6 Hosting and SQL 2019 Hosting.


Month List

Tag cloud

Sign in