European Windows 2019 Hosting BLOG

BLOG about Windows 2019 Hosting and SQL 2019 Hosting - Dedicated to European Windows Hosting Customer

SQL Server 2014 with Free ASP.NET Hosting - HostForLife.eu :: How to Track Page Splits in SQL Server

clock May 29, 2015 06:59 by author Rebecca

In this tutorial, I will show you how to use extended events to identify page splits in SQL Server. The easiest way to track if page splits are happening in SQL Server is to use the PerfMon Counters. For the records you can start from  “SQL Server: Access Methods -> Page Splits/sec”. This counter is quite handy to understand if this behavior happens in our SQL Server instance.

Step 1

Let us first create a database for our experiment. We will also create our Extended Event to track the PageSplits.

-- Create a dummy database
CREATE DATABASE PageSplits
GO

-- Get the DB ID, we will use it in next step
SELECT DB_ID('PageSplits')
GO

-- Create Session
CREATE EVENT SESSION [Catch_PageSplit] ON SERVER
ADD EVENT sqlserver.page_split(
WHERE ([package0].[equal_uint64]([database_id],(10))))  -- NOTE: Please make sure you change the DATABASE_ID
ADD TARGET package0.ring_buffer
WITH (MAX_MEMORY=4096 KB,EVENT_RETENTION_MODE=ALLOW_SINGLE_EVENT_LOSS,
MAX_DISPATCH_LATENCY=30 SECONDS,MAX_EVENT_SIZE=0 KB,
MEMORY_PARTITION_MODE=NONE,TRACK_CAUSALITY=OFF)
GO

-- Start the event session
ALTER EVENT SESSION [Catch_PageSplit] ON SERVER
STATE = start;
GO

Step 2

Before we get to the next step, let us start monitoring our Extended Events for any possible page splits.

USE PageSplits
GO
CREATE TABLE mytest (
myCompany CHAR(5) NOT NULL CONSTRAINT pk_mytest PRIMARY KEY CLUSTERED,
FillData VARCHAR(3000) NOT NULL
)
GO
INSERT mytest ( myCompany, FillData )
VALUES( '00001', REPLICATE( 'A', 3000 ) ),
( '00002', REPLICATE( 'B', 1000 ) ),
( '00003', REPLICATE( 'C', 3000 ) ),
( '00004', REPLICATE( 'A', 3000 ) ),
( '00005', REPLICATE( 'B', 1000 ) ),
( '00006', REPLICATE( 'C', 3000 ) ),
( '00007', REPLICATE( 'A', 3000 ) ),
( '00008', REPLICATE( 'B', 1000 ) ),
( '00009', REPLICATE( 'C', 3000 ) )
GO

Step 3

Next step is to create a table with some values. Later we will use this to create a page split scenario:

Step 4

Then, create the scenario of page split by updating a row with some extra data.

-- Update to introduce a page split
UPDATE mytest
SET FillData = REPLICATE( 'B', 3000)
WHERE myCompany = '00002'
GO

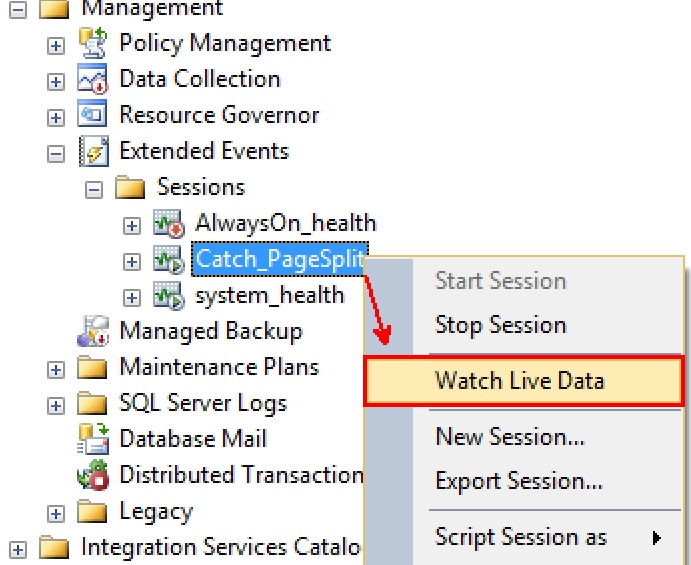
Don’t forget to look at the Live Data feed for entries. If the Page Split happen you will see something like:

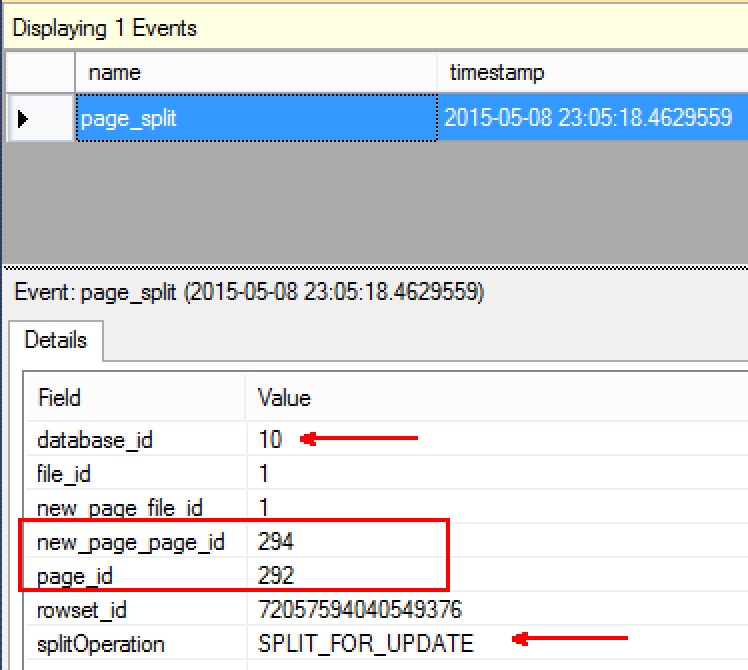
As you can see, this Page Split has happened because of an Update. The two pages under question are also shown. We can also see the database ID under question that caused the page split.

Step 5

Now that we learnt something new here, let us clean up the database we just created using this code:
-- Clean up time
USE MASTER
GO
DROP DATABASE PageSplits
GO
DROP EVENT SESSION [Catch_PageSplit] ON SERVER
GO

HostForLIFE.eu SQL Server 2014 with Free ASP.NET Hosting
Try our SQL Server 2014 with Free ASP.NET Hosting today and your account will be setup soon! You can also take advantage of our Windows & ASP.NET Hosting support with Unlimited Domain, Unlimited Bandwidth, Unlimited Disk Space, etc.


SQL Server 2014 with Free ASP.NET Hosting - HostForLIFE.eu :: Execute a Task at a Specific Time in SQL Server

clock May 28, 2015 07:52 by author Peter

Here during this example I'll show you the way to execute a task or call a store procedure at a specific time(like at midnight) using SQL Server or I will say the way to schedule a job at a specific time. Sometimes you have got to perform something daily, weekly or at a selected gap of your time. Repeat a similar task when by a person is little bit difficult. So, in this case SQL is here to solve your problem using SQL Job scheduler. This is often a task you fixed in your server, set timer on at particular time and write down the SQL query to perform. That is all you have got to do. Let’s see the way to schedule your Job at a selected time.

Open your Management Studio and check the SQL Server Agent. Begin the SQL Server Agent by following steps.

Next step, go to Job section in your SQL Server Agent and select New Job, shown on the below picture:

After choosing the New Job, a new window will be opened with all the properties of a New Job. Now it’s time to fill up each and every field according to your specification. In the General tabs write down any name according to your project and left the others as it is.

Now, in the “Steps”, click on the New button, and a new window will be opened as shown on the following picture:

Write a name for your step and your query to be executed and select on the OK button.

Now, in the Schedule tab follow the steps as the following image:

The only thing is left is to start your job. To start the job follow this steps.

After successfully starting of the job you will get a successful alert message shown on the following picture:

HostForLIFE.eu SQL Server 2014 with Free ASP.NET Hosting
Try our SQL Server 2014 with Free ASP.NET Hosting today and your account will be setup soon! You can also take advantage of our Windows & ASP.NET Hosting support with Unlimited Domain, Unlimited Bandwidth, Unlimited Disk Space, etc.


SQL Server 2014 with Free ASP.NET Hosting - HostForLIFE.eu :: How to BackUp SQL Server Database at Once

clock May 26, 2015 06:21 by author Rebecca

Here I am going to share how can you take the database backup of all the SQL Server databases at once instead of taking it individually.

First, you need to create a folder in any drive to store the backup of database which you are going to take. For example, you have to create a folder named "dbBackup" in my drive "C:\"

Then, copy the below code & paste it in your SQL Server Query Executer page:

    DECLARE @DBName varchar(255)
    DECLARE @DATABASES_Fetch int
    DECLARE DATABASES_CURSOR CURSOR FOR
        select
            DATABASE_NAME   = db_name(s_mf.database_id)
        from
            sys.master_files s_mf
        where
           -- ONLINE
            s_mf.state = 0

           -- Only look at databases to which we have access
        and has_dbaccess(db_name(s_mf.database_id)) = 1

            -- Not master, tempdb or model
        and db_name(s_mf.database_id) not in ('Master','tempdb','model')
        group by s_mf.database_id
        order by 1

    OPEN DATABASES_CURSOR

    FETCH NEXT FROM DATABASES_CURSOR INTO @DBName

    WHILE @@FETCH_STATUS = 0
    BEGIN
        declare @DBFileName varchar(256)   
        set @DBFileName = datename(dw, getdate()) + ' - ' +
                           replace(replace(@DBName,':','_'),'\','_')

        exec ('BACKUP DATABASE [' + @DBName + '] TO  DISK = N''c:\dbBackup\' +
            @DBFileName + '.bak' + ''' WITH NOFORMAT, INIT,  NAME = N''' +
            @DBName + '-Full Database Backup'', SKIP, NOREWIND, NOUNLOAD,  STATS = 100')

        FETCH NEXT FROM DATABASES_CURSOR INTO @DBName
    END

    CLOSE DATABASES_CURSOR
    DEALLOCATE DATABASES_CURSOR


Now execute the page and check your Folder "dbBackup" in Drive "C:/" . You will find all the databases backup in it.

Now, you are done! Simple, right?

HostForLIFE.eu SQL Server 2014 with Free ASP.NET Hosting
Try our SQL Server 2014 with Free ASP.NET Hosting today and your account will be setup soon! You can also take advantage of our Windows & ASP.NET Hosting support with Unlimited Domain, Unlimited Bandwidth, Unlimited Disk Space, etc.


SQL Server 2014 with Free ASP.NET Hosting - HostForLIFE.eu :: How to Create a Large Table with Random Data in SQL Server

clock May 22, 2015 07:31 by author Rebecca

In this tutorial, I'm gonna tell you about inserting large amount of random data into sql server tables for performance testing. 

Just follow these step to create a large table with random data for performance testing:

Step 1

If Table exists drop the tables:

If (Exists (select *
            from information_schema.tables
            where table_name = 'tblProductSales'))
Begin
 Drop Table tblProductSales
End

If (Exists (select *
            from information_schema.tables
            where table_name = 'tblProducts'))
Begin
 Drop Table tblProducts
End

Step 2

Then you can recreate the tables:

Create Table tblProducts
(
 [Id] int identity primary key,
 [Name] nvarchar(50),
 [Description] nvarchar(250)
)

Create Table tblProductSales
(
 Id int primary key identity,
 ProductId int foreign key references tblProducts(Id),
 UnitPrice int,
 QuantitySold int
)

Step 3

Insert Sample data into tblProducts table

Declare @Id int
Set @Id = 1

While(@Id <= 300000)
Begin
 Insert into tblProducts values('Product - ' + CAST(@Id as nvarchar(20)),
 'Product - ' + CAST(@Id as nvarchar(20)) + ' Description')
 
 Print @Id
 Set @Id = @Id + 1
End

Step 4

Declare variables to hold a random ProductId, UnitPrice and QuantitySold

declare @RandomProductId int
declare @RandomUnitPrice int
declare @RandomQuantitySold int


Declare and set variables to generate a random ProductId between 1 and 100000

declare @UpperLimitForProductId int
declare @LowerLimitForProductId int


set @LowerLimitForProductId = 1
set @UpperLimitForProductId = 100000


Declare and set variables to generate a random UnitPrice between 1 and 100

declare @UpperLimitForUnitPrice int
declare @LowerLimitForUnitPrice int

set @LowerLimitForUnitPrice = 1
set @UpperLimitForUnitPrice = 100

Declare and set variables to generate a random QuantitySold between 1 and 10

declare @UpperLimitForQuantitySold int
declare @LowerLimitForQuantitySold int

set @LowerLimitForQuantitySold = 1
set @UpperLimitForQuantitySold = 10

Step 5

Now, you have to insert Sample data into tblProductSales table

Declare @Counter int
Set @Counter = 1


While(@Counter <= 450000)
Begin
 select @RandomProductId = Round(((@UpperLimitForProductId - @LowerLimitForProductId) * Rand() + @LowerLimitForProductId), 0)
 select @RandomUnitPrice = Round(((@UpperLimitForUnitPrice - @LowerLimitForUnitPrice) * Rand() + @LowerLimitForUnitPrice), 0)
 select @RandomQuantitySold = Round(((@UpperLimitForQuantitySold - @LowerLimitForQuantitySold) * Rand() + @LowerLimitForQuantitySold), 0)
 
 Insert into tblProductsales
 values(@RandomProductId, @RandomUnitPrice, @RandomQuantitySold)

 Print @Counter
 Set @Counter = @Counter + 1
End

Step 6

Finally, check the data in the tables using a simple SELECT query to make sure the data has been inserted as expected.
Select * from tblProducts
Select * from tblProductSales

HostForLIFE.eu SQL Server 2014 with Free ASP.NET Hosting
Try our SQL Server 2014 with Free ASP.NET Hosting today and your account will be setup soon! You can also take advantage of our Windows & ASP.NET Hosting support with Unlimited Domain, Unlimited Bandwidth, Unlimited Disk Space, etc.


SQL Server 2014 with Free ASP.NET Hosting - HostForLIFE.eu :: How to List Out SQL Logins and Database User Mappings

clock May 21, 2015 08:14 by author Peter

In this post, let me explain about How to List Out SQL Logins and Database User Mappings.

You can use system stored procedure sp_msloginmappings to list out the SQL logins and database user mappings. And here is the syntax:
sp_msloginmappings @Loginname , @Flags

@Loginname – Optional argument, in case if you not specify the Login name procedure will return the result for all the SQL Server logins
@Flags – You can specify value 0 or 1, 0 value will show user mapping to all databases and 1 will show the user mapping to current database only. Default value is 0
use master
go
exec sp_msloginmappings 'sa', 0

use master
go
exec sp_msloginmappings 'sa', 1


If you want to run the sp_msloginmappings across multiple SQL Instance using either Central management server or Powershell, write the following script:
create table #loginmappings( 
 LoginName  nvarchar(128) NULL, 
 DBName     nvarchar(128) NULL, 
 UserName   nvarchar(128) NULL, 
 AliasName  nvarchar(128) NULL
)   
insert into #loginmappings
EXEC master..sp_msloginmappings
select * from #loginmappings
 drop table #loginmappings

HostForLIFE.eu SQL Server 2014 with Free ASP.NET Hosting
Try our SQL Server 2014 with Free ASP.NET Hosting today and your account will be setup soon! You can also take advantage of our Windows & ASP.NET Hosting support with Unlimited Domain, Unlimited Bandwidth, Unlimited Disk Space, etc.


SQL Server 2014 with Free ASP.NET Hosting - HostForLIFE.eu :: How to Identify Unused Indexes in SQL Server

clock May 18, 2015 07:44 by author Rebecca

Indexes play an important role in SQL Server performance. Coins always have two sides, just like a well-designed index can improve query performance and an incorrect index can impact query performance. So it is important to find which indexes are not being used. It helps us to reduce storage and reduce the overhead of the database engine to maintain unused indexes. But how can we find indexes that are not being used? In this article, I'm gonna tell you how to identify unused indexes in SQL Server.

The absence of an index can result in table or index scans that reduce performance in some case and also too many indexes require extra storage and extra effort to maintain the database and it might slow down insert / update operations. One of the approaches to improve the overall performance is keep used indexes but drop all unused indexes.

"dm_db_index_physical_stats" is a dynamic management view related to index statistics. This view gives information about indexes used or unused, it complete or missing some columns is irrelevant. This dynamic view has many important columns like user_seeks (number of seeks by user queries), user_scans (number of scans by user queries), user_lookups (number of bookmark lookups by user queries) and a combination of these three columns provide us a total read count. The column user updates (number of updates by user queries) indicates the level of maintenance on the index caused by insert / update / delete operations on the table or view. A proper join among these DVM and system tables such as indexes, objects and schemas enable us to list all unused indexes for a single database.

The following query helps us to find unused indexes in our database:

    SELECT  
    o.name AS TableName, 
    i.name AS Indexname, 
    i.is_primary_key AS PrimaryKey, 
    s.user_seeks + s.user_scans + s.user_lookups AS NumOfReads, 
    s.user_updates AS NumOfWrites, 
    (SELECT SUM(p.rows) FROM sys.partitions p WHERE p.index_id = s.index_id AND s.object_id = p.object_id) AS TableRows, 
    'DROP INDEX ' + QUOTENAME(i.name) + ' ON ' + QUOTENAME(c.name) + '.' + QUOTENAME(OBJECT_NAME(s.object_id)) AS 'DropStatement' 
    FROM sys.dm_db_index_usage_stats s  
    INNER JOIN sys.indexes i ON i.index_id = s.index_id AND s.object_id = i.object_id  
    INNER JOIN sys.objects o ON s.object_id = o.object_id 
    INNER JOIN sys.schemAS c ON o.schema_id = c.schema_id 
    WHERE OBJECTPROPERTY(s.object_id,'IsUserTable') = 1 
    AND s.databASe_id = DB_ID()  
    AND i.type_desc = 'NONCLUSTERED' 
    AND i.is_primary_key = 0 
    AND i.is_unique_constraint = 0 

The preceding query includes the following helpful information.

  •     Table name
  •     Index name
  •     Primary key
  •     Number of read count
  •     Number of writes
  •     Total number of rows
  •     Drop statement

The following  is the output of the preceding query:

After running the preceding query for the database it will list all the non-clustered indexes for all tables. Now we can determine the unused indexes by comparing the number of reads applied to an index with the number of writes. If we have a number of reads (NumOfReads column in the preceding query) then the indexes are not being used.

Base on the query result and application knowledge, we may decide which index needs to be dropped and the last column of the query contains a drop index statement.

HostForLIFE.eu SQL Server 2014 with Free ASP.NET Hosting
Try our SQL Server 2014 with Free ASP.NET Hosting today and your account will be setup soon! You can also take advantage of our Windows & ASP.NET Hosting support with Unlimited Domain, Unlimited Bandwidth, Unlimited Disk Space, etc.


SQL Server 2014 with Free ASP.NET Hosting - HostForLIFE.eu :: Import Excel File into SQL Server using SQLBULK in ASP.NET

clock May 18, 2015 06:17 by author Peter

Today, I will show you how to upload excel file, read Excel file data,  save Excel file data & import into SQL Server using SQLBULK in ASP.NET.

First step, you must create the excel file. And then create a SQL table in database like the following picture:

Next step, add the code in "Default.aspx"

<asp:FileUpload ID="fupUpload" runat="server" />
<asp:Button ID="btnImport" Font-Bold="true" ForeColor="White"
BackColor="#136671" Height="23px" runat="server" Text="Import Excel Data"
onclick="btnImport_Click" />


Now, write the following code in "Default.aspx.cs"
Add these NameSpace
using System.IO;
using System.Data.OleDb;
using System.Data;


Write the code in Click Event of Import Button:
protected void btnImport_Click(object sender, EventArgs e)
{
 string strFilepPath;
 DataSet ds = new DataSet();
 string strConnection = ConfigurationManager.ConnectionStrings
                          ["connectionString"].ConnectionString;
 if (fupUpload.HasFile)
 {
  try
  {
    FileInfo fi = new FileInfo(fupUpload.PostedFile.FileName);
    string ext = fi.Extension;
    if (ext == ".xls" || ext == ".xlsx")
    {
     string filename = Path.GetFullPath(fupUpload.PostedFile.FileName);
     string DirectoryPath = Server.MapPath("~/UploadExcelFile//");
     strFilepPath = DirectoryPath + fupUpload.FileName;     
     Directory.CreateDirectory(DirectoryPath);
     fupUpload.SaveAs(strFilepPath);  
     string strConn = @"Provider=Microsoft.ACE.OLEDB.12.0;Data Source="
                      + strFilepPath + ";Extended Properties=\"Excel 12.0
                      Xml;HDR=YES;IMEX=1\"";
     OleDbConnection conn = new OleDbConnection(strConn);
     conn.Open();    
     OleDbCommand cmd = new OleDbCommand("SELECT * FROM [Sheet1$]", conn);
     OleDbDataAdapter da = new OleDbDataAdapter(cmd);
     da.Fill(ds);
     DeleteExcelFile(fupUpload.FileName); // Delete File Log
     SqlBulkCopy sqlBulk = new SqlBulkCopy(strConnection,
                                   SqlBulkCopyOptions.KeepIdentity);
     sqlBulk.DestinationTableName = "Table_1";
     sqlBulk.WriteToServer(ds.Tables[0]);
     conn.Close();
     sqlBulk.Close();     
     ScriptManager.RegisterStartupScript(Page, GetType(), "script1", 
        "alert('Excel file successfully imported into DB');", true);
     return;
    }    
    else
    {
      ScriptManager.RegisterStartupScript(Page, GetType(), "script1",  
                    "alert('Please upload excel file only');", true);
     return;
    }
  }  
  catch (Exception ex)
   {
    DeleteExcelFile(fupUpload.FileName);      
    ScriptManager.RegisterStartupScript(Page, GetType(), "script1",  
      "alert('error occured: " + ex.Message.ToString() + "');", true);
    return;
   }
  } 
 else
  {
    ScriptManager.RegisterStartupScript(Page, GetType(), "script1",  
                        "alert('Please upload excel file');", true);
   return;
  }
}
protected void DeleteExcelFile(string Name)
{             
 if (Directory.Exists(Request.PhysicalApplicationPath +  
                                           "UploadExcelFile\\"))
   {     
    string[] logList = Directory.GetFiles(Request.PhysicalApplicationPath
                       + "UploadExcelFile\\", "*.xls");
     foreach (string log in logList)
      {        
        FileInfo logInfo = new FileInfo(log);
        string logInfoName = logInfo.Name.Substring(0, 
                             logInfo.Name.LastIndexOf('.'));
        if (logInfoName.Length >= Name.Length)
         {           
          if (Name.Equals(logInfoName.Substring(0, Name.Length)))
           {
             logInfo.Delete();
           }
         }
      }
   }
}

I hope it works for you! Good luck.

HostForLIFE.eu SQL Server 2014 with Free ASP.NET Hosting

Try our SQL Server 2014 with Free ASP.NET Hosting today and your account will be setup soon! You can also take advantage of our Windows & ASP.NET Hosting support with Unlimited Domain, Unlimited Bandwidth, Unlimited Disk Space, etc.


SQL Server 2014 with free ASP.NET Hosting - HostForLIFE.eu :: How to Use RAND() Function in SQL Server 2014

clock May 15, 2015 07:01 by author Rebecca

You know that RAND() function in SQL Server generates a random float value 0 through 1 (excluding 0 and 1). In this article, I will show you how to generate different random number for each group using RAND() Function.

First, let's us create the following dataset:

CREATE TABLE #random(no INT)
INSERT INTO #random(no)
SELECT 1 UNION ALL
SELECT 1 UNION ALL
SELECT 1 UNION ALL
SELECT 2 UNION ALL
SELECT 3 UNION ALL
SELECT 3


If you want to generate a random value, you can use the following code:

SELECT no, RAND() AS random_number FROM #random

This code will result to:
no random_number
 1 0.370366365964781
 1 0.370366365964781
 1 0.370366365964781
 2 0.370366365964781
 3 0.370366365964781
 3 0.370366365964781

Please note that when you execute it , you may get different random number than what I got for column 2 but all will be same. What if you want to generate random number in such a way that it is reset to each column value (in this case the column is no)? Did you know that RAND() accepts a seed value as well?

If you execute the following code:

SELECT no, RAND() AS random_number,RAND(no) AS random_number_reset FROM #random

Then, it will comes to the result:
no random_number random_number_reset
 1 0.58334760467751 0.713591993212924
 1 0.58334760467751 0.713591993212924
 1 0.58334760467751 0.713591993212924
 2 0.58334760467751 0.713610626184182
 3 0.58334760467751 0.71362925915544
 3 0.58334760467751 0.71362925915544


Please note that when you execute it , you may get different random number than what I got for column2 2 and 3. If you notice the result the values of second column is same for all rows, whereas the values of third column is same withing a group (column no), and different across groups. So if you want to generate random number differently for each group, you can make use of this method.

HostForLIFE.eu SQL Server 2014 with Free ASP.NET Hosting
Try our SQL Server 2014 with Free ASP.NET Hosting today and your account will be setup soon! You can also take advantage of our Windows & ASP.NET Hosting support with Unlimited Domain, Unlimited Bandwidth, Unlimited Disk Space, etc.


SQL Server 2014 with Free ASP.NET Hosting - HostForLIFE.eu :: How to Move TempDB from one Drive to Another Drive

clock May 12, 2015 07:30 by author Rebecca

When you found that your TempDB log file is filled up, you will come across following errors in log file:
Source: MSSQLSERVER
Event ID: 17052
Description: The LOG FILE FOR DATABASE 'tempdb' IS FULL.
Back up the TRANSACTION LOG FOR the DATABASE TO free
up SOME LOG SPACE

So, you have to move the TempDB to different drive. Moving the TempDB to another drive will help the growth of the file. Sometimes user also moves to different drive due to performance reasons as keeping TempDB on a different drive from your main database helps. By this article, I'm gonna show you how to move TempDB from one drive to another drive.

There are major two reasons why TempDB needs to move from one drive to other drive:
1) TempDB grows big and the existing drive does not have enough space.
2) Moving TempDB to another file group which is on different physical drive helps to improve database disk read, as they can be read simultaneously.

You can follow the direction below exactly to move database and log from one drive (c:) to another drive (d:) and (e:)

Make sure that TempDB is set to autogrow and do not set a maximum size for TempDB. If the current drive is too full to allow autogrow events, then arrange a bigger drive, or add files to TempDB on another device (using ALTER DATABASE as described below and allow those files to autogrow).

1. Open Query Analyzer and connect to your server. Run this script to get the names of the files used for TempDB:

USE TempDB
GO
EXEC sp_helpfile
GO


Results will be something like:
name fileid filename filegroup size
——- —— ————————————————————– ———- ——-
tempdev 1 C:Program FilesMicrosoft SQL ServerMSSQLdatatempdb.mdf PRIMARY 16000 KB
templog 2 C:Program FilesMicrosoft SQL ServerMSSQLdatatemplog.ldf NULL 1024 KB

2. Along with other information related to the database, the names of the files are usually tempdev and demplog by default. These names will be used in next statement. Run following code, to move mdf and ldf files:

USE master
GO
ALTER DATABASE TempDB MODIFY FILE
(NAME = tempdev, FILENAME = 'd:datatempdb.mdf')
GO
ALTER DATABASE TempDB MODIFY FILE
(NAME = templog, FILENAME = 'e:datatemplog.ldf')
GO


The definition of the TempDB is changed. However, no changes are made to TempDB till SQL Server restarts. Please stop and restart SQL Server and it will create TempDB files in new locations.

HostForLIFE.eu SQL Server 2014 with Free ASP.NET Hosting
Try our SQL Server 2014 with Free ASP.NET Hosting today and your account will be setup soon! You can also take advantage of our Windows & ASP.NET Hosting support with Unlimited Domain, Unlimited Bandwidth, Unlimited Disk Space, etc.


ASP.NET Web Pages 3.1 with Free ASP.NET Hosting - HostForLIFE.eu :: SQL Syntax to Perform a Task for Database

clock May 8, 2015 06:10 by author Rebecca

At times you will need to access a database to perform tasks such as updating and removing information. Here, I will show you the most commonly used SQL statements such as reading from database, updating database and deleting database entries.

Connecting to Database

To connect to a database you use the Database.Open command then in brackets you give the database name. The database must be in the app_data folder (unless you specified it somewhere else in the web.config).

Here are the example:

Database.Open("DatabaseName");

The database name must be wrapped in quotation marks; you do not specify the database extension.

Read and Select Data in Database

The select statement will read data from a database. The syntax is as follows:

"SELECT columnname FROM tablename";

To select all the columns you use an asterisk:

"SELECT * FROM tablename";

Insert Data in Database

The insert statement will insert data into the database:

"INSERT INTO tablename (column 1, 2, 3 5) VALUES (@1, @2)";

Updating Database

"Update tablename set column1=@1, column2=@2";

Detele Data in Database

"DELETE FROM tablename WHERE column=value";

Filter Data Records

The where clause is used to filter records like this:

"SELECT  * FROM tablename WHERE columnname = 'value';

HostForLIFE.eu ASP.NET WebPages 3.1 with Free ASP.NET Hosting
Try our ASP.NET WebPages 3.1 with Free ASP.NET Hosting today and your account will be setup soon! You can also take advantage of our Windows & ASP.NET Hosting support with Unlimited Domain, Unlimited Bandwidth, Unlimited Disk Space, etc.


About HostForLIFE

HostForLIFE is European Windows Hosting Provider which focuses on Windows Platform only. We deliver on-demand hosting solutions including Shared hosting, Reseller Hosting, Cloud Hosting, Dedicated Servers, and IT as a Service for companies of all sizes.

We have offered the latest Windows 2019 Hosting, ASP.NET 5 Hosting, ASP.NET MVC 6 Hosting and SQL 2019 Hosting.


Month List

Tag cloud

Sign in