Within the ever-changing SQL Server environment, Windows functions are particularly potent instruments for analytical processing. They provide a unique method for carrying out calculations over a certain range of rows that are connected to the current row. In this blog, we'll explore Window Functions through a number of scenarios, a basic table example, and the use of normalizing techniques.
Knowing How Windows Work
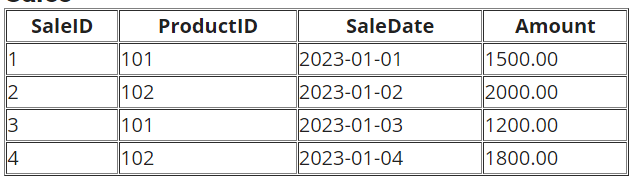
Without lowering the result set, window functions work inside a given window of rows that are connected to the current row. They provide SQL queries access to new levels of analytical power. Let's begin by making a straightforward table and adding data to it.
-- Create a simple table
CREATE TABLE Sales (
SaleID INT PRIMARY KEY,
ProductID INT,
SaleDate DATE,
Amount DECIMAL(10, 2)
);
-- Insert sample data
INSERT INTO Sales VALUES (1, 101, '2023-01-01', 1500.00);
INSERT INTO Sales VALUES (2, 102, '2023-01-02', 2000.00);
INSERT INTO Sales VALUES (3, 101, '2023-01-03', 1200.00);
INSERT INTO Sales VALUES (4, 102, '2023-01-04', 1800.00);
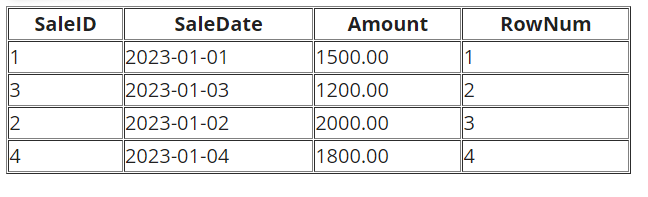
ROW_NUMBER() - Enumerating Rows
The ROW_NUMBER() function assigns a unique number to each row based on a specified order. This can be useful for pagination or ranking purposes.
-- Enumerate rows based on SaleDate
SELECT SaleID, SaleDate, Amount,
ROW_NUMBER() OVER (ORDER BY SaleDate) AS RowNum
FROM Sales;
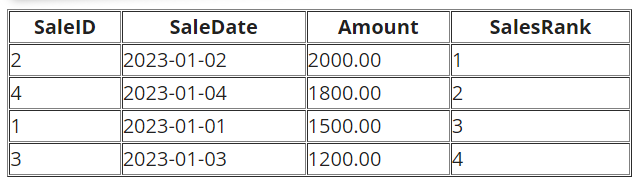
RANK() - Ranking Rows
RANK() assigns a unique rank to each distinct row, leaving gaps for tied values.
-- Rank rows based on Amount
SELECT SaleID, SaleDate, Amount,
RANK() OVER (ORDER BY Amount DESC) AS SalesRank
FROM Sales;
DENSE_RANK() - Dense Ranking Rows
DENSE_RANK() is similar to RANK(), but without gaps for tied values.
-- Dense rank rows based on Amount
SELECT SaleID, SaleDate, Amount,
DENSE_RANK() OVER (ORDER BY Amount DESC) AS DenseSalesRank
FROM Sales;
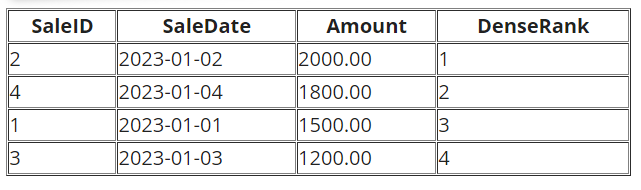
In this specific dataset, since there are no tied values in the Amount column, the rankings provided by both RANK() and DENSE_RANK() are identical.
Here's a brief explanation of the differences:
RANK()
- Assigns a unique rank to each distinct row.
- Leaves gaps in the ranking for tied values. If two rows have the same value, they both get the same rank, and the next rank is skipped.
DENSE_RANK()
- Similar to RANK().
- Does not leave gaps for tied values. If two rows have the same value, they both get the same rank, and the next rank is not skipped.
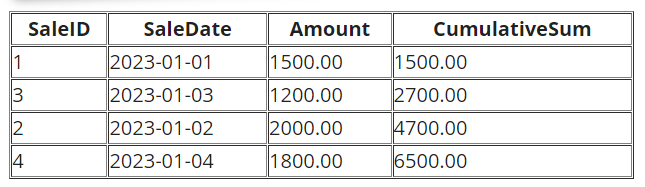
SUM() - Cumulative Sum
SUM() as a window function enables the calculation of cumulative sums.
-- Calculate cumulative sum of Amount
SELECT SaleID, SaleDate, Amount,
SUM(Amount) OVER (ORDER BY SaleDate) AS CumulativeSum
FROM Sales;
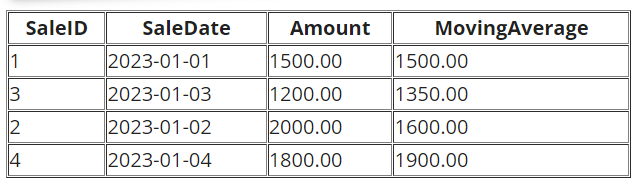
AVG() - Moving Average
AVG() as a window function calculates a moving average over a specified window of rows.
-- Calculate 3-day moving average of Amount
SELECT SaleID, SaleDate, Amount,
AVG(Amount) OVER (ORDER BY SaleDate ROWS BETWEEN 1 PRECEDING AND 1 FOLLOWING) AS MovingAverage
FROM Sales;
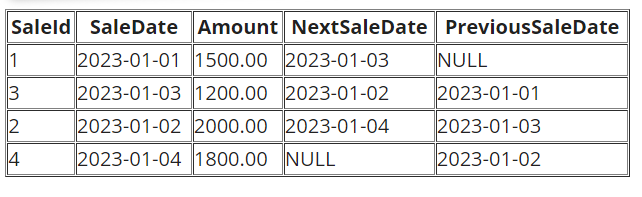
LEAD() and LAG() - Accessing Adjacent Rows
LEAD() and LAG() provide access to subsequent and preceding rows, respectively.
-- Access next and previous SaleDate
SELECT SaleID, SaleDate, Amount,
LEAD(SaleDate) OVER (ORDER BY SaleDate) AS NextSaleDate,
LAG(SaleDate) OVER (ORDER BY SaleDate) AS PreviousSaleDate
FROM Sales;
Normalizing Data Using Window Functions
Normalization is a key database design principle. Let's use Window Functions to normalize data by creating a new table to store aggregated information.
-- Create a normalized table
CREATE TABLE ProductSales (
ProductID INT PRIMARY KEY,
TotalSales DECIMAL(10, 2),
AverageSaleAmount DECIMAL(10, 2)
);
-- Insert normalized data using Window Functions
INSERT INTO ProductSales
SELECT ProductID,
SUM(Amount) OVER (PARTITION BY ProductID) AS TotalSales,
AVG(Amount) OVER (PARTITION BY ProductID) AS AverageSaleAmount
FROM Sales
GROUP BY ProductID;
ProductSales

The ProductSales table in this normalized database removes unnecessary data by capturing the total sales and average selling amount for each product.
SQL Server Window Functions are a developer's and data analyst's gold mine. These routines improve your analytical skills, from ordering rows to computing cumulative sums and moving averages. Gaining proficiency with Windows functions will enable you to extract meaningful insights from your data and optimize the performance of your SQL queries. They can also be crucial in normalizing data, as shown in the aforementioned instances, which helps create an effective and well-designed database structure. Cheers to your inquiring!
HostForLIFEASP.NET SQL Server 2022 Hosting
