Before SQL Server 2017 (SQL Server 2014 below), concatenating rows of strings into one column could be done using the STUFF function that combines with FOR XML PATH. However, in my opinion, it's quite messy. In this article, we'll explore SQL's STRING_AAG function and see how we can concatenate rows of strings into one column string using a separator.
The examples provided will work with SQL Server 2017 and later.
Ok, let's get started.
What's SQL's STRING_AAG Function?
It is an aggregate function that concatenates strings into a single line separated by a separator.
The separator is not appended to the end of the result string.
This function was introduced into SQL Server 2017 and later.
Syntax
STRING_AGG(string expression, separator) [order clause]
The string expression could be any type.
It can be converted into VARCHAR or NVARCHAR during concatenation.
Non-string types are converted to NVARCHAR types.
The separator is used as a separator for the concatenated strings.
It can be literal or variable. Just remember it doesn't add itself at the end of the result string.
The order clause is the sort order of the result string using the WITHIN GROUP clause.
Syntax of WITHIN GROUP
WITHIN GROUP (ORDER BY expression [ASC | DESC])
The expression can be used for sorting results; only one expression is allowed per query.
The default order is ascending.
Examples
Before we show examples, the AdventureWorks database will be used for the first of our samples.
Using STRING_AGG First Example
To have an overview, the [Sales].[SalesOrderHeader] under the AdventureWorks database does have a [SalesOrderNumber] column.
And we wanted to show the list of different sales-order-number per customer by using the STRING_AGG function.
Ok, let's see the examples below.
SELECT CustomerID as [Customer ID],
COUNT(CustomerID) as [Number Of Sales Order] ,
STRING_AGG([SalesOrderNumber], ',') as [Sales Order List]
FROM [AdventureWorks2019].[Sales].[SalesOrderHeader]
GROUP BY CustomerID
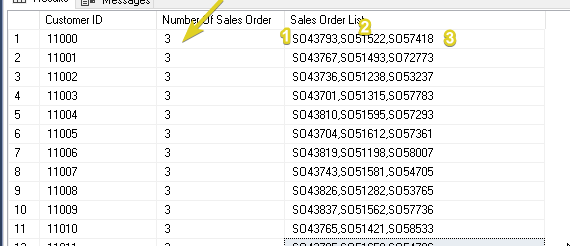
As you can see, with the query that we have we did get the [CustomerID] column as our reference for a particular customer.
Then by knowing the number of its records, we can show the different sales-order numbers per record.
But, of course, using the STRING_AGG.
That's why we can come up with the query above.
Let's see the output below.
Output
Now, for us to appreciate the WITHIN GROUP syntax when using STRING_AGG.
Let's look at the example below.
SELECT CustomerID as [Customer ID],
COUNT(CustomerID) as [Number Of Sales Order],
STRING_AGG([SalesOrderNumber], ',')
WITHIN GROUP (ORDER BY [SalesOrderNumber] DESC)
as [Sales Order List]
FROM [AdventureWorks2019].[Sales].[SalesOrderHeader]
GROUP BY CustomerID
Output
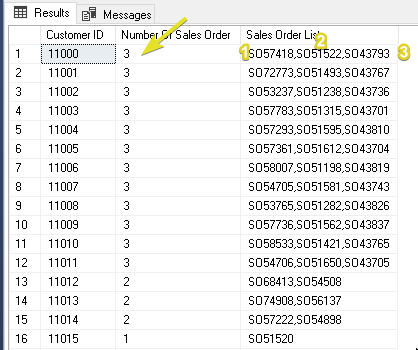
Now, let's try to see the difference between the two outputs.
Output Difference

Using STRING_AGG Second Example
In this section, I will try to give another example. The idea here is to get all the phone numbers of a particular customer; it seems easy, right?
Yap, let's show the code now, and let's create the table structure.
Note: We'll use a local temporary table to avoid tabl structure complexities.
Build the structure first.
-- 1. Let's create the tables needed.
IF OBJECT_ID(N'tempdb..#Customers') IS NOT NULL
BEGIN
DROP TABLE #Customers
END
CREATE TABLE #Customers(
Id int,
FirstName nvarchar(50),
LastName nvarchar(50)
)
IF OBJECT_ID(N'tempdb..#CustomersPhone') IS NOT NULL
BEGIN
DROP TABLE #CustomersPhone
END
CREATE TABLE #CustomersPhone(
PhoneId int,
UserId int,
PhoneNumber nvarchar(50)
)
Second, let's put some data on it.
-- 2. Let's put some data on it.
INSERT INTO #Customers VALUES
(1, 'Peter', 'Scott'),
(2, 'Mark', 'Tom')
INSERT INTO #CustomersPhone
VALUES
(1, 1, '+63 895 789 5751'),
(2, 1, '+63 795 689 5752'),
(3, 1, '+63 695 589 5753'),
(1, 2, '+63 915 739 5651'),
(2, 2, '+63 917 649 5552'),
(3, 2, '+63 095 559 5453');
Third, let's create a query that will show the customer's name, the number of phones they have, and their phone list separated by a comma.
-- 3. Let's show the number of phone and phone list a customer have.
SELECT CONCAT(C1.[LastName], ', ', C1.[FirstName]) as [FullName],
COUNT(C1.Id) as [Total Phone Number],
STRING_AGG (P1.[PhoneNumber], ',') as [Phone List]
FROM #CustomersPhone P1
INNER JOIN #Customers C1 ON P1.UserId = C1.Id
GROUP BY C1.Id, C1.[LastName], C1.[FirstName]

HostForLIFEASP.NET SQL Server 2021 Hosting
