European Windows 2019 Hosting BLOG

BLOG about Windows 2019 Hosting and SQL 2019 Hosting - Dedicated to European Windows Hosting Customer

Visual Studio UK Hosting - HostForLIFE.eu :: Tutorial New API For Refreshing Data in LightSwitch in Visual Studio 2013

clock December 17, 2013 07:47 by author Administrator

New API For Refreshing Data in LightSwitch in Visual Studio 2013

You can get Visual Studio 2013 here: http://www.microsoft.com/visualstudio/eng/2013-downloads.

The Sample Project

When we open it up, it will be converted to the new Visual Studio 2013 format. However, to get it to run we have right-click on the first project

The API
The new refresh() API consists of  two methods that each return a Promise object.

  • Refresh()
    Asynchronously loads the first page of items into this collection and returns a promise that will be fulfilled when the first page is loaded. Existing results will be refreshed on the first page and subsequent pages unless load() is called again.
  • Refresh(navigationPropertyNames)
    Updates the entity with values from the data source if the entity
    is not changed.
    <param name="navigationPropertyNames" type="Array" optional="true">
    . An array of names of navigation properties to be included. An empty array means no properties will be included. If not specified, all reference properties are included.

Sample usage

  • Refresh the Order entity and its Customer, Employee, Shipper

        screen.Order.details.refresh();

  • Refresh only the Order entity

        screen.Order.details.refresh([]);

  • Refresh the Order entity and its Customer

        screen.Order.details.refresh(["Customer"]);

The Problem

Let’s say we have a field on the Order entity that is updated in the save pipeline when an associated OrderDetail record is updated.

In the OrderDetail record, the updating event looks like this:

We can update an OrderDetail record

Save the changes. But the time is unchanged on the screen (even though it has been updated in the database).

The Solution

We can instantly have the entity updated if we use the new refresh() method.

To do so requires us to implement our own code to open the edit screen (so we have an opportunity to implement the refresh code).
We select the Item Tap action for the Orders list.

Select Write my own method.

We then edit the code for the method we created.
We use the following code:

myapp.Main.Order_ItemTap_execute = function (screen) {
    myapp.showAddEditOrder(null, {
        beforeShown: function (addEditOrderScreen) {
            // Set the Order on the AddEditOrder screen
            // to the selected Order on the Main screen
            addEditOrderScreen.Order = screen.Orders.selectedItem;}
        },
        afterClosed: function (addEditScreen, navigationAction) {
            // If the user commits the change,
            // update the selected order on the Main screen
            if (navigationAction === msls.NavigateBackAction.commit) {
 // *****************************************
// The .refresh() method refreshes the Order
screen.Orders.selectedItem.details.refresh();
            }
        }
    });
};

When we update the record we will see the date instantly updated without the need to refresh the entire screen.


Visual Studio Hosting - HostForLIFE.eu - Spain :: Integrating PayPal With Visual Studio LightSwitch

clock December 10, 2013 05:35 by author Administrator

This example application shows how you can integrate a complex API such as PayPal Adaptive Payments with Visual Studio LightSwitch.
The Sample Application

You can test out the sample application at:

https://paypalstore.lightswitchhelpwebsite.com/HTMLClient/

(use your user name and password of your LightSwitchHelpWebsite.com account)

Note: All transactions are real and your PayPal account will be debited $2.00. However, please  do not complete a transaction and then reverse the charges, that will cause me quite a hassle.
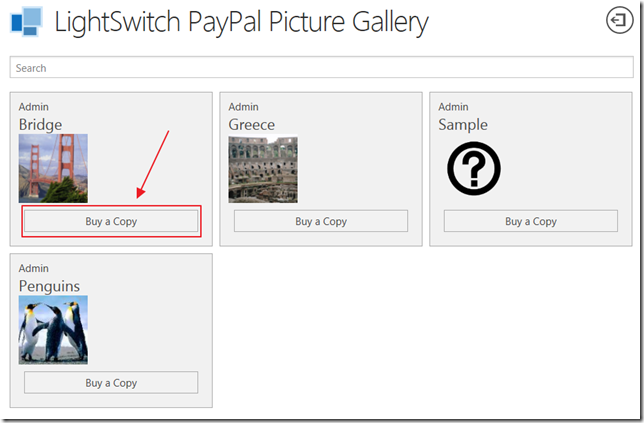
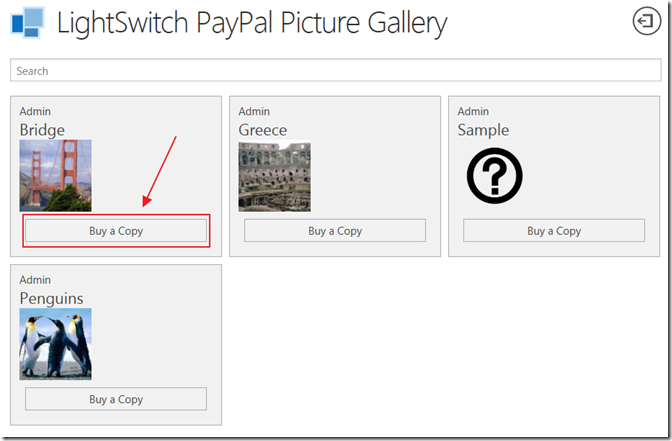
A user can browse the available pictures and purchase a copy by clicking the Buy a Copy button.

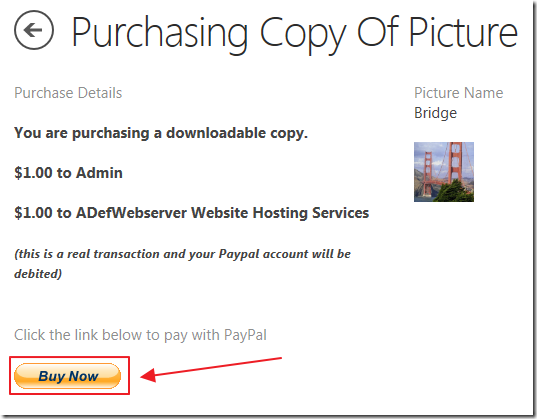
  • They are taken to a page where they can click the Buy Now button.
  • They are taken to the PayPal site where they can pay.
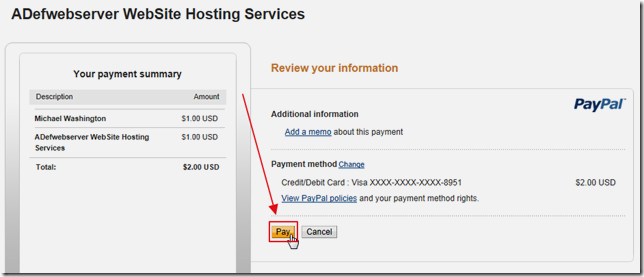
  • They can use a credit card (if the merchant account has that option), check, or their PayPal account.
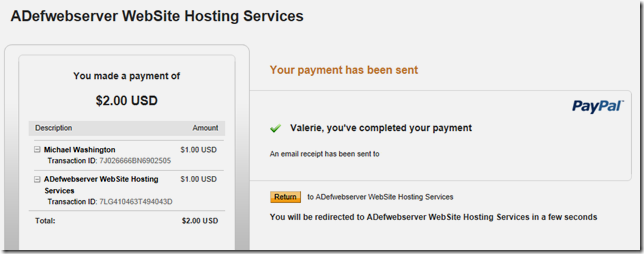
  • After making payment they see a confirmation.
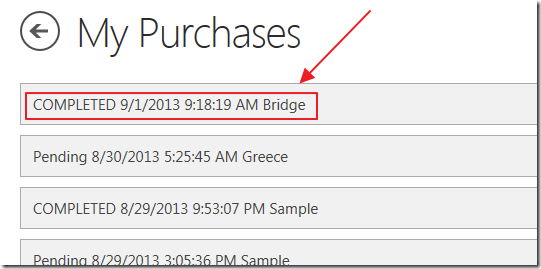
 

  • They are taken back to the application, to the My Purchases page.

Clicking on a purchase record will take them to a page where they can download the picture, if the payment has cleared.
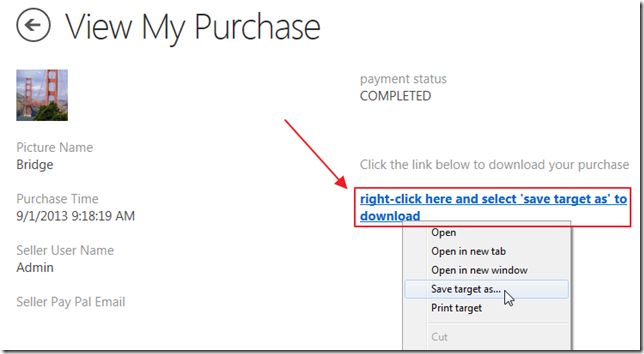
 

  • If the payment has not cleared, it will say so and display any error messages. Once payment has cleared this page will allow them to download the picture.
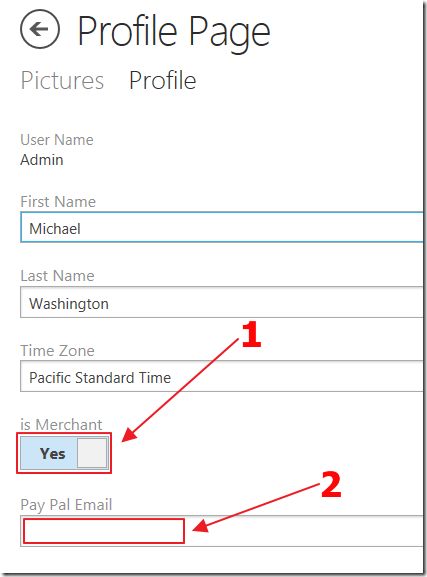
  • Any user can upload their own pictures, indicate that they are a Merchant, and enter their PayPal account.
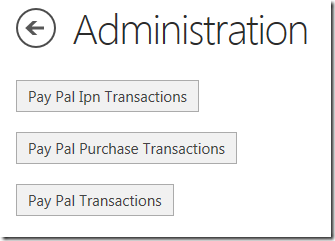
An administrator can see and diagnose all transactions. The administrator is defined when the application is published using the Visual Studio LightSwitch publishing wizard.

The administrator PayPal account is also configured in the web.config file (this is covered in the next section).

The PayPal API

Also note, the PayPal IPN notifications, will only work if the application has been published using the using the Visual Studio LightSwitch publishing wizard and is at a location that can be reached by the PayPal servers.
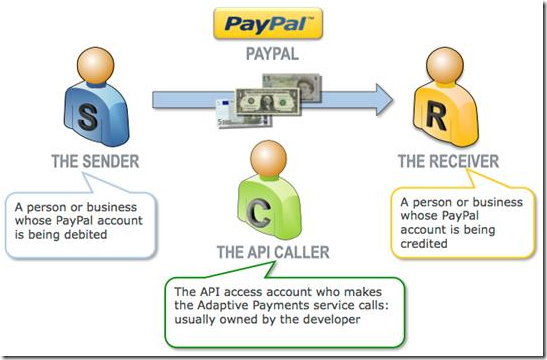


The code in the sample LightSwitch application uses the PayPal Adaptive Payments Classic API: https://developer.paypal.com/webapps/developer/docs/classic/adaptive-payments/gs_AdaptivePayments/. You can get a complete overview of PayPal Adaptive Payments at this link: https://developer.paypal.com/webapps/developer/docs/classic/adaptive-payments/integration-guide/APIntro/.
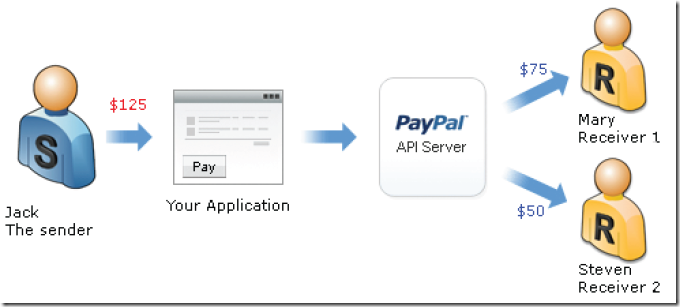
Specifically it uses the Pay API call to make a parallel payment: https://developer.paypal.com/webapps/developer/docs/classic/api/adaptive-payments/Pay_API_Operation/.

It also uses the PayPal IPN Classic API to determine when a payment has been completed: https://developer.paypal.com/webapps/developer/docs/classic/products/instant-payment-notification/.

Running The Sample Application
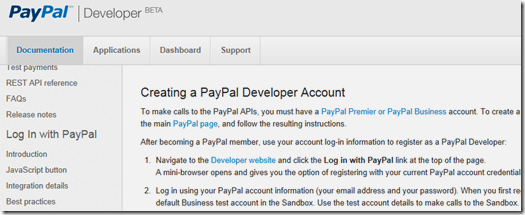
  • You will also need to go to: https://apps.paypal.com to create a PayPal Classic Application (this is because at the time of this writing the Adaptive Payments API is not available using the newer REST Services API).
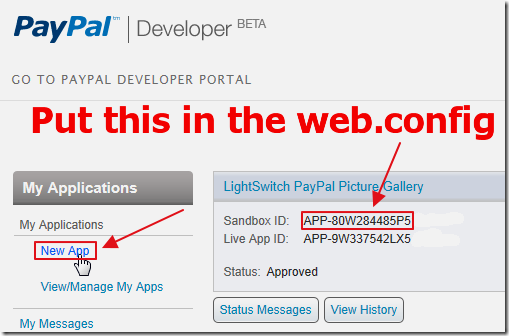
  • Create a new application. This will create a Sandbox ID that you will need to also put in the web.config of the sample app.
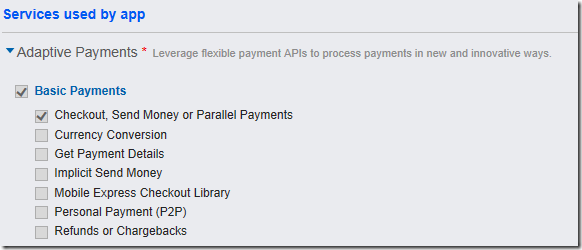
  • When you create your application, use the settings in the image above.

You will need to create PayPal Sandbox test accounts: https://developer.paypal.com/webapps/developer/docs/classic/lifecycle/ug_sandbox/#accounts

The merchant test account will need to be entered in the web.config of the LightSwitch application.

  • The sample transactions will need three accounts and no two can be the same so you will need to create two additional test accounts (besides the test merchant account that will be created for you) to use to test the application.
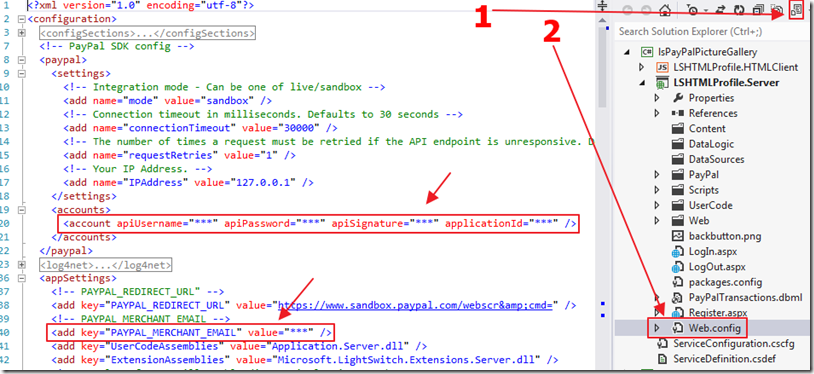
Open the sample LightSwitch application (available on the downloads page), switch to file view, and open the Web.config, and enter the values in the spaces marked ***.

The application should now work.

If it doesn’t work for you:

Also note: the PayPal IPN notifications will only work if the application has been published using the using the Visual Studio LightSwitch publishing wizard and is at a location that can be reached by the PayPal servers.

When the sample application was created, I used the PayPal Nuget package to install the needed binaries: https://www.nuget.org/packages/PayPalCoreSDK.

Exploring The Sample Application
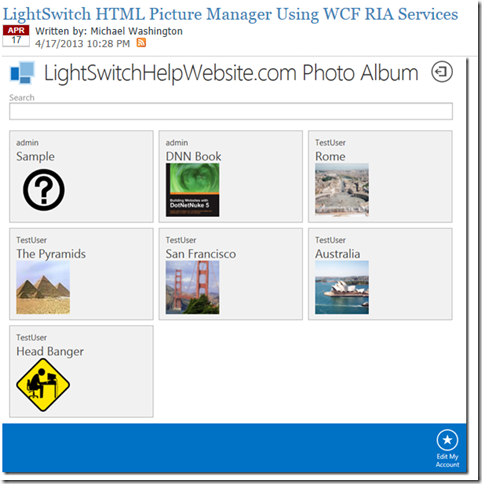
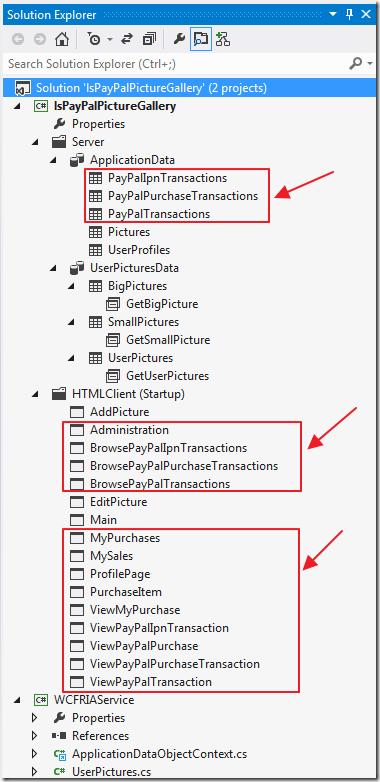
The PayPal version adds additional tables and screens.

Note that important code is implemented to properly secure the PayPal tables:

     // PayPalPurchaseTransactions
        #region PayPalPurchaseTransactions
        partial void PayPalPurchaseTransactions_Filter(ref Expression<Func<PayPalPurchaseTransaction, bool>> filter)
        {
            // Only an Admin can see the entire table
            if (!(this.Application.User.HasPermission(Permissions.SecurityAdministration)))
            {
                // Users can see any Transction where they are the buyer or the seller
                filter = e => e.PurchaserUserName == this.Application.User.Identity.Name
                    || e.SellerUserName == this.Application.User.Identity.Name;
            }
        }
        partial void PayPalPurchaseTransactions_Inserting(PayPalPurchaseTransaction entity)
        {
            // Set time and IP Address
            var context = System.Web.HttpContext.Current;
            entity.PurchaseTime = DateTime.Now;
            entity.PurchaseIPAddress = context.Request.UserHostAddress;
            // Payment Status is always set to Pending
            entity.payment_status = "Pending";
        }
        partial void PayPalPurchaseTransactions_Updating(PayPalPurchaseTransaction entity)
        {
            // An update can only be made by the orginal user
            if (!(entity.PurchaserUserName == this.Application.User.Identity.Name
                || entity.SellerUserName == this.Application.User.Identity.Name
                || this.Application.User.HasPermission(Permissions.SecurityAdministration)))
            {
               throw new Exception(string.Format("Only buyer, seller or administrator can update!"));
            }
            // Payment Status is always set to Pending
            // IPN handler updated this value directly outside of oData
            entity.payment_status = "Pending";
        }
        partial void PayPalPurchaseTransactions_CanDelete(ref bool result)
        {
            // Only an Admin can access the table (.ashx file has an override)
            result = this.Application.User.HasPermission(Permissions.SecurityAdministration);
        }
        #endregion
        // PayPalIpnTransactions
        #region PayPalIpnTransactions
        partial void PayPalIpnTransactions_CanDelete(ref bool result)
        {
            // Only an Admin can access the table (.ashx file has an override)
            result = this.Application.User.HasPermission(Permissions.SecurityAdministration);
        }
        partial void PayPalIpnTransactions_CanInsert(ref bool result)
        {
            // Only an Admin can access the table (.ashx file has an override)
           result = this.Application.User.HasPermission(Permissions.SecurityAdministration);
        }
        partial void PayPalIpnTransactions_CanUpdate(ref bool result)
        {
            // Only an Admin can access the table (.ashx file has an override)
            result = this.Application.User.HasPermission(Permissions.SecurityAdministration);
        }
        partial void PayPalIpnTransactions_CanRead(ref bool result)
        {
            // Only an Admin can access the table (.ashx file has an override)
            result = this.Application.User.HasPermission(Permissions.SecurityAdministration);
        }
        #endregion
        // PayPalTransactions
        #region PayPalTransactions
        partial void PayPalTransactions_CanDelete(ref bool result)
        {
            // Only an Admin can access the table (.ashx file has an override)
            result = this.Application.User.HasPermission(Permissions.SecurityAdministration);
        }
        partial void PayPalTransactions_CanInsert(ref bool result)
        {
            // Only an Admin can access the table (.ashx file has an override)
            result = this.Application.User.HasPermission(Permissions.SecurityAdministration);
        }
        partial void PayPalTransactions_CanRead(ref bool result)
        {
            // Only an Admin can access the table (.ashx file has an override)
            result = this.Application.User.HasPermission(Permissions.SecurityAdministration);
        }
        partial void PayPalTransactions_CanUpdate(ref bool result)
        {
            // Only an Admin can access the table (.ashx file has an override)
            result = this.Application.User.HasPermission(Permissions.SecurityAdministration);
        }
        #endregion 

The Screen
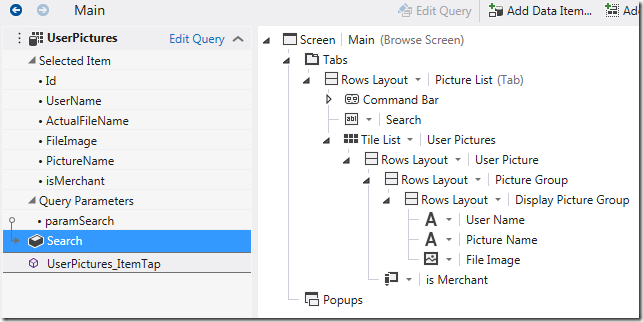
  • The Main screen is the screen customers use to search for and purchase copies of pictures.
  • The following code shows the Buy a Copy button if the person who uploaded the picture is a Merchant:

myapp.Main.isMerchant_render = function (element, contentItem) {
    // Show button if isMerchant
    if (contentItem.value == true) {
        // Get the UserPicture
        var objUserPicture = contentItem.parent;
       element.innerHTML =
         "<button type='button'>Buy a Copy</button>";
    };
};

  • When the Buy a Picture button is clicked the following code runs that calls the Adaptive Payments handler that contacts PayPal to generate a PayKey:

myapp.Main.UserPictures_ItemTap_execute = function (screen)

{    // Get the selected Picture
    var objUserPicture = screen.UserPictures.selectedItem;
    // Get selected selectedPictureId
    selectedPictureId = screen.UserPictures.selectedItem.Id;  
   // Show the UserPicture
    myapp.showPurchaseItem(objUserPicture, {
        beforeShown: function (PurchaseItemScreen) {
            msls.promiseOperation(CallAdaptivePaymentsHandler)
                .then(function PromiseSuccess(AdaptivePaymentsHandlerResult) {
                    // Parse the JSON returned
                    var objPayPalResponse = jQuery.parseJSON(AdaptivePaymentsHandlerResult);
                    // Set the PayPal response
                    PurchaseItemScreen.PayPalRedirectUrl = objPayPalResponse.PayPalRedirectUrl
                        + "_ap-payment&paykey="
                        + objPayPalResponse.PayPalPaykey;
                    PurchaseItemScreen.PayPalPaykey = objPayPalResponse.PayPalPaykey;
                    PurchaseItemScreen.PayPalPaymentExecStatus =
objPayPalResponse.PayPalPaymentExecStatus;
                    PurchaseItemScreen.PayPalError = objPayPalResponse.PayPalError;
                    PurchaseItemScreen.PayPalErrorMessage = objPayPalResponse.PayPalErrorMessage;
               });
        }
    });
};


  • The following code is the Adaptive Payments handler that contacts PayPal and returns a PayKey:

using System;
using System.Data;
using System.Web;
using System.Collections;
using System.Web.Services;
using System.Collections.Generic;
using System.Collections.Specialized;
using PayPal;
using PayPal.Exception;
using PayPal.Util;
using PayPal.AdaptivePayments;
using System.Configuration;
using PayPal.AdaptivePayments.Model;
using System.Linq;
using Microsoft.LightSwitch.Server;
namespace LightSwitchApplication
{
    [Serializable]
    public class PayPalResponse
    {
        public string PayPalRedirectUrl { get; set; }
        public string PayPalPaykey { get; set; }
        public string PayPalPaymentExecStatus { get; set; }
        public bool PayPalError { get; set; }
        public string PayPalErrorMessage { get; set; }
    }
    public class adaptivepaymentshandler : IHttpHandler
    {
        public void ProcessRequest(HttpContext context)
        {
            Pay(context);
        }
        public bool IsReusable
        {
            get
            {
                return false;
            }
        }
        /// <summary>
        /// Handle Pay API calls
        /// </summary>
        /// <param name="context"></param>
        private void Pay(HttpContext context)
        {
            // Get the PictureID
            int UserPicturesId = Convert.ToInt32(context.Request.Params["UserPicturesId"]);
            // Global values
            int PayPalPurchaseTransactionId = -1;
            string PayPalRedirectUrl = ConfigurationManager.AppSettings["PAYPAL_REDIRECT_URL"];
            string SellerPayPalEmail = "";
            string SellerUserName = "";
            // Instantiate PayPalResponse class
            PayPalResponse objPayPalResponse = new PayPalResponse();
            objPayPalResponse.PayPalPaykey = " ";
            objPayPalResponse.PayPalPaymentExecStatus = " ";
            objPayPalResponse.PayPalRedirectUrl = PayPalRedirectUrl;
            objPayPalResponse.PayPalErrorMessage = " ";
            objPayPalResponse.PayPalError = false;
            using (var serverContext =
                ServerApplicationContext.CreateContext()
                )
            {
                // Insert a record in the Transaction table
                var objPayPalTransaction =
                    serverContext.DataWorkspace.ApplicationData.PayPalPurchaseTransactions.AddNew();
                // Get the Picture
                var objPicture = (from Pictures in serverContext.DataWorkspace.ApplicationData
                                      .Pictures.GetQuery().Execute()
                                  where Pictures.Id == UserPicturesId
                                  select Pictures).FirstOrDefault();
                if (objPicture == null)
                {
                    // No Picture found
                    objPayPalResponse.PayPalError = true;
                    objPayPalResponse.PayPalErrorMessage =
                        string.Format("UserPicturesId {0} not found.", UserPicturesId);
                }
                else
                {
                    // Get the Merchant
                    var objUserProfiles = (from UserProfiles in serverContext.DataWorkspace.ApplicationData
                                               .UserProfiles.GetQuery().Execute()
                                           where UserProfiles.UserName == objPicture.UserName
                                           select UserProfiles).FirstOrDefault();
                    if (objUserProfiles == null)
                    {
                        // No Seller Found
                        objPayPalResponse.PayPalError = true;
                        objPayPalResponse.PayPalErrorMessage =
                            string.Format("UserName {0} does not have a UserProfile record.", objPicture.UserName);
                    }
                    else
                    {
                        // Set SellerUserName
                        SellerUserName = objUserProfiles.UserName;
                        if (objUserProfiles.PayPalEmail.Length < 5)
                        {
                            // Seller does not have a PayPal Email set
                            objPayPalResponse.PayPalError = true;
                            objPayPalResponse.PayPalErrorMessage =
                                string.Format("UserName {0} does not have a PayPal Email set.", objPicture.UserName);
                        }
                        else
                        {
                            // Get values needed to construct PayPal request
                            SellerPayPalEmail = objUserProfiles.PayPalEmail;
                            objPayPalTransaction.payment_status = "Pending";
                            objPayPalTransaction.PayPalError = false;
                            objPayPalTransaction.PayPalRedirectUrl = PayPalRedirectUrl;
                            objPayPalTransaction.PurchaserUserName = Application.Current.User.Name;
                            objPayPalTransaction.SellerPayPalEmail = SellerPayPalEmail;
                            objPayPalTransaction.SellerUserName = objUserProfiles.UserName;
                            // Associate the Picture to the PayPalTransaction
                            objPayPalTransaction.Picture = objPicture;
                            // Save the record so we get a Id to use in the PayPal request
                            serverContext.DataWorkspace.ApplicationData.SaveChanges();
                            // set PayPalPurchaseTransactionId
                            PayPalPurchaseTransactionId = objPayPalTransaction.Id;
                        }
                    }
                }
                // Proceed if no errors
                if (!objPayPalResponse.PayPalError)
                {
                    string currentPath =
                        System.Web.HttpContext.Current.Request.Url.OriginalString
                        .Replace(@"/PayPal/adaptivepaymentshandler.ashx", "");
                    ReceiverList receiverList = new ReceiverList();
                    receiverList.receiver = new List<Receiver>();
                    string strActionType = "PAY";
                    string currencyCode = "USD";
                    string cancelUrl = string.Format(@"{0}/HTMLClient/?mode=cancel", currentPath);
                    string returnUrl = String.Format(@"{0}/HTMLClient/?mode=return", currentPath);
                    string IpnURL = String.Format(@"{0}/PayPal/IPNListener.aspx", currentPath);
                    Receiver Receiver1 = new Receiver(Decimal.Parse("1.0"));
                    Receiver1.email = SellerPayPalEmail;
                    Receiver1.primary = false;
                    Receiver1.paymentType = "SERVICE";
                    receiverList.receiver.Add(Receiver1);
                    Receiver Receiver2 = new Receiver(Decimal.Parse("1.0"));
                    Receiver2.email = ConfigurationManager.AppSettings["PAYPAL_MERCHANT_EMAIL"];
                    Receiver2.primary = false;
                    Receiver2.paymentType = "SERVICE";
                    receiverList.receiver.Add(Receiver2);
                    PayRequest req = new PayRequest(new RequestEnvelope("en_US"),
                        strActionType,
                        cancelUrl,
                        currencyCode,
                        receiverList,
                        returnUrl);
                    // IPN Url (only enable with a published internet accessable application)
                    req.ipnNotificationUrl = IpnURL; 
                   // set optional parameters
                    //(Optional) Whether to reverse parallel payments if an error occurs with a payment.
                    //Allowable values are:
                    //true – Each parallel payment is reversed if an error occurs
                    //false – Only incomplete payments are reversed (default)
                    req.reverseAllParallelPaymentsOnError = true;
                    //(Optional) A unique ID that you specify to track the payment.
                    //Note: You are responsible for ensuring that the ID is unique.
                    //Maximum length: 127 characters
                    req.trackingId = PayPalPurchaseTransactionId.ToString();
                    // (Optional) The payer of PayPal fees. Allowable values are:
                    //    SENDER – Sender pays all fees (for personal, implicit simple/parallel payments;
                    //    do not use for chained or unilateral payments)
                    //    PRIMARYRECEIVER – Primary receiver pays all fees (chained payments only)
                    //    EACHRECEIVER – Each receiver pays their own fee (default, personal and unilateral payments)
                    //    SECONDARYONLY – Secondary receivers pay all fees
                    //    (use only for chained payments with one secondary receiver)
                    // req.feesPayer = "EACHRECEIVER";
                    // Calll PayPal to get PayKey          
                    AdaptivePaymentsService service = new AdaptivePaymentsService();
                    PayResponse resp = null;
                    try
                    {
                        resp = service.Pay(req);
                    }
                    catch (System.Exception e)
                    {
                        objPayPalResponse.PayPalError = true;
                        objPayPalResponse.PayPalErrorMessage = e.Message;
                        // Write to the database ********
                        objPayPalTransaction.PayPalError = true;
                        objPayPalTransaction.PayPalErrorMessage = e.Message;
                        serverContext.DataWorkspace.ApplicationData.SaveChanges();
                        OutputResponse(context, objPayPalResponse);
                    // Check for errors
                    if ((resp.responseEnvelope.ack == AckCode.FAILURE) ||
                        (resp.responseEnvelope.ack == AckCode.FAILUREWITHWARNING))
                    {
                        string strError = "";
                        objPayPalResponse.PayPalError = true;
                        foreach (var error in resp.error)
                        {
                            strError = strError + " " + error.message;
                        }
                        objPayPalResponse.PayPalErrorMessage = strError;
                        // Write to the database ********
                        objPayPalTransaction.PayPalError = true;
                        objPayPalTransaction.PayPalErrorMessage = strError;
                        serverContext.DataWorkspace.ApplicationData.SaveChanges();
                    }
                    else
                    {
                        objPayPalResponse.PayPalPaykey = resp.payKey;
                        objPayPalResponse.PayPalPaymentExecStatus = resp.paymentExecStatus;
                        // Write to the database ********
                        objPayPalTransaction.PayPalPaykey = resp.payKey;
                        objPayPalTransaction.PayPalPaymentExecStatus = resp.paymentExecStatus;
                        serverContext.DataWorkspace.ApplicationData.SaveChanges();
                    }
                }
            }
            // Return Response
            OutputResponse(context, objPayPalResponse);
        }
        private static void OutputResponse(HttpContext context, PayPalResponse objPayPalResponse)
        {
            // Create JavaScriptSerializer
            System.Web.Script.Serialization.JavaScriptSerializer jsonSerializer =
                new System.Web.Script.Serialization.JavaScriptSerializer();
            // Output as JSON
            context.Response.Write(jsonSerializer.Serialize(objPayPalResponse));
            return;
        }
    }
}


  • When the user clicks the Buy Now button they are taken to PayPal with the PayKey that has all the details of the transaction.
  • When the payment has been processed the following code listens for the IPN notification (that was set in the Adaptive Payments handler):

Try
    {
        byte[] parameters = Request.BinaryRead(HttpContext.Current.Request.ContentLength);
        if (parameters.Length > 0)
        {
            IPNMessage ipn = new IPNMessage(parameters);
            bool isIpnValidated = ipn.Validate();
            string transactionType = ipn.TransactionType;
            NameValueCollection map = ipn.IpnMap;
            if (isIpnValidated)
            {
                string connString =
                System.Web.Configuration.WebConfigurationManager
                .ConnectionStrings["_IntrinsicData"].ConnectionString;
                // Connect to the database
                PayPalTransactionsDataContext db = new LinqToSQL.PayPalTransactionsDataContext(connString);
                // Log the PayPal data received
                var objPayPalIpnTransaction = new LinqToSQL.PayPalIpnTransaction();
                string PayPalPayKey = ipn.IpnValue("pay_key"); ;
                string PayPalStatus = ipn.IpnValue("status");
                objPayPalIpnTransaction.transaction_type = ipn.IpnValue("transaction_type");
                objPayPalIpnTransaction.status = ipn.IpnValue("status");
                objPayPalIpnTransaction.sender_email = ipn.IpnValue("sender_email");
                objPayPalIpnTransaction.action_type = ipn.IpnValue("action_type");
                objPayPalIpnTransaction.payment_request_date = ipn.IpnValue("payment_request_date");
                objPayPalIpnTransaction.reverse_all_parallel_payments_on_error
                   ipn.IpnValue("reverse_all_parallel_payments_on_error");
                objPayPalIpnTransaction.return_url = ipn.IpnValue("return_url");
                objPayPalIpnTransaction.cancel_url = ipn.IpnValue("cancel_url");
                objPayPalIpnTransaction.ipn_notification_url = ipn.IpnValue("ipn_notification_url");
                objPayPalIpnTransaction.pay_key = ipn.IpnValue("pay_key");
                objPayPalIpnTransaction.memo = ipn.IpnValue("memo");
                objPayPalIpnTransaction.fees_payer = ipn.IpnValue("fees_payer");
                objPayPalIpnTransaction.trackingId = ipn.IpnValue("trackingId");
                objPayPalIpnTransaction.preapproval_key = ipn.IpnValue("preapproval_key");
                objPayPalIpnTransaction.reason_code = ipn.IpnValue("reason_code");
                objPayPalIpnTransaction.currencyCode = ipn.IpnValue("currencyCode");
                objPayPalIpnTransaction.approved = ipn.IpnValue("approved");
                objPayPalIpnTransaction.charset = ipn.IpnValue("charset");
                objPayPalIpnTransaction.transaction_0_id = ipn.IpnValue("transaction[0].id");
                objPayPalIpnTransaction.transaction_0_status = ipn.IpnValue("transaction[0].status");
                objPayPalIpnTransaction.transaction_0_id_for_sender
ipn.IpnValue("transaction[0].id_for_sender");
                objPayPalIpnTransaction.transaction_0_status_for_sender_txn =
                  ipn.IpnValue("transaction[0].status_for_sender_txn");
                objPayPalIpnTransaction.transaction_0_refund_id = ipn.IpnValue("transaction[0].refund_id")
                objPayPalIpnTransaction.transaction_0_refund_amount =
                    ipn.IpnValue("transaction[0].refund_amount");
                objPayPalIpnTransaction.transaction_0_refund_account_charged
                    ipn.IpnValue("transaction[0].refund_account_charged");
                objPayPalIpnTransaction.transaction_0_receiver = ipn.IpnValue("transaction[0].receiver");
                objPayPalIpnTransaction.transaction_0_invoiceId = ipn.IpnValue("transaction[0].invoiceId");
                objPayPalIpnTransaction.transaction_0_amount = ipn.IpnValue("transaction[0].amount");
                objPayPalIpnTransaction.transaction_0_is_primary_receiver
ipn.IpnValue("transaction[0].is_primary_receiver");
                objPayPalIpnTransaction.transaction_1_id = ipn.IpnValue("transaction[1].id");
                objPayPalIpnTransaction.transaction_1_status = ipn.IpnValue("transaction[1].status");
                objPayPalIpnTransaction.transaction_1_id_for_sender ipn.IpnValue("transaction[1].id_for_sender");
                objPayPalIpnTransaction.transaction_1_status_for_sender_txn = ipn.IpnValue("transaction[1].status_for_sender_txn");
                objPayPalIpnTransaction.transaction_1_refund_id = ipn.IpnValue("transaction[1].refund_id");
                objPayPalIpnTransaction.transaction_1_refund_amount = ipn.IpnValue("transaction[1].refund_amount");
                objPayPalIpnTransaction.transaction_1_refund_account_charged = ipn.IpnValue("transaction[1].refund_account_charged");
                objPayPalIpnTransaction.transaction_1_receiver = ipn.IpnValue("transaction[1].receiver");
                objPayPalIpnTransaction.transaction_1_invoiceId = ipn.IpnValue("transaction[1].invoiceId");
                objPayPalIpnTransaction.transaction_1_amount = ipn.IpnValue("transaction[1].amount");
                objPayPalIpnTransaction.transaction_1_is_primary_receiver = ipn.IpnValue("transaction[1].is_primary_receiver");
                // Save the record
                db.PayPalIpnTransactions.InsertOnSubmit(objPayPalIpnTransaction);
                db.SubmitChanges();
                // Only do the following if the status is COMPLETED
                if (PayPalStatus == "COMPLETED")
                {
                    // Start a Transaction log record
                    var objPayPalTransaction = new LinqToSQL.PayPalTransaction();
                    // Search for related PayPalPurchaseTransaction
                    var result = (from PayPalPurchaseTransactions in db.PayPalPurchaseTransactions
                                    where PayPalPurchaseTransactions.PayPalPaykey == PayPalPayKey
                                    select PayPalPurchaseTransactions).FirstOrDefault();
                    if (result != null)
                    {
                        // Update PayPalPurchaseTransaction
                        result.payment_status = "COMPLETED";
                        // Make a log entry                               
                        objPayPalTransaction.LogDateTime = DateTime.No
                        objPayPalTransaction.pay_key = PayPalPayKey;
                        objPayPalTransaction.LogData = String.Format(
                            "IPN Received for pay_key: {0} - Updated payment to COMPLETED", PayPalPayKey);
                    }
                    else
                    {
                        // Make a log entry                               
                        objPayPalTransaction.LogDateTime = DateTime.Now;
                        objPayPalTransaction.pay_key = PayPalPayKey;
                        objPayPalTransaction.LogData = String.Format(
                            "IPN Received for pay_key: {0} - Associated payment not found!", PayPalPayKey);
                    }
                    // Save the record
                    db.PayPalTransactions.InsertOnSubmit(objPayPalTransaction);
                    db.SubmitChanges();
                }
            }
        }
    }
    catch (System.Exception ex)
    {
        string connString =
            System.Web.Configuration.WebConfigurationManager
            .ConnectionStrings["_IntrinsicData"].ConnectionString;
        // Connect to the database
        PayPalTransactionsDataContext db = new LinqToSQL.PayPalTransactionsDataContext(connString);
        // Start a Transaction log record
        var objPayPalTransaction = new LinqToSQL.PayPalTransaction();
        // Make a log entry                               
        objPayPalTransaction.LogDateTime = DateTime.Now;
        objPayPalTransaction.pay_key = "";
        objPayPalTransaction.LogData = String.Format(
            "Error in {0} : {1}", this.GetType().Name, ex.Message);
        // Save the record
        db.PayPalTransactions.InsertOnSubmit(objPayPalTransaction);
        db.SubmitChanges();
        return;
    }


Linq to Sql is used because the call from PayPal is unauthenticated and the LightSwitch application is running under forms authentication. Entity Framework or ADO .Net could have also been used.

(you must have Visual Studio 2012 (or higher) installed to run the code)


European Visual Studio LightSwitch Hosting - Amsterdam :: How to Deploy LightSwitch in Visual Studio 2012

clock May 3, 2013 07:37 by author Scott

In this article I describe the LightSwitch development environment in Visual Studio 2012. We can easily create a LightSwitch application using Visual Studio LightSwitch 2012.

LightSwitch Development in Visual Studio 2012

Visual Studio LightSwitch automatically creates the User Interface for a DataSource without manually writing any code.

In order to begin our work with LightSwitch 2012 we will perform the following steps:

Step 1

1. Open the Visual Studio 2012.
2. Go to "File" => "New" => "Project..."
3. In "New Project" => "Installed" => "Template"
4. In "Template" => "LightSwitch"
5. Select "LightSwitch Application (Visual C#)".
6. Enter the Name and choose the location.
7. Click "OK".

Step 2

After creating the project a LightSwitch Designer will appear on the screen.

LightSwitch Designer consists of the following two options:

- we can create a new table for our application.
- we can also attach an external database. 

Step 3

Now we will see that Solution Explorer consists of a list of the following items along with two folders:

- Data Sources
- Screens

Here the "Data Sources" folder is used to store user data i.e. "Database Tables" and the "Screens" folder is used where we can create the user interface for our application.

Step 4

When we click on "Create new table" we will get the following image:

Each table consists of an "Id" that is automatically assigned and is also a "Primary Key" of the table.

Step 5

First we will rename the title of the table from "Table" to "ContactTable". Now we will add four additional columns called "Name", "Email", "Age" and "Address" to our table.

Step 6

In order to insert the record we need to create a User Interface screen. When we right-click on the "Screens" Folder we will click on "Add New." It will open the "Add New Screen" dialog window. As the window opens we will select "New Data Screen" from the Screen Template, we will also provide a Screen Name to our screen and choose the database table.

In order to continue we will Click on the "Ok" button. This will create a new UI screen for inserting a new data record by a user.

"Properties" are those where you set properties for various items.

Step 7

When we run the UI screen we get the following.

Step 8

Now we are able to insert a new record without writing any code. We don't need to create anything since Visual Studio LightSwitch automatically creates the screen for us with "Save" and "Refresh" buttons.

Step 9

In the following step we insert a record of another user; for that we create a new contact table.

Step 10

In Light Switch validations are automatically applied to the table. We do not need to apply any kind of validation on their own.

Deploy your LightSwitch application with only 3.00 EUR/month with HostForLIFE.eu


European Visual Studio 2012 Hosting - Amsterdam :: Features Visual Studio 2012 for Developers

clock March 26, 2013 10:49 by author Scott

Developer Testing in Visual Studio 2012 has been improved a lot and it is allowing them to concentrate more on the code they are writing in the application. In addition to the testing framework that comes with Visual Studio 2012, you can easily add third-party testing frameworks in the IDE. This post discusses the new unit and integration testing features for developer in Visual Studio 2012.

To open the new Test Explorer window, Select the Test Menu then choose windows and click Test Explorer

The look and fell of Test Explorer in VS 2012 is different in number of ways. You do not have too many different windows to say same information in new IDE, instead you have one widow that focus on unit and integration testing results.

When you select a test case in Test Explorer then you can see the detailed information about the test in below pane. The green bar in test explorer gives you quick view on the out-come.

Integrating Third Party Testing Frameworks

One of the important feature for developers for testing in this release is, it enables you to quickly integrate third-party testing frame-works in VS 2012. So If your team uses N-Unit or XUnit.net or some other testing framework then you can simply install Visual Studio extension.

To open the Extension tools manager, Go to Tools and click Extensions and Updates

You can search the framework that you need and download as shown below

In Visual Studio 2012 Regard less of which Testing Framework you use, it is fast and scales  up to thousands of test cases.

Developer testing is also very easy to use, If you want to Run or Debug the test that is in your editor then you can right-click on the code and select either run tests or debug tests.

You can also Filter the test cases by entering the search term in Test Explorer. You can also group tests with different properties, You can group the tests either by Test Outcome or Duration.

If you often require to run unit and integration tests in your solution then with single click in Visual Studio 2012 you can accomplish with Run test after build feature.

Now your test will run as part of every build you do.

With a single-click you can analyze and understand various code-metrics about your solution.

The Code Metrics Results window will appear as below information like number of line of code , Class Cohesion and Depth of inheritance

As it in previous visual studio versions, you can use Code Analysis Tool to quickly find common coding and design mistakes in your code

Another new feature in Visual Studio 2012 is Code Clone Analysis, using this feature you can scan your entire solution for duplicate code

Code Clone Analysis is smart enough to identify the duplicate code and groups the results with Exact match and medium match.

You can also use code clone feature that matches selected code in editor as shown below

Code Coverage Analysis

Code Coverage Analysis tool helps you to know how well your tests exercise your code? Code Coverage Analysis has significantly improved in Visual Studio 2012. To Analyze the code coverage of all the tests in your solution simply click Run drop down in Test Explorer

You can browse and explore the Code Coverage Results after completing the run


European Visual Studio LightSwitch Hosting - Amsterdam :: Masked password textbox in LightSwitch

clock March 11, 2013 06:39 by author Scott

In this article you will see how to create a masked password textbox. A masked control is used to save time and reduce the complaints and errors. They enhance the function of the textbox control, which can validate the input. By default the property masked is set to none. A password textbox is used for authorization of an any application. It is very useful to provide security for any application.

1. Open Your VS LightSwitch and Create a New Table

2. Create a Table called Customer

3. Right Click on Screens à Add screen

4. Select New Data Screen

5. Expand Password à select textbox and custom control

6. Go to password properties à Click change

7. Select password control à OK

8. Click write code->Select CreateNewCustomer_InitializeDataWorkSpace->Write the following code

using System;
using System.Linq;
using System.IO;
using System.IO.IsolatedStorage;
using System.Collections.Generic;
using Microsoft.LightSwitch;
using Microsoft.LightSwitch.Framework.Client;
using Microsoft.LightSwitch.Presentation;
using Microsoft.LightSwitch.Presentation.Extensions;
namespace LightSwitchApplication
{
    public partial class CreateNewCustomer
    {
        partial void CreateNewCustomer_InitializeDataWorkspace(List<IDataService> saveChangesTo)
        {
            // Write your code here.
            this.CustomerProperty = new Customer();
             this.FindControl("Password").ControlAvailable += pwdAvailable;
        }
        private void pwdAvailable(object sender, ControlAvailableEventArgs e)
        {
            ((System.Windows.Controls.Control)e.Control).LostFocus += PasswordLostFocus;
        }
        private void PasswordLostFocus(object sender, System.Windows.RoutedEventArgs e)
        {
             this.CustomerProperty.Password = ((System.Windows.Controls.PasswordBox)sender).Password;
        }
        partial void CreateNewCustomer_Saved()
        {
            // Write your code here.
            this.Close(false);
            Application.Current.ShowDefaultScreen(this.CustomerProperty);
        }
    }
}

9. Run Application (Press F5)


European Visual Studio LightSwitch Hosting - Amsterdam :: Getting the Most Out of Screens in Visual Studio LightSwitch

clock March 5, 2013 05:55 by author Scott

One of the biggest benefits of building applications with Visual Studio LightSwitch is that it generates the user interface for you, including labels, data-bound fields, commands, and controls. You can rearrange the positions of controls on the screen, and you can determine a number of properties for setting up the appropriate layout. If you're an experienced developer coming from a different development environment, you might need to set up additional requirements such as displaying text messages, implementing a home screen, or interacting with controls at runtime. This article shows a number of handy tips and tricks that you can use to create even more powerful and interesting screens.

Adding Labels and Descriptive Text

LightSwitch automatically adds label and text box controls to display data-bound information coming from the data source for both single entities and entity collections. This is a tremendous benefit because it saves the developer from having to select and add the appropriate controls. However, in LightSwitch every label or text box control is data-bound. Unlike in other development environments, such as Microsoft Access or Visual Studio 2010, you can't show a text message inside an unbound control.

For instance, you might want to show warning messages, advice, or welcome text in your controls. To accomplish this goal in LightSwitch, you use local properties, which are basically data items associated to the selected screen and representing a piece of information that isn't related to the bound data source. Think of a local property as a variable of a given type.

Let's try an example. Suppose you want to display a warning message inside a screen. Follow these steps:

1. Open the screen designer for the screen and click Add Data Item. This action opens the Add Data Item dialog.

2. Select the Local Property item.

3. Specify the data type in the Type combo box (see Figure below) and a name for the property. For this example, use a String type, enter WarningMessage as the property name, and then click OK. At this point, the new data item appears with the list of other data items and methods.

Make sure that the Is Required check box is deselected when you use local properties to display descriptive messages; otherwise, the validation mechanism will throw an exception. In fact, data validation automatically runs against local properties.

4. Drag the property from the list of data items onto the designer's surface and release it under the Screen Command Bar element. Since the property will only be used to display some text, you can replace the default Text Box with a Label.


5. Go to the Properties window, where you can fine-tune the appearance of your label.

6. Change the value of the Label Position property from Left-aligned to None. This change ensures that the name of the label will not be shown.

7. Change the value of the Font Style property from Normal to Warning. As Figure below shows, you can select from a number of font styles. When you select Warning, your text message will be displayed in red and boldfaced (assuming that you're using the default LightSwitch theme).

So far you've prepared a label to display text, but the dialog offers no way to assign text to the label at design time. The only way to perform this assignment is by writing code, so click the Write Code button in the upper-right corner of the screen designer. You can write the label assignment in a couple of different method hooks:

- Created. Write the assignment inside Created when your text is a message that doesn't take information from the screen's data source. This is exactly our case.

- InitializeDataWorkspace. If you need to display some text that's constructed with information coming from the screen's data source, write the assignment inside InitializeDataWorkspace.

Listing 1 shows how to perform the assignment. (In your code, replace ScreenName with the name of the screen you're creating.)

Listing 1—Assigning the content of an informative label.

Private Sub ScreenName_Created()
    Me.WarningMessage = "Warning: the application is going to handle your information."
End Sub

This is nothing but a variable assignment. If you run the application, you'll see how the text message appears, as represented in Figure below.


European Visual Studio LightSwitch Hosting :: Forms Authentication in LightSwitch

clock February 21, 2013 06:40 by author Scott

There are two types of Authentications available in LightSwitch applications.

  1. Forms Authentication
  2. Windows Authentication

In this article, I will discuss the first one, Forms Authentication.

Forms Authentication:

Forms Authentication means that a username/password is prompted for when the application opens and these values are checked against the database.
 
This works nicely for clients running across the Internet that are not on a Windows domain. I'll show you both but first let's choose Forms Authentication.

Setting up LightSwitch Solution:

Create a LightSwitch Desktop Application. And create a table called Person as shown in the following picture.

Design a screen for the created table Person. We will discuss the design in future articles

Select the List and Details Screen from the Screen Template list [No: 1] for getting the Person details as well as the Details of the selected Person.

Give a name for the Screen [No: 2].

Select the Date for the Screen Data ComboBox [No: 3] which is retrieved from the table we have created.

Enabling Authentication:

By default the authentication is not enabled. To enable the authentication just select the project's properties from the Project Menu.
Select Access Control [No: 1] Menu Tab.

From the Access Control Tab, select the Use Forms Authentication option [No: 2].

Yes. We have just done that with enabling the forms authentication. The next step is to create the Permissions for Roles for Users. We will discuss Roles and Users later; first we will see how Permission works.

Adding Permissions:

Permissions are nothing but allowing the user to do something on our LightSwitch application.

In the above picture we have created three permissions Read, Write and Delete. The SecurityAdministration is the default permission provided by the LightSwitch application to create Users and Roles.

We have selected the four permissions to True on Debug mode. So that user can Read, Write and Delete or Add users and roles in Debug mode.
Set the permissions we have created to take effect.

Setting Permissions in Methods:

To add a method to check for the permission, we need to open the table we have created. For this application we have created Person table; just open it.

On the right top corner you can see the Write Code menu. Just click it. You will get a collection of items. From that select Access Control group as shown in this above figure.

Click on People_CanInsert, _CanDelete and _CanRead. These are the default methods provided by LightSwitch.

Now write a line of code as shown in the figure given below.

At the time of creation of Permissions an enumeration of Permissions will be created for us with the Permissions we created in the Access Control Tab in Project Properties.

The first method _CanDelete will check for the currently logged in user whether the user has the permission to do a Delete. If it is true then the application will allow the user to delete.

As like _CanDelete method, the other methods will act.

Now we are ready to Press F5. Just press it.

In Debug mode the LightSwitch application will not show the Login form; it will ask for the user name and password only on Published Application. But permissions that we have selected as granted will havew an affect in Debug mode. Let's see in Action.

As we have enabled all the Permissions the Buttons for Add Edit and Delete are enabled here.

Now deselect the CanDelete permission in Project Properties to check whether it is preventing the user to delete the data.

Here we have deselected the CanDelete Permission. Let's see in Code and Screen.

We can see that the result is false because the Permission CanDelete is deselected.

As the CanDelete Permissions is deselected, the Delete button is disabled in the application.

We have just enabled Permissions in Debug mode but we need to create the user and their roles and permissions for that roles created.

In Part II we will discuss about how to add Users Roles and Permissions for the Roles.


European Visual Studio LightSwitch 2012 Hosting - Amsterdam :: New Features in VS LightSwitch 2012

clock October 29, 2012 06:28 by author Scott

As we know, Visual Studio 2012 has been released on Aug 15, 2012 I just wanted to discuss about the new features of LightSwitch.

In Visual Studio 2012, LightSwitch is included as a core part and we can create the LightSwitch application from Visual Studio 2012 IDE. LightSwitch will be available as a Project Template group Node in the Visual Studio 2012.


New Lightswitch Architecture

Visual Studio 2012 LightSwitch has a lot of enhancements including OData Services which leads to define the new architecture for the LightSwitch Application Development. You can get more details about the LightSwitch Architecture, please have a look at
MSDN.

New Enhancements in LightSwitch 2012

There are ton of new features included in the Visual Studio 2012 LightSwitch. We will briefly discuss about all the new features of the new enhanced LightSwitch.

1. Connecting with OData Services:

LightSwitch 2012 now supports Open Data Protocol Services.

2. Formatting Numbers & Dates:

We can easily format the Numbers and Dates using Format Pattern property in LightSwitch 2012. This Format Pattern Property is available only for the particular data types.

3. New Data Types in LightSwitch:

Visual Studio LightSwitch team has introduced two more Data Types namely Percent and Web Address. Here the Decimal will be treated as Percent business type and the String will be treated as Web Address.

4. Static Label & Image Control:

LightSwitch 2012 includes two more controls which can be used to display the content statically without binding data. These controls can be used to display the static texts about the organization and logo.

5. Improved Application Security:

In LightSwitch Business Application we can apply security by two ways like Forms Authentication and Windows Authentication, In Windows Authentication it is possible to provide the Roles & Permissions to Active Directory User Groups.

You can download the Visual Studio 2012 90 days trail version from the
Microsoft site.

If you need LightSwitch hosting, please check our site at
http://www.hostforlife.eu.


Visual Studio 2012 Hosting - ASPHostPortal :: What is new in C# and Visual Basic in Visual Studio 2012

clock October 10, 2012 09:34 by author Scott

This post discusses the new language features that is introduced in Visual Studio 2012. One of the main things that language team introduced is the idea of producing windows 8 App. These APPs are talking to new API called windows runtime.

This release also brings iterators to Visual Basic. The main discussion in this post is around Asynchronous programming in C# language.


If you want to give importance on responsiveness of client and scalability in server App then you probably call Asynchronous API’s. These API’s take Callbacks as parameters and uses that Callback to notify you about result of available. When you start write these call backs then it is harder maintain the code but with new Async language support that introduced in Visual Basic and C# and it is easy consume these API’s.


Below is the synchronous code in C#


The code basically Searches the movie index in
Netflix using OData by taking Year as parameter. While it is downloading the movies using above code , you can notice you can not interact with your user interface. You can scroll along UI and explore the movies only after the search operation is complete. Users expects more responsive apps.

Why the above code is Unresponsive?

The call to DownloadString is of webclient type and it asks you to wait till it returns string. During this process your UI is going to hang-up and holds the thread until it returns the result back you.


Two different options here, you can put this code on background Thread and it is bit complicated. You may have to marshal and unmarshal the code. The second option is to interact with Asynchronous API there you have an overloaded function DownloadStringAsync, But when you use this method you are no longer take back data as result. You need to sign-up a call-back when a result is available. If you have multiple Async calls then you have to write multiple call-backs. In this case your code is getting more difficult to understand.

Solution

The new overload method is DownloadStringTaskAsync, This method now returns string of type Task, Task of string is object that notify you when result is available. Now you can change the signature of the method QueryMovies and mark this as async. This tells the compiler that this method is pausable and resumeable , they can wait without locking to the UI thread. Now change the return type of method from Movie array to Task<Movie[]> array. Write a word await to get the string from Task of objects from DownloadStringTaskAsync call.


Now you can call the above even from while loop


The compiler is now able to figure out how to handle the await inside the while loop and resume it when it gets the result. Now you should be able to interact with your UI without any hang-ups.


European Visual Studio 2012 Hosting - Amsterdam :: Visual Studio 2012 is More Friendly with Javascript and CSS

clock September 27, 2012 07:26 by author Scott

Visual Studio over the years has provided very good support for the core application development languages like C#, VB, etc. But when it comes to web development languages like javascript and CSS, Visual Studio lacked some main support such as intellisense, debugging, etc. This article discusses some key features introduced in Visual Studio 11 with respect to Javascript and CSS.

Javascript


In this section we will look at some important and useful features that the Visual Studio 11 JavaScript editor provides.


Intellisense, Type Inference & Documentation

Prior versions of Visual Studio were a pain for Javascript developers due to the lack of intellisense for Javascript. The intellisense provided was very basic; developers had to be very sure of the method and class names, including the casing. Now Visual Studio 11 provides complete intellisense support for all the javascript objects and its methods. Fig below is a sample intellisense menu and you can see the number of options.


Visual Studio 11 also provides rich intellisense support for popular third party Javascript libraries like JQuery. Since Jquery is used by almost all web developers this will be of tremendous help to them. Fig below shows a sample intellisense available for JQuery in the Visual Studio 11 IDE.


In the above screenshot you would have noticed documentation for the method in the intellisense window like C# code. You could provide the documentation for your Javascript method as shown in the below example.


<
script type="text/javascript">
        function DoSummation(a, b) {
            ///      <summary>
            ///            Returns the sum of the variables a and b
            ///      </summary>
            ///      <param name="a" type="int">Integer variable 1</param>
            /// <param name="b" type="int">Integer variable 2</param>
            return a + b;
        }
</script
>

The Javascript editor also performs type inference, for example if a Javascript variable is assigned with a string value and later when the variable is used then the intellisense displays only the string related methods.

Curly Brace and Bracket Matching

When I use to write a large amount of Javascript code, especially with object oriented Javascript or jQuery, I used to get confused with the brackets and curly braces on their scopes. It may sometimes be a nightmare for developers to fix a brace mismatch on a huge Javascript code file. Fig below shows how the bracket scopes are highlighted by Visual Studio 11.


Go to Definition Feature

Like the C# Visual Studio editor of Visual Studio, now the Javascript editor also provides the Go to definition feature, which will be very useful in going through the code flow or to debug a Javascript issue especially when there are a lot of files involved and the method calls are scattered. In order to make this feature work you need to add the reference path of the .js file containing the method implementation onto the caller .js file. Below is a sample.


/// <reference path="File1HavingImplementation.js" />


A generic approach to provide the reference path is to add them to the _references.js file.


Debugging

There is a new window added to Visual Studio 11 called the Javascript Console, which provides various features in terms of debuggingJjavascript code. I will cover this topic in a separate article.


CSS

In this article we will take a look at two important features on the CSS front.

Code Snippets and Writing Vendor Specific CSS

One of the most repetitive and boring tasks for the UI developer is to write the vendor specific styles in a CSS file. Vendor specific CSS is nothing but writing the same style with different names as supported by different browsers in order to get the style working on multiple browser combinations. Now Visual Studio 11 provides CSS code snippets, for example type transform and hitting tab would create the different vendor specific properties for transform in a CSS class. Below is the generated CSS class.

.MyClass
{
       -ms-transform: rotate(-90deg);
       -moz-transform: rotate(-90deg);
       -o-transform: rotate(-90deg);
       -webkit-transform: rotate(-90deg);
       transform: rotate(-90deg);
}


Color Picker

One thing that bothered me while writing CSS classes is providing the color code. I had to use some external utility to figure out the color code of the color being used, which I was trying to create a style for. Now with Visual Studio 11 the UI designer doesn’t have to move away from the CSS editor to pick the color, the editor itself has the color picker integrated. Fig below shows the screenshot of the color picker on a CSS file.


I hope these features have simplified and provided solutions for some long lasting issues faced by web developers.


Happy reading!


About HostForLIFE

HostForLIFE is European Windows Hosting Provider which focuses on Windows Platform only. We deliver on-demand hosting solutions including Shared hosting, Reseller Hosting, Cloud Hosting, Dedicated Servers, and IT as a Service for companies of all sizes.

We have offered the latest Windows 2019 Hosting, ASP.NET 5 Hosting, ASP.NET MVC 6 Hosting and SQL 2019 Hosting.


Month List

Tag cloud

Sign in