Here, I have provided an article showing you how to utilize the two new logical functions Choose and IIF in SQL Server. The Choose function works like an array kind of thing and the IIF function is used to check a condition. In this article we will see both functions with examples. These functions are also called new logical functions in SQL Server 2012. So let's take a look at a practical example of how to use the Choose and IIF functions in SQL Server. The example is developed in SQL Server 2012 using the SQL Server Management Studio.
These are the two logical functions:
1. IIF() Function
2. Choose() Function

IIF() Function
The IIF function is used to check a condition. Suppose X>Y. In this condition a is the first expression and b is the second expression. If the first expression evaluates to TRUE then the first value is displayed, if not the second value is displayed.
Syntax
IIF ( boolean_expression, true_value, false_value )
Example
DECLARE @X INT;
SET @X=50;
DECLARE @Y INT;
SET @Y=60;
Select iif(@X>@Y, 50, 60) As IIFResult
In this example X=50 and Y=60; in other words the condition is false. Select iif(@X>@Y, 50, 60) As IIFResult. It returns false value that is 60.
Output
Choose() Function
This function is used to return the value out of a list based on its index number. You can think of it as an array kind of thing. The Index number here starts from 1.
Syntax
CHOOSE ( index, value1, value2.... [, valueN ] )
CHOOSE() Function excepts two parameters,
Index: Index is an integer expression that represents an index into the list of the items. The list index always starts at 1.
Value: List of values of any data type.
Now some facts related to the Choose Function
1. Item index starts from 1
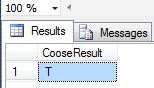
DECLARE @ShowIndex INT;
SET @ShowIndex =5;
Select Choose(@ShowIndex, 'M','N','H','P','T','L','S','H') As ChooseResult
In the preceding example we take index=5. It will start at 1. Choose() returns T as output since T is present at @Index location 5.
Output
2. When passed a set of types to the function it returns the data type with the highest precedence; see:
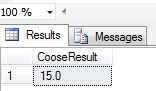
DECLARE @ShowIndex INT;
SET @ShowIndex =5;
Select Choose(@ShowIndex ,35,42,12.6,14,15,18.7) As CooseResult
In this example we use index=5. It will start at 1. Choose() returns 15.0 as output since 15 is present at @ShowIndex location 5 because in the item list, fractional numbers have higher precedence than integers.
3. If an index value exceeds the bound of the array it returns NULL
DECLARE @ShowIndex INT;
SET @ShowIndex =9;
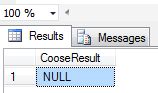
Select Choose(@ShowIndex , 'M','N','H','P','T','L','S','H') As CooseResult
In this example we take index=9. It will start at 1. Choose() returns Null as output because in the item list the index value exceeds the bounds of the array; the last Index=8.
Output
4. If the index value is negative then that exceeds the bounds of the array therefore it returns NULL; see:
DECLARE @ShowIndex INT;
SET @ShowIndex =-1;
Select Choose(@ShowIndex, 'M','N','H','P','T','L','S','H') As CooseResult
In this example we take index= -1. It will start at 1. Choose() returns Null as output because in the item list the index value exceeds the bounds of the array.
Output

5. If the provided index value has a float data type other than int, then the value is implicitly converted to an integer; see:
DECLARE @ShowIndex INT;
SET @ShowIndex =4.5;
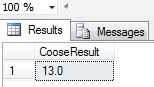
Select Choose(@ShowIndex ,35,42,12.6,13,15,20) As CooseResult
In this example we take index= 4.5. It will start at 1. If the specified index value has a float data type other than int, then the value is implicitly converted to an integer. It returns the 13.0 as output since 15 is present at @ShowIndex=4.5 which means index is 4.
Output