European Windows 2019 Hosting BLOG

BLOG about Windows 2019 Hosting and SQL 2019 Hosting - Dedicated to European Windows Hosting Customer

European SQL Server 2022 Hosting :: How to Correct an MS SQL Server Database's Recovery Pending State?

clock February 13, 2025 06:56 by author Peter

One of the most potent database management systems for storing and retrieving data is SQL Server. The DBAs are occasionally unable to access the database because of its "Recovery Pending" state. This article's goal is to explain why it happens and provide suggestions for resolving the problem.

If one or more of the core files in a SQL database are corrupted, the database is considered damaged. The database will be marked with various states based on how serious the problem is. Among these states are:

  • Online: If a database data file is damaged during query execution, it will stay online.
  • Suspect: A database will be marked as a "suspect" if it cannot be recovered during SQL Server initialization.
  • Recovery Pending: The SQL Server places the database in a "Recovery Pending" state if it knows that a recovery needs to be done but is unable to begin due to an issue.

What Does SQL Server Recovery Pending State Mean?
The Recovery Pending state in MS SQL Server indicates that the database cannot start the recovery process due to missing files, resource constraints, or corruption issues. This is different from the Suspect state, which clearly shows there is corruption. Recovery Pending just means the recovery can't continue due to incomplete or inconsistent files.

Common Causes of SQL Server Recovery Pending State

  • Insufficient Disk Space: The database recovery process may halt due to a lack of space on the server.
  • Corrupted Log Files: Damaged or missing transaction log files can disrupt recovery.
  • Power Failure or Crash: Unexpected shutdowns can lead to database inconsistency.
  • Hardware Malfunctions: Disk errors or faulty storage devices can corrupt database files.
  • Improper Shutdowns: Forceful termination of SQL Server processes can result in uncommitted transactions.

When a database is in this state, it becomes inaccessible, and immediate action is required to restore normal operations.

How Does SQL Server Recovery Work?
When an SQL Server starts or a database is restarted, it goes through a recovery process with three phases:

  • Analysis: SQL Server reads the transaction log to determine which transactions need to be rolled forward or rolled back.
  • Redo (Roll Forward): All committed transactions from the log are reapplied to the database to ensure consistency.
  • Undo (Roll Back): Uncommitted transactions are rolled back to maintain a clean state.

Characteristics of a Database in the "Recovery Pending" State

  • Database Inaccessible: The database is not available for use by applications or users.
  • No Automatic Recovery: SQL Server is unable to initiate the automatic recovery process.
    • Error Messages: Common error messages related to this state include:
    • Error 9003: The log file is corrupt or missing.
    • Error 1813: SQL Server cannot attach the database because some files are missing.
    • Error 5123: The operating system returned an error while trying to access the database files.

How to Check if a Database is in Recovery Pending State?
To verify the state of your SQL Server database, execute the below query:
SELECT name, state_desc FROM sys.databases;

This query lists all databases and their current states. If the database is marked as "RECOVERY_PENDING" you need to fix the issue.

Methods to Fix SQL Server Recovery Pending State
1. Ensure Sufficient Disk Space: First, check if the drive with the database files has enough free space. If not, free up some space or move the files to a drive with more storage.

2. Check SQL Server Permissions: Make sure the SQL Server service account has the right permissions to access the database files. Wrong permissions can block the recovery process.

3. Manually Bring the Database Online: You can attempt to resolve the issue by setting the database to Emergency mode and performing repairs. Follow these steps:

Set the Database to Emergency Mode:
ALTER DATABASE [TestDatabase] SET EMERGENCY;

Perform Consistency Check: Run DBCC CHECKDB to check for corruption:
DBCC CHECKDB([TestDatabase]);

Repair the Database: If corruption is detected, use the REPAIR_ALLOW_DATA_LOSS option to repair the database:
ALTER DATABASE [TestDatabase] SET SINGLE_USER;
DBCC CHECKDB([TestDatabase], REPAIR_ALLOW_DATA_LOSS);
ALTER DATABASE [TestDatabase] SET MULTI_USER;


Note: The REPAIR_ALLOW_DATA_LOSS option may result in some data loss. Always back up your database before using this option.

4. Restore from a Backup: If you have a recent backup of the database, restoring it can be the safest way to resolve the issue:
RESTORE DATABASE [TestDatabase] FROM DISK = 'BackupFilePath.bak';

5. Use third-party recovery tool: When there are problems with SQL Server, like database corruption or the "Recovery Pending" state, manual troubleshooting methods, such as restoring from backups, running DBCC CHECKDB, or detaching and reattaching database files, may not always help. In these situations, special tools like Stellar Repair for MS SQL can be very important for recovering essential data accurately and quickly. In situations where data is accidentally deleted, specialized recovery techniques can help retrieve the deleted records during the database repair process, ensuring that important information is not permanently lost.

How SQL Database Repair Tools Can Assist in Recovery?

  • Repair tools help fix corrupted MDF and NDF files and restore the database without changing its original structure..
  • The tool can bypass the issues and recover the data even if SQL Server cannot bring it online.
  • Unlike manual methods that may risk losing data, the recovery process ensures no data loss..
  • Whether you are using an old or the latest version, the tool supports all versions and ensures smooth recovery.
  • In situations where data is accidentally deleted, specialized recovery techniques can help retrieve the deleted records during the database repair process, ensuring that important information is not permanently lost.

Preventive Measures

  • Regularly back up your database to avoid data loss during unforeseen issues.
  • Monitor disk usage and ensure sufficient free space.
  • Use reliable storage devices to minimize hardware-related corruption.
  • Always shut down SQL Server gracefully to prevent uncommitted transactions.

Conclusion
To fix a SQL Server database in a 'Recovery Pending' state, you need to find the root cause and take the right steps. Manual fixes like repairing the database or restoring from backups can help, but may not work for heavily corrupted databases. Always keep regular backups and check disk space to avoid these problems.

HostForLIFEASP.NET SQL Server 2022 Hosting


European SQL Server 2022 Hosting :: Recognizing Accuracy in SQL Server Computations

clock February 6, 2025 08:17 by author Peter

Many database developers encounter unexpected discrepancies when performing calculations in SQL Server. One common issue arises when the same mathematical expression is evaluated differently. For instance, consider the following SQL Server code snippet:

DECLARE @Number1 AS DECIMAL(26,7) = 0.9009000;
DECLARE @Number2 AS DECIMAL(26,7) = 1.000000000;
DECLARE @Number3 AS DECIMAL(26,7) = 1000.00000000;
DECLARE @Result  AS DECIMAL(26,7);

SET @Result = (@Number1 * @Number2) / @Number3;

SELECT @Result; -- 0.0009000

SET @Result = (@Number1 * @Number2);

SET @Result = (@Result / @Number3);

SELECT @Result; -- 0.0009009


In the first case, the output is 0.0009000, while in the second case, the output is 0.0009009. This divergence raises the question: Why are the results different when the same calculation is performed?

Explanation. Single Step Calculation
In the first approach, the entire expression (@Number1 * @Number2) / @Number3 is computed in a single step:

  • SQL Server first computes the product of @Number1 and @Number2, which equals 0.9009000.
  • Next, it divides that result by @Number3 (1000.00000000).


The result of this division is affected by how SQL Server handles precision and rounding for decimal operations. This might introduce slight inaccuracies, leading to the outcome of 0.0009000.

Multiple Step Calculation

In the second approach, the operations are separated into two distinct steps:

  • First, the calculation @Number1 * @Number2 is executed and stored in @Result. This retains the value of 0.9009000.
  • Then, the variable @Result is divided by @Number3 in a separate statement.

This step-by-step division allows SQL Server to apply different rounding and precision rules, which can sometimes yield a more accurate result of 0.0009009.

Conclusion

The difference in outputs can often be attributed to the varying treatment of precision and rounding during calculations:

  • In a single-step calculation, SQL Server evaluates the entire expression at once, potentially altering precision during the process.
  • In a multiple-step calculation, SQL Server retains more precision through intermediate results, leading to a different output.

Resolution
To achieve consistent results in SQL Server calculations, developers should consider controlling precision explicitly. For example, applying rounding can help standardize outcomes:
SET @Result = ROUND((@Number1 * @Number2) / @Number3, 7);

By managing precision and rounding explicitly, programmers can avoid discrepancies and ensure that their numerical calculations yield the expected results. Understanding these nuances in SQL Server can lead to more reliable and accurate database operations.

HostForLIFEASP.NET SQL Server 2022 Hosting


European SQL Server 2022 Hosting :: Differences Between TRUNCATE and DELETE in SQL Server

clock January 23, 2025 06:57 by author Peter

Although both TRUNCATE and DELETE can be used to remove data from a table in SQL Server, they differ greatly in terms of logging, performance, and how they affect the table structure. We examine these distinctions using sophisticated real-world examples below.

Deleting Specific Rows
You have a large customer database and need to delete records based on a condition, such as all customers from a specific country.

DELETE FROM Customers
WHERE Country = 'USA';

Why Use DELETE?

  • DELETE allows you to remove specific rows based on a WHERE condition.
  • It supports triggers, enabling additional actions like logging or cascading updates.
  • Referential integrity is preserved, ensuring foreign key constraints are respected.

Note. Since DELETE logs each row individually, it can be slower for large datasets, especially when dealing with a significant number of rows.

Resetting a Table for Data Migration

During data migration, you need to clear all rows from a table, such as the Users or Orders table, before inserting new data.
TRUNCATE TABLE Users;

Why Use TRUNCATE?

  • TRUNCATE quickly removes all rows from the table.
  • It resets the identity column, allowing new rows to start from the seed value.
  • The operation is much faster than DELETE as it does not log each row deletion.

Note. TRUNCATE cannot be used if there are foreign key constraints, even if those constraints are defined with ON DELETE CASCADE.

Managing Temporary Tables for Large Datasets
While working with large datasets, you need to clear the contents of a temporary table after processing it, such as Temp_SessionData.
TRUNCATE TABLE Temp_SessionData;

Why Use TRUNCATE?

  • It efficiently clears large amounts of data from the table.
  • No individual row logs are generated, making it a fast cleanup option.
  • Ideal for temporary tables where data retention is unnecessary.

Note. Using TRUNCATE avoids performance bottlenecks associated with row-by-row deletions.

Deleting Data with Referential Integrity
You need to delete all records in a parent table (e.g., Customers) while ensuring that related records in child tables (e.g., Orders) are also removed.
DELETE FROM Customers WHERE Country = 'USA';

Why Use DELETE?

  • DELETE respects foreign key constraints and triggers cascading deletions to dependent tables.
  • Cascading deletions, defined with ON DELETE CASCADE, ensure child rows (e.g., in Orders) are automatically deleted.

Note. While DELETE is slower than TRUNCATE, it ensures referential integrity and cascading actions across related tables.
Regular Data Resets for Large Tables

You regularly refresh data in a table (e.g., SalesData) from an external system and need to reset it completely.
TRUNCATE TABLE SalesData;

Why Use TRUNCATE?

  • TRUNCATE quickly wipes out all data and resets the identity column, starting new rows from the default seed value.
  • It is more efficient and minimalistic compared to DELETE.

Note. Check that no foreign key dependencies exist, as these will block the use of TRUNCATE.

Partial Table Cleanup with Complex Conditions
You need to clean up a specific subset of data from a large table where conditions involve multiple columns (e.g., inactive users who haven’t logged in for a year).
DELETE FROM Users

WHERE
    LastLogin < DATEADD(YEAR, -1, GETDATE())
    AND IsActive = 0;


Why Use DELETE?

  • DELETE enables precise removal of rows based on complex conditions.
  • It ensures that other unaffected rows remain intact.
  • Triggers can be used to log or audit the deletions.

Note. For large datasets, indexing the columns used in the WHERE clause can improve performance.

Archiving Old Data
You need to archive old transactional data from a table (e.g., Orders) into an archive table before removing it from the main table.
INSERT INTO ArchivedOrders
SELECT *
FROM Orders
WHERE OrderDate < '2023-01-01';

DELETE FROM Orders
WHERE OrderDate < '2023-01-01';


Why Use DELETE?

  • DELETE allows the selective removal of old data after archiving.
  • It ensures referential integrity for current data.
  • Archiving can be performed in batches to avoid locking issues on the main table.

Note. Using DELETE in combination with INSERT INTO helps retain historical data while managing table size.

Clearing Audit Logs Periodically
Use Case

Your application generates a large number of audit logs, and you periodically clear logs older than a specific timeframe to maintain performance.
TRUNCATE TABLE AuditLogs;

Why Use TRUNCATE?

  • Audit logs often do not require referential integrity, making TRUNCATE a fast and efficient option.
  • It clears all rows quickly without logging each deletion.
  • TRUNCATE minimizes the overhead on large tables with high write frequency.

Note. Check retention policies are implemented before truncating, as all data will be permanently removed.

Performance Considerations

Deleting a Large Number of Rows: DELETE can be slow for large tables since it logs each row deletion. To handle large data deletions more efficiently, you can break the operation into smaller chunks
    DELETE TOP (1000)
    FROM Customers
    WHERE Country = 'USA';


Truncating Large Tables: TRUNCATE is much faster because it doesn't log individual row deletions and deallocates entire pages, making it efficient for large-scale deletions.

Summary of When to Use Each

  • Use DELETE when
    • You need to delete specific rows based on conditions.
    • You need to trigger referential integrity checks or cascading deletions.
    • You need to ensure that triggers are fired.
    • You don't want to reset the identity column or change the table structure.
  • Use TRUNCATE when
    • You need to remove all rows from a table and reset the identity column.
    • There are no foreign key constraints.
    • You want faster performance and minimal logging for bulk deletions.

Now Let’s walk through a stock exchange scenario where you can apply both DELETE and TRUNCATE commands in SQL Server, depending on the requirements. This covers a realistic stock trading system scenario, including market operations, account management, and transaction logs.


In a stock exchange system, you might have multiple tables like,

  • Stocks (Information about stocks traded)
  • Trades (Transaction records of stock buys and sells)
  • Orders (Active orders for buying/selling stocks)
  • Users (Trader accounts and details)


We will look at how DELETE and TRUNCATE can be used for various operations in this stock exchange system, depending on whether we need to delete specific records, reset tables, or manage large datasets efficiently.

Deleting a Specific Stock Order from the Orders Table

Let’s say a trader cancels a buy/sell order. You need to delete the specific order record from the Orders table.

  • The trader places an order to buy 100 shares of the Company Jack&Jones.
  • The order is still active and hasn’t been filled.
  • The trader decides to cancel the order.

DELETE FROM Orders
WHERE OrderID = 12345;


Why use DELETE?

  • You are deleting a specific row that matches the condition (based on OrderID).
  • You need to ensure that any relevant foreign key constraints (e.g., relationship to Users or Stocks) are respected. If any cascades or actions need to be triggered (e.g., updating user balance or stock status), DELETE ensures that happens.
  • The operation is logged for transaction tracking, allowing you to monitor exactly what was deleted.

Impact
This operation is slow compared to TRUNCATE, especially if there are a large number of active orders in the system, but it is necessary for deleting specific rows based on user actions.

Resetting All Orders for the End of the Day

At the end of each trading day, the stock exchange needs to clear all orders from the Orders table to prepare for the next trading day. The system clears all records, regardless of whether the orders are pending or executed.

  • The stock exchange clears all pending orders after the market closes.
  • You want to quickly remove all rows from the Orders table to start fresh.

SQL Query
TRUNCATE TABLE Orders;

Why use TRUNCATE?

  • You want to remove all rows efficiently without worrying about individual row deletions.
  • This operation does not log individual row deletions (it’s minimally logged), making it much faster when dealing with large datasets.
  • It also resets any identity column (if there’s one for OrderID), which is useful if you want to restart the order numbering from the seed value the next day.

Consideration
Ensure that there are no foreign key constraints in place, or if there are, ensure TRUNCATE is allowed (i.e., no dependencies with cascading deletes).

Impact

  • Efficient for clearing large volumes of data, but be cautious if there are foreign key constraints that prevent truncating the table.
  • This is suitable for an end-of-day reset where all orders must be wiped out to prepare for the next day.

Clearing Historical Data for Trades
The exchange wants to archive the trades older than a year, as they are no longer relevant for active trading or reporting but need to be stored for historical purposes.
Trades that happened more than a year ago need to be archived into a backup system, and the records should be removed from the main Trades table.

SQL Query
DELETE FROM Trades
WHERE TradeDate < DATEADD(YEAR, -1, GETDATE());

Why use DELETE?

  • You need to delete specific records based on the condition (TradeDate < DATEADD(YEAR, -1, GETDATE())), so DELETE allows for precise control.
  • The operation respects foreign key constraints, ensuring that dependent data in other tables (such as order details or user information) is also managed correctly.

Consideration
If you have millions of trades, DELETE might be slow, but this is necessary if you want to keep the data that is still relevant (for example, trades made within the last year).

Impact
Deleting specific records ensures that important data (such as current trades) is not deleted by mistake, and you can archive old data efficiently.

Resetting All Stock Prices for a New Trading Day

On the stock exchange, stock prices need to be reset every morning to the opening prices of the day. You want to clear all the previous day’s data and set the new day's prices.

Scenario
Every morning, you reset the stock price data for each traded stock.
The previous day’s data is irrelevant for the new trading day, so it’s cleared.

SQL Query
TRUNCATE TABLE StockPrices;

Why use TRUNCATE?
You want to quickly remove all rows without worrying about specific conditions or the individual deletion of each stock's price.
It’s much more efficient than DELETE since it doesn’t log each row removal, which is ideal for large datasets where performance is crucial.

Consideration
If there are foreign key constraints or dependencies on the StockPrices table (e.g., historical trades), TRUNCATE may not be possible. In such cases, you would need to first delete or archive related data.

Impact
Faster performance compared to DELETE and useful for daily resets. This is a classic use of TRUNCATE when the data doesn't need to be retained across days.

Deleting Specific Trade Records Based on a Condition
Let’s say an anomaly or error occurred in the trading system where certain trades were mistakenly recorded (perhaps due to a bug or a trading error), and you need to delete them.

Scenario

  • A certain group of trades (e.g., trades that involve incorrect stock symbols or trade amounts) needs to be deleted.
  • These trades are identifiable based on a condition, such as a stock symbol mismatch or a trade amount exceeding a predefined limit.

SQL Query
DELETE FROM Trades
WHERE StockSymbol = 'INVALID' OR TradeAmount > 1000000;


Why use DELETE?

  • The operation deletes specific rows based on certain conditions, so DELETE is appropriate for this task.
  • Triggers (if any) would be fired to ensure related actions are performed (e.g., adjusting the trader's balance or reversing order statuses).

Consideration
This could be a slow operation if the trades table is very large and the condition affects a significant number of rows.

Impact
It’s essential to identify and delete only the erroneous rows based on conditions, so DELETE allows for precise control.

In stock exchange systems, TRUNCATE is usually reserved for bulk operations where all data can be removed quickly (such as resetting stock prices), while DELETE is used for more granular, specific removals or when data integrity constraints are involved (such as removing erroneous trades or orders).

HostForLIFEASP.NET SQL Server 2022 Hosting


European SQL Server 2022 Hosting :: SQL Services Integration Services (SSIS) Conditional Split

clock January 9, 2025 07:44 by author Peter

Conditional Split is an important feature of SQL Services Integration Services (SSIS). In this article, we will learn how to perform conditional split. Now, first, let’s understand what conditional split is.

A data flow component called conditional split transformation divides the data according to predetermined criteria. It is an effective tool that helps businesses handle and analyze data by splitting an input stream into several output streams.

Let's look at an example to better understand. Before creating a data flow task, let's establish an SSIS package called "Conditional Split Task."

OLE DB Source and Conditional Split transformations from the SSIS toolbox will be added to the data flow task. You can see how it appears in the screenshot below.

Here, we will use the Hostforlife database to perform a conditional split that is already loaded in the SQL server.

Now, we will establish an OLE DB Source connection and use the below query in the SQL Command section.
SELECT *,
       NTILE(4) OVER (ORDER BY [CustomerKey]) AS NTileOutput
FROM [Hostforlife].[dbo].[DimCustomer]
ORDER BY [CustomerKey];


In the above query, the NTile(N) Function splits the DimCustomer table into four random groups. The connection has been established, and we can see it in the screenshot below.

We use SSIS expressions to specify which rows are routed where and use a conditional split transformation to push this randomly grouped data into four different UNION ALL. Now, add UNION ALL in the SSIS package from Toolbox.

Now let’s go to Conditional Split Transformation Editor and apply a condition like [NTileOutput] ==1 for Group 1 and for other groups, too, and hit OK.

Now, we will establish the connection between Conditional Split and all 4 UNION ALL. And Enable Data Viewer for all 4 UNION ALL. We will also add one more UNION ALL for Default Output, and by default, it will take Conditional Split Default Output. See the screenshot below to understand more.

Now, let’s execute a Conditional Split Task and see the result.

As you can see, the table was split into four random groups (Case 1, Case 2, Case 3, and Case 4) based on a given condition.

HostForLIFEASP.NET SQL Server 2022 Hosting


European SQL Server 2022 Hosting :: Create FTP Task in SQL Server Integration Services

clock December 20, 2024 06:44 by author Peter

FTP tasks in SSIS (SQL Server Integration Services) are an important feature that is used to perform file operations across the server and client/local machine. FTP task in SSIS is used to automate the process of uploading and downloading files to/from the FTP server. This task ensures the secure transfer of files, automates data workflow, and improves its efficiency. FTP Task, when combined with other SSIS tasks, can integrate data from multiple sources, such as File System Task, Script Task, Execute SQL Task, etc.

Now, let’s see how to create an FTP Task.

FTP is basically a File Transfer Protocol; it’s basically transferring files from one server to another server or to a local machine.

In the SSIS package within the control flow, we can see the SSIS Toolbox, and there are numerous options. From there we can select FTP Task by drag and drop it on package.

Below is the screenshot, which shows what it looks like.

In the above screenshot, we can see a red sign popped up; it means the connection is empty.

Note: I have used a personal FTP server and hence you may not be able to access it, you can however check a few public FTP servers available online.

Now, let’s configure the FTP Task and establish a connection. We will go on the FTP task editor and do the following.

Add FTP Server to establish FTP connection: Enter the below credential to establish an FTP connection. (FTP server path: ftp://Peter:[email protected].
x.x)
Server Name: 192.168.x.x
User ID: Peter
PWD: ****

The connection has been established.

Now, enter the following details in file transfer and hit ok; the red sign will go away.

  • Add Operation as Send files
  • Add local path: C:\Users\Peter\Documents\FTP_Local
  • Add RemotePath: /

After hitting ok, you will see on the screen below that the red sign is gone. This means that both connections are established, and we can see this in Connection Manager.

The screenshot below shows that it was taken before executing the package, and you can see no files in the FTP Server are available currently.

Once step 2 is done, Execute the FTP Task by hitting the start button. The screenshot below shows packages executed successfully. Here, our objective is to see if the file moved from the source (local path) to the destination (FTP Server).

Now, I will check into the FTP server to see if the file moved to the destination or FTP Server. As you can see in the screenshot below, the file has indeed been moved to the FTP server.

Summary
There are several benefits of creating FTP Tasks in SSIS, for example.

  • Automates the data transfer and reduces the time-consuming manual efforts.
  • It helps integrate data from various sources by creating a workflow that automatically handles file transfers.
  • Enables creation of FTP tasks for regular data backups and enhances data transfer security.

HostForLIFEASP.NET SQL Server 2022 Hosting


European SQL Server 2022 Hosting :: Using Tablock to Unlock Faster INSERT Operations in SQL Server

clock December 18, 2024 07:17 by author Peter

Performance is frequently the main issue in any SQL Server system when working with big datasets. The INSERT operation is one frequent operation that occasionally turns into a bottleneck. The time required to input data increases with its size, which can have a major effect on system performance and user experience in general. The usage of the TABLOCK hint is one of the many methods and improvements that SQL Server offers to help speed up data insertions. When working with huge datasets or when parallelism is crucial, this straightforward yet effective method can significantly increase the pace of your INSERT operations.

Let’s explore how using the TABLOCK hint works, its benefits, and how you can apply it to your own operations, with examples from the HFL database.

What is the TABLOCK Hint?
The TABLOCK hint is a table-level lock hint that forces SQL Server to take a schema modification (Sch-M) lock on the target table when performing an INSERT, UPDATE, or DELETE operation. This hint ensures that the table is locked for the duration of the operation, which can help speed up data loading by minimizing logging and reducing contention.

A key benefit of the TABLOCK hint is that it reduces the amount of log space used during the operation, as the minimal logging mechanism is activated. This means that SQL Server does not have to log each individual row insertion, but rather just the metadata for the bulk operation. As a result, this significantly reduces the overhead and speeds up data loading.

Additionally, because the table is locked at the schema level, it allows SQL Server to parallelize the operation, leading to faster execution times. This is particularly useful for large-scale data-loading tasks.

When to Use TABLOCK Hint
The TABLOCK hint is ideal for scenarios where:

  • You are inserting a large number of rows into a table.
  • You can afford to lock the table for the duration of the operation (i.e., no other transactions need access to the table while the insert is in progress).
  • You want to reduce the logging overhead and speed up bulk insertions.
  • You want to use parallel insertions to take advantage of SQL Server's ability to use multiple threads for data loading.


It’s also important to note that the TABLOCK hint works well with temporary tables, so you can take advantage of these performance benefits when working with temp tables, often used in ETL processes or batch operations.

Benefits of Using TABLOCK

  • Improved Performance: The primary benefit of using the TABLOCK hint is the performance improvement during large INSERT operations. By reducing the amount of logging, SQL Server can insert rows much faster.
  • Parallel Insertion: With TABLOCK, SQL Server can use parallelism to load the data, speeding up the operation of systems with sufficient resources.
  • Reduced Logging Overhead: Since SQL Server logs less information, the system consumes less log space, which can be crucial when working with large datasets.
  • Works with Temp Tables: You can apply TABLOCK to temporary tables as well, giving you the same performance benefits for in-memory operations.


Example
Let’s consider a scenario where we need to insert a large number of rows from the Sales.SalesOrderDetail table into the Sales.SalesOrderDetailTemp table in the HFL database.
Create table script for Sales.SalesOrderDetailTem
USE [HFL]
GO

DROP TABLE IF EXISTS [Sales].[SalesOrderDetailTemp]
GO

SET ANSI_NULLS ON
GO

SET QUOTED_IDENTIFIER ON
GO

CREATE TABLE [Sales].[SalesOrderDetailTemp](
    [SalesOrderID] [int] NOT NULL,
    [SalesOrderDetailID] [int] NOT NULL,
    [CarrierTrackingNumber] [nvarchar](25) NULL,
    [OrderQty] [smallint] NOT NULL,
    [ProductID] [int] NOT NULL,
    [SpecialOfferID] [int] NOT NULL,
    [UnitPrice] [money] NOT NULL,
    [UnitPriceDiscount] [money] NOT NULL,
    [LineTotal]  [money] NULL,
    [rowguid] [uniqueidentifier] ROWGUIDCOL  NOT NULL,
    [ModifiedDate] [datetime] NOT NULL,
 CONSTRAINT [PK_SalesOrderDetailTemp_SalesOrderID_SalesOrderDetailTempID] PRIMARY KEY CLUSTERED
(
    [SalesOrderID] ASC,
    [SalesOrderDetailID] ASC
)WITH (PAD_INDEX = OFF, STATISTICS_NORECOMPUTE = OFF, IGNORE_DUP_KEY = OFF, ALLOW_ROW_LOCKS = ON, ALLOW_PAGE_LOCKS = ON, OPTIMIZE_FOR_SEQUENTIAL_KEY = OFF) ON [PRIMARY]
) ON [PRIMARY]
GO


Without the TABLOCK hint, this operation may take a considerable amount of time, especially when the table is large and the database is under load.

Here’s a basic example of how you can speed up the INSERT operation by using the TABLOCK hint.
USE HFL
GO

SET STATISTICS TIME, IO ON

SET NOCOUNT ON

INSERT INTO Sales.SalesOrderDetailTemp
SELECT *
FROM Sales.SalesOrderDetail;

Truncate the table.
USE HFL
GO

TRUNCATE TABLE Sales.SalesOrderDetailTemp


Now, let’s modify the query to use the TABLOCK hint.
USE HFL
GO

SET STATISTICS TIME, IO ON

SET NOCOUNT ON

INSERT INTO Sales.SalesOrderDetailTemp
WITH (TABLOCK)
SELECT *
FROM Sales.SalesOrderDetail;

Comparison
Execution 1 (without TABLOCK) took longer, with higher CPU and elapsed time (204 ms and 284 ms), indicating a slower operation. Execution 2 (with TABLOCK) performed better, completing in 125 ms CPU time and 157 ms elapsed time, making the TABLOCK version more efficient in this case.
Considerations When Using TABLOCK

While the TABLOCK hint can greatly improve performance, it’s important to be aware of some considerations:

  • Table Locking: The TABLOCK hint locks the entire table for the duration of the operation. This means that other transactions cannot access the table until the INSERT operation is complete, so be sure that this behavior aligns with your application’s requirements.
  • Transaction Log Growth: Although TABLOCK reduces the amount of logging, it still logs certain details of the operation. If you’re inserting a massive amount of data, you may need to monitor transaction log growth and ensure that you have enough log space available.
  • Not Suitable for OLTP Workloads: The TABLOCK hint is more suited to batch operations or bulk-loading scenarios. It may not be appropriate for transactional systems that require frequent concurrent access to the table.

Conclusion
If you are working with large datasets and want to speed up your INSERT operations in SQL Server, the TABLOCK hint can be a game-changer. By reducing logging overhead and enabling parallel insertions, it helps improve performance and can significantly reduce the time it takes to load data.

HostForLIFEASP.NET SQL Server 2022 Hosting


European SQL Server 2022 Hosting :: Understanding Triggers in SQL Server

clock December 10, 2024 06:17 by author Peter

Triggers in SQL Server are special types of stored procedures that automatically execute or “fire” when certain events occur in the database.

Types of Triggers
DML Triggers

These are triggers that fire in response to data manipulation events such as INSERT, UPDATE, or DELETE operations on a table or view.

  • AFTER Triggers: Execute after the associated DML operation is completed.
  • INSTEAD OF Triggers: Execute in place of the associated DML operation.

DDL Triggers
These fire in response to data definition language (DDL) events such as CREATE, ALTER, or DROP statements.

Real-Time Use Case Example
Scenario. Imagine a retail company that wants to maintain an audit trail for all changes made to the Orders table. Every time an order is inserted, updated, or deleted, the company wants to log the details of the operation in an OrderAudit table.

Setting Up the Example

First, let’s create the Orders table and the OrderAudit table.
CREATE TABLE Orders (
    OrderID INT PRIMARY KEY,
    CustomerID INT,
    OrderDate DATETIME,
    Amount DECIMAL(10, 2)
);

CREATE TABLE OrderAudit (
    AuditID INT IDENTITY(1,1) PRIMARY KEY,
    OrderID INT,
    Operation VARCHAR(10),
    OldCustomerID INT,
    NewCustomerID INT,
    OldOrderDate DATETIME,
    NewOrderDate DATETIME,
    OldAmount DECIMAL(10, 2),
    NewAmount DECIMAL(10, 2),
    ChangeDate DATETIME DEFAULT GETDATE()
);

Creating Triggers
AFTER INSERT Trigger
CREATE TRIGGER trg_AfterInsert_Orders
ON Orders
AFTER INSERT
AS
BEGIN
    INSERT INTO OrderAudit (OrderID, Operation, NewCustomerID, NewOrderDate, NewAmount)
    SELECT OrderID, 'INSERT', CustomerID, OrderDate, Amount
    FROM inserted;
END;

-- Insert a new order
INSERT INTO Orders (OrderID, CustomerID, OrderDate, Amount)
VALUES (1, 101, '2024-01-01', 100.00);

-- Check audit logs
select * from  OrderAudit


Result
We can see we have a record inserted into the audit log table, and when any record is inserted into the order table, we will know what operation was performed and at what time it was executed.

AFTER INSERT Trigger: When a new order is inserted into the Orders table, the trg_AfterInsert_Orders trigger fires. It captures the new order details from the inserted pseudo-table and inserts a corresponding record into the OrderAudit table with the operation type 'INSERT'.

2. AFTER UPDATE Trigger

CREATE TRIGGER trg_AfterUpdate_Orders
ON Orders
AFTER UPDATE
AS
BEGIN
    INSERT INTO OrderAudit (OrderID, Operation, OldCustomerID, NewCustomerID, OldOrderDate, NewOrderDate, OldAmount, NewAmount)
    SELECT
        i.OrderID,
        'UPDATE',
        d.CustomerID,
        i.CustomerID,
        d.OrderDate,
        i.OrderDate,
        d.Amount,
        i.Amount
    FROM inserted i
    INNER JOIN deleted d ON i.OrderID = d.OrderID;
END;

-- Update the order
UPDATE Orders
SET Amount = 120.00
WHERE OrderID = 1;

-- Audit log
SELECT * FROM OrderAudit;

Result

we can see at this time, we updated the record, and we can see details of updated records, this is very helpful in case when we want to track how many time a order has been updated etc.

AFTER UPDATE Trigger: When an existing order is updated, the trg_AfterUpdate_Orders trigger fires. It captures both the old and new values by joining the inserted and deleted pseudo-tables and inserts a record into the OrderAudit table with the operation type 'UPDATE'.

3. AFTER DELETE Trigger
CREATE TRIGGER trg_AfterDelete_Orders
ON Orders
AFTER DELETE
AS
BEGIN
    INSERT INTO OrderAudit (OrderID, Operation, OldCustomerID, OldOrderDate, OldAmount)
    SELECT
        OrderID,
        'DELETE',
        CustomerID,
        OrderDate,
        Amount
    FROM deleted;
END;

-- Delete the order
DELETE FROM Orders
WHERE OrderID = 1;

-- Reading audit table
SELECT * FROM OrderAudit;


Result. We can see that order data has been deleted, and we can check logs to see what time it was deleted.

AFTER DELETE Trigger: When an order is deleted, the trg_AfterDelete_Orders trigger fires. It captures the details of the deleted order from the deleted pseudo-table and inserts a corresponding record into the OrderAudit table with the operation type 'DELETE'.

Dropping a Trigger

Just use DROP triggername.

Instead of Trigger
Let’s consider a table of Employees where we want to restrict the insertion of records such that the Salary must be above a certain threshold (e.g., $30,000). If the Salary is below this threshold, the insertion should be rejected.

We can use it instead of Trigger in this case.
CREATE TABLE Employees (
    EmployeeID INT IDENTITY(1,1) PRIMARY KEY,
    Name VARCHAR(100),
    Position VARCHAR(50),
    Salary DECIMAL(10, 2)
);


CREATE TRIGGER trg_InsteadOfInsert_Employees
ON Employees
INSTEAD OF INSERT
AS
BEGIN
    IF EXISTS (SELECT * FROM inserted WHERE Salary < 30000)
    BEGIN
        -- Raise an error and roll back the transaction if the salary is below the threshold
        RAISERROR ('Salary must be at least $30,000', 16, 1);
        ROLLBACK TRANSACTION;
    END
    ELSE
    BEGIN
        -- Perform the actual insert if the condition is met
        INSERT INTO Employees (Name, Position, Salary)
        SELECT Name, Position, Salary
        FROM inserted;
    END
END;


--

--less than 90000
-- This insertion should  fail
INSERT INTO Employees (Name, Position, Salary)
VALUES ('peter scott', 'Developer', 89999);

Explanation

  • The trigger intercepts the insert operation and checks if any of the inserted rows have a Salary below $90,000.
  • If any rows do not meet the condition, an error is raised, and the transaction is rolled back, preventing the insertion.
  • If all rows meet the condition, the insertion proceeds by inserting the rows into the Employees table.

Thanks. We have learned triggers.

HostForLIFEASP.NET SQL Server 2022 Hosting


European SQL Server 2022 Hosting :: What is a CTE, and How Do You Write a CTE in SQL Server?

clock December 2, 2024 07:07 by author Peter

We will learn what CTE is, how to construct it in SQL Server, and its applications in this article.

CTE: What is it?

"Common Table Expressions" is what CTE stands for. SQL servers utilize it to specify a temporary name result. The common table expression (CTE) is a temporary named result set that can be referenced within a Select, Insert, Update, or Delete operation. It was first introduced in SQL Server 2005. Another crucial point is that, like any other table, CTE results can always be accessed within the query even when they are not saved anywhere.

Why do we need CTE on the SQL server?
CTE is a powerful SQL feature that helps simplify queries. CTEs act as virtual tables (with records and columns) that are created during query execution, used by the query, and deleted after the query executes.

Syntax
[ WITH <common_table_expression> [ ,...n ] ]

<common_table_expression>::=
    expression_name [ ( column_name [ ,...n ] ) ]
    AS
    ( CTE_query_definition )


Let’s try to understand CTE Syntax.

Arguments

There are three arguments in the above syntax.

  • expression_name.
  • column_name.
  • query_derfination.

Let’s understand one by one.

  • expression_name: It should be a valid identifier for a common table expression. The expression_name must be different from the names of other common table expressions defined in the same WITH clause.
  • column_name: Specifies a column name in the common table expression. Duplicate names are not allowed within a single CTE definition. There are two rules for column names. The first is the number of column names specified, which must match the number of columns in the result set of the query_definition, and the second one is The list of column names is optional only if distinct names for all resulting columns are supplied in the query definition.
  • query_defination: Specifies a SELECT statement whose result set satisfies a common table expression.

Some Examples
Before starting to explain some CTE examples, we need to create a database and some tables under the database, so run the following script in your SQL server.
USE [master]
GO

/****** Object:  Database [db_MyPractice]    Script Date: 06-10-2024 01:18:01 ******/
CREATE DATABASE [db_MyPractice]
    CONTAINMENT = NONE
    ON PRIMARY
    (
        NAME = N'db_MyPractice',
        FILENAME = N'C:\Program Files\Microsoft SQL Server\MSSQL15.SQLEXPRESS\MSSQL\DATA\db_MyPractice.mdf',
        SIZE = 8192KB,
        MAXSIZE = UNLIMITED,
        FILEGROWTH = 65536KB
    )
    LOG ON
    (
        NAME = N'db_MyPractice_log',
        FILENAME = N'C:\Program Files\Microsoft SQL Server\MSSQL15.SQLEXPRESS\MSSQL\DATA\db_MyPractice_log.ldf',
        SIZE = 8192KB,
        MAXSIZE = 2048GB,
        FILEGROWTH = 65536KB
    )
    WITH CATALOG_COLLATION = DATABASE_DEFAULT
GO

ALTER DATABASE [db_MyPractice] SET COMPATIBILITY_LEVEL = 150
GO

IF (1 = FULLTEXTSERVICEPROPERTY('IsFullTextInstalled'))
BEGIN
    EXEC [db_MyPractice].[dbo].[sp_fulltext_database] @action = 'enable'
END
GO


ALTER DATABASE [db_MyPractice] SET ANSI_NULL_DEFAULT OFF
GO
ALTER DATABASE [db_MyPractice] SET ANSI_NULLS OFF
GO
ALTER DATABASE [db_MyPractice] SET ANSI_PADDING OFF
GO
ALTER DATABASE [db_MyPractice] SET ANSI_WARNINGS OFF
GO
ALTER DATABASE [db_MyPractice] SET ARITHABORT OFF
GO
ALTER DATABASE [db_MyPractice] SET AUTO_CLOSE OFF
GO
ALTER DATABASE [db_MyPractice] SET AUTO_SHRINK OFF
GO
ALTER DATABASE [db_MyPractice] SET AUTO_UPDATE_STATISTICS ON
GO
ALTER DATABASE [db_MyPractice] SET CURSOR_CLOSE_ON_COMMIT OFF
GO
ALTER DATABASE [db_MyPractice] SET CURSOR_DEFAULT GLOBAL
GO
ALTER DATABASE [db_MyPractice] SET CONCAT_NULL_YIELDS_NULL OFF
GO
ALTER DATABASE [db_MyPractice] SET NUMERIC_ROUNDABORT OFF
GO
ALTER DATABASE [db_MyPractice] SET QUOTED_IDENTIFIER OFF
GO
ALTER DATABASE [db_MyPractice] SET RECURSIVE_TRIGGERS OFF
GO
ALTER DATABASE [db_MyPractice] SET DISABLE_BROKER
GO
ALTER DATABASE [db_MyPractice] SET AUTO_UPDATE_STATISTICS_ASYNC OFF
GO
ALTER DATABASE [db_MyPractice] SET DATE_CORRELATION_OPTIMIZATION OFF
GO
ALTER DATABASE [db_MyPractice] SET TRUSTWORTHY OFF
GO
ALTER DATABASE [db_MyPractice] SET ALLOW_SNAPSHOT_ISOLATION OFF
GO
ALTER DATABASE [db_MyPractice] SET PARAMETERIZATION SIMPLE
GO
ALTER DATABASE [db_MyPractice] SET READ_COMMITTED_SNAPSHOT OFF
GO
ALTER DATABASE [db_MyPractice] SET HONOR_BROKER_PRIORITY OFF
GO
ALTER DATABASE [db_MyPractice] SET RECOVERY SIMPLE
GO
ALTER DATABASE [db_MyPractice] SET MULTI_USER
GO
ALTER DATABASE [db_MyPractice] SET PAGE_VERIFY CHECKSUM
GO
ALTER DATABASE [db_MyPractice] SET DB_CHAINING OFF
GO
ALTER DATABASE [db_MyPractice] SET FILESTREAM (NON_TRANSACTED_ACCESS = OFF)
GO
ALTER DATABASE [db_MyPractice] SET TARGET_RECOVERY_TIME = 60 SECONDS
GO
ALTER DATABASE [db_MyPractice] SET DELAYED_DURABILITY = DISABLED
GO
ALTER DATABASE [db_MyPractice] SET ACCELERATED_DATABASE_RECOVERY = OFF
GO
ALTER DATABASE [db_MyPractice] SET QUERY_STORE = OFF
GO

USE [db_MyPractice]
GO

/****** Object:  Table [dbo].[Employees]    Script Date: 06-10-2024 01:18:01 ******/
SET ANSI_NULLS ON
GO
SET QUOTED_IDENTIFIER ON
GO
CREATE TABLE [dbo].[Employees] (
    [EmployeeID] [smallint] NOT NULL,
      NOT NULL,
      NOT NULL,
      NOT NULL,
    [DeptID] [smallint] NOT NULL,
    [ManagerID] [smallint] NULL,
    CONSTRAINT [PK_EmployeeID] PRIMARY KEY CLUSTERED
    (
        [EmployeeID] ASC
    ) WITH (
        PAD_INDEX = OFF,
        STATISTICS_NORECOMPUTE = OFF,
        IGNORE_DUP_KEY = OFF,
        ALLOW_ROW_LOCKS = ON,
        ALLOW_PAGE_LOCKS = ON,
        OPTIMIZE_FOR_SEQUENTIAL_KEY = OFF
    ) ON [PRIMARY]
) ON [PRIMARY]
GO

/****** Object:  Table [dbo].[tbl_book]    Script Date: 06-10-2024 01:18:01 ******/
SET ANSI_NULLS ON
GO
SET QUOTED_IDENTIFIER ON
GO
CREATE TABLE [dbo].[tbl_book] (
    [BookId] [bigint] IDENTITY(1,1) NOT NULL,
      NOT NULL,
      NOT NULL
) ON [PRIMARY]
GO

/****** Object:  Table [dbo].[Tbl_Bookissued]    Script Date: 06-10-2024 01:18:01 ******/
SET ANSI_NULLS ON
GO
SET QUOTED_IDENTIFIER ON
GO
CREATE TABLE [dbo].[Tbl_Bookissued] (
    [transaction_id] [bigint] IDENTITY(1,1) NOT NULL,
    [StudentID] [bigint] NULL,
    [TeacherID] [bigint] NULL,
    [BookID] [bigint] NOT NULL,
    [issueDate] [date] NOT NULL
) ON [PRIMARY]
GO

/****** Object:  Table [dbo].[tbl_student]    Script Date: 06-10-2024 01:18:01 ******/
SET ANSI_NULLS ON
GO
SET QUOTED_IDENTIFIER ON
GO
CREATE TABLE [dbo].[tbl_student] (
    [StudentID] [bigint] IDENTITY(1,1) NOT NULL,
      NOT NULL
) ON [PRIMARY]
GO

/****** Object:  Table [dbo].[tbl_teacher]    Script Date: 06-10-2024 01:18:01 ******/
SET ANSI_NULLS ON
GO
SET QUOTED_IDENTIFIER ON
GO
CREATE TABLE [dbo].[tbl_teacher] (
    [TeacherID] [bigint] IDENTITY(1,1) NOT NULL,
      NOT NULL
) ON [PRIMARY]
GO

-- Insert statements
INSERT [dbo].[Employees] ([EmployeeID], [FirstName], [LastName], [Title], [DeptID], [ManagerID]) VALUES
(1, N'Ken', N'Sánchez', N'Chief Executive Officer', 16, NULL),
(16, N'David', N'Bradley', N'Marketing Manager', 4, 273),
(23, N'Mary', N'Gibson', N'Marketing Specialist', 4, 16),
(273, N'Brian', N'Welcker', N'Vice President of Sales', 3, 1),
(274, N'Stephen', N'Jiang', N'North American Sales Manager', 3, 273),
(275, N'Michael', N'Blythe', N'Sales Representative', 3, 274),
(276, N'Linda', N'Mitchell', N'Sales Representative', 3, 274),
(285, N'Syed', N'Abbas', N'Pacific Sales Manager', 3, 273),
(286, N'Lynn', N'Tsoflias', N'Sales Representative', 3, 285)
GO

SET IDENTITY_INSERT [dbo].[tbl_book] ON
GO
INSERT [dbo].[tbl_book] ([BookId], [bookName], [className]) VALUES
(1, N'Maths', N'Class-1'),
(2, N'Maths', N'Class-2'),
(3, N'Maths', N'Class-3'),
(4, N'Maths', N'Class-4'),
(5, N'Maths', N'Class-5'),
(6, N'Maths', N'Class-6'),
(7, N'Hindi', N'Class-1'),
(8, N'Hindi', N'Class-2'),
(9, N'Hindi', N'Class-3'),
(10, N'Hindi', N'Class-4'),
(11, N'Hindi', N'Class-5'),
(12, N'Hindi', N'Class-6'),
(13, N'English', N'Class-1'),
(14, N'English', N'Class-2'),
(15, N'English', N'Class-3'),
(16, N'English', N'Class-4'),
(17, N'English', N'Class-5'),
(18, N'English', N'Class-6')
GO
SET IDENTITY_INSERT [dbo].[tbl_book] OFF


After running this script, you will have the following table. Following tables with data.

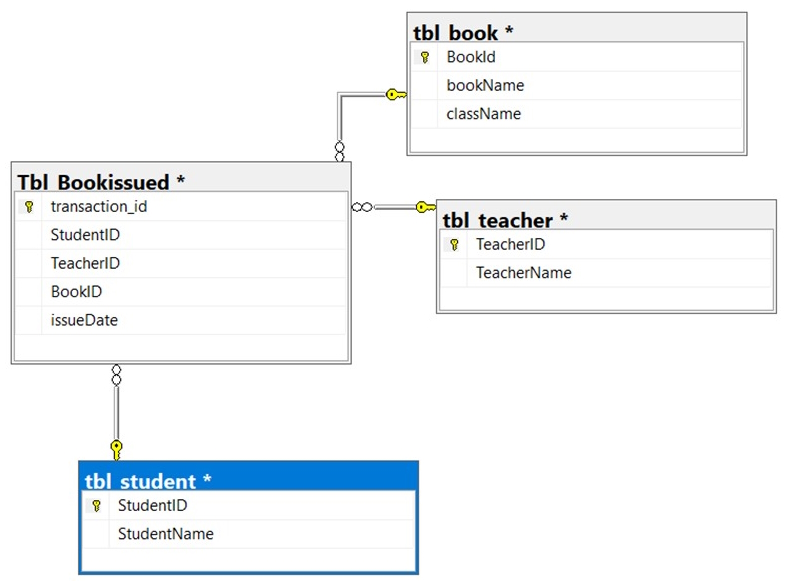
A. Create a common table expression: The following example shows the total number of books issued per year for each student during their all-academic years.
-- Define the CTE expression name and column list.
WITH book_Issue_CTE (StudentID, StudentName, BookID, AcademicYear)
AS
(
    -- Define the CTE query.
    SELECT
        BI.StudentID,
        StudentName,
        BookID,
        YEAR(issueDate) AS AcademicYear
    FROM
        Tbl_Bookissued BI
    JOIN
        tbl_student s ON BI.StudentID = s.StudentID
    WHERE
        BI.StudentID IS NOT NULL
)
-- Define the outer query referencing the CTE name.
SELECT
    StudentID,
    StudentName,
    COUNT(BookID) AS TotalBookIssued,
    AcademicYear
FROM
    book_Issue_CTE
GROUP BY
    AcademicYear, StudentID, StudentName
ORDER BY
    StudentID, AcademicYear;

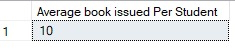
B. Use a common table expression to limit counts and report averages: The following example shows the average number of books issued for all years for the students.
WITH Avg_book_Issue_CTE (StudentID, NumberOfBooks) AS
(
    SELECT StudentID, COUNT(*)
    FROM Tbl_Bookissued
    WHERE StudentID IS NOT NULL
    GROUP BY StudentID
)
SELECT AVG(NumberOfBooks) AS "Average book issued Per Student"
FROM Avg_book_Issue_CTE;

C. Use multiple CTE definitions in a single query: The following example shows how to define more than one CTE in a single query. Notice that a comma is used to separate the CTE query definitions.

In the example below, we are fetching records of books issued to teachers and students.
WITH book_issued_student_CTE (StudentID, BookIssued, IssueYear) AS
-- Define the first CTE query.
(
    SELECT StudentID, COUNT(BookID) AS BookIssued, YEAR(issueDate) AS IssueYear
    FROM Tbl_Bookissued
    WHERE StudentID IS NOT NULL
    GROUP BY StudentID, YEAR(issueDate)
),

-- Define the second CTE query, which returns sales quota data by year for each sales person.
book_issued_Teacher_CTE (TeacherID, BookIssued, IssueYear) AS
(
    SELECT TeacherID, COUNT(BookID) AS BookIssued, YEAR(issueDate) AS IssueYear
    FROM Tbl_Bookissued
    WHERE TeacherID IS NOT NULL
    GROUP BY TeacherID, YEAR(issueDate)
)

-- Define the outer query by referencing columns from both CTEs.
SELECT CTE.StudentID,
       StudentName,
       NULL AS TeacherID,
       '' AS TeacherName,
       BookIssued,
       IssueYear
FROM book_issued_student_CTE CTE
JOIN tbl_student s ON CTE.StudentID = s.StudentID

UNION ALL

SELECT '',
       '',
       CTE.TeacherID,
       TeacherName,
       BookIssued,
       IssueYear
FROM book_issued_Teacher_CTE CTE
JOIN tbl_teacher t ON CTE.TeacherID = t.TeacherID

ORDER BY CTE.StudentID, TeacherID;


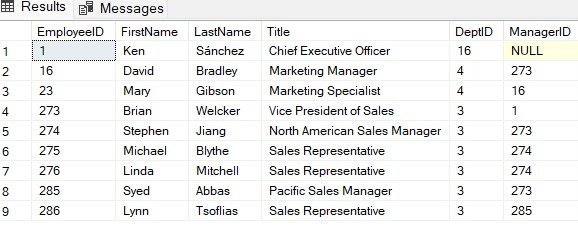
D. Use a recursive common table expression to display multiple levels of recursion: The following example shows managers and the employees reporting to them. The number of levels returned is limited to two.

Create one more table to proceed with this example.
-- Create an Employee table.
CREATE TABLE dbo.Employees
(
    EmployeeID SMALLINT NOT NULL,
    FirstName NVARCHAR(30) NOT NULL,
    LastName NVARCHAR(40) NOT NULL,
    Title NVARCHAR(50) NOT NULL,
    DeptID SMALLINT NOT NULL,
    ManagerID SMALLINT NULL,

    CONSTRAINT PK_EmployeeID PRIMARY KEY CLUSTERED (EmployeeID ASC),
    CONSTRAINT FK_Employees_ManagerID_EmployeeID
        FOREIGN KEY (ManagerID) REFERENCES dbo.Employees (EmployeeID)
);
-- Populate the table with values.
INSERT INTO dbo.Employees
VALUES
    (1, N'Ken', N'Sánchez', N'Chief Executive Officer', 16, NULL),
    (273, N'Brian', N'Welcker', N'Vice President of Sales', 3, 1),
    (274, N'Stephen', N'Jiang', N'North American Sales Manager', 3, 273),
    (275, N'Michael', N'Blythe', N'Sales Representative', 3, 274),
    (276, N'Linda', N'Mitchell', N'Sales Representative', 3, 274),
    (285, N'Syed', N'Abbas', N'Pacific Sales Manager', 3, 273),
    (286, N'Lynn', N'Tsoflias', N'Sales Representative', 3, 285),
    (16, N'David', N'Bradley', N'Marketing Manager', 4, 273),
    (23, N'Mary', N'Gibson', N'Marketing Specialist', 4, 16);

After running this script we have the following data.

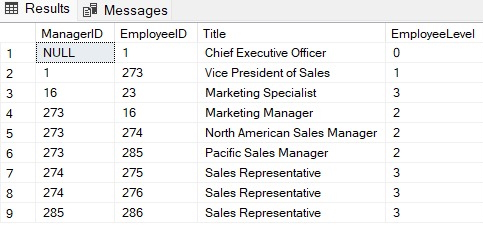
The following example shows the hierarchical list of managers and the employees who report to them.
WITH DirectReports(ManagerID, EmployeeID, Title, EmployeeLevel) AS
(
    SELECT
        ManagerID,
        EmployeeID,
        Title,
        0 AS EmployeeLevel
    FROM dbo.Employees
    WHERE ManagerID IS NULL

    UNION ALL

    SELECT
        e.ManagerID,
        e.EmployeeID,
        e.Title,
        EmployeeLevel + 1
    FROM dbo.Employees AS e
    INNER JOIN DirectReports AS d
        ON e.ManagerID = d.EmployeeID
)

SELECT
    ManagerID,
    EmployeeID,
    Title,
    EmployeeLevel
FROM DirectReports
ORDER BY ManagerID;

The output of this CTE will be.

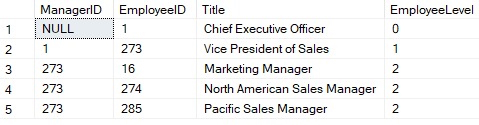
E. Use a recursive common table expression to display two levels of recursion: The following example shows managers and the employees reporting to them. The number of levels returned is limited to two.
WITH DirectReports (ManagerID, EmployeeID, Title, EmployeeLevel) AS
(
    SELECT ManagerID, EmployeeID, Title, 0 AS EmployeeLevel
    FROM dbo.Employees
    WHERE ManagerID IS NULL
    UNION ALL
    SELECT e.ManagerID, e.EmployeeID, e.Title, EmployeeLevel + 1
    FROM dbo.Employees AS e
    INNER JOIN DirectReports AS d
        ON e.ManagerID = d.EmployeeID
)
SELECT ManagerID, EmployeeID, Title, EmployeeLevel
FROM DirectReports
WHERE EmployeeLevel <= 2;


The result of this CTE will be.

HostForLIFEASP.NET SQL Server 2022 Hosting


European SQL Server 2022 Hosting :: Cleaning Data in SQL Server

clock November 25, 2024 06:45 by author Peter

In order to guarantee the accuracy, consistency, and dependability of the data used for analysis, reporting, or machine learning, data cleansing is an essential stage in the data preparation process. Inaccurate judgments, faulty models, and ineffective decision-making can result from low-quality data.

1. Removing Duplicates
Duplicates in datasets can skew results, inflate counts, or cause redundancy. SQL Server provides ways to remove duplicates using DISTINCT or GROUP BY.
Example. Identify and remove duplicate rows in the Person.EmailAddress table.

If you want to remove duplicates permanently, you can use CTE (Common Table Expressions) with ROW_NUMBER().
USE Hostforlife;
GO

SELECT DISTINCT
    EmailAddressID,
    EmailAddress
FROM
    Person.EmailAddress;

WITH CTE AS (
    SELECT
        EmailAddressID,
        EmailAddress,
        ROW_NUMBER() OVER (PARTITION BY EmailAddress ORDER BY EmailAddressID) AS RowNum
    FROM
        Person.EmailAddress
)
DELETE FROM CTE
WHERE RowNum > 1;

2. Handling Missing Values
Missing values can impact analysis and decision-making. Use SQL functions like IS NULL, COALESCE, or CASE to identify and handle missing data. Example. Replace missing PhoneNumber values in the Person.Use the personPhone table with a default value or remove rows with missing values.
USE 
Hostforlife;
GO

SELECT
    BusinessEntityID,
    PhoneNumber,
    COALESCE(PhoneNumber, 'Unknown') AS CleanedPhoneNumber
FROM
    Person.PersonPhone;

DELETE FROM
    Person.PersonPhone
WHERE
    PhoneNumber IS NULL;

3. Correcting Data Inconsistencies
Inconsistencies like variations in case or formatting can lead to errors in joins or grouping. SQL Server string functions like UPPER, LOWER, or REPLACE can help standardize data.

Example. Standardize FirstName values in the Person.Person table to uppercase. Replace incorrect substrings in email addresses.
USE 
Hostforlife;
GO

UPDATE Person.Person
SET FirstName = UPPER(FirstName);

UPDATE Person.EmailAddress
SET EmailAddress = REPLACE(EmailAddress, '@
Hostforlife.eu', '@Hostforlife.eu
');

4. Standardizing Data Formats
Standardized data formats ensure consistency and compatibility across systems. Functions like CAST and CONVERT are often used for this purpose. Example. Convert ModifiedDate in the Sales.SalesOrderHeader table to a specific format. Here, the date format 101 converts the date to MM/DD/YYYY.

USE
Hostforlife
GO

SELECT SalesOrderID,
       CONVERT(VARCHAR(10), ModifiedDate, 101) AS FormattedDate
FROM Sales.SalesOrderHeader;

5. Removing Outliers

Outliers can distort statistical analyses and trends. Use statistical functions and filtering to identify and exclude them.

Example. Remove outliers based on TotalDue in the Sales.SalesOrderHeader table.
USE
Hostforlife
GO

SELECT *
FROM Sales.SalesOrderHeader
WHERE TotalDue BETWEEN
      (SELECT PERCENTILE_CONT(0.05) WITHIN GROUP (ORDER BY TotalDue) OVER ()) AND
      (SELECT PERCENTILE_CONT(0.95) WITHIN GROUP (ORDER BY TotalDue) OVER ());

6. Validating Data
Data validation ensures data integrity by applying constraints or rules. SQL Server constraints like NOT NULL, UNIQUE, and CHECK are essential for enforcing data quality.
Example. Enforce data integrity when creating a new table.
USE 
Hostforlife;
GO

CREATE TABLE Sales.Promotions (
    PromotionID INT PRIMARY KEY,
    PromotionName NVARCHAR(100) NOT NULL,
    DiscountPercentage DECIMAL(5, 2) CHECK (DiscountPercentage BETWEEN 0 AND 100),
    StartDate DATE NOT NULL,
    EndDate DATE NOT NULL,
    CONSTRAINT CK_Promotions_EndDate CHECK (EndDate > StartDate)
);

Alternatively, validate existing data using conditional queries.
SELECT *
FROM Sales.Promotions
WHERE DiscountPercentage < 0
   OR DiscountPercentage > 100;


Conclusion
Data cleansing is an ongoing process and a crucial component of the data lifecycle. By removing duplicates, handling missing values, correcting inconsistencies, standardizing formats, removing outliers, and validating data, you can significantly improve the quality of your data. These techniques, demonstrated using the AdventureWorks2022 database, can be applied to real-world datasets to ensure accurate and actionable insights. By incorporating these practices into your data workflows, you can ensure that your analysis, reports, and machine learning models are built on a solid foundation of clean data.

HostForLIFEASP.NET SQL Server 2022 Hosting


European SQL Server 2022 Hosting :: Temporary Tables vs Table Variables in SQL Server Explained

clock November 20, 2024 07:52 by author Peter

In SQL Server, a temporary table is a unique kind of table that is used to hold data for a short time. When it is no longer required, it is automatically removed after existing for the duration of a batch or database session. The tempdb system database contains temporary tables.

Types of Temporary Tables
SQL Server supports two types of temporary tables.

  • Local Temporary Table (#)
    • Only visible to the session or connection that created it.
    • Automatically deleted when the session ends.
  • Global Temporary Table (##)
    • Visible to all sessions and connections.
    • Deleted only when the last session referencing it is closed.

Procedure for utilizing a temporary table

Step 1. Syntax for Creating a Temporary Table.
CREATE TABLE #TempTableName
(
    Column1 DataType PRIMARY KEY,  -- Example of a primary key
    Column2 DataType,
    Column3 DataType
);


Step 2. Example of Using a Temporary Table in a Stored Procedure.
CREATE PROCEDURE StudentDetailsTempTable
AS
BEGIN
    -- Step 1: Create a temporary table
    CREATE TABLE #StudentDetails
    (
        StudentID INT PRIMARY KEY,           

-- Primary key example
        StudentName NVARCHAR(100),
        Course NVARCHAR(100),
        Fees DECIMAL(18,2)
    );

    -- Step 2: Insert data into the temporary table
    INSERT INTO #StudentDetails (StudentID, StudentName, Course, Fees)
    VALUES
        (1, 'Peter', 'MBA-IT', 160000.00),
        (2, 'Leon', 'MBA-Economics', 180000.00),
        (3, 'Alex', 'Master in technology in cs', 150000.00);

    -- Step 3: Select data from the temporary table
    SELECT * FROM #StudentDetails;

    -- Step 4: Temporary table will be dropped automatically after procedure ends
END;

Notes

  • Scope: A temporary table established within a stored procedure is confined to that specific procedure and is automatically removed upon the completion of the procedure's execution.
  • Multiple Sessions: Temporary tables that begin with a # symbol are restricted to the session in which they were created. For access across different sessions, a global temporary table can be created using ##; however, local tables are generally considered safer for use within stored procedures.

When to Utilize Temporary Tables?

  • Intermediate Results: Temporary tables are advantageous for storing intermediate results of queries temporarily within a stored procedure.
  • Data Transformation: They serve the purpose of manipulating or aggregating data prior to delivering the final result set.
  • Performance: In certain scenarios, the use of temporary tables can enhance performance, particularly when managing complex joins or aggregations involving large datasets.

Process for utilizing a Table variable
A table variable in SQL Server is a distinct category of variable designed to hold a temporary collection of data organized in a table structure. It is defined through the DECLARE statement utilizing the TABLE data type. While table variables share similarities with temporary tables, they exhibit notable differences in terms of scope, performance, and application.Limitations

  1. Prohibition of DDL Operations: DDL commands such as ALTER or DROP are not permitted on table variables.
  2. Restriction on Explicit Indexes: Only indexes that are established through constraints are permissible.
  3. Inefficiency with Large Data Sets: Table variables are not as effective as temporary tables when managing large volumes of data.

Step 1. To create a table variable, the appropriate syntax involves using the DECLARE statement in conjunction with the TABLE. Syntax for Declaring a Table Variable.
DECLARE @TableName TABLE
(
    Column1 DataType PRIMARY KEY,  -- Primary key example
    Column2 DataType,
    Column3 DataType
);


Step 2. Defining and Utilizing a Table Variable.
CREATE PROCEDURE StudentDetailsTableVariable
AS
BEGIN
    DECLARE @StudentDetailsTable TABLE
    (
        StudentID INT PRIMARY KEY,            -- Primary key example
        StudentName NVARCHAR(100),
        Course NVARCHAR(100),
        Fees DECIMAL(18,2)
    );

    -- Insert data into the table variable
    INSERT INTO @StudentDetailsTable (StudentID, StudentName, Course, Fees)
    VALUES
        (1, 'Peter', 'BSC', 60000.00),
        (2, 'Leon', 'BA', 80000.00),
        (3, 'Alex', 'Data Science', 50000.00);

    -- Select data from the table variable
    SELECT * FROM @StudentDetailsTable;
END;


  • Scope: A temporary table established within a stored procedure is confined to that specific procedure and is automatically removed upon the completion of the procedure's execution.
  • Multiple Sessions: Temporary tables that begin with a # symbol are restricted to the session in which they were created. For access across different sessions, a global temporary table can be created using ##; however, local tables are generally considered safer for use within stored procedures.

When to Utilize Temporary Tables?

  • Intermediate Results: Temporary tables are advantageous for storing intermediate results of queries temporarily within a stored procedure.
  • Data Transformation: They serve the purpose of manipulating or aggregating data prior to delivering the final result set.
  • Performance: In certain scenarios, the use of temporary tables can enhance performance, particularly when managing complex joins or aggregations involving large datasets.

Process for utilizing a Table variable

A table variable in SQL Server is a distinct category of variable designed to hold a temporary collection of data organized in a table structure. It is defined through the DECLARE statement utilizing the TABLE data type. While table variables share similarities with temporary tables, they exhibit notable differences in terms of scope, performance, and application.

Limitations

  • Prohibition of DDL Operations: DDL commands such as ALTER or DROP are not permitted on table variables.
  • Restriction on Explicit Indexes: Only indexes that are established through constraints are permissible.
  • Inefficiency with Large Data Sets: Table variables are not as effective as temporary tables when managing large volumes of data.

Step 1. To create a table variable, the appropriate syntax involves using the DECLARE statement in conjunction with the TABLE. Syntax for Declaring a Table Variable.
DECLARE @TableName TABLE
(
    Column1 DataType PRIMARY KEY,  -- Primary key example
    Column2 DataType,
    Column3 DataType
);

Step 2. Defining and Utilizing a Table Variable.
CREATE PROCEDURE StudentDetailsTableVariable
AS
BEGIN
    DECLARE @StudentDetailsTable TABLE
    (
        StudentID INT PRIMARY KEY,            -- Primary key example
        StudentName NVARCHAR(100),
        Course NVARCHAR(100),
        Fees DECIMAL(18,2)
    );

    -- Insert data into the table variable
    INSERT INTO @StudentDetailsTable (StudentID, StudentName, Course, Fees)
    VALUES
        (1, 'AmIt', 'BSC', 60000.00),
        (2, 'Nagpal', 'BA', 80000.00),
        (3, 'Prashant', 'Data Science', 50000.00);

    -- Select data from the table variable
    SELECT * FROM @StudentDetailsTable;
END;

When to Utilize Table Variables?

  • Small Data Sets: Table variables are more effective for handling small amounts of data.
  • Short Lifespan: These variables are automatically removed upon the completion of the batch or procedure.
  • Stored Procedures: They function optimally within the context of a stored procedure or batch.

 Key Distinctions Between Table Variables and Temporary Tables

HostForLIFEASP.NET SQL Server 2022 Hosting


About HostForLIFE

HostForLIFE is European Windows Hosting Provider which focuses on Windows Platform only. We deliver on-demand hosting solutions including Shared hosting, Reseller Hosting, Cloud Hosting, Dedicated Servers, and IT as a Service for companies of all sizes.

We have offered the latest Windows 2019 Hosting, ASP.NET 5 Hosting, ASP.NET MVC 6 Hosting and SQL 2019 Hosting.


Month List

Tag cloud

Sign in