European Windows 2019 Hosting BLOG

BLOG about Windows 2019 Hosting and SQL 2019 Hosting - Dedicated to European Windows Hosting Customer

European SQL Server 2019 Hosting :: Dynamically Getting Database Collection From SQL Server Using C#

clock January 24, 2023 10:54 by author Peter

In this article, we will see how to dynamically get a database List using C#.

Step 1. Used Namespaces
using System.Web.Configuration;
using System.Data.SqlClient;
using Microsoft.SqlServer.Management.Common;
using Microsoft.SqlServer.Management.Smo;


Step 2. Referenced DLL

Step 3. Connection String:
<add name="<KEY>" connectionString="Data Source=<SERVERNAME>;Initial Catalog=<DATABASE>;Integrated Security=True" />

Step 4. Used to get Connection String from Web.config file.
public static string GetConnectionStringFromWebConfigByName(string name)
{
    return WebConfigurationManager.ConnectionStrings[name].ConnectionString;
}

Step 5. Usage
DatabaseCollection databases =  SQLDatabaseClass .DbCollection(connectionString);

Here you can get the collection of a database as a List.

Database database =  SQLDatabaseClass.SinglDatabase(connectionString);

Here you can get a single database by its name.

Step 6. Creating a Connection String for server connection.
public static SqlConnection Connecection(string connectionString)
{
    SqlConnection con = new SqlConnection(connectionString);
    return con;
}


Step 7. Create a Server connection using a Connection string.
public static ServerConnection GetServerConnection(string connectionString)
{
    ServerConnection serverCon = new ServerConnection(Connecection(connectionString));
    serverCon.Connect();
    return serverCon;
}


Step 8. Creating Server Object.
public static Server GetServer(string connectionString)
{
    Server server = new Server(GetServerConnection(connectionString));
    return server;
}


Step 9. Getting Database collection from the SQL Server:
public static DatabaseCollection DbCollection(string connectionString)
{
    Server server = GetServer(connectionString);
    return server.Databases;
}

Step 10. Getting a specific database from the collection of databases in the SQL Server:
public static Database SinglDatabase(string connectionString, string databaseName)
{
    return GetServer(connectionString).Databases[databaseName];
}


Code Snippet
class SQLDatabaseClass
{
    #region Database

    public static DatabaseCollection DbCollection(string connectionString)
    {
        Server server = GetServer(connectionString);
        return server.Databases;
    }

public static Database SinglDatabase(string connectionString, string Name)
{
    return GetServer(connectionString).Databases[databaseName];
}

#endregion

public static Server GetServer(string connectionString)
{
    Server server = new Server(GetServerConnection(connectionString));
    return server;
}

public static ServerConnection GetServerConnection(string connectionString)
{
    ServerConnection serverCon = new ServerConnection(Connecection(connectionString));
    serverCon.Connect();
    return serverCon;
}

public static ServerConnection GetServerConnectionByLogin(bool isWindows, string serverName)
    {
        ServerConnection serverCon = new ServerConnection();
        serverCon.LoginSecure = isWindows;
        serverCon.ServerInstance = serverName;
        serverCon.Connect();
        return serverCon;
    }

    public static SqlConnection Connecection(string connectionString)
    {
        SqlConnection con = new SqlConnection(connectionString);

        return con;
    }
}

Thanks for reading this article. I hope you have a nice day.

HostForLIFEASP.NET SQL Server 2019 Hosting


European SQL Server 2019 Hosting :: What Is MDF and LDF in SQL Server?

clock January 16, 2023 06:19 by author Peter

If you work with a SQL Server database, I'm sure you have heard of .mdf and .ldf files. When you install a new SQL Server database server on a machine, and create a database, these files are created on a hard drive. In this blog, let's learn about mdf and ldf files.

MDF - Main Database File

    It contains all the main information of the database that is part of the server.
    It plays a crucial role in information storage.

Note - All the successful queries go in MDF.

LDF - Log Database File

    It stores information related to transaction logs for the main data file.
    It stores changes related to CRUD Insert, Delete, and Update.

Note - All the unsuccessful or stuck queries go in LDF.

IMP Image Note
The below image shows the .mdf and .ldf files of EmployeeDB Database.

Difference between MDF and LDF

MDF file is the primary file in SQL server database. The LDF is a supporting file.
MDF contains database record data.  Records information related to changes made in the server as well as all the actions performed.
MDF can vary in its file size with the change of the table and record data. LDF files can go on to consume a lot of storage space depending on the number of changes made in the server as well as the number of transactions that took place. 

HostForLIFEASP.NET SQL Server 2019 Hosting


European SQL Server 2019 Hosting :: What Is Common Table Expression (CTE) In SQL Server?

clock January 13, 2023 06:31 by author Peter

Common Table Expression (CTE) in SQL offers a more readable form of a derived table. A Common Table Expression is an expression that returns a temporary result set. This result set is similar to a hybrid Derived Table. The resultset can be declared once and referenced multiple times in a query. It does not require any extra effort to declare it. CTE is more powerful than the derived table. It can self-reflect, and we can also use CTE multiple times in the same query. Mainly, CTE improves readability and makes it easy to maintain complex queries. CTE can be used for selects, and DML (Insert, Update, and Delete) statements.

Common Structure of CTE 

;WITH CTE_name [ ( column_name [,...n] ) ]
AS
(
query_definition
)
select * from CTE_name;

The Common Table Expression is created using the WITH statement followed by the CTE name and List of Columns (specifying a column is optional). After the "AS," the information used to populate the returning columns begins. The CTE is then followed by a select calling it. Always start CTE with a semi-colon.

Example

Step 1. Create a query 

The following is a sample of creating two tables, EmployeeMasters and DepartmentMasters, and inserting some default values into them.

IF EXISTS (SELECT * FROM sys.objects WHERE object_id = OBJECT_ID(N'[dbo].[DepartmentMasters]') AND type in (N'U'))
DROP TABLE [dbo].[DepartmentMasters]
CREATE TABLE [dbo].[DepartmentMasters](
[DepartmentId] [int] IDENTITY(1,1) NOT NULL,
[DepartmentCode] [varchar](50) NULL,
[DepartmentName] [varchar](50) NULL,
CONSTRAINT [PK_DepartmentMasters] PRIMARY KEY CLUSTERED
(
[DepartmentId] ASC
)WITH (PAD_INDEX = OFF, STATISTICS_NORECOMPUTE = OFF, IGNORE_DUP_KEY = OFF, ALLOW_ROW_LOCKS = ON, ALLOW_PAGE_LOCKS = ON) ON [PRIMARY]
) ON [PRIMARY]
GO
SET ANSI_PADDING OFF
GO
IF EXISTS (SELECT * FROM sys.objects WHERE object_id = OBJECT_ID(N'[dbo].[EmployeeMasters]') AND type in (N'U'))
DROP TABLE [dbo].[EmployeeMasters]
CREATE TABLE [dbo].[EmployeeMasters](
[EmployeeId] [int] IDENTITY(1,1) NOT NULL,
[EmployeeName] [varchar](50) NULL,
[EmployeeCode] [varchar](50) NULL,
[DepartmentId] [int] NULL,
CONSTRAINT [PK_EmployeeMasters] PRIMARY KEY CLUSTERED
[EmployeeId] ASC
)WITH (PAD_INDEX = OFF, STATISTICS_NORECOMPUTE = OFF, IGNORE_DUP_KEY = OFF, ALLOW_ROW_LOCKS = ON, ALLOW_PAGE_LOCKS = ON) ON [PRIMARY]
) ON [PRIMARY]
GO
SET ANSI_PADDING OFF
GO
ALTER TABLE [dbo].[EmployeeMasters] WITH CHECK ADD CONSTRAINT [FK_EmployeeMaster_DepartmentMaster] FOREIGN KEY([DepartmentId])
REFERENCES [dbo].[DepartmentMasters] ([DepartmentId])
GO
ALTER TABLE [dbo].[EmployeeMasters] CHECK CONSTRAINT [FK_EmployeeMaster_DepartmentMaster]
GO
INSERT INTO DepartmentMasters VALUES
('Eaxm', 'Examination'),
('Staff', 'Exam Staff')
INSERT INTO EmployeeMasters VALUES
('Peter','D0093',1),
('Scott','D0094',1),
('Mike','D0095',1),
('Friedrich','D0096',2),
('Kenneth','D0097',2)

Step 2. Writing CTE Query

The following is a sample use of a CTE Query.

;WITH emp_detail(EmployeeName,EmployeeCode,DepartmentCode)
AS
(
SELECT e.EmployeeCode,e.EmployeeName,d.DepartmentCode FROM EmployeeMasters e JOIN DepartmentMasters d ON e.DepartmentId=d.DepartmentId
)
SELECT * FROM emp_detail;


When to Use CTE in SQL?

CTE offers the same functionality as a View (ideal for one-off usages). CTE provides the following four advantages.

  • Create a recursive query. 
  • Alternative from a view when the general use of an idea is not required, a case in which you do not have to store the definition in metadata.
  • Enable grouping by a column derived from a scalar subselect or a function that is either not deterministic or has external access.
  • Reference the resulting table multiple times in the same statement. 

CIt can not use with CTE

  • The clauses like ORDER BY, INTO, OPTION clause with query hints, FOR XML, and BROWSE cannot be used in the CTE query definition.
  •  "SELECT DISTINCT," GROUP BY, PIVOT, HAVING, Scalar aggregation, TOP, LEFT, RIGHT, OUTER JOIN, and Subqueries "are not allowed in the CTE query definition of a recursive member.
  •  A CTE can be self-referencing and previously defined CTEs in the same WITH clause. Forward referencing is not allowed.
  • Specifying more than one "WITH" clause in a CTE is prohibited. For example, if a CTE query definition contains a subquery, then that subquery cannot have a nested WITH clause to define other CTE. 

Summary
CTE provides a more readable and usable approach to derived tables. CTE is not materialized into a work table (temporary table). CTEs are not a replacement for temporary Tables. The scope of the CTE is limited to the first SELECT statement only.

HostForLIFEASP.NET SQL Server 2019 Hosting


European SQL Server 2019 Hosting :: Everything You Need To Know About SQL Server TempDB

clock January 4, 2023 07:37 by author Peter

SQL Server TempDB is a special database in SQL Server that stores temporary objects. It allows you to partition your workloads such that frequently accessed data is stored in memory and less frequently accessed data can be stored on disk, reducing contention for resources. It not only provides you temp storage but also helps improve the performance of the database queries and reduces workloads of the front-end applications as well.

You rarely use TempDB directly, but it has many functions behind the scenes and it is always in use by SQL Server to ensure the performance and responsiveness of some system and non-system databases. For example, if a database operation is too large that needs more memory and storage than the database server currently has, the server uses TempDB as the temp storage to help execute the operation. You can think of TempDB as virtual memory and storage on the OS level that is used when Windows OS needs extra memory and storage.

What is SQL Server TempDB

    TempDB is a system database used by SQL Server (and other RDBMS).
    Apps requiring heavy sorting, grouping, etc. can use TempDB to offload temporary data.
    TempDB files are recreated every time SQL Server starts, so the data in them will be lost after a restart.
    You can use TempDB to store your custom tables, query results, views, and variables.

What is stored in TempDB?
TempDB is a system database. Its name is derived from the fact that it stores temporary user objects. These are tables, stored procedures, table variables, cursors, or derived tables that contain intermediate results when processing queries.

SQL Server uses the TempDB database for various purposes such as the storage of temporary user objects like tables, temporary stored procedures, table variables, cursors, or derived tables that contain intermediate results when processing queries and for internal SQL Server system objects such as row versioning information.

This database is used for sorting and grouping large amounts of data during the execution of a query. It can also be used for storing rows returned by an INSERT statement in batches (one batch per thread). The size of each row varies but is usually 8 KB or 16 KB for small tables and large rows respectively. For example: If you are inserting a million rows into your table with 100 columns each then you would have 100 million pages in tempdb.*

How to access TempDB?
The TempDB is a system database and in automatically created when a SQL Server is installed on a machine. You can access TempDB object by executing queries on TempDB or using SSMS.

Let’s look at the SSMS system databases installed by default when a new SQL Server is installed. As you can see from the following image, four system databases are installed by default when a new SQL Server is installed, master, mode, msdb, and tempdb.

If you expand tempdb database, you will see Tables, Views etc. However, until you start working with databases, they all will be empty.

Where is TempDB location?
The default location of tempdb database is the data folder same where other system databases are. If you right click on tempdb in SSMS, select Properties and select Files, you can find the exact location of tempdb.mdf and other supporting files. The templog file is also in the same folder.

How to move TempDB to a Different Drive or Folder?
Often times, we do not want to store tempdb data and log files on our main drive. You can change the default location of tempdb data and log files by moving them to another drive or folder using the ALTER DATABASE statement.

Run the following command on tempdb.
ALTER DATABASE [tempdb] MODIFY FILE ( NAME = N'tempdev', FILENAME = N'D:\tempdbstorage\tmp.mdf');
GO
ALTER DATABASE [tempdb] MODIFY FILE ( NAME = N'templog', FILENAME = N'D:\tempdbstorage\tmplog.ldf');
GO

Once you execute the above queries, Stop and Restart SQL Server service to make this change in effect.

Also, don’t forget to delete old tempdb.mdf and templog.ldf files.

How to create a Temporary Table in TempDB?

We can also use tempdb explicitly by createng tables, views etc on a tempdb. We can also create regular table as well as temp tables. The following queries create two tables in tempdb, CSharpCorner and Csharp2.
CREATE TABLE CSharpCorner (ID int, data text);
CREATE TABLE #CSharp2 (ID int, name text);


Select tempdb in SSMS and execute above queries in query explorer on tempdb. Right click on tempdb, select New Query, type above SQL statements and execute.

Now refresh tempdb, Right click on tempdb, select Refresh.

Expand Tables and Temporary Tables nodes.

You will CSharpCorner tabe and CSharp2 temporaty table in the database.

To learn how to work with temproraty tables, read Working with Temporaty Tables in SQL Server.

The tempdb is also used to store Temporary Variables. Temporary Variables are used to store data temporarily in tempdb.

Apps requiring heavy sorting, grouping etc. can use TempDB to offload temporary data
You can use TempDB to offload temporary data from the transactional tables. For example, if you are writing an OLTP application that requires heavy sorting and grouping operations, you can use TempDB to store these temporary results.

Sorting or grouping is a common operation when you are processing large amounts of data in a relational database. However, sorting is one of the most expensive operations in traditional databases because it involves disk I/O as well as CPU utilization by the query processor (SQL Server).
TempDB files are recreated every time SQL Server starts.

The TempDB is a system database. It's not specific to any SQL Server instance, but it's always created when you start SQL Server.

For this reason, TempDB is recreated every time SQL Server starts. This happens regardless of whether it was dropped or not, and also if the files are manually deleted (but not using RECREATE).

If TempDB is on an SSD it performs better compared with HDD
If the TempDB database is on an SSD, it performs better compared with a HDD. SSDs are faster, more reliable and durable than HDDs, but they are also more expensive.
TempDB should be one single file per core - up to 8 cores.

SQL Server recommends that TempDB be one single file per core - up to 8 cores. The number of cores in a server can be determined by using the following query:
SELECT * FROM sys.dm_os_sys_info WHERE name='max degree of parallelism'

To determine the number of associated data files for an instance, you can use this script:
select * from sys.master_files

You can monitor TempDB usage using sys.dm_db_task_space_usage and sys.dm_exec_query_resource_semaphores DMVs.

In general, you can monitor TempDB usage using sys.dm_db_task_space_usage and sys.dm_exec_query_resource_semaphores DMVs.
    sys.dm_db_task_space_usage: This DMV returns information about the memory used by all user processes that are connected to the instance of SQL Server. The information includes a breakdown of how much memory each process is using in its buffers, as well as whether any allocations have been deferred or not yet committed by a specific session.
    sys.dm_exec
    exec (sqlserver) This function returns a recordset object that represents an execution plan for an SQL statement compiled with the specified options and parameter values—or no such plan if there is none available because of insufficient system resources or incompatible settings on this instance of SQL Server2005 2005 Management Studio (SSMS).

How to distribute TempDB files for better performance?
When multiple tempdb files are used, make sure they are evenly distributed across different physical disks to improve performance and reliability (e.g., by putting the tempdb files on separate physical disks).

When monitoring the performance of SQL Server, look at the disk I/O subsystem performance. If a disk is reached its maximum throughput, it becomes the bottleneck for SQL Server's workload. If you experience lower than expected CPU utilization, it may indicate that your I/O subsystem is limiting your system’s overall performance instead of CPU resources being consumed by other tasks such as data compression or encryption operations running concurrently with other workloads.

HostForLIFEASP.NET SQL Server 2019 Hosting


European SQL Server 2019 Hosting :: Call Any Web API & Web Service From SQL Server

clock December 21, 2022 07:29 by author Peter

If you have a Web API or a Web Service and want to call from SQL Server to get data in your database, you can do that. In this blog, let's learn how to call a Web API or a Web Service form SQL Server.

Enable configuration in SQL
sp_configure 'show advanced options', 1;
GO
RECONFIGURE;
GO
sp_configure 'Ole Automation Procedures', 1;
GO
RECONFIGURE;
GO


Sample API link
-- Sample API Link
http://sbankapi7.somee.com:80/api/Member/GetDataFromServerByMobile

Sample JSON Request
@Mobile varchar(max),
@Flag varchar(max)

{
  "CID": 0,
  "CName": "",
  "AC_Balance": "",
  "AC_No": "",
  "AC_ID": "",
  "CDOB": {},
  "CEmail": "",
  "ReciverEmail": "",
  "CMObile": "'+@Mobile+'",
  "CGender": "",
  "CPan": "",
  "CAdhaar": "",
  "CNationality": "",
  "CAddress": "",
  "City": "",
  "State": "",
  "Country": "",
  "PinCode": "",
  "Cisdelete": 0,
  "CreatedBy": 0,
  "CreatedDate": {},
  "ModifiedBy": 0,
  "ModifiedDate": {},
  "UID": 0,
  "CustImgPath": "",
  "CustAdaarPath": "",
  "CustPanPath": "",
  "Flag": "'+@Flag+'",
  "OpMsg": "",
  "Pass": ""
} '

Content Type
application/json

Create Store Procedure for Calling Web API.
--//========================
    -- if you learn more please visit my blog

    -- https://saipathrikar.blogspot.com/
--//========================
--================ execute this 1st for 1st time use only

Create Proc Proc_CallApiFromSQL
(
@Mobile varchar(max),
@Flag varchar(max)
)
as
Declare @Object as Int;
Declare @ResponseText as Varchar(8000);
 declare @json table (Json_Table nvarchar(max))
 declare @body varchar(max)
 declare @Apilink varchar(max)
 set @Apilink='http://sbankapi7.somee.com:80/api/Member/GetDataFromServerByMobile';
 set @body='

 {
  "CID": 0,
  "CName": "",
  "AC_Balance": "",
  "AC_No": "",
  "AC_ID": "",
  "CDOB": {},
  "CEmail": "",
  "ReciverEmail": "",
  "CMObile": "'+@Mobile+'",
  "CGender": "",
  "CPan": "",
  "CAdhaar": "",
  "CNationality": "",
  "CAddress": "",
  "City": "",
  "State": "",
  "Country": "",
  "PinCode": "",
  "Cisdelete": 0,
  "CreatedBy": 0,
  "CreatedDate": {},
  "ModifiedBy": 0,
  "ModifiedDate": {},
  "UID": 0,
  "CustImgPath": "",
  "CustAdaarPath": "",
  "CustPanPath": "",
  "Flag": "'+@Flag+'",
  "OpMsg": "",
  "Pass": ""
} '

Exec sp_OACreate 'MSXML2.XMLHTTP', @Object OUT;
Exec sp_OAMethod @Object, 'open', NULL, 'post',@Apilink,'false'
EXEC sp_OAMethod @Object, 'setRequestHeader', null, 'Content-Type', 'application/json'
Exec sp_OAMethod @Object, 'send', null, @body
Exec sp_OAMethod @Object, 'responseText', @ResponseText OUTPUT

  INSERT into @json (Json_Table) exec sp_OAGetProperty @Object, 'responseText'
-- select the JSON string
--select * from @json
-- Parse the JSON string
SELECT * FROM OPENJSON((select * from @json))
WITH (
CID bigint,CName varchar(max),AC_Balance varchar(max),AC_No varchar(max),AC_ID bigint,CDOB datetime,
CEmail varchar(max),ReciverEmail varchar(max),CMObile varchar(max),CGender varchar(max),CPan varchar(max),
CAdhaar varchar(max),CNationality varchar(max),CAddress varchar(max),City varchar(max),State varchar(max),
Country  varchar(max),PinCode varchar(max),Cisdelete bit,CreatedBy varchar(max),CreatedDate datetime,ModifiedBy varchar(max),
ModifiedDate datetime,UID bigint,CustImgPath varchar(max),CustAdaarPath varchar(max),CustPanPath varchar(max),
Flag varchar(max),OpMsg varchar(max),Pass varchar(max)
)
return

Execute Stored Procedure
EXEC  Proc_CallApiFromSQL '8541254874','SE'


Output

HostForLIFEASP.NET SQL Server 2019 Hosting


European SQL Server 2019 Hosting :: Grant Read Write Permission To User in SQL Server

clock December 19, 2022 06:52 by author Peter

In our earlier article, we had learned how to create a login in SQL Server with help of GUI as well as T-SQL script. Granting read, write, execute, create, etc. in SQL Server comes under a security context, and being a Database Administrator, it’s very important to make sure that a user must have sufficient permission to access the database and its objects once he/she gets a new login for the server.

The Database Administrator must ensure that no other anonymous user can access the database to perform any unauthorized activity.

By default, the SQL Server denies access to database objects after you create a login for a user. Therefore, if you want to access the database objects with your login, you must have sufficient permissions provided by your database administrator.

Before proceeding, below are the details we’ve provided for the demo:
    Database: CSharpCornerDB
    User: Peter
    Connection Required: 2 (Admin Session, SQL Login Session)

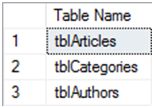
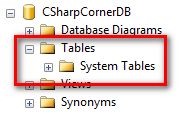
Currently, we’ve connected with Admin login and have three tables with some data in it.

You can find attached script to create database and objects used in this demo. If you want to grant permissions to any user, you must be a member of sysadmin, db_owner or the SA account. Let’s begin with the demo.

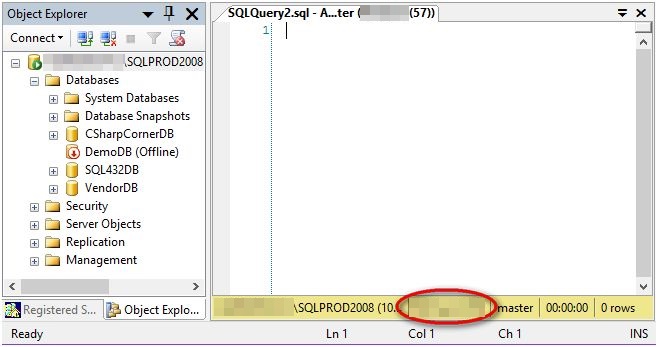
Connect to your server session with the SQL login as in the following:

After successful authentication, you’ll get connected to the server with the username as in the following:

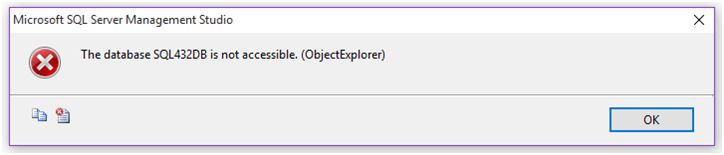
As we mapped our user to CSharpCornerDB database, we’ll connect to it. But if you try to connect to other database, you’ll end up with the following error message.

Msg 916, Level 14, State 1, Line 1
The server principal "MChand" is not able to access the database "SQL432DB" under the current security context.

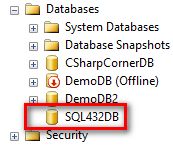
Also if you try to expand other database node, SQL Server throws the following error message window. And the '+' sign disappears as shown below.

So, this simply means that the user can only connect to the database on which it is mapped. We’ll select our mapped database i.e. CSharpCornerDB. As we already know, we have three tables in our database, as mentioned earlier. But if you expand the Tables folder you won’t find any table in it. You’ll only get the following output:

Also, if you try to execute the following query to get data in tables, you’ll get the following error message.
    SELECT * FROM tblArticles 
    SELECT * FROM tblCategories 
    SELECT * FROM tblAuthors 


Error Message:
Msg 229, Level 14, State 5, Line 1
The SELECT permission was denied on the object 'tblArticles', database 'CSharpCornerDB', schema 'dbo'.

Msg 229, Level 14, State 5, Line 2
The SELECT permission was denied on the object 'tblCategories', database 'CSharpCornerDB', schema 'dbo'.

Msg 229, Level 14, State 5, Line 3
The SELECT permission was denied on the object 'tblAuthors', database 'CSharpCornerDB', schema 'dbo'.

This is nothing new but the default behavior of SQL Server to deny access on database objects after creating new login for user. If we want to access those objects, we require read permission for the user with which we’re connected.

To provide READ permission to the user on the database, connectthe server with your admin account or with Windows account and follow the below steps.

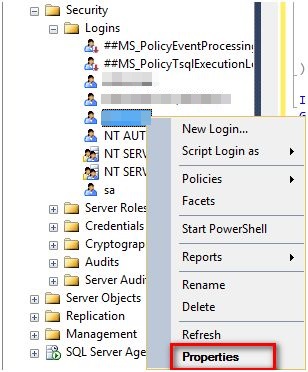
Expand Security - Logins, then Right Click on login and then click Properties.

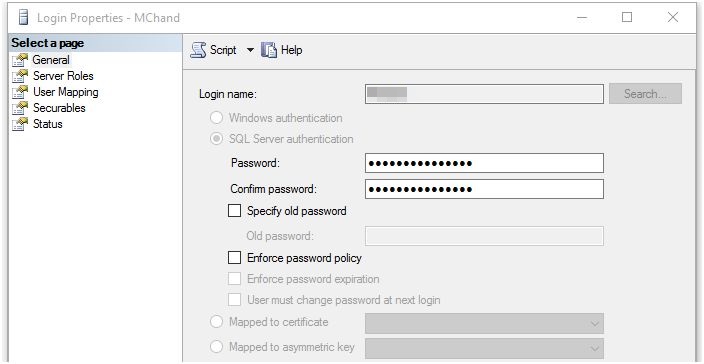
You’ll get Login Properties window as in the following screenshot:


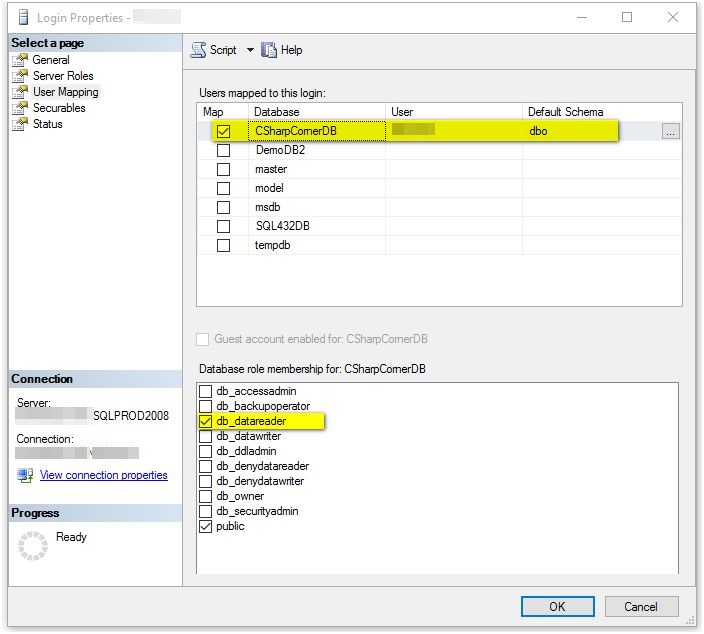
Go to User Mapping tab and select the database on which you want to give permission and at bottom select db_datareader as shown below.


Click Ok and you’re done.

The following is the T-SQL for the same.

    USE [CSharpCornerDB] 
    GO 
    EXEC sp_addrolemember N'db_datareader', N'Peter' 
    GO 


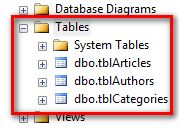
Now go to the session on which you’re connected with Peter login and refresh the Tables folder. If you see all the tables are now visible and are listed below.

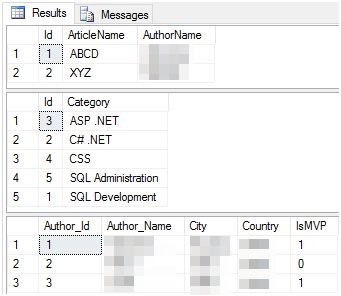
Now if you execute the following select query, you’ll be able to see all the data in the table.

    USE CSharpCornerDB 
    GO 
    SELECT * FROM tblArticles 
    SELECT * FROM tblCategories 
    SELECT * FROM tblAuthors 


Also, if you run SELECT command to get table details, you’ll get output for both.


Now let’s insert another record into table tblArticles.
    USE CSharpCornerDB 
    GO 
    INSERT INTO tblArticles values('Strings in C#','Scott') 
    GO 


If you execute the above query, you’ll encounter the following error message:

Msg 229, Level 14, State 5, Line 1
The INSERT permission was denied on the object 'tblArticles', database 'CSharpCornerDB', schema 'dbo'.

The error message simply states that INSERT permission is denied on the object. This means we don’t have permission to write any data in the database objects.

To give WRITE permission on database to the user, follow below steps.

Security - Logins, then double click on Login and you’ll get Login Properties window.

Go to User Mapping Tab and select the database on which you want to give permission.

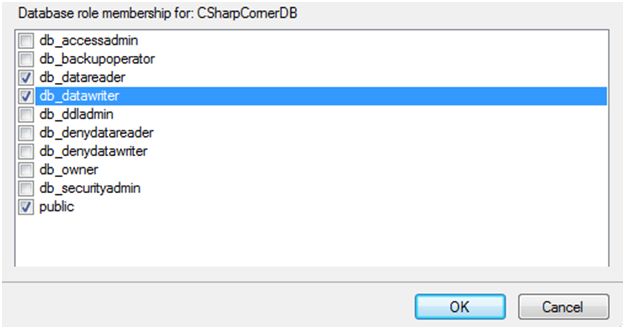
Under ‘Database role membership for’ section, check ‘db_datawriter’ checkbox as shown below.


Click Ok and you’re done.

The following is the T-SQL script for the same.
    USE [CSharpCornerDB] 
    GO 
    EXEC sp_addrolemember N'db_datawriter', N'Peter' 
    GO 


Now if you execute INSERT command from Peter session, it’ll add the record without any error.

After getting WRITE permission, you can run INSERT, UPDATE and DELETE commands.

If you want to revert back the action you can execute the following query from admin session.
    USE [CSharpCornerDB] 
    GO 
    EXEC sp_droprolemember N'db_datareader', N'Peter' 
    GO 
    USE [CSharpCornerDB] 
    GO 
    EXEC sp_droprolemember N'db_datawriter', N'Peter' 
    GO 

Conclusion
So, this is an article based on SQL Security where we learned how to provide read/write permission for user to read and write data from/to SQL Server database. If you are new to SQL, please read What is SQL.

Hope this article helps you o understand how to provide read write permissions. There are also other permissions which you can try with database on your server. If you need any help in this, please let me know. I’ll try my best to solve those.

Please provide your valuable feedback and comments that will help me in providing a better article the next time. Till then keep learning and keep sharing.

HostForLIFEASP.NET SQL Server 2019 Hosting


European SQL Server 2019 Hosting :: Common Table Expression (CTE) In SQL Server

clock December 16, 2022 06:32 by author Peter

Simplify complex joins and subqueries using SQL Server Common Table Expressions or CTEs. It also provides a way to query hierarchical data. This article provides a complete overview of CTEs, types of CTEs, benefits, drawbacks, and how to use them with SQL Server.

A Common Table Expression or CTE is a short-lived named result set created from an easy SELECT statement employed in a subsequent SELECT statement. Every SQL CTE is sort of a named query, the result of which is kept in a very virtual table (a CTE) which is referenced later within the main query.

Syntax
WITH cte_expression_name[ ( column_name [,...n] ) ]
AS
( CTE_query_definition )


To view the CTE results, use a select query with the name of the CTE expression.
Select [Column1,Column2,Column3,Column4...] from cte_expression_name

OR

SELECT * FROM cte_expression_name


Types of CTE(Common Table Expression)
There are 2 types of CTEs,
    Recursive CTE.
    Non-Recursive CTE.

Recursive CTE
A Recursive common table expression (CTE) could be a CTE that references itself. By doing so, the CTE repeatedly executes, and returns subsets of information, till it returns the whole result set.

A recursive CTE is beneficial in querying ranked data adore organization charts wherever one worker reports to a manager or multi-level bill of materials once a product consists of many components, and every component itself additionally consists of many different components.

We'll see how to use a CTE to create a simple recursive query that displays row numbers from 1 to 10.

First, he declared an integer variable as 'RowNo', set the default value to 1, and created our first CTE query as the expression name 'ROW_CTE'. This CTE first displays the default row number, then uses union ALL to increment the row number by 1 until the row number reaches the incremented value of 10. To view the results, use the query of your choice to view the CTE results.
Declare @RowNo int =1;
;with ROW_CTE as
   (
      SELECT @RowNo as ROWNO
        UNION ALL
      SELECT  ROWNO+1
  FROM  ROW_CTE
  WHERE RowNo < 10
    )

SELECT * FROM ROW_CTE

Output
ROWNO
 1
 2
 3
 4
 5
 6
 7
 8
 9
 10

Non-Recursive CTE
Non-Recursive CTEs are easy in which the CTE doesn’t use any recursion, or repeated processing in of a sub-routine. We will create an easy Non-Recursive CTE to show the row variety from 1 to 10.

As in keeping with the CTE Syntax, every CTE question will begin with a "With" observed with the aid of using the CTE Expression call with a column list.

Here we had been the usage of only one column as ROWNO. Next is the Query part, right here we write our pick-out question to be executed for our CTE. After developing our CTE question to run the CTE uses the pick out an announcement with the CTE Expression call.
;with ROW_CTE(ROWNO) as
   (
     SELECT
  ROW_NUMBER() OVER(ORDER BY name ASC) AS ROWNO
FROM table_name
WHERE id <= 10
    )

SELECT * FROM ROW_CTE

Output:
ROWNO
 1
 2
 3
 4
 5
 6
 7
 8
 9
 10


Nested CTE (Common Table Expression)
WITH First_CTE
   AS (SELECT 1 EmpId, 'Peter James' Name)

  ,Second_CTE
   AS (SELECT EmpID, Name, 'London' State FROM First_CTE)

SELECT *   FROM Second_CTE

HostForLIFEASP.NET SQL Server 2019 Hosting


European SQL Server 2019 Hosting :: Difference Between Char, Nchar, Varchar and Nvarchar Data Types in SQL Server

clock December 12, 2022 06:35 by author Peter

SQL Server char data types can be confusing if you are not an experience developer. You may also get to ask a question in an interview, what is the difference between char and varchar in SQL Server? SQL Server has char, varchar, nchar, and nvarcar data types that all are used for storing character data. In this article, learn the difference between CHAR, VARCHAR, NCHAR and NVARCHAR data types. Actually it is simple but sometimes people get confused.

To store data as characters, numeric values and special characters in a database, there are 4 data types that can be used. So what is the difference among all 4 of these data types?
    CHAR vs VARCHAR
    NCHAR vs NVARCHAR


Considering an example, we will look into each one of them.
    DECLARE @string CHAR(20) 
    SET @string = 'Robin' 
    SELECT @string AS 'String', DATALENGTH(@string) AS 'Datalength' , LEN(@string) AS 'Len' 

Note: The LEN() method provides the length of a character excluding trailing blanks stored in the string expression whereas the DATALENGTH() method provides the number of byte spaces occupied by the characters in a string expression.
 
As you know we represent the character values within single quotes, for example 'Robin'. But do you know we can represent these same characters within double quotes similar to programming languages representing a string, for example “Robin”? This can be done by setting the value:
    SET QUOTED_IDENTIFIER OFF

By default, it is set to ON
 
CHAR vs VARCHAR
Talking about the CHAR data type:
    It is a fixed length data type
    Used to store non-Unicode characters
    Occupiers 1 byte of space for each character

If the value provided to a variable of CHAR data type is shorter than the length of a column of declared the size of the variable, then the value would be right-padded with blanks to match the size of column length.
    DECLARE @string CHAR(20) 
    SET @string = 'Robin' 
    SELECT @string AS 'String', DATALENGTH(@string) AS 'Datalength' , LEN(@string) AS 'Len'

As you can see above, the bytes occupied by the variable are 20 even though the length of the characters is 5. That means that irrespective of the character stored in the column, it will occupy all bytes to store the value.

About the VARCHAR data type:
    It is a variable length data type
    Used to store non-Unicode characters
    Occupies 1 byte of space for each character
    DECLARE @string VARCHAR(20) 
    SET @string = 'Robin' 
    SELECT @string AS 'String', DATALENGTH(@string) AS 'Datalength' , LEN(@string) AS 'Len'


As you can see above, it is showing DATALENGTH as 5 which means it will use only the number of bytes equal to the number of characters. This will allow me to avoid wasting database space.

Note:  If SET ANSI_PADDING is OFF when CREATE TABLE or ALTER TABLE is executed, a CHAR column defined as NULL is considered as VARCHAR.

When to use what?
If you are sure about the fixed length of the data that would be captured for any specific column then go for CHAR data type and if the data may vary then go for VARCHAR.
 
NCHAR vs NVARCHAR

Similar to CHAR data type, the NCHAR data type:
    Is a fixed length data type
    Used to store Unicode characters (for example the languages Arabic, German and so on)
    Occupies 2 bytes of space for each character

    DECLARE @string NCHAR(20) 
    SET @string = 'Robin' 
    SELECT @string AS 'String', DATALENGTH(@string) AS 'Datalength' , LEN(@string) AS 'Len'


As you can see above, the data length column shows 40 bytes even though the size declared is 20. It's because NCHAR holds 2 bytes of space for each character.

About the NVARCHAR data type:
    It is a variable-length data type
    Used to store Unicode characters
    Occupies 2 bytes of space for each character
    DECLARE @string NVARCHAR(20) 
    SET @string = 'Robin' 
    SELECT @string AS 'String', DATALENGTH(@string) AS 'Datalength' , LEN(@string) AS 'Len'

As in the output above, you will observe DATALENGTH column is showing only 10 as a value. That is because it occupies 2 bytes of space for each character and the data length is only 5 characters, therefore it will occupy 10 bytes of space in the database.

When to use what?
If your column will store a fixed-length Unicode characters like French, Arabic and so on characters then go for NCHAR. If the data stored in a column is Unicode and can vary in length, then go for NVARCHAR.
 
Querying to NCHAR or NVARCHAR is a bit slower then CHAR or VARCHAR. So don't go for NCHAR or NVARCHAR to store non-Unicode characters even though this data type supports that.

This article explains the differences between CHAR, VARCHAR, NCHAR and NVARCHAR data types. All of these data types are used to store characters, numbers or special characters. I hope you like this small article and will that it will be helpful to you at some point of time. Leave your comments whether its good or bad. Sharing is valuable no matter what :)

HostForLIFEASP.NET SQL Server 2019 Hosting


European SQL Server 2019 Hosting :: SQL Keyword - UNION And UNION ALL

clock December 9, 2022 06:55 by author Peter

UNION Keyword
The result set from two or more SELECT operations is combined by the UNION command but only distinct values.

There are two basic rules are followed when you want to use Union Keyword or Union All.

    All queries must have the same amount of columns and column ordering.
    Each query requires that the data types of the columns on the involving table be the same or compatible.

Syntax
SELECT <COLUMN1>,<COLUMN2> FROM <TABLE1>
UNION
SELECT <COLUMN1>,<COLUMN2> FROM <TABLE2>

Example

SELECT Name FROM Employee
UNION
SELECT Name FROM Worker


In the above example, it returns only unique names from both tables.

UNION ALL Keyword
The result set from two or more SELECT operations is combined by the UNION ALL command, and it also allows duplicate values.

SELECT <COLUMN1>,<COLUMN2> FROM <TABLE1>
UNION ALL
SELECT <COLUMN1>,<COLUMN2> FROM <TABLE2>

Example
SELECT Name FROM Employee
UNION ALL
SELECT Name FROM Worker


In the above example, it returns all names from both tables, and if names are duplicates, it also returns.

The UNION and UNION ALL command combine the result set of two or more SELECT statements.

HostForLIFEASP.NET SQL Server 2019 Hosting


European SQL Server 2019 Hosting :: Format Date in SQL Server using Format Function

clock December 5, 2022 07:41 by author Peter

In this article, you will learn how to format dates in SQL Server using the format function. In this article, we will learn how to format dates using Format function in SQL Server.
Built-in function in SQL Server to get the DateTime value in a specific format

By using some built-in function in SQL Server we can get the DateTime value in a specific format.

For example,
GETDATE()

It returns server DateTime in “YYYY-MM-DD HH:mm:ss.fff” format.
SELECT GETDATE() AS [GETDATE()]
Result:-2022-06-09 12:28:37.787


GETUTCDATE()
It returns DateTime in GMT.
SELECT GETUTCDATE() AS [GETDATE()];
Result:-2022-06-09 07:10:54.350

SYSDATETIME()
It returns the server’s DateTime
SELECT SYSDATETIME() AS [GETDATE()];
Result:2022-06-09 12:41:46.8713228

SYSDATETIMEOFFSET()

It returns the server’s DateTime with time zone in which SQL Server instance is running.
SELECT SYSDATETIMEOFFSET() AS [GETDATE()];
Result:2022-06-09 12:42:15.7936382 +05:30

SYSUTCDATETIME()
It returns server DateTime in GMT.
SELECT SYSUTCDATETIME() AS [GETDATE()];
Result:2022-06-09 07:12:54.4664815

CURRENT_TIMESTAMP
It returns current DateTime of the server.
SELECT CURRENT_TIMESTAMP AS [GETDATE()];
Result:2022-06-09 12:43:40.650

After the CONVERT function, SQL Server added a function (FORMAT) to handle date formatting, giving us a new way to format dates in SQL Server.

To format the date and time data types from a date column (Date, DateTime, etc. Data type) in a table or a variant such as GETDATE(), use the FORMAT function.
Date Format with FORMAT Function

We have many ways to format dates as given below

DD/MM/YYYY
SELECT FORMAT (getdate(), 'dd/MM/yyyy ') as date;
Result:09/06/2022

DD/MM/YYYY, HH:MM:SS
SELECT FORMAT (getdate(), 'dd/MM/yyyy, hh:mm:ss ') as date;
Result:09/06/2022, 04:56:44

DDDD,MMMM,YYYY
SELECT FORMAT (getdate(), 'dddd, MMMM, yyyy') as date;
Result:Thursday, June, 2022

MMM DD YYYY
SELECT FORMAT (getdate(), 'MMM dd yyyy') as date;
Result:Jun 09 2022

MM.DD.YY
SELECT FORMAT (getdate(), 'MM.dd.yy') as date;
Result:06.09.22

MM-DD-YY
SELECT FORMAT (getdate(), 'MM-dd-yy') as date;
Result:06-09-22

HH:MM:SS TT
SELECT FORMAT (getdate(), 'hh:mm:ss tt') as date;
Result:05:17:37 PM

MM/DD/YYYY (Standard: USA)
SELECT FORMAT (getdate(), 'd','us') as date;
Result:06/09/2022

YYYY-MM-DD HH:MM:SS TT
SELECT FORMAT (getdate(), 'yyyy-MM-dd hh:mm:ss tt') as date;
Result:2022-06-09 05:18:55 PM

YYYY.MM.DD HH:MM:SS T
SELECT FORMAT (getdate(), 'yyyy.MM.dd hh:mm:ss t') as date;
Result:2022.06.09 05:19:53 P

DDDD,MMM,YYYY in Spanish
SELECT FORMAT (getdate(), 'dddd, MMMM, yyyy','es-es') as date;
Result:jueves, junio, 2022

DDDD DD, MMMM,YYYY in Japanese

SELECT FORMAT (getdate(), 'dddd dd, MMMM, yyyy','ja-jp') as date;
Result:木曜日 09, 6月, 2022

Date Format with Culture
We can get regional formatting by using the culture option as shown below:

English-USA
SELECT FORMAT (getdate(), 'd', 'en-US') as date;
Result:6/10/2022

French-France
SELECT FORMAT (getdate(), 'd', 'fr-FR') as date;
Result:10/06/2022

French - Belgium
SELECT FORMAT (getdate(), 'd', 'fr-BE') as date;
Result:10-06-22

French - Canada
SELECT FORMAT (getdate(), 'd', 'fr-CA') as date;
Result:2022-06-10

Danish - Denmark
SELECT FORMAT (getdate(), 'MM.dd.yy') as date;
Result:06.10.22

Dari - Afghanistan
SELECT FORMAT (getdate(), 'd', 'prs-AF') as date;
Result:1401/3/20

Simplified Chinese
SELECT FORMAT (getdate(), 'd', 'zh-CN') as date;
Result:2022/6/10

Divehi - Maldives
SELECT FORMAT (getdate(), 'd', 'dv-MV') as date;
Result:10/06/22

Bosnian Latin
SELECT FORMAT (getdate(), 'd', 'bs-Latn-BA') as date;
Result:10. 6. 2022.


isiXhosa / Xhosa - South Africa
SELECT FORMAT (getdate(), 'd', 'xh-ZA') as date;
Result:2022-06-10

Hungarian - Hungary
SELECT FORMAT (getdate(), 'd', 'hu-HU') as date;
Result:2022. 06. 10.

Spanish - Bolivia
SELECT FORMAT (getdate(), 'd', 'es-bo') as date;
Result:10/6/2022


Here is a list of all CultureInfo codes along with country names and language.

Country Language CultureInfo Code
Afghanistan Pashto ps-AF
Dari prs-AF
Albania Albanian sq-AL
Algeria Arabic ar-DZ
Argentina Spanish es-AR
Armenia Armenian hy-AM
Australia English en-AU
Austria German de-AT
Bahrain Arabic ar-BH
Bangladesh Bengali bn-BD
Basque Basque eu-ES
Belarus Belarusian be-BY
Belgium French fr-BE
Dutch nl-BE
Belize English en-BZ
Bolivarian Republic of Venezuela Spanish es-VE
Bolivia Quechua quz-BO
Spanish es-BO
Brazil Portuguese pt-BR
Brunei Darussalam Malay ms-BN
Bulgaria Bulgarian bg-BG
Cambodia Khmer km-KH
Canada French fr-CA
English en-CA
Caribbean English en-029
Catalan Catalan ca-ES
Chile Mapudungun arn-CL
Spanish es-CL
Colombia Spanish es-CO
Costa Rica Spanish es-CR
Croatia Croatian hr-HR
Cyrillic, Azerbaijan Azeri az-Cyrl-AZ
Cyrillic, Bosnia and Herzegovina Serbian sr-Cyrl-BA
Cyrillic, Bosnia and Herzegovina Bosnian bs-Cyrl-BA
Cyrillic, Mongolia Mongolian mn-MN
Cyrillic, Montenegro Serbian sr-Cyrl-ME
Cyrillic, Serbia Serbian sr-Cyrl-RS
Cyrillic, Serbia and Montenegro (Former Serbian ) sr-Cyrl-CS
Cyrillic, Tajikistan Tajik tg-Cyrl-TJ
Cyrillic, Uzbekistan Uzbek uz-Cyrl-UZ
Czech Republic Czech cs-CZ
Denmark Danish da-DK
Dominican Republic Spanish es-DO
Ecuador Quechua quz-EC
Spanish es-EC
Egypt Arabic ar-EG
El Salvador Spanish es-SV
Estonia Estonian et-EE
Ethiopia Amharic am-ET
Faroe Islands Faroese fo-FO
Finland Finnish fi-FI
Swedish sv-FI
Sami, Northern se-FI
Sami, Skolt sms-FI
Sami, Inari smn-FI
Former Yugoslav Republic of Macedonia Macedonian mk-MK
France French fr-FR
Breton br-FR
Occitan oc-FR
Corsican co-FR
Alsatian gsw-FR
Galician Galician gl-ES
Georgia Georgian ka-GE
Germany German de-DE
Upper Sorbian hsb-DE
Lower Sorbian dsb-DE
Greece Greek el-GR
Greenland Greenlandic kl-GL
Guatemala K'iche qut-GT
Spanish es-GT
Honduras Spanish es-HN
Hungary Hungarian hu-HU
Iceland Icelandic is-IS
India Hindi hi-IN
Bengali bn-IN
Punjabi pa-IN
Gujarati gu-IN
Oriya or-IN
Tamil ta-IN
Telugu te-IN
Kannada kn-IN
Malayalam ml-IN
Assamese as-IN
Marathi mr-IN
Sanskrit sa-IN
Konkani kok-IN
English en-IN
Indonesia Indonesian id-ID
Iran Persian fa-IR
Iraq Arabic ar-IQ
Ireland Irish ga-IE
English en-IE
Islamic Republic of Pakistan Urdu ur-PK
Israel Hebrew he-IL
Italy Italian it-IT
Jamaica English en-JM
Japan Japanese ja-JP
Jordan Arabic ar-JO
Kazakhstan Kazakh kk-KZ
Kenya Kiswahili sw-KE
Korea Korean ko-KR
Kuwait Arabic ar-KW
Kyrgyzstan Kyrgyz ky-KG
Lao P.D.R. Lao lo-LA
Latin, Algeria Tamazight tzm-Latn-DZ
Latin, Azerbaijan Azeri az-Latn-AZ
Latin, Bosnia and Herzegovina Croatian hr-BA
Latin, Bosnia and Herzegovina Bosnian bs-Latn-BA
Latin, Bosnia and Herzegovina Serbian sr-Latn-BA
Latin, Canada Inuktitut iu-Latn-CA
Latin, Montenegro Serbian sr-Latn-ME
Latin, Nigeria Hausa ha-Latn-NG
Latin, Serbia Serbian sr-Latn-RS
Latin, Serbia and Montenegro (Former Serbian ) sr-Latn-CS
Latin, Uzbekistan Uzbek uz-Latn-UZ
Latvia Latvian lv-LV
Lebanon Arabic ar-LB
Libya Arabic ar-LY
Liechtenstein German de-LI
Lithuania Lithuanian lt-LT
Luxembourg Luxembourgish lb-LU
German de-LU
French fr-LU
Malaysia Malay ms-MY
English en-MY
Maldives Divehi dv-MV
Malta Maltese mt-MT
Mexico Spanish es-MX
Mohawk Mohawk moh-CA
Monaco French fr-MC
Morocco Arabic ar-MA
Nepal Nepali ne-NP
Netherlands Dutch nl-NL
Frisian fy-NL
New Zealand Maori mi-NZ
English en-NZ
Nicaragua Spanish es-NI
Nigeria Yoruba yo-NG
Igbo ig-NG
Norway Norwegian, Bokmål nb-NO
Sami, Northern se-NO
Norwegian, Nynorsk nn-NO
Sami, Lule smj-NO
Sami, Southern sma-NO
Oman Arabic ar-OM
Panama Spanish es-PA
Paraguay Spanish es-PY
Peru Quechua quz-PE
Spanish es-PE
Philippines Filipino fil-PH
Poland Polish pl-PL
Portugal Portuguese pt-PT
PRC Tibetan bo-CN
Yi ii-CN
Uyghur ug-CN
Puerto Rico Spanish es-PR
Qatar Arabic ar-QA
Republic of the Philippines English en-PH
Romania Romanian ro-RO
Russia Russian ru-RU
Tatar tt-RU
Bashkir ba-RU
Yakut sah-RU
Rwanda Kinyarwanda rw-RW
Saudi Arabia Arabic ar-SA
Senegal Wolof wo-SN
Simplified, PRC Chinese zh-CN
Simplified, Singapore Chinese zh-SG
Singapore English en-SG
Slovakia Slovak sk-SK
Slovenia Slovenian sl-SI
South Africa Setswana tn-ZA
isiXhosa xh-ZA
isiZulu zu-ZA
Afrikaans af-ZA
Sesotho sa Leboa nso-ZA
English en-ZA
Spain, International Sort Spanish es-ES
Sri Lanka Sinhala si-LK
Sweden Swedish sv-SE
Sami, Northern se-SE
Sami, Lule smj-SE
Sami, Southern sma-SE
Switzerland Romansh rm-CH
German de-CH
Italian it-CH
French fr-CH
Syllabics, Canada Inuktitut iu-Cans-CA
Syria Syriac syr-SY
Syria Arabic ar-SY
Thailand Thai th-TH
Traditional Mongolian, PRC Mongolian mn-Mong-CN
Traditional, Hong Kong S.A.R. Chinese zh-HK
Traditional, Macao S.A.R. Chinese zh-MO
Traditional, Taiwan Chinese zh-TW
Trinidad and Tobago English en-TT
Tunisia Arabic ar-TN
Turkey Turkish tr-TR
Turkmenistan Turkmen tk-TM
U.A.E. Arabic ar-AE
Ukraine Ukrainian uk-UA
United Kingdom Welsh cy-GB
Scottish Gaelic gd-GB
English en-GB
United States English en-US
Spanish es-US
Uruguay Spanish es-UY
Vietnam Vietnamese vi-VN
Yemen Arabic ar-YE
Zimbabwe English en-ZW

As you saw above, we have used a lot of options for date and time formatting, which are detailed below,

  • hh - this is the hour from 01-12
  • HH - this is the hour from 00-23
  • mm - this is the minute from 00-59
  • ss - this is the second from 00-59
  • dd - this is day of month from 01-31
  • dddd - this is the day spelled out
  • MM - this is the month number from 01-12
  • MMM - month name abbreviated
  • MMMM - this is the month spelled out
  • yy - this is the year with two digits
  • yyyy - this is the year with four digits
  • tt - this shows either AM or PM
  • d - this is day of month from 1-31 (if this is used on its own it will display the entire date)
  • us - this shows the date using the US culture which is MM/DD/YYYY

HostForLIFEASP.NET SQL Server 2019 Hosting


About HostForLIFE

HostForLIFE is European Windows Hosting Provider which focuses on Windows Platform only. We deliver on-demand hosting solutions including Shared hosting, Reseller Hosting, Cloud Hosting, Dedicated Servers, and IT as a Service for companies of all sizes.

We have offered the latest Windows 2019 Hosting, ASP.NET 5 Hosting, ASP.NET MVC 6 Hosting and SQL 2019 Hosting.


Month List

Tag cloud

Sign in