European Windows 2019 Hosting BLOG

BLOG about Windows 2019 Hosting and SQL 2019 Hosting - Dedicated to European Windows Hosting Customer

European Visual Studio 2010 Hosting - Amsterdam :: Easy to Deploy Package Using Visual Studio 2010

clock December 7, 2012 07:23 by author Scott

Deploying a web project with all its correct dependencies is not a trivial task. Some of the assets which need to be considered during deployment are:

  • Web Content (.aspx, .ascx, images, xml files, PDBs, Binaries etc)
  • IIS Settings (Directory browsing, Error pages, Default Documents etc)
  • Databases that the web project uses
  • GAC Assemblies and COM components which the web project depends upon
  • Registry Settings that may be used within the web project
  • Security Certificates
  • App Pools

In an enterprise environment a web application with all of its dependencies needs to move across various environments before being finally being deployed to a production server.  A typical set of transition servers are development, testing/QA, staging/pre-production and production.  Also on the production environment there are web farms where these webs need to be replicated.  Today doing all these things is more or less a manual process and involves a tons of documentation that both developers and server admins have to deal with.  Even with all the documentation the steps are certainly very much prone to errors.

To aid all these scenarios we are introducing the concept of  a "Web Package". Web Package is an atomic, transparent, self describing unit representing your web which can be easily hydrated onto any IIS Web server to reproduce your web.  VS 2010 uses MSDeploy  to create the web package from your web application.

In today's post I will be primarily focusing on creating a web package from VS 2010 which has IIS Settings as well as web content.

Step 1: Configure your Web Application Project (WAP) to use IIS Settings

For this discussion we have BlogEngine.Web downloaded from codeplex and converted it into a WAP.  Then this project was opened in VS 2010  and the VS10 migration wizard moved the project into VS10 format.  Thanks to the multi-targeting  features in VS 2010 which can support .NET versions 2.0 till 4.0; hence it is up to you which Framework version you want to run your web against. 

Step 2: Configure IIS Settings in IIS Manager

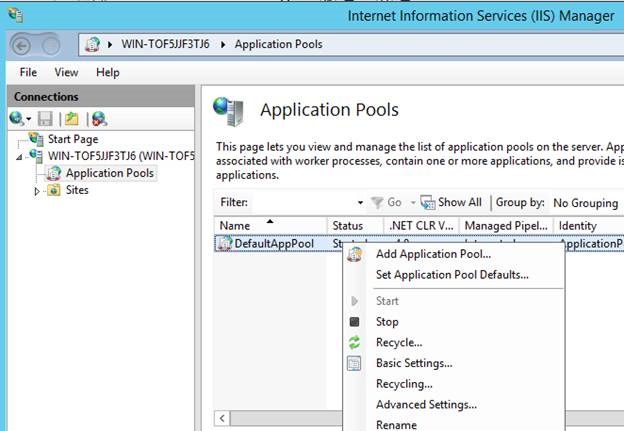
Most IIS 7 web applications use IIS integrated pipeline which is configured with "Default App Pool" of IIS.  Blog Engine .web does not use integrated mode and will throw an error shown below if made to run under "Default App Pool".

To get rid of this error I changed the App Pool of this application to "Classic App Pool" and then the application runs great as shown below:

App Pool mapping is just one of the IIS setting which your app may use, there are various other IIS Settings which you can configure using IIS Manager (e.g. Default document, Error pages etc etc); all of these settings are relevant based on your application scenario... The good news is that VS 10 & MSDeploy will auto detect all the changes you make to the default IIS settings and pick it up for deployment...

Essentially, at the end of this step you should have your web application up and running with all the IIS settings configured in IIS Manager. 

Step 3: Configure Package Settings

In VS 2010 we have introduced one additional property page for WAPs called "Publish" as shown below:

Let us look at various properties of the this tab to understand how it works:

Configuration Aware Tab: Note that the Publish tab is build configuration aware:

The Publish tab is made configuration aware as deployment settings tend to change from environment to environment; for e.g. many a times developers want to deploy their “Debug” configuration on a Test Server and include PDBs as part of this deployment. When the same web is deployed in “Release” configuration on a production server the deployment may exclude PDBs. 

Items to Package/Publish – This section will help you decide what type of content you would really like to package/deploy.

- Types of Files: By default this option is set to "Only files needed to run this application" .  This is usually sufficient for your deployment as it includes all the files from your project except source code, project files and other crud files not required to be deployed...  But apart from that there are two additional options available as shown below...

"All files in this project" and "All files in this project folder" options are very similar to what Publish WAP options were in VS 2008

- Exclude Files from App_Data folder – “App_Data” folder is a special ASP.NET folder where many developers like to put their SQL Express DBs (.mdf/.ldf files), XML files and other content which they consider Data. In many situations on production web server a full version of SQL Server is available and using SQL Express is not all that relevant. In such scenario (and for the corresponding build configuration e.g “Release” ) a user can check the “Exclude Files from App_Data”.


- Exclude Generated Debug Symbols – It is important to understand that generation of debug symbols is different from deployment of the same. This check box will tell VS 10 whether you would like to package/deploy the already generated Debug Symbols.

Package Items


-
IIS Settings  - Checking this checkbox informs VS10 that you are ready to take all of your IIS Settings configured for your application in IIS Manager as a part of your web package.  I am glad to tell you that IIS 5.1, IIS 6 as well as IIS 7 environments are supported as part of this feature hence whether you are working on XP, Win2K, Win2K3, Vista or Win2K8 you should have no issue with packaging IIS Settings...  

These setting includes the "App Pool mapping" your web is configured to run against (e.g. "Classic App Pool" mapping discussed in Step 2)

- Additional Settings -   The items in this grid are advanced properties.  It is still good to know about these coz it impacts what will be included in your package.  Most of the properties in this grid are related to the entire server and not just to your application so you should use them very carefully. 

Currently VS10 only displays "Application Pool Settings" but behind the scene it is possible to configure VS10 to support packaging root web.config, machine config , security certificates, ACLs etc…

Package Settings

-
Create MSDeploy Package as a ZIP file - This checkbox allows you to decide whether you would like to create your web package as a .zip file or as a folder structure. If you are concerned about the size and are moving the web package around very often then I can see you using .zip format for the package; on the other hand if you care to compare two packages using diff commands (either of source control or independently) then I can see you using the folder format.

-
Package Location - This is an important and required property as it defines the path at which Visual Studio will place your web package. If you choose to change this path make sure that you have write access to the location. Do note that the Package Location is modified based on whether you choose to create the web package as a .ZIP file or vs a folder structure.

-
Destination IIS Application Path/Name - This property allows you to give IIS Application name that you will use at the destination Web Server.

-
Destination Application Physical Path - One of the most important information which is embedded inside the web package is the physical location where the package should be installed. This property allows you to pre-specify this embedded information.  You will have an opportunity change both IIS Application Physical Path as well as Application Name at the time of deployment but in this property page you are given an opportunity to choose a default value.

Step 4: Create the "Web Package"

This is the last step in creating the web package and the simplest too...  The idea is that once you configure the above settings creating a package should be easy; in fact even if you do not go to the "Publish" tab we have tried to set smart defaults so that in most normal circumstances creating web package should be just the below two steps:

  • Right Click on your "Project"
  • Click on Package --> Create Package

Once you click on this command you should start getting output messages around your package creation pumped into your output window... 

When you see “Publish Succeeded” as below in the output window then your package is successfully created.

To access the package go to the location specified in the “Package Location” textbox. By default this is in obj/Configuration/Package folder under your project root directory (Configuration here implies Active Configuration like Debug/Release etc).

Note: "Create Package" command creates web package only for Active configuration. By default “Debug” is the active configuration inside Visual Studio. If you would like to change the Active configuration you can do so by using Build --> Configuration Manager.

You can certainly set properties for all available configurations by switching the configuration on top of the “Publish” tab but that action does not change the Active configuration

Finally, you can also automate creation of web packages via your team build environment as everything discussed above is supported via MSBuild Tasks.  In subsequent posts we will get into the details of these areas too...

Hope this helps... 


SharePoint 2013 Cloud Hosting Explained

clock November 30, 2012 09:38 by author Administrator

SharePoint Cloud hosting gives companies the ability to share data in real time. This makes it possible for employees to collaborate with each other and share data, content, ideas, essentially, whatever they’d like. This type of collaboration can occur between locations, departments and even time zones, which is in part, one of the reasons why it is in such high demand and companies are willing to make big-time investments in order to utilize it.

HostForLife.eu
is only a few hosting providers in European region that supports SharePoint 2013 Hosting on a Cloud Server. Price from just €9.99/month, HostForLife.eu gives opportunity to everyone to try to host their SharePoint site on a cloud server.

When searching for SharePoint Cloud hosting, companies should be sure that whatever hosting company they choose to work with, is willing to create a system that is tailored-made to their particular needs, if necessary. Some hosting companies will allow businesses to pay as they go or give them the option of purchasing a license. It will also be extremely important that all of a business’ data is stored on servers that are secure.


The very best hosting companies will offer support 24 hours a day, 7 days a week. They will also provide around-the-clock monitoring by trained IT techs that are able to detect and address any issues that come up. Having around-the-clock support is very important and extremely valuable. Businesses must be extremely protective of their data. If it were to be lost or suddenly became inaccessible, this could cause a tremendous amount of problems and could even negatively affect a company’s bottom line.


Another feature of quality SharePoint Cloud hosting is built-in disaster recovery coupled with continuous backups and data protection. This will ensure that a company’s data is always protected even during inclement weather. Application access from anywhere on the globe is important as well, if the hosting company is based in a country different the one the client they are servicing is located.


SharePoint is a great data management system. In fact, it is one of the most utilized systems of its type. It is feature-packed and very robust. However, to get the most out of it, it is important that the company using it is well-studied in all things related to SharePoint, has undergone proper training and has good hosting. Cloud hosting provides businesses with essentially everything they need so that that their data management, courtesy of SharePoint, functions optimally.


Because small businesses are typically very dependent on being able to access their data, it is extremely important that they use the right hosting. Quality third-party, Cloud hosting will offer around-the-clock-support, qualified IT staff on hand to detect and fix any problems, continuous backups and disaster protection and recovery. This type of hosting is ideal and will help businesses keep their data and documents safe, secure and accessible


Premier European HostForLIFE.eu Officially Announces SharePoint 2013 Hosting in European Data Center

clock November 21, 2012 07:44 by author Scott

HostForLIFE.eu, the premier European Windows and ASP.NET provider proudly announces the immediate availability of Microsoft’s new SharePoint 2013 hosting. HostForLIFE.eu offers this new product at the amazing price, just only €9.99/month.

“SharePoint 2013 is really fantastic; it brings many exciting new features, like Microsoft App Store, SharePoint Designer 2013 support, the use of mobile smart devices. And what amazing here is you can find all this new functionality for only €9.99/month” Said Kevin Joseph, manager of HostForLIFE.eu. “These enhancements are fantastic and make the platform more user-friendly, scalable, modern, and powerful as a robust collaboration, social, and knowledge management platform for the enterprise.”

HostForLIFE.eu utilizes the newly-released Microsoft Windows Server 2012 and SQL Server 2012 as the foundation for the plans. The base hosting plans specification have been architected to meet Microsoft recommended configurations for both SharePoint 2013 and SQL Server 2012 and will include SQL Server and disk configuration best practices identified by HostForLife’s database administrators to optimize SharePoint 2013 performance.

The HostForLIFE.eu SharePoint 2013 product is divided into SharePoint Foundation 2013 and SharePoint Server 2013 hosting plan. SharePoint 2013 Foundation is the core platform of the product which comes with enhancements to the administration and user experience, plus new options for enterprise users to collaborate using social media features. SharePoint Server 2013 is basically Foundation with additional Enterprise services and functionality added on top. You will still get Central administration, basic search, document collaboration, and team sites with Foundation.

For additional information about SharePoint 2013 offered by HostForLIFE.eu, please visit http://www.hostforlife.eu.

About HostForLIFE.eu:

HostForLIFE.eu is European Windows Hosting Provider which focuses on Windows Platform only. We deliver on-demand hosting solutions including Shared hosting, Reseller Hosting, Cloud Hosting, Dedicated Servers, and IT as a Service for companies of all sizes.

HostForLIFE.eu is awarded Top No#1 SPOTLIGHT Recommended Hosting Partner by Microsoft (see www.microsoft.com/web/hosting/HostingProvider/Details/953). Our service is ranked the highest top #1 spot in several European countries, such as: Germany, Italy, Netherlands, France, Belgium, United Kingdom, Sweden, Finland, Switzerland and other European countries. Besides this award, we have also won several awards from reputable organizations in the hosting industry and the detail can be found on our official website.


European SSRS 2012 Hosting - Amsterdam :: PowerView with SSRS 2012 Native mode and Excel 2013

clock November 15, 2012 06:30 by author Scott

Powerpivot has now become a native part of Excel 2013, which was available as a separate add-in in prior version. This very of powerpviot comes with few new inevitable enhancements like ability to edit tabular models. This is a very welcome news. But the news that I am not happy with is, there is also an add-in available for PowerView with Excel 2013.

After reading some of you might wonder why am I not happy with this news as this makes Excel a very powerful client tool as the reporting capabilities would get a silverlight based animatory touch. The reason is that as of this draft and to the best of my knowledge, PowerView is not available with SSRS 2012 native mode. It's a Sharepoint only available feature. In my opinion, it should be made available in BIDS as well as SSRS native mode too, in the form of an external add-in and rendering extension respectively.

Another thing that seems strange to me is why is PowerView add-in available as a COM add-in. I am not that deeply aware of office add-ins, but from a general development standpoint, from the name I understand that its a COM component. In .NET terms it's unmanaged code / component, instead of a .NET Framework based managed code. If that's the case, my curiosity asks why COM ?

An interesting outcome of this can be that Powerpivot in Excel 2013 would become the new BIDS as well as reports manager for PowerView based reports, instead of buying entire enterprise class license for better compressed reports, data alerts and powerview which are the major enhancements available in SSRS 2012 Sharepoint integrated mode.

One another such very interesting capability is provided by PivotViewer Extension for Reporting Services, but its in CTP2. But even this application is available with Sharepoint only.


European Visual Studio LightSwitch 2012 Hosting - Amsterdam :: New Features in VS LightSwitch 2012

clock October 29, 2012 06:28 by author Scott

As we know, Visual Studio 2012 has been released on Aug 15, 2012 I just wanted to discuss about the new features of LightSwitch.

In Visual Studio 2012, LightSwitch is included as a core part and we can create the LightSwitch application from Visual Studio 2012 IDE. LightSwitch will be available as a Project Template group Node in the Visual Studio 2012.


New Lightswitch Architecture

Visual Studio 2012 LightSwitch has a lot of enhancements including OData Services which leads to define the new architecture for the LightSwitch Application Development. You can get more details about the LightSwitch Architecture, please have a look at
MSDN.

New Enhancements in LightSwitch 2012

There are ton of new features included in the Visual Studio 2012 LightSwitch. We will briefly discuss about all the new features of the new enhanced LightSwitch.

1. Connecting with OData Services:

LightSwitch 2012 now supports Open Data Protocol Services.

2. Formatting Numbers & Dates:

We can easily format the Numbers and Dates using Format Pattern property in LightSwitch 2012. This Format Pattern Property is available only for the particular data types.

3. New Data Types in LightSwitch:

Visual Studio LightSwitch team has introduced two more Data Types namely Percent and Web Address. Here the Decimal will be treated as Percent business type and the String will be treated as Web Address.

4. Static Label & Image Control:

LightSwitch 2012 includes two more controls which can be used to display the content statically without binding data. These controls can be used to display the static texts about the organization and logo.

5. Improved Application Security:

In LightSwitch Business Application we can apply security by two ways like Forms Authentication and Windows Authentication, In Windows Authentication it is possible to provide the Roles & Permissions to Active Directory User Groups.

You can download the Visual Studio 2012 90 days trail version from the
Microsoft site.

If you need LightSwitch hosting, please check our site at
http://www.hostforlife.eu.


European DNN Hosting - Amsterdam :: Steps to Apply Facebox Effect in your DNN Blog

clock October 24, 2012 08:04 by author Scott

Facebox is a jQuery-based, Facebook-style lightbox which can display images, divs, or entire remote pages. And now, you can use it with your DNN module to make your DNN module more interactive. Today I would like to show you how to apply lightbox effect for some big image within dnn blog post. Note that we just demonstrated the process in Window Live Writer. Actually we also recommend that you should manage your posts with WLW, which will make your post management simply and easily. Now you just follow the simple steps below:

1) Open up your WLW and get started to write your post.


2) Just copy your big graphs or images into the content section of WLW and it will be scaled in to a little one. Also you can apply some options for some customized effects, like size, text wrapping, borders.


3) Set the option [Link to] as Source Picture and click the Options below. Then it should pop up the Source Picture Options window and there you can set it as follows and click "OK":


4) Switch the source tab at the left-bottom of content panel, find out the image tag section and insert the rel property for facebox detected. The following code should look like:


Okey, that’s all. Now the built-in facebox plugin will automatically attach the Facebook-style lightbox for your picture.


In the end I presented an illustration depicting a common scenario for DotNetNuke Deployment in the Enterprise.


European Orchard CMS Hosting - Amsterdam :: How to Install Orchard CMS with WebMatrix

clock October 22, 2012 07:01 by author Scott

Today, I will show you how to install Orchard CMS with WebMatrix. If you don’t have WebMatrix, you can download it first from Microsoft site.

WebMatrix currently gives you three options for creating a new website:


1) Site From Web Gallery

2) Site From Template
3) Site From Folder.


The
Site From Web Gallery Option is a portal into a number of Web Applications based on the .NET Framework. You will find some really nice ASP.NET Content Management Systems ( CMS ) that you can use to power your website. Of course, in this case we are interested in our favorite ASP.NET CMS, Orchard!

Once you choose Orchard CMS from the Web Gallery and give your new Orchard Website a name, click the next button to continue the process of installing Orchard CMS on your PC.


The next step is to confirm the download location and accept the Orchard CMS license. Click on I Accept to begin the download and installation of Orchard CMS on your PC.


WebMatrix will begin to download and install Orchard CMS into the
My Websites Directory under the name you called your new Orchard Website. Once download and installation is complete, you will be greeted with your final step.


Click OK! Congratulations, you have now successfully installed Orchard onto your PC.


You can now run your new Orchard Website within WebMatrix for the first time and begin configuring it based on your needs.


By default, Orchard includes a built-in database that you can use without installing a separate database server. However, if you are running SQL Server or SQL Server Express, you can configure Orchard to use either of those products instead by specifying a connection string. Optionally, you can enter a table prefix so that multiple Orchard installations can share the same database but keep their data separate.


The setup screen also includes a section where you can choose an Orchard recipe to set up your site. You can choose from the following Orchard recipes:


-
Default. Sets up a site with frequently used Orchard features.
- Blog. Sets up a site as a personal blog.
- Core. Sets up a site that has only the Orchard framework for development use.

<image>


Hope this tutorial help you. If you’re looking for Orchard CMS hosting, please visit our site at
http://www.hostforlife.eu. Find us also at Microsoft site, http://www.microsoft.com/web/hosting/HostingProvider/Details/953.


European WebMatrix Hosting - Amsterdam :: Deploy your Web Application with HostForLIFE.eu

clock October 15, 2012 08:24 by author Scott

Getting Ready to Publish

Before you publish your site to the world-wide-web it is a good idea click on the ‘Reports’ tab and ask WebMatrix to run a full site report. The generated report includes useful information on the site’s performance and hints on Search Engine Optimisation (SEO), to help make your site more visible to popular search engines such as Yahoo, Google and Bing.


To correct any errors or warnings simply click the ‘Edit this page’ link to be taken directly to the area of concern.


At this point it is also worth proof-reading your content and using the ‘Run’button on the toolbar to carry out cross-browser compatibility checks to ensure an optimal experience for all your users.


Once you are satisfied that your web site is ready for publication it is time to find a suitable hosting provider.


Finding a Hosting Provider

WebMatrix has a facility designed to help you find a suitable host for your web site. If you already have an account with a web hosting provider you may want to skip to the next section, ‘Configuring WebMatrix Publish Settings’.


By clicking on the ‘Need web hosting for your web site?’ button on the ‘Site’tab of the WebMatrix home page you will be directed to the ‘Find Web Hosting...’ page of the Microsoft web site.


WebMatrix passes some basic information about your web site to this page in order to generate a list of hosting plans tailored to meet the requirements of your site. The results can be filtered and the criteria changed, using the tools on the page.


You should be careful about changing some of these settings, in particular the scripting language; otherwise you could end up purchasing an account on a web server which won’t support the language in which your site has been written. If you are unsure of the scripting language you should leave it set to its default of ASP.NET 4.0. This is the default scripting language for all new WebMatrix projects.


The filters for minimum and maximum price, storage (GB), number of SQL databases, number of e-mail accounts and bandwidth per month can be set using the sliders.


The initial storage required for your site can be estimated by viewing the folder properties of your local site in Windows Explorer. However, this should only be taken as a guide as the overall required storage depends a great deal on the features of your site. For example, if your site has a facility to allow users to upload content, or contains a blog which will grow over time, be sure to allow for future expansion. Generally though web sites primarily consist of text files and small images and do not require a huge amount of disk space.


If your site requires the use of a database other than SQL Server Compact you will need to find a web host which has this facility. If you are using SQL Server or MySQL, WebMatrix will automatically publish scripts to create tables and insert data to replicate the schema and data on your development computer. These scripts will need to be run on the database provided for you by your chosen hosting provider, usually through the host’s control panel.


If you are using a SQL Server Compact database there is no need to choose a host with additional database facilities as SQL Server Compact is file-based, which can deliver a significant cost-saving in some cases. If you do choose this option though it is important to consider the disk-space required to store the database files - SQL Server Compact databases can grow to a maximum of 4GB in size. In addition to the SQL Server Compact (.sdf) file containing the data, WebMatrix will also upload the database program itself to the web server to ensure the site will work even if SQL Server Compact is not already installed.


To set up a new account, choose a suitable provider and click the green ‘Learn More’ button. This will display more information about the hosting package and a link to ‘Sign Up’ on the hosting company’s web site.


Configuring WebMatrix Publish Settings

Once you have chosen and purchased a hosting plan, the provider will typically send you an email confirming the details of your account and the information necessary to configure WebMatrix for publishing. This information will be provided either as a list of settings or as a .PublishSettings file.


Configuration Using A Publish Settings File


If your hosting company has provided you with a .PublishSettings file, this is the easiest way to set up publishing within WebMatrix.


To open the ‘Publish Settings’ dialog click the ‘Set up the remote publishing location for your web site’ button in the ‘Site’ tab of the WebMatrix home page.


Click on the ‘Import Publish Settings’ link and browse to your Publish Settings file. This will populate the Publish Settings dialog for you, including connection strings for any non-SQL Compact databases you may be using.


Click the ‘Validate Connection’ button to have WebMatrix check the settings and click ‘Save’.


Manual Configuration Without A Publish Settings File

If your web hosting company has not provided you with a .PublishSettings file it is easy to configure the Publish Settings manually using the host settings, usually sent to you in your confirmation email or available through the host’s control panel.


If you selected your hosting provider through WebMatrix you can leave the Protocol drop-down set to ‘Web Deploy’. If you did not choose your hosting provider through WebMatrix and your host does not support Web Deploy, you should skip ahead to the next section, ‘Configuring Publish Settings Using FTP’.


Enter the information provided to you by your web host into the boxes provided:


·
Server– This is typically referred to as the ‘Server Name’ or ‘Service URL’.

o E.g.- server.sample.com


·
User Name& Password – These are usually chosen by you at sign up, although alternatives for publishing may be set by the provider.

·
Site Name– Web hosting companies often refer to this as the ‘Site’ or ‘Site/Application’

o E.g.- site.server.sample.com


·
Destination URL – This is the URL that will be used to browse to your site.

o E.g.–
http://site.server.sample.com

Once you have entered all of the required information, click the ‘Validate Connection’ button to verify that WebMatrix can successfully connect to your hosting account and click ‘Save’.


Configuring Database Connections

If your web site is using a database other than SQL Server Compact, your site will need a web.configfile that tells the site how to connect to the database on your local development machine. When you add a database through the ‘Connect to Database’dialog in the ‘Databases’ tab, the file is automatically created and configured for you and looks something like this:


01.<?xml version="1.0" encoding="UTF-8"?>
02.
03.<configuration>
04.
05. <connectionStrings>
06.
07. <add connectionString="Uid=testUser;Server=testDBServer; Pwd=passw0rd; Database=testDB" name="testDB" providerName="System.Data.SqlClient" />
08.
09. </connectionStrings>
10.
11.</configuration>


Your web host will provide you with a connection string, or a series of settings, for connecting to the hosted database which you should enter in the‘Publish Settings’ dialog box.


These settings tell WebMatrix how to connect to the live data and overwrite the web.config settings on the host server.

Publishing Your Site to the World Wide Web

OK, so you have checked your site for errors, selected a web host and configured the WebMatrix Publish Settings; it’s time to publish your site.

The first time you click the ‘Publish’ button on the WebMatrix toolbar, a dialog will appear asking whether you would like WebMatrix to test your sites compatibility and adjust .NET settings on the remote server if necessary. Click ‘Yes’ to proceed with the test:


Once the test is complete the ‘Publish Preview’ dialog will be displayed. This dialog allows you to check the list of files to be published and make changes as necessary.


If this is the first time you have published your site you should ensure that you check the boxes next to any necessary databases, to have MebMatrix include them in the file upload. On subsequent publishes only the changed files will appear in this dialog, enabling you to easily keep your local development and remote hosted sites synchronized.


Once you are happy with your selection, click ‘Continue’ to publish your web site.


The yellow bar at the bottom of the screen will show the progress of file uploads and let you know when the publishing has been completed:


And that’s it! You have seen how easy it really is to find a suitable web site host and deploy feature-rich, dynamic, data-driven websites to your web server, using the power and flexibility of Microsoft WebMatrix.


Visual Studio 2012 Hosting - ASPHostPortal :: What is new in C# and Visual Basic in Visual Studio 2012

clock October 10, 2012 09:34 by author Scott

This post discusses the new language features that is introduced in Visual Studio 2012. One of the main things that language team introduced is the idea of producing windows 8 App. These APPs are talking to new API called windows runtime.

This release also brings iterators to Visual Basic. The main discussion in this post is around Asynchronous programming in C# language.


If you want to give importance on responsiveness of client and scalability in server App then you probably call Asynchronous API’s. These API’s take Callbacks as parameters and uses that Callback to notify you about result of available. When you start write these call backs then it is harder maintain the code but with new Async language support that introduced in Visual Basic and C# and it is easy consume these API’s.


Below is the synchronous code in C#


The code basically Searches the movie index in
Netflix using OData by taking Year as parameter. While it is downloading the movies using above code , you can notice you can not interact with your user interface. You can scroll along UI and explore the movies only after the search operation is complete. Users expects more responsive apps.

Why the above code is Unresponsive?

The call to DownloadString is of webclient type and it asks you to wait till it returns string. During this process your UI is going to hang-up and holds the thread until it returns the result back you.


Two different options here, you can put this code on background Thread and it is bit complicated. You may have to marshal and unmarshal the code. The second option is to interact with Asynchronous API there you have an overloaded function DownloadStringAsync, But when you use this method you are no longer take back data as result. You need to sign-up a call-back when a result is available. If you have multiple Async calls then you have to write multiple call-backs. In this case your code is getting more difficult to understand.

Solution

The new overload method is DownloadStringTaskAsync, This method now returns string of type Task, Task of string is object that notify you when result is available. Now you can change the signature of the method QueryMovies and mark this as async. This tells the compiler that this method is pausable and resumeable , they can wait without locking to the UI thread. Now change the return type of method from Movie array to Task<Movie[]> array. Write a word await to get the string from Task of objects from DownloadStringTaskAsync call.


Now you can call the above even from while loop


The compiler is now able to figure out how to handle the await inside the while loop and resume it when it gets the result. Now you should be able to interact with your UI without any hang-ups.


European ASP.NET MVC 4 Hosting - Amsterdam :: ASP.NET MVC 4 Mobile Tutorial - Part III

clock October 8, 2012 07:07 by author Scott

This final post will discuss the final piece; the UI and how it all comes together.

The User Interface

The default project uses the
jQuery mobile plugin to target mobile devices. The jQuery mobile plugin is touch-optimized for smartphones and tablets and it targets iOS, Android, Blackberry, Bada, Windows Phone, Palm WebOS, Symbian and MeeGo.

Lets start with the JavaScript logic, which will perform the interaction between the HTML UI and the JSON web service.


1. In the Scripts folder, add a folder called com then mobile underneath that and finally babyfeeding underneath that


2. In the final babyfeeding folder, add a JavaScript file and called it proxy.js


3. Copy and paste the following code into the js file


if
(mobile == undefined) var mobile;
if
(!mobile) mobile = {};

//Constructor

mobile.Proxy = function (siteBaseUrl) {

    // constructor
    mobile.Proxy.prototype.baseUrl = siteBaseUrl;
    mobile.Proxy.prototype.heartBeatUrl = siteBaseUrl + "/Services/BabyMonitorService.svc/HeartBeat";
    mobile.Proxy.prototype.FeeedingUrl = siteBaseUrl + "/Services/BabyMonitorService.svc/AddFeedingEntry"
    mobile.Proxy.prototype.DiaperingUrl = siteBaseUrl + "/Services/BabyMonitorService.svc/AddDiaperingEntry"
}


mobile.Proxy.prototype = {

    CallWebService: function (url, input, successCallBack, errorCallBack) {
        //Uncomment the next line to support JSONP
        //url = url + "?callback=?";      
        $.ajax({
            async: false,
            cache: false,
            type: "GET",
            contentType: "application/json; charset=utf-8",
            url: url,
            dataType: "json",
            data: input,
            success: successCallBack,
            error: errorCallBack
        });

    },

    HeartBeat: function (successFunction, failFunction) {
        this.CallWebService(this.heartBeatUrl, "", successFunction, failFunction);
    },
    AddFeeding: function (UserId, FeedType, FeedAmount, successFunction, failFunction) {
        var input = "UserId=" + UserId + "&FeedType=" + FeedType + "&FeedAmount=" + FeedAmount;
        this.CallWebService(this.FeeedingUrl, input, successFunction, failFunction);
    },
    AddDiapering: function (UserId, DiaperType, successFunction, failFunction) {
        var input = "UserId=" + UserId + "&DiaperType=" + DiaperType;
        this.CallWebService(this.DiaperingUrl, input, successFunction, failFunction);
    }
};


4. The JavaScript is structured using objects and namespaces. Every JavaScript object contains an inner class called Prototype. By defining methods on this inner class, we can encapsulate object variables and methods and share them across concrete instances of the class. In the code above, the Proxy object defines the following methods:


- CallWebService - helper method for invoking the JSON service

- HearBeat - invokes the Heat method call for diagnostics
- AddFeeding - creates a feed entry by taking input from the form and invoking the web service
- AddDiapering - creates an entry for a diaper change by taking input from the form and invoking the web service

Finally, we encapsulate the Proxy object inside the mobile object to create a namespace so that the proxy object can be referenced like so: mobile.Proxy


The Index.cshtml View

Copy and paste the following code for the Index page


@{
    ViewBag.Title = "Baby Log Home";
}

<script type="text/javascript">
    $(document).ready(function () {
        $("#btnSubmit").click(function () {

            $("#txtLastEntry").val("Last: ");

            // Create the proxt class
            var proxy = new mobile.Proxy("@Request.Url.GetLeftPart(UriPartial.Authority)");
            // Add the feeding entry
            if ($("#chkFeed").attr("checked") != undefined && $("#chkFeed").attr("checked") == "checked") {
                proxy.AddFeeding("@Membership.GetUser().UserName", $("#drpType").val(), $("#drpAmount").val(),
                    function (result) {
                        // succeeded
                        $("#txtLastEntry").val($("#txtLastEntry").val() + $("#drpAmount option:selected").text() +
                        " of " + $("#drpType option:selected").text());
                    },
                    function (jqXHR, textStatus, errorThrown) {
                        // failed
                        var err = "Details: " + textStatus;
                        if (errorThrown != undefined) {
                            err += "\rMore details : " + errorThrown;
                        }
                        alert(err);
                    });
            }
            // Add the diapering entry
            if ($("#chkDiaper").attr("checked") != undefined && $("#chkDiaper").attr("checked") == "checked") {
                proxy.AddDiapering("@Membership.GetUser().UserName",
$("#drpDiaper").val(),

                    function (result) {
                        // succeeded
                        $("#txtLastEntry").val($("#txtLastEntry").val() + ", " +
                        $("#drpDiaper option:selected").text() + " diaper");
                    },
                    function (jqXHR, textStatus, errorThrown) {
                        // failed
                        var err = "Details: " + textStatus;
                        if (errorThrown != undefined) {
                            err += "\rMore details : " + errorThrown;
                        }
                        alert(err);
                    });
            }
        });
    });
</script>
<div data-role="fieldcontain" data-inset="true">
    <fieldset data-role="controlgroup">
        <legend>Feed Details</legend>
        <input id='chkFeed' name='chkFeed-1' type="checkbox" checked="checked" class="custom" />
        <label for="chkFeed">

            Log Feed</label>
    </fieldset>
    <fieldset data-role="controlgroup">
        <legend>Feed Type:</legend>
        @Html.DropDownList("drpType", new List<SelectListItem> {
            new SelectListItem { Text="Bottle", Value="Bottle", Selected=true },
            new SelectListItem { Text="Left", Value="Left" },
            new SelectListItem { Text="Right", Value="Right" },
        })
    </fieldset>
    <fieldset data-role="controlgroup">
        <legend>Amount:</legend>
        @Html.DropDownList("drpAmount", new List<SelectListItem> {
            new SelectListItem { Text="0.5 oz.", Value="0_5" },
            new SelectListItem { Text="1.0 oz.", Value="1_0" },
            new SelectListItem { Text="1.5 oz.", Value="1_5" },
            new SelectListItem { Text="2.0 oz.", Value="2_0" },
            new SelectListItem { Text="2.5 oz.", Value="2_5", Selected=true },
            new SelectListItem { Text="3.0 oz.", Value="3_0" },
            new SelectListItem { Text="3.5 oz.", Value="3_5" },
            new SelectListItem { Text="4.0 oz.", Value="4_0" },
            new SelectListItem { Text="4.5 oz.", Value="4_5" },
            new SelectListItem { Text="5.0 oz.", Value="5_0" },
            new SelectListItem { Text="5.5 oz.", Value="5_5" },
            new SelectListItem { Text="6.0 oz.", Value="6_0" },
            new SelectListItem { Text="6.5 oz.", Value="6_5" },
            new SelectListItem { Text="7.0 oz.", Value="7_0" },
            new SelectListItem { Text="7.5 oz.", Value="7_5" },
            new SelectListItem { Text="8.0 oz.", Value="8_0" },
            new SelectListItem { Text="8.5 oz.", Value="8_5" },
            new SelectListItem { Text="9.0 oz.", Value="9_0" }
        })
    </fieldset>
</div>
<div data-role="fieldcontain" data-inset="true">
    <fieldset data-role="controlgroup">
        <legend>Diaper Details</legend>
        <input id='chkDiaper' name='chkDiaper-1' type="checkbox" class="custom" />
        <label for="chkDiaper">
            Log Diaper</label>
    </fieldset>
    <fieldset data-role="controlgroup">
        <legend>Diaper:</legend>
        @Html.DropDownList("drpDiaper", new List<SelectListItem> {
            new SelectListItem { Text="Wet", Value="wet", Selected=true },
            new SelectListItem { Text="Dirty", Value="dirty" },
            new SelectListItem { Text="Both", Value="both" }
        })
    </fieldset>
</div>
<div data-role="fieldcontain" data-inset="true">
    <input id="btnSubmit" type="submit" value="Submit" data-role="button" />
    <fieldset data-role="controlgroup">
        <input id="txtLastEntry" readonly="readonly" type="text" />
    </fieldset>
</div>


The HTML code builds the input form for entering the feed and diaper change details and the Javascript code collects the input, creates the proxy class and calls its methods to invoke the web service.

Notice how the @ tag is used to inject runtime variables, such as the logged on user and the base url.


About HostForLIFE

HostForLIFE is European Windows Hosting Provider which focuses on Windows Platform only. We deliver on-demand hosting solutions including Shared hosting, Reseller Hosting, Cloud Hosting, Dedicated Servers, and IT as a Service for companies of all sizes.

We have offered the latest Windows 2019 Hosting, ASP.NET 5 Hosting, ASP.NET MVC 6 Hosting and SQL 2019 Hosting.


Month List

Tag cloud

Sign in