European Windows 2019 Hosting BLOG

BLOG about Windows 2019 Hosting and SQL 2019 Hosting - Dedicated to European Windows Hosting Customer

SQL Server 2021 Hosting - HostForLIFE :: Difference Between SQL And NoSQL

clock June 10, 2022 09:45 by author Peter

1. Relational vs. non-relational

  • SQL databases are relational while NoSQL databases are non-relational.
  • A relational database is a digital database based on the relational model of data.
  • A non-relational database is not based on the traditional table structure that you may be used to. Instead, it is based on a more flexible model that can be adapted to fit the needs of the application.

2. Data schemas

  • SQL databases use a predefined schema and structured query language.
  • NoSQL databases have dynamic schemas that can accommodate unstructured data, which is often stored in a variety of ways.

3. Scaling

  • SQL databases are known for their ability to scale vertically in most situations.
  • It means you can increase the performance by adding more resources like CPU, RAM, or faster hard drives.
  • NoSQL databases are able to scale horizontally, meaning they can handle an increased workload by adding more servers.

4. Data structure

  • SQL databases store data in tables.
  • NoSQL databases are usually a document or key-value stores.

5. Use cases

  • SQL databases are the best choice for complex queries. If the data integrity and transactions are the requirements the SQL is better than NoSQL.
  • If you're working with constantly changing data structures or JSON data, NoSQL could be a better choice.

HostForLIFEASP.NET SQL Server 2021 Hosting


SQL Server 2021 Hosting - HostForLIFE :: How To Configure SMTP O365 Migration Using TLS 1.2 For SQL Database Mail?

clock June 8, 2022 10:06 by author Peter

This article will explain to you how exactly you need to configure TLS 1.2 as a default protocol and setup SMTP O365 migration with Database mail using SQL 2012 and above versions for Windows Server 2012 and above.

Common SMTP exceptions we usually faced

The mail could not be sent to the recipients because of the mail server failure. (Sending Mail using Account 2. Exception Message: Cannot send mails to mail server. (Failure sending mail.). )

Just follow the steps. The below steps are verified, proven, and compatible with the below servers and SQL versions,
    Windows Server 2012 R2 – SQL Server 2014 SP3
    Windows Server 2012 R2 – SQL Server 2012
    Windows Server 2016 – SQL Server 2016
    Windows Server 2016 – SQL Server 2017 and above.

Step 1

Check if your .NET framework is 4.6 or above, especially for SQL 2014/2016 version. Otherwise, install the latest .Net version. To verify the current version, open PowerShell, and run as administrator. Copy and execute the below command

reg query "HKLM\SOFTWARE\Microsoft\Net Framework Setup\NDP\v4" /s

Step 2
Check if .NET 3.5 was installed (You can skip this installation for SQL Server 2017, but the .Net framework installation must be .Net 4.8 or above)

Powershell command to list out the installed.NET versions - Run as admin
gci 'HKLM:\SOFTWARE\Microsoft\NET Framework Setup\NDP’ -recurse | gp -name Version -EA 0 | where { $_.PSChildName -match ‘^(?!S)\p{L}’} | select PSChildName, Version

If not installed, either install 3.5 or place a config file in Binn folder
C:\Program Files\Microsoft SQL Server\MSSQL13.MSSQLSERVER\MSSQL\Binn\DatabaseMail.exe.config

Place the XML content
<?xml version="1.0" encoding="utf-8" ?>
    <configuration>
        <startup useLegacyV2RuntimeActivationPolicy="true">
            <supportedRuntime version="v4.0"/>
            <supportedRuntime version="v2.0.50727"/>
        </startup>
    </configuration>

Save file as DatabaseMail.exe.config, with UTF-8 and saved in config format
MSSQL13/14/15 – Version depends on the SQL server installed. Forex: MSSQL13 – 2014 and MSSQL14-2016

Step 3
Install the Database mail advanced configuration. Execute the first query
sp_configure 'show advanced options', 1;
GO
RECONFIGURE;
GO
sp_configure 'Database Mail XPs', 1;
GO
RECONFIGURE
GO

Step 4
Enable the Windows firewall in the Azure portal under networking for VM
Add a rule in Inbound port rules and Outbound port rules with the highest priority by enabling the recommended port 587 with TCP protocol

Step 5
Enable the TLS 1.2 by adding/updating the registry Keys under Regedit. Click on start and type registry editor, run as admin, go to the respective Path and add the key(folder) and (DWord 32-bit) value

[HKEY_LOCAL_MACHINE\SOFTWARE\Microsoft\.NETFramework\v2.0.50727]
"DefaultSecureProtocols"=dword:00000001
"SchUseStrongCrypto"=dword:00000001

[HKEY_LOCAL_MACHINE\SOFTWARE\WOW6432Node\Microsoft\.NETFramework\v2.0.50727]
"SystemDefaultTlsVersions"=dword:00000001
"SchUseStrongCrypto"=dword:00000001

[HKEY_LOCAL_MACHINE\\SOFTWARE\\Microsoft\\.NETFramework\\v4.0.30319]
"SystemDefaultTlsVersions"=dword:00000001
"SchUseStrongCrypto"=dword:00000001

[HKEY_LOCAL_MACHINE\\SOFTWARE\\Wow6432Node\\Microsoft\\.NETFramework\\v4.0.30319]
"SystemDefaultTlsVersions"=dword:00000001
"SchUseStrongCrypto"=dword:00000001

[HKEY_LOCAL_MACHINE\\SYSTEM\\CurrentControlSet\\Control\\SecurityProviders\\SCHANNEL\\Protocols\\SSL 2.0\\Client]
"DisabledByDefault"=dword:00000001

[HKEY_LOCAL_MACHINE\\SYSTEM\\CurrentControlSet\\Control\\SecurityProviders\\SCHANNEL\\Protocols\\TLS 1.2\\Client]
"DisabledByDefault"=dword:00000000
"Enabled"=dword:00000001

[HKEY_LOCAL_MACHINE\\SYSTEM\\CurrentControlSet\\Control\\SecurityProviders\\SCHANNEL\\Protocols\\TLS 1.2\\Server]
"DisabledByDefault"=dword:00000000
"Enabled"=dword:00000001

[HKEY_LOCAL_MACHINE\SOFTWARE\Microsoft\Windows\CurrentVersion\Internet Settings\WinHttp]
"DefaultSecureProtocols"=dword:00000800

[HKEY_LOCAL_MACHINE\SOFTWARE\Wow6432Node\Microsoft\Windows\CurrentVersion\Internet Settings\WinHttp]
"DefaultSecureProtocols"=dword:00000800

NOTE: Make sure you add only the pre-defined registry keys. Any typo error will stop the registry functions instantly. Copy and paste exactly the same.

Step 6
Configure SQL Database mail with account Name, Email-address [email protected], Server Name, PORT, Enable SSL, and Basic Auth

Step 7
Restart the machine and try the Database mail. If this does not work, add the below registry keys

[HKEY_LOCAL_MACHINE\\SYSTEM\\CurrentControlSet\\Control\\SecurityProviders\\SCHANNEL\\Protocols\\SSL 2.0\\Client]
"DisabledByDefault"=dword:00000001
"Enabled"=dword:00000000

[HKEY_LOCAL_MACHINE\\SYSTEM\\CurrentControlSet\\Control\\SecurityProviders\\SCHANNEL\\Protocols\\SSL 2.0\\Server]
"DisabledByDefault"=dword:00000001
"Enabled"=dword:00000000

[HKEY_LOCAL_MACHINE\\SYSTEM\\CurrentControlSet\\Control\\SecurityProviders\\SCHANNEL\\Protocols\\SSL 3.0\\Client] #apply only if the registry key (SSL 3.0) is present
"DisabledByDefault"=dword:00000001
"Enabled"=dword:00000000

[HKEY_LOCAL_MACHINE\\SYSTEM\\CurrentControlSet\\Control\\SecurityProviders\\SCHANNEL\\Protocols\\SSL 3.0\\Server] #apply only if the registry key(SSL 3.0) is present
"DisabledByDefault"=dword:00000001
"Enabled"=dword:00000000

[HKEY_LOCAL_MACHINE\\SYSTEM\\CurrentControlSet\\Control\\SecurityProviders\\SCHANNEL\\Protocols\\TLS 1.0\\Client]
"DisabledByDefault"=dword:00000001
"Enabled"=dword:00000000

[HKEY_LOCAL_MACHINE\\SYSTEM\\CurrentControlSet\\Control\\SecurityProviders\\SCHANNEL\\Protocols\\TLS 1.0\\Server]
"DisabledByDefault"=dword:00000001
"Enabled"=dword:00000000

[HKEY_LOCAL_MACHINE\\SYSTEM\\CurrentControlSet\\Control\\SecurityProviders\\SCHANNEL\\Protocols\\TLS 1.1\\Client]
"DisabledByDefault"=dword:00000001
"Enabled"=dword:00000000

[HKEY_LOCAL_MACHINE\\SYSTEM\\CurrentControlSet\\Control\\SecurityProviders\\SCHANNEL\\Protocols\\TLS 1.1\\Server]
"DisabledByDefault"=dword:00000001
"Enabled"=dword:00000000

Step 8
Restart again and Check if the TLS 1.2 is enabled through PowerShell. Copy, paste, and execute

$key = 'HKLM:\SYSTEM\CurrentControlSet\Control\SecurityProviders\SCHANNEL\Protocols\TLS 1.2\Client\'
if (Test-Path $key) {
  $TLS12 = Get-ItemProperty $key
  if ($TLS12.DisabledByDefault -ne 0 -or $TLS12.Enabled -eq 0) {
    Throw "TLS 1.2 Not Enabled"
  }
  else{
 "TLS is enabled"
  }
}


Step 9
Execute the PowerShell and check if the email has triggered. Change values for $From - (Domain Account), $To - (User Account) , $Email.Credentials - (Domain Account and Password) variables
#Email Information
$From = "[email protected]"
$To = "[email protected]"
$Subject = "Test authenticated O365 smtp email"
$Body = "Test smtp email sent through Office 365's smtp relay."
#SMTP Relay Settings
$SMTP = "smtp.office365.com"
$Port = 587
$Email = New-Object Net.Mail.SmtpClient($SMTP, $Port)
$Email.EnableSsl = $true
$Email.Credentials = New-Object System.Net.NetworkCredential("[email protected]", "Add Password")
$Email.Send($From, $To, $Subject, $Body)


Step 10
Send test email from step-6 Database mail

Step 11
Execute the below SQL query and verify your email has been sent
select top 10 * from msdb.dbo.sysmail_sentitems order by send_request_date desc;
select top 10 * from msdb.dbo.sysmail_event_log order by log_date desc;

Step 12
If you are still struggling with the email, then the issue is probably in the Exchange Center. To resolve that, log in to the O365 and go to the Microsoft 365 Admin Center, select Users and follow the steps

Go to the Active User([email protected]) and select Manage Email Apps under the Mail tab and enable IMAP, POP, and Authenticated SMTP and execute the Powershell or Database mail test email and see the magic :-)

HostForLIFEASP.NET SQL Server 2021 Hosting


SQL Server 2021 Hosting - HostForLIFE :: SQL's Choose Function

clock June 7, 2022 10:00 by author Peter

In some cases, using the CASE statement can lead to numerous conditions. You may agree or not; these multiple conditions will look extensive and lengthy in some situations. Moreover, it can be challenging to maintain because of its complexity.

That's why in this post, we'll explore CHOOSE function. It helps developers have a better alternative to the CASE statement when simplifying lengthy conditions.
What's CHOOSE Function in SQL Server?

    Introduced in SQL Server 2012
    A function returns a specific value from a list based on its number index.
    It looks like an array, but the index starts from 1.

Syntax
CHOOSE (INDEX, VALUE1, VALUE2, VALUE3, VALUE4...)

Index
This is the element's position we seek in the output. Remember that CHOOSE doesn't use a zero-based index strategy (meaning the first item starts with 1). If in case the index is not an integer, SQL converts it to an integer otherwise returns NULL.

Values
It is a comma-separated list of any data type. Returns an item based on the index specified in the first(index) parameter.
Examples
 
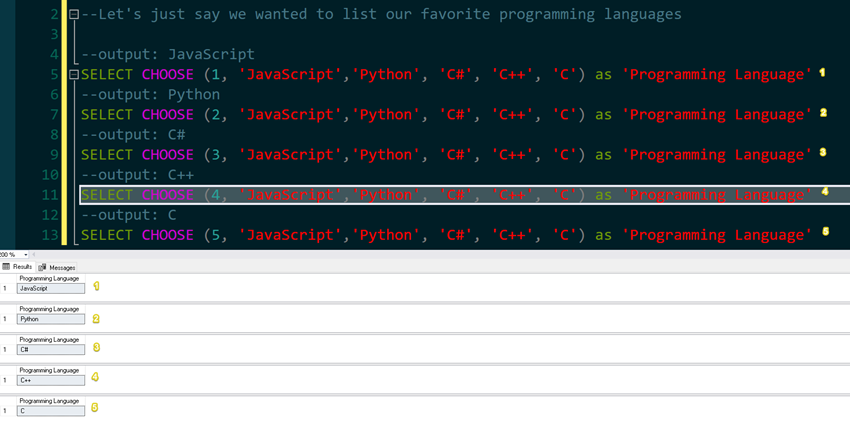
1. Item index starts at 1
--Let's just say we wanted to list our favorite programming languages

--output: JavaScript
SELECT CHOOSE (1, 'JavaScript','Python', 'C#', 'C++', 'C') as 'Programming Language'
--output: Python
SELECT CHOOSE (2, 'JavaScript','Python', 'C#', 'C++', 'C') as 'Programming Language'
--output: C#
SELECT CHOOSE (3, 'JavaScript','Python', 'C#', 'C++', 'C') as 'Programming Language'
--output: C++
SELECT CHOOSE (4, 'JavaScript','Python', 'C#', 'C++', 'C') as 'Programming Language'
--output: C
SELECT CHOOSE (5, 'JavaScript','Python', 'C#', 'C++', 'C') as 'Programming Language'


Output


2. When CHOOSE Function Returns NULL
--output: NULL
SELECT CHOOSE (0, 'JavaScript','Python', 'C#', 'C++', 'C') as 'Programming Language'

--output: NULL
SELECT CHOOSE (6, 'JavaScript','Python', 'C#', 'C++', 'C') as 'Programming Language'


Output


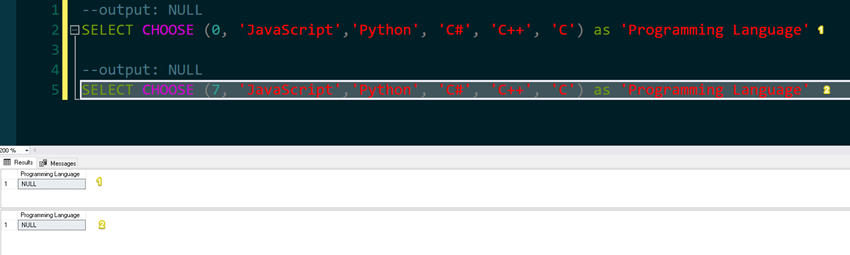
If we have passed the index outside the value list range, you'll be getting NULL as the return value.

3. Using Float or Decimal as Index Values
--output: NULL
SELECT CHOOSE (0.10, 'JavaScript','Python', 'C#', 'C++', 'C') as 'Programming Language'
--output: JavaScript
SELECT CHOOSE (1.10, 'JavaScript','Python', 'C#', 'C++', 'C') as 'Programming Language'
--output: Python
SELECT CHOOSE (2.23, 'JavaScript','Python', 'C#', 'C++', 'C') as 'Programming Language'
--output: C#
SELECT CHOOSE (3.9923423, 'JavaScript','Python', 'C#', 'C++', 'C') as 'Programming Language'
--output: C++
SELECT CHOOSE (4.7412122, 'JavaScript','Python', 'C#', 'C++', 'C') as 'Programming Language'
--output: C
SELECT CHOOSE (5, 'JavaScript','Python', 'C#', 'C++', 'C') as 'Programming Language'
--output: NULL
SELECT CHOOSE (6.636, 'JavaScript','Python', 'C#', 'C++', 'C') as 'Programming Language'


Output


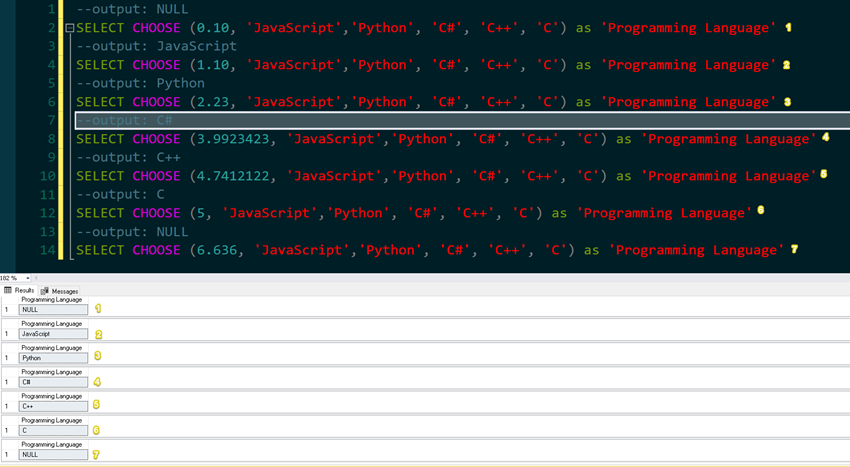
In our example above, we have seen that once we have passed a float or decimal data type, the value is implicitly converted into an integer as long as it's not int. We'll have the same output as from the first two examples.

4. Using String as Index-values
In this section, you'll see that we can still pass a string that has an integer value.

Let's see an example below.

--Let's just say we wanted to list our favorite programming languages
-- This time around, we'll use string but with a correct integer index
--output: JavaScript
SELECT CHOOSE ('1', 'JavaScript','Python', 'C#', 'C++', 'C') as 'Programming Language'
--output: Python
SELECT CHOOSE ('2', 'JavaScript','Python', 'C#', 'C++', 'C') as 'Programming Language'
--output: C#
SELECT CHOOSE ('3', 'JavaScript','Python', 'C#', 'C++', 'C') as 'Programming Language'
--output: C++
SELECT CHOOSE ('4', 'JavaScript','Python', 'C#', 'C++', 'C') as 'Programming Language'
--output: C
SELECT CHOOSE ('5', 'JavaScript','Python', 'C#', 'C++', 'C') as 'Programming Language'

Output

However, if we pass a non-integer value like an alphanumeric value or decimal value, it will throw an exception.

Let's see an example below.

--output: exception
SELECT CHOOSE ('One', 'JavaScript','Python', 'C#', 'C++', 'C') as 'Programming Language'
--output: exception
SELECT CHOOSE ('1.15', 'JavaScript','Python', 'C#', 'C++', 'C') as 'Programming Language'


5. Using CHOOSE in a SELECT Statements
This time, we'll be using the AdventureWorks database and trying to see the employees' birth months. By the way, we'll be using two tables [HumanResources].[Employee] and [Person].[Person] for us to get the names of the employees and show the birth months.

Let's see the example below.
SELECT
    FORMATMESSAGE('%s, %s %s',
                    P.[LastName],
                    P.[FirstName],
                    ISNULL(P.[MiddleName], '')) AS  [FullName],
    E.[BirthDate],
    CHOOSE(MONTH(E.[BirthDate]),  'Jan.',
                                'Feb.',
                                'Mar.',
                                'Apr.',
                                'May.',
                                'Jun.',
                                'Jul.',
                                'Aug.',
                                'Sep',
                                'Oct.',
                                'Nov.',
                                'Dec.') as [Birth Month]
  FROM
  [AdventureWorks2019].[HumanResources].[Employee] E
  INNER JOIN [Person].[Person] P ON
  E.[BusinessEntityID] = P.[BusinessEntityID]

HostForLIFEASP.NET SQL Server 2021 Hosting


SQL Server 2021 Hosting - HostForLIFE :: IIF and Choose Functions in SQL Server 2012

clock May 31, 2022 08:59 by author Peter

Here, I have provided an article showing you how to utilize the two new logical functions Choose and IIF in SQL Server. The Choose function works like an array kind of thing and the IIF function is used to check a condition. In this article we will see both functions with examples. These functions are also called new logical functions in SQL Server 2012. So let's take a look at a practical example of how to use the Choose and IIF functions in SQL Server. The example is developed in SQL Server 2012 using the SQL Server Management Studio.

These are the two logical functions:
    IIF() Function
    Choose() Function

IIF() Function
The IIF function is used to check a condition. Suppose X>Y. In this condition a is the first expression and b is the second expression. If the first expression evaluates to TRUE then the first value is displayed, if not the second value is displayed.

Syntax
IIF ( boolean_expression, true_value, false_value )

Example
DECLARE @X INT;
SET @X=50;
DECLARE @Y INT;
SET @Y=60;
Select iif(@X>@Y, 50, 60) As IIFResult


In this example X=50 and Y=60; in other words the condition is false.  Select iif(@X>@Y, 50, 60) As IIFResult. It returns false value that is 60.

Output

Choose() Function
This function is used to return the value out of a list based on its index number. You can think of it as an array kind of thing. The Index number here starts from 1.

Syntax
CHOOSE ( index, value1, value2.... [, valueN ] )
CHOOSE() Function excepts two parameters,


Index: Index is an integer expression that represents an index into the list of the items. The list index always starts at 1.

Value: List of values of any data type.

Now some facts related to the Choose Function

1. Item index starts from 1
DECLARE @ShowIndex INT;
SET @ShowIndex =5;
Select Choose(@ShowIndex, 'M','N','H','P','T','L','S','H') As ChooseResult

In the preceding example we take index=5. It will start at 1. Choose() returns T as output since T is present at @Index location 5.

Output

2.  When passed a set of types to the function it returns the data type with the highest precedence; see:
DECLARE @ShowIndex INT;
SET @ShowIndex =5;
Select Choose(@ShowIndex ,35,42,12.6,14,15,18.7)  As CooseResult

In this example we use index=5. It will start at 1. Choose() returns 15.0 as output since 15 is present at @ShowIndex location 5 because in the item list, fractional numbers have higher precedence than integers.

3. If an index value exceeds the bound of the array it returns NULL
DECLARE @ShowIndex INT;
SET @ShowIndex =9;

Select Choose(@ShowIndex , 'M','N','H','P','T','L','S','H') 
As CooseResult

In this example we take index=9. It will start at 1. Choose() returns Null as output because in the item list the index value exceeds the bounds of the array; the last Index=8.

Output

4. If the index value is negative then that exceeds the bounds of the array therefore it returns NULL; see:
DECLARE @ShowIndex INT;

SET @ShowIndex =-1;


Select Choose(@ShowIndex, 'M','N','H','P','T','L','S','H')
  As CooseResult

In this example we take index= -1. It will start at 1. Choose() returns Null as output because in the item list the index value exceeds the bounds of the array.

Output

5. If the provided index value has a float data type other than int, then the value is implicitly converted to an integer; see:
DECLARE @ShowIndex  INT;

SET @ShowIndex =4.5;

Select Choose(@ShowIndex ,35,42,12.6,13,15,20)
As CooseResult

In this example we take index= 4.5. It will start at 1.  If the specified index value has a float data type other than int, then the value is implicitly converted to an integer. It returns the 13.0 as output since 15 is present at @ShowIndex=4.5 which means index is 4.

Output


SQL Server 2021 Hosting - HostForLIFE :: SQL Server INFORMATION_SCHEMA Views

clock May 25, 2022 07:42 by author Peter

Have you ever come across a situation where you need to check first if a table exists? Or have you come across a scenario where you need to check if the table's column exists?  Then alter the table by adding your desired column. If you have answered yes to any of these two, you came to the right place.

This post will explore the INFORMATION_Schema views, learn what it is, and show you some of its common usages.

By the way, I'll be using SQL Server 2016, but it can also be applied with other older and later versions of SQL Server.
What is INFORMATION_SCHEMA Database?

The INFORMATION_SCHEMA stores other databases' details on the server.

It gives you the chance to retrieve views/information about the tables, views, columns, and procedures within a database.

The views are stored in the master database under Views->System Views and will be called from any database you choose.

Let's see a screenshot below,


Benefits
As a database developer or administrator, understanding schema and what tables are in a specific database gives us a good idea what's the underlying structure, which can help you write SQL queries. It also allows us to check if everything is expected or on the database. Moreover, it also helps us avoid running queries multiple times to see if the schema name or column name is correct.

Common Usages
Before we start, we'll be using the Northwind database for all our examples. You can download it from here. Now, here are the steps we're going to take. First, get all the databases on our local SQL Server instance, get all the tables, third, let's search for a column, fourth search for constraints, and the last query some views.
Showing All Databases

Let's try to show first all of the databases on a current server instance that we're in.

Note that my result will differ from yours, but you'll see all the databases on your SQL Server instance once you run the query below.
SELECT * FROM sys.databases;

EXEC sp_databases;


Output

The syntax on how we were able to show the database isn't directly related to INFORMATION_Schema.

However, it is an excellent start for us as we go through from database to tables to columns to keys.
Showing All Tables

Now that we have an idea of getting the database on a SQL Server instance.

In this section, we will try to get all of the possible tables of the Northwind database.
USE [Northwind];
--show all table
SELECT * FROM INFORMATION_SCHEMA.Tables;


Querying Column of a Specific Table
In this example, we'll explore how to check a table and then a column if it exists.

Then add a new column to the categories table. Then let's set Tags as its column name and set its data type as NVARCHAR(MAX).

Let's try to see a sample query below.
USE [Northwind];

/*
 * Let's try to declare some variables here that we can use later when searching for them.
 */
DECLARE @TABLE_NAME NVARCHAR(50);
SET @TABLE_NAME = 'Categories';

DECLARE @COLUMN_NAME NVARCHAR(50);
SET @COLUMN_NAME = 'Tags';

IF EXISTS (SELECT * FROM INFORMATION_SCHEMA.TABLES WHERE
                    TABLE_NAME = @TABLE_NAME)
    BEGIN

        PRINT CONCAT('1. Categories table does exists.',
                    CHAR(13), '1.1 Let''s now create the Tags column.');

        IF EXISTS (SELECT * FROM INFORMATION_SCHEMA.COLUMNS
                    WHERE TABLE_NAME = @TABLE_NAME
                    AND COLUMN_NAME = @COLUMN_NAME)
            BEGIN
                PRINT '2. Dropping the Tags column of the Categories table.';
                ALTER TABLE [Categories]
                DROP COLUMN [Tags];
            END

        BEGIN
            PRINT '3. Creating the Tags column of the Categories table.';

            ALTER TABLE [Categories]
            ADD [Tags] NVARCHAR(MAX);

            DECLARE @ADDED_COLUMNS NVARCHAR(MAX);

            SET @ADDED_COLUMNS = CONCAT('4. Categories table columns: ',
                                        (SELECT STRING_AGG(COLUMN_NAME, ',')
                                        FROM INFORMATION_SCHEMA.COLUMNS WHERE TABLE_NAME = @TABLE_NAME));

            PRINT @ADDED_COLUMNS;
        END
    END
ELSE
    BEGIN
        PRINT 'CATEGORY TABLE DOESN''T EXISTS';
    END


Going to the example above, as you can see, we have to check if the Categories-table exists. Then from that, we did check if the Tags column does exist. If it does, we need to drop the existing column. And after that, we have re-created the Tags column. Lastly, we have shown all the Categories-table columns by a comma-separated list.

Just a note, the STRING_AGG function is a function that can be applied to SQL Server 2017 and later.

Output

Find Foreign Keys, Primary Key, and Check Constraint in a Table
Let's see how we can query the primary key, foreign key and check the constraint of a specific table.

In this case, we're just going to use the [Order Details] table and show the constraints such as primary key, foreign key, and check constraint.

Let's see the query below.
USE [Northwind];

SELECT CONSTRAINT_TYPE, CONSTRAINT_NAME
FROM INFORMATION_SCHEMA.TABLE_CONSTRAINTS
WHERE CONSTRAINT_TYPE IN ('PRIMARY KEY', 'FOREIGN KEY', 'CHECK')
AND TABLE_NAME = 'Order Details';

Querying Views
In this last section, we'll make a simple query that will show the Views inside the Northwind database.

Let's see the query below.
USE [Northwind];

SELECT TABLE_CATALOG AS 'Database Name',
       TABLE_NAME AS 'View Name',
       View_Definition as 'Query'
FROM INFORMATION_SCHEMA.VIEWS
WHERE TABLE_NAME  LIKE 'Products%'

I hope you have enjoyed this article. I know that there are many ways you can use INFORMATION_Schema.

Moreover, this article has given you a jump start by showing you how to get all the databases, get all the tables, search for a column, search for constraints and search for views using the INFORMATION_Schema.

Once again, I hope you have enjoyed this article/tutorial as I have enjoyed writing it.

Stay tuned for more. Until next time, happy programming!

Please don't forget to bookmark, like, and comment. Cheers! And Thank you!


SQL Server 2021 Hosting - HostForLIFE :: Database Backup Using SQL Queries And Its Type

clock May 18, 2022 08:53 by author Peter

In this article, you will learn how to take backup of database using SQL queries in a compressed condition and in uncompressed condition.

Prerequisites
    Install SQL Server
    Install SQL Server Management Studio (SSMS)

For above prerequisites, you can follow the article that is How to Install SQL Server and SQL Server Management Studio (SSMS)
Backup of Database in compressed condition

Use the below query to take the backup of database in compressed condition.
BACKUP DATABASE Database_Name TO
DISK = 'BackupPath\BackupFileName.bak'
WITH COMPRESSION
GO

Backup of Database in uncompressed condition
Use the below query to take the backup of database in uncompressed condition.
BACKUP DATABASE Database_Name TO
DISK = 'BackupPath\BackupFileName.bak'
WITH NO_COMPRESSION
GO


Restore the database using backup file with SQL query
RESTORE DATABASE Database_Name
FROM DISK = 'BackupPath\BackupFileName.bak'
WITH RECOVERY
GO

RESTORE DATABASE Database_Name
FROM DISK = 'BackupPath\BackupFileName.bak'
WITH RECOVERY
GO


Now I will demonstrate the same with the help of an example.
Before we start we need to know where do we define the following items in the SQL query as shown in figure-1.
    Database name
    Backup folder location
    Backup file name
    Backup file extension

As I have a database named as "Company" now I am taking backup of this database in compressed condition as shown in figure-2.

Now I can see the Backup file is created successfully and saved at the defined location as shown in picture below

now I am going to delete the Database using Drop query as shown in picture below

Now restore the database using backup file as shown in a picture below:

Now I am going to create a backup of the same database "Company" in uncompressed condition as shown in a picture below:

Now I am going to create a backup of the same database "Company" in uncompressed condition

Now follow the same step as shown in figure-4 to delete/drop the database, then follow the steps as shown in figure-5 to restore the database using compressed backup file.


Difference between Compressed Backup and Uncompressed Backup

S. No.            Compressed Backup                       Uncompressed Backup           
1 It is very small in size as compared to uncompressed backup.            It is large in size as compared to compressed backup.           
2 It takes time to create backup file as compared to uncompressed backup.            It takes an exceedingly small time to create backup file.           
3 Its restoring time is very less.            It takes time to restore the backup file as compared to compressed backup.           
4 It saves about 75% of disk space as compared to uncompressed backup.            Its size is approx 4 times of compressed backup.           

HostForLIFEASP.NET SQL Server 2021 Hosting


SQL Server 2021 Hosting - HostForLIFE :: Import CSV File Into SQL Server Using SQL Server Management Studio

clock May 10, 2022 12:14 by author Peter

In this article, we learn how to import CSV files into SQL server using SQL server management Studio
    Log in to your database using SQL Server Management Studio.
    Right-click the database and select Tasks -> Import Data.

Then click the Next button.

From Data Source, select Flat File Source and then use the Browse button to select the CSV file.


Here is my sample CSV file that has some dummy data.

Then select Advanced, and as per your CSV data size is required to set column width.


Then click the Next button.

Destination select as SQL Server Native Client and Enter the Server name;
Enter SQL Server Authentication data and click the Next button.

Then click the Next button.

Then click the Next button.

Then click the Finish button.


CSV file data imported successfully in SQL database table. The table is created as per the CSV file name. Select the database and execute a query.


SQL Server 2021 Hosting - HostForLIFE :: Using For XML Clause In SQL Queries

clock May 9, 2022 10:21 by author Peter

XML acronym for eXtensible Markup Language. This markup language is much similar to HTML. It is designed to store and transport data. Moreover, the XML tag is not predefined, it is designed to be self-descriptive.

For XML Clause

For XML clause is used to convert SQL result set into XML format. It is a very much helpful clause when we need XML data from the SQL result set. The FOR XML clause can be used in top-level queries and in subqueries. The top-level FOR XML clause can be used only in the SELECT statement. In subqueries, FOR XML can be used in the INSERT, UPDATE, and DELETE statements. 

There are four modes of For XML Clause. Like

  • Raw 
  • Auto
  • Path
  • Explicit

Elaboration of Modes
 
Raw
Each row is turned into an XML node. That is called row by default, but you change the node name at any time by your own name. Every column will convert as an attribute.

select Id, Name, CatId from Product for xml raw

Now replace the default row node name with own custom name.

select Id, Name, CatId from Product for xml raw('product')

It is also possible to set a root element in this XML structure. Here is the same as before. The default root element name is root. But you can change the root element name.

select Id, Name, CatId from Product for xml raw('product'), root

Moreover, you can also set elements instead of attribute.


select Id, Name, CatId from Product for xml raw('product'), root, elements

Auto
Similar to raw mode, but here uses table name as default node name instead of row. Here everything is possible as in raw mode. Like the root, elements can be used.


select Id, Name, CatId from Product for xml auto

But in this mode, you can’t set a custom node name instead of the default table name.

Use of root and elements in auto mode.


select Id, Name, CatId from Product for xml auto, root('products'), elements

Difference between raw and auto mode
When you will retrieve data from multiple tables by joining then you will see the big difference between the two modes.

Raw mode query
select Category.Name as Title, Product.Name from Product
inner join Category on Product.CatId = Category.CatId
for xml raw, root

Auto mode query
select Category.Name as Title, Product.Name from Product
inner join Category on Product.CatId = Category.CatId
for xml auto, root


Path
This mode will convert each record as a parent element and every column as a nested element. There is no default attribute, but you can set custom attributes. In this mode, you can also use row, root, and elements. This mode is the best and better.


select Category.Name as Title, Product.Name from Product
inner join Category on Product.CatId = Category.CatId
for xml path

Use of custom parent path and root element in path mode.


select Category.Name as Title, Product.Name from Product
inner join Category on Product.CatId = Category.CatId
for xml path('Category'), Root('Products')

You can set attributes in this path mode very easily. But keep in mind that to assign attribute must be use @sign with the column name alias.

select Category.Name as [@Title], Product.Name from Product
inner join Category on Product.CatId = Category.CatId
for xml path('Category'), Root('Products')

Explicit
This mode is used to generate own custom XML structured format. So, you can choose it to generate own XML structure.

<ELEMENT>: The name of the element to which values will be assigned.
<TAG>: The tag number represents the level in hierarchy or depth.
<ATTRIBUTE>: The name of the attribute to which a particular column’s value will be assigned.
<DIRECTIVE>: This is optional and used to provide additional information for XML creation. We will look at one of its options "ELEMENT".


The first two columns are Tag and Parent and are Meta columns. These values determine the hierarchy. Moreover, this two-column name must be Tag and Parent. This name is required.


SELECT        1 AS TAG,
              NULL AS PARENT,
              c.Name AS [Category!1!Name],
              NULL AS [Sales!2!SaleID],
              p.Name AS [Sales!2!Product!ELEMENT],
              NULL AS    [Sales!2!Quantity!ELEMENT],
              NULL AS [Sales!2!Date!ELEMENT]
FROM          [Product] p
              INNER JOIN Category c ON p.CatId = c.CatId
              WHERE p.Id in (SELECT ProductId FROM Sales)
              UNION ALL
              SELECT        2 AS TAG,
              1 AS PARENT,
              c.Name AS [Category!1!Name],
              s.SaleId AS [Sales!2!SaleID],
              p.Name AS [Sales!2!Product!ELEMENT],
              s.Quantity AS    [Sales!2!Quantity!ELEMENT],
              s.Date AS [Sales!2!Date!ELEMENT]
FROM          [Product] p
              INNER JOIN Category c ON p.CatId = c.CatId
              INNER JOIN Sales s ON s.ProductId = p.Id
              WHERE p.Id = s.ProductId
              ORDER BY  [Category!1!Name], [Sales!2!Product!ELEMENT], [Sales!2!SaleID]
              FOR XML EXPLICIT

Hope this article would have helped you to understand about SQL XML clause. Here I have tried to explain very simply all terms of this clause. Happy coding and thanks for reading my article!

HostForLIFEASP.NET SQL Server 2021 Hosting


SQL Server 2021 Hosting - HostForLIFE :: Another Way To Implement The Incremental Load

clock April 22, 2022 08:06 by author Peter

In this article I'll discuss one of the functionalities of SQL SERVER: CDC (Change Data Capture). This feature has been present since the 2008 version. This presentation will be about the 2012 version.

What is the CDC?
The CDC Control task is used to control the life cycle of change data capture (CDC) packages. It handles CDC package synchronization with the initial load package, the management of Log Sequence Number (LSN) ranges that are processed in a run of a CDC package. In addition, the CDC Control task deals with error scenarios and recovery. [Microsoft Documentation]

The objective of the CDC is to optimize the integration of data (of the ETL process) by directly requesting the modifications made to a table instead of working on the entire table and thereby increasing processing times. Among other things, it allows basic auditing and synchronization between two databases.

Change data capture is a concept that is not specific to SQL Server (it's present in other DBMS such as Postgres, Oracle…), and which consists of tracking and recovering changes to data in a table.

The CDC was implemented at the SQL Server 2008 level, but only at the database engine level, and the concept of the Log Sequence Number (LSN) was used, which makes the implementation of the CDC under SSIS more complex.

The log sequence number (LSN) value is a three-part, uniquely incrementing value. It is used for maintaining the sequence of the transaction log records in the database. This allows SQL Server to maintain the ACID properties and to perform appropriate recovery actions.

Starting from SQL Server 2012, Microsoft goes further in its approach and introduced 3 main components to use the CDC directly in SSIS:

A CDC Control Task: managing the life cycle of CDC packages, and in particular all the mechanics of LSNs.

A Source CDC:  reads the information from a data capture exchange table

A CDC Splitter: redirects the rows according to whether they need to be inserted, updated, or deleted.

Setup Change Data Capture on the source database
On this table, I activate the CDC. Here it is the same as under SQL Server 2008, we find the same commands.

EXEC sp_changedbowner 'sa'

/* Activate the CDC */
EXEC sp_cdc_enable_db

/* Verify if the CDC is activated */
SELECT name, is_cdc_enabled
FROM sys.databases
WHERE name LIKE 'LearningDatabase'

/* Parametrize the CDC for the table STG.Employee  */
EXEC sys.sp_cdc_enable_table
@source_schema = N'SRC'
, @source_name = N'Employee'
, @role_name = NULL
, @supports_net_changes = 1


It is important to note that, there is no necessity for tables in the source database to include a column that indicates the date and time of the last modification. This means that no structural changes are needed in order to enable CDC for extraction.

Make sure that SQL Server Agent is running as a SQL Server Agent Job is used to capture CDC data.
Change Data Capture Control Flow Task in SSIS

Starting from SSIS 2012, the CDC Control Task was introduced as the new control flow task to implement the change data capture working with the CDC enabled databases and tables.

This new feature works on controlling the life cycle of change set for both CDC marked database and table :
    it enables the SSIS package to use CDC change set
    it applies the transfer of data as required, and finally
    it marks the change set as accomplished, or in case of an error it retains the change set for further analysis.

 The CDC Control Task holds the state of CDC into a package variable (defined when configuring the component), used later in CDC Data Flow components.

1. Starting the CDC for a table
Let’s start by configuring the CDC Control Task where we need to Mark CDC for Start.
Drag and drop a CDC Control Task into the package.

And follow the configuration like below:


  1. Set a connection manager (ADO.NET Connection Manager) to the source database.
  2. Set CDC Control Operation as: Mark CDC Start
  3. Set a variable of type string for CDC State.
  4. Set the connection for the database contains state data.
  5. Set the table for storing CDC state. You can create a new table here if you don’t have any table for it already : 

CREATE TABLE [dbo].[cdc_states]
([name] [nvarchar](256) NOT NULL,
 [state] [nvarchar](256) NOT NULL) ON [PRIMARY]
GO
CREATE UNIQUE NONCLUSTERED INDEX [cdc_states_name] ON
 [dbo].[cdc_states]
 ( [name] ASC )
 WITH (PAD_INDEX  = OFF) ON [PRIMARY]
GO

Verify or Set the State Name values.

We can now run the package. But what happens if the task is run successfully?
Actually since we didn’t set any actions for the change set, no data will be transferred.

The aim of this task is to set the CDC state in cdc_state table. Note that this task with the above configuration needs to be run one and only once.

If we query the cdc_states table, we can see that the state has a timestamp portion showing the data and time of the state storage.
By definition, this state represents the state of table stored so the SSIS can recognize the very first state of the Change Data Capture, and get the range of changes afterwards.

We will disable the task, as we don’t want to run it again.

2. Working with the Range of changes with CDC Control Task

The next step is creating two CDC control tasks: one for getting the range and the other for marking it. To better explain it, we need to retrieve the range of data that has updates and then mark it as processed.

    We need to create a new CDC Control Task and configure it exactly as we did for the CDC Control Task – Start, with changing the CDC control operation as “Get Processing Range”.

We need to create another CDC Control task same as previous one and set the CDC control operation as Mark Processed.

We need to place a Data Flow Task between these two tasks. We will leave the data flow empty as we should fill it in the next stage. The aim of using the Data Flow is to read the change set and execute the appropriate action based on the ETL load actions (delete, insert, or update)


3. Reading the Changed Set with CDC Source and CDC Splitter

In the data flow task we have to read the changed set with the help of CDC change set table, CDC data flow components (CDC Source, and CDC Splitter), and CDC state (stored by CDC Control Tasks). CDC Source is a component that read the change set and provide it as the main output so it can be used for CDC splitter. CDC Splitter split the change set into three data set: Inserted, Deleted, and Updated outputs. For this example, I’ve used a stage table as the destination of this step to be able to write result sets into it. my state table is exactly same as the source table plus single column for Status. I’ll fill the status column in Derived Column depends on the change happened on the data row.

Moving to the data flow task, we need to read the changed set using :

    the CDC change set table
    the CDC data flow components (CDC Source, and CDC Splitter)
    the CDC state (stored by CDC Control Tasks)

The CDC Source reads the change set and supply it as the input which will be used by the CDC Splitter

The CDC Splitter splits the change set into 3 branchs: Inserted - Updated - Deleted

    Create a CDC Source component in the data flow.
    Set ADO.NET connection manager to the source database which has CDC enabled.
    Set CDC enabled table name
    Verify the CDC processing mode to be Net :  the CDC processing mode is set to Net in order to capture the net changes rather than capturing all records
    Set CDC state variable the same variable that we’ve used in CDC Control Tasks.

After that, we created a CDC Splitter component after the CDC Source. (it doesn’t require any configuration, we need just to connect the CDC source to it)

We need to create a Derived Column transformation and connect InsertOutput/ UpdateOutput/ DeleteOutput of the CDC Splitter to it.

In each one of it, we need to create a Status Column in Derived Column and set its value as :

    0 for InsertOutput
    1 for UpdateOutput
    2 for DeleteOutput


Then we use a Union All transformation to integrate all three data outputs together, so we can load them into the staging table using an OLE DB Destination. Please note that we may encounter Data conversion issues between the source and the destination, in this case we may use a Data Conversion component.


HostForLIFEASP.NET SQL Server 2021 Hosting


SQL Server 2021 Hosting - HostForLIFE :: Examples Of DATE/DATETIME Conversion

clock April 12, 2022 09:50 by author Peter

I've noticed a bit of confusion when it comes to date conversion in T-SQL; recurring questions on how to strip the TIME part from a DATETIME variable, or how to convert between locales. Here we will see a fast method to split a DATETIME from its sub-parts DATE and TIME and how to reset the TIME part in a DATETIME.
 
We'll also see a method to quickly retrieve a list of all the possible conversion formats, applied to a certain date.
Let's consider the following script:

    DECLARE @myDateTime DATETIME  
    SET @myDateTime = '2015-05-15T18:30:00.340'  
      
    SELECT @myDateTime   
      
    SELECT CAST(@myDateTime AS DATE)  
    SELECT CAST(@myDateTime AS TIME)  
    SELECT CAST(CAST(@myDateTime AS DATE) AS DATETIME)   


I've created a DATETIME variable, named @myDateTime, and assigned to it the value "2015-05-15T18:30:00.340".

With the first SELECT, we simply print out that value.
 
But look at the three SELECTs that follow the first. We'll use the CAST function to convert between data types, asking, in the first case, to output our DATETIME as a DATE and in the second one, add a TIME type variable.
 
That will have the effect of suppressing the part of the DATETIME that we haven't asked for. Casting toward DATE will produce a variable from which the TIME part will be stripped, whereas converting towards TIME, we are asking to take away the DATE part from the DATETIME.


In the preceding example, we can see the result of those queries. Applying the logic seen a few lines ago, when we need to mantain a DATETIME, resetting (or setting to zero) its TIME part, we could use a double casting, as you can see in the fourth SELECT. First, we cast our DATETIME to a DATE (the internal cast of the two). That will produce a DATE-only variable. Then, with the second cast, we restore the type of the variable to its original one. But since the TIME part is now gone, the result will be in DATETIME format, with a zero TIME part.

Convert a Date in all possible formats
Sometimes we need to format a date depending on the specific locale, without remembering its conversion code. The following script will help us print all the conversion styles we can impose to a given date. It loops from a range of 0 - 255 (with many of those values not used for conversion that will be skipped thanks to the TRY/CATCH block), indicating which of those values return a valid conversion.

    DECLARE @myDateTime DATETIME    
    SET @myDateTime = '2015-05-15T18:30:00.340'   
      
    DECLARE @index INT  
    SET @index = 0  
    WHILE @index < 255  
    BEGIN  
      
       BEGIN try  
          DECLARE @cDate VARCHAR(25)  
          SET @cDate = CONVERT(NVARCHAR, GETDATE(), @index)  
          PRINT CAST(@index AS VARCHAR) + '   ' + @cDate  
       END try  
       BEGIN catch   
       END catch  
       SET @index = @index + 1  
    END 

We can insert an arbitrary value into the @myDateTime variable and run the script. We'll then obtain output like the following: 

Executing the code, we will print each CONVERT style, with its representation of our date. A quick reference to spot what we need in a specific context. I hope this helps!

HostForLIFEASP.NET SQL Server 2021 Hosting


About HostForLIFE

HostForLIFE is European Windows Hosting Provider which focuses on Windows Platform only. We deliver on-demand hosting solutions including Shared hosting, Reseller Hosting, Cloud Hosting, Dedicated Servers, and IT as a Service for companies of all sizes.

We have offered the latest Windows 2019 Hosting, ASP.NET 5 Hosting, ASP.NET MVC 6 Hosting and SQL 2019 Hosting.


Month List

Tag cloud

Sign in