European Windows 2019 Hosting BLOG

BLOG about Windows 2019 Hosting and SQL 2019 Hosting - Dedicated to European Windows Hosting Customer

European SQL Server 2019 Hosting :: APPLY in SQL Server

clock February 20, 2023 06:39 by author Peter

The apply keyword was introduced mainly for selecting data by combining a select query with a table-valued function, which is nothing but a select query on another table (or the result of any business logic in the function). To understand it better, let's call our main table the left table and the second table (in the table-valued function) the right table.

Let's start by creating sample data. We will have two tables, Employee and Department. Here, our Employee table will be the left table, and the Department table will be the right one. Each employee can only belong to one department.

Our intent will be to join these two tables to get the required data. One solution that immediately comes to mind is using a LEFT, RIGHT, or INNER JOIN, which will depend on our requirements. Let's see the results with the use of JOINS.

APPLY works the same way as the co-related subquery, with the fact that the select query on which the application is used, in other words, the right table, will be executed for every record of the main table or the left table, that is nothing but how the co-related sub query works. The same results can be obtained using the apply keyword. It can be applied in either of the following two ways:

    CROSS APPLY- Works the same as the INNER JOIN on two queries.
    OUTER APPLY- Works the same as the LEFT JOIN on two queries.

Let's change the queries using these two apply forms and see the results.


As we can see above, CROSS APPLY gives the same result as the INNER JOIN, and OUTER APPLY gives the same result as the LEFT OUTER JOIN. The difference with the JOIN is that APPLY results in the execution of the select statement of the Department query for each record of the Employee record (the same as that of a co-related sub-query).

Next, suppose we were using the co-related subquery. But we need to view the rest of the columns of the second table. In other words, the Department table. Can we do that? Unless we add some twist to the query, it doesn't seem to be. But this can be easily done with the APPLY keyword. Add the name of the columns we want to view in the select statement of the Department, and we are done. Let's change our queries and see the results:


Another possible and extensive use of APPLY is with the table-valued function. We create a simple function that returns Department details by Id. Next, we replace our select statement for Department with a call to the user-defined function. See the query below:


So, depending on the requirements, we can add or remove the columns' names in the function call's SELECT statement. To summarize, we can use the apply keyword as.

    A co-related subquery with the advantage of selecting multiple columns.
    A join with the table-valued user-defined function to select multiple columns from the second table.

So this was about the use of the apply keyword.

HostForLIFEASP.NET SQL Server 2019 Hosting


European SQL Server 2019 Hosting :: Deploy SSIS Package To SQL Server

clock February 16, 2023 07:01 by author Peter

Note
Before going next, first, make sure you have SQL Server Integration Services installed. Open the Visual Studio SSIS package project and right-click on the project and hit Deploy to deploy all packages, if you want to install individual packages then right-click on the package and hit deploy.

The first window is the introduction windows click the Next button.


We have two deployment targets,

    SSIS in SQL Server
    SSIS in Azure Data Factory

As in this article, we are going to deploy on SQL Server, so we must select SSIS in SQL Server and click Next.


Select a destination, Enter the SQL Server name, Authentication type, Username, and password, and click Connect. Once connect Browse the project folder path if available, if not available create a directory in SSISDB and create a new project, and hit Next.

You can review all the given changes and hit Deploy.


You can check the deployment result in the last windows. If all results are passed, then click close.

The above screenshot shows that all results are passed and successfully deployed.


Go to SQL Server and expand Integration Services Catalogs and go to SSISDB you can see the created folder and project and deployed packages there.

Conclusion
In this article, we have learned how to deploy SSIS Project to SQL Server.

HostForLIFEASP.NET SQL Server 2019 Hosting


European SQL Server 2019 Hosting :: Change Data Capture in SQL Server

clock February 13, 2023 06:42 by author Peter

Change Data Capture (CDC) captures the data of insert, update and delete activity. When you insert or delete the data in the table it maintains a record of the same data. When you update the data it maintains records before updating the data and after updating the data.

To understand the change data capture we go through the following process.

Process

Step 1. Create DB
CREATE DATABASE CDC_DEMO
GO


Step 2. Create a Table

Create one table in the preceding database.

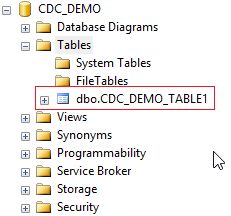
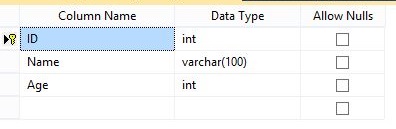
Execute the following query and the "CDC_DEMO_TABLE1" table is created.
USE CDC_DEMO
GO

CREATE TABLE CDC_DEMO_TABLE1
(
    ID      INT         IDENTITY(1,1) PRIMARY KEY,
    Name        VARCHAR(50)     NOT NULL,
    Age     INT         NOT NULL,
);
GO


You can check the table in the Object Explorer.

Step 3. Insert Rows
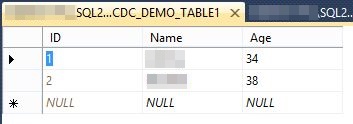
Insert some rows into the table "CDC_DEMO_TABLE1".

Here we inserted two rows into the table.
USE CDC_DEMO
GO

INSERT INTO CDC_DEMO_TABLE1 (Name,Age) VALUES ('Peter',34)
GO
INSERT INTO CDC_DEMO_TABLE1 (Name,Age) VALUES ('Scott',38)
GO

Step 4. Enable CDC on DB
We have a database, table, and some rows in the table, now we need to enable CDC on the database.
Execute the following query and it will show whether CDC is enabled or not for the database.
USE CDC_DEMO
GO

SELECT name, database_id, is_cdc_enabled
FROM SYS.DATABASES
WHERE name = 'CDC_DEMO'

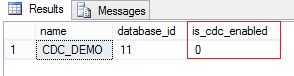
"is_cdc_enabled" has the value "0", which means it is not enabled for the database.

Execute the following query to enable CDC on the database. We need to execute the "sys.sp_cdc_enable_db" Stored Procedure to enable CDC on the database. It is necessary to execute it before we know any tables are enabled for the CDC.
USE CDC_DEMO
GO
EXEC sys.sp_cdc_enable_db
GO

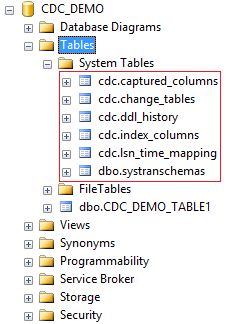
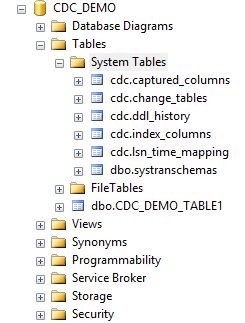
This will create some system tables.

Check again and verify that CDC is enabled on the database.
USE CDC_DEMO
GO

SELECT name, database_id, is_cdc_enabled
FROM SYS.DATABASES

WHERE name = 'CDC_DEMO'

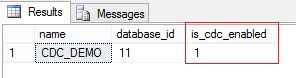
Now "is_cdc_enabled" has the value 1, in other words, it is enabled.

Step 5. Enable CDC on Table
Enable CDC on the "CDC_DEMO_TABLE1" table.
Before enabling CDC, we need to check whether it is enabled already or not. Execute the following query and we have a list of all tables with CDC status.
USE CDC_DEMO
GO
SELECT [name], is_tracked_by_cdc  FROM SYS.TABLES
GO

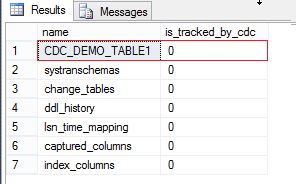
The value of "is_tracked_by_cdc" is "0" for the "CDC_DEMO_TABLE1" table, in other words, CDC is not enabled for this table.
Execute the following query to enable CDC on the table.
USE CDC_DEMO;
GO
EXECUTE sys.sp_cdc_enable_table
  @source_schema = N'dbo'
  , @source_name = N'CDC_DEMO_TABLE1'
  , @role_name = NULL
GO


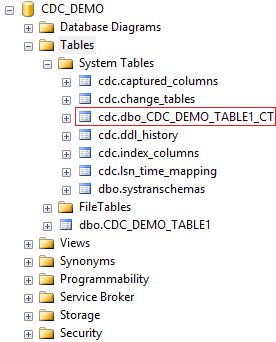
We can check in the Object Explorer that one more table is created under the system tables, "cdc.dbo_CDC_DEMO_TABLE1_CT".

Check again and verify that CDC is enabled on the table.

USE CDC_DEMO
GO
SELECT [name], is_tracked_by_cdc  FROM SYS.TABLES
GO

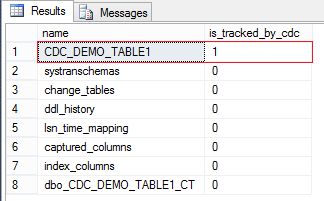
Now "is_tracked_by_cdc" has the value 1, which represents that CDC is enabled for the table.

Step 6. Insert Operation
We have enabled CDC for the database and table. Now let's check where SQL Server persists in the change log when we insert the data in the table.
Execute the following query to insert one row into the table.
USE CDC_DEMO
GO

INSERT INTO CDC_DEMO_TABLE1 (Name,Age) VALUES ('Alex',35)
GO

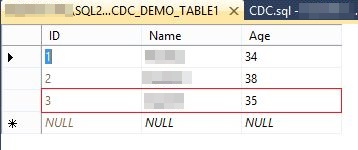
Open the table "CDC_DEMO_TABLE1" and we can see that one row is inserted with the ID 3.

The change log is captured in the table "cdc.dbo_CDC_DEMO_TABLE1_CT". You can see the entire row that we have created. One more thing you can observe here is that the _$operation value is 2, in other words for Insert values.

Step 7. Update Operation
Now let's check by updating any of the rows in the table. Execute the following script that will update the value of the name field where id = 3.
USE CDC_DEMO
GO

UPDATE CDC_DEMO_TABLE1
SET Name = 'Jigi'
WHERE id = 3
GO


Open the table and verify that the value is changed.

Open the "cdc.dbo_CDC_DEMO_TABLE1_CT" table and you can see that the updated data is captured in two rows. One is with operation 3 and the other with operation 4. Operation value 3 means before updating and value 4 means after updating.

Step 8. Delete Operation
To check the captured data after the delete operation, execute the following script that deletes the record with id=3.
USE CDC_DEMO
GO

DELETE FROM CDC_DEMO_TABLE1
WHERE id = 3
GO


Open the table and verify that the record is deleted from the table.

Open the "cdc.dbo_CDC_DEMO_TABLE1_CT" table and you can see that the deleted row is captured with operation value 1.

We have seen a change in data capture for insert, update and delete operations and for those only one system table is used, "cdc.dbo_CDC_DEMO_TABLE1_CT". But there are more than six tables that were created when enabling CDC on the database. So let's see the schema and values for those tables:

Cdc.captured_columns
Provides the information of columns that are tracked for the changed data capture.
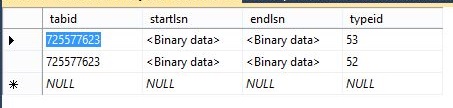

Cdc.change_tables
Provides the information in the table. It shows the default value for "capture_instance" since we have not provided a parameter when enabling CDC on the table.

Cdc.ddl_history
Provides the information for any schema changes. Currently, this table doesn't have any value since we did not change any schema for the table. So let's change the schema and check the values. Execute the following query to change the schema for the table:
USE CDC_DEMO
GO

ALTER TABLE CDC_DEMO_TABLE1
ALTER COLUMN Name VARCHAR(100) NOT NULL
GO

We have changed the datatype from varchar(50) to varchar(100) for the name field.

Open the "cdc.ddl_history" table and we can see that the ddl_command is captured as in the following:

Cdc.index_columns
Provides the information if any of the index columns are changed.

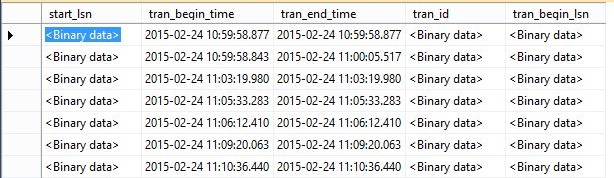
Cdc.Isn_time_mapping
Provides information about the start and end time for the operation done for changes.

Cdc.systranschemas
Provides the information for the schema changes.

Step 9. Disable CDC on Table

Execute the following query to disable CDC on the table.
USE CDC_DEMO;
GO

EXECUTE sys.sp_cdc_disable_table
    @source_schema = N'dbo',
    @source_name = N'CDC_DEMO_TABLE1',
    @capture_instance = N'dbo_CDC_DEMO_TABLE1'
GO


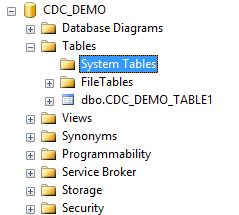
We can observe in the Object Explorer that one table is removed under the system tables, "cdc.dbo_CDC_DEMO_TABLE1_CT". That means CDC is disabled for this table.


Step 10. Disable CDC on Database
Execute the following query to disable CDC on the database. 
USE CDC_DEMO
GO
EXEC sys.sp_cdc_disable_db
GO


We can observe in the Object Explorer that all the tables are removed under the system tables. That means CDC is disabled on the database.

HostForLIFEASP.NET SQL Server 2019 Hosting


European SQL Server 2019 Hosting :: Full Text Index In SQL Server

clock February 9, 2023 08:35 by author Peter

Full-text search is one of the needs of an application to find data in a database. The full-Text Index feature in SQL Server allows you to run a full text search on a database table. In this article, we will learn about full-text index in SQL Server, including what full-text index is, how to create a full-text search index, and other use cases.

What is Full-Text Index in SQL Server?

Full-Text Search in SQL Server lets users and applications run full-text queries against character-based data in SQL Server tables. Full-Text index helps to perform complex queries against character data. These queries can include word or phrase searching. Before we can run full-text queries on a table, we first need to create a full-text index on the table. Only one full-text index is allowed per table, and this index can contain up to 1024 columns. The full-text index includes one or more character-based columns in the table. These columns can have any of the following data types: char, varchar, char, nvarchar, text, ntext, image, XML, or varbinary.

Full-text queries perform searches against text data in full-text indexes by operating on words and phrases based on rules of a particular language such as English or Japanese. Full-text queries can include simple words and phrases or multiple forms of a word or phrase. A full-text query returns any document that contains at least one match (also known as a hit). A match occurs when a target document contains all the terms specified in the full-text query and meets any other search conditions, such as the distance between the matching terms.

Why do we need a Full Text Index (FTI) if we can use a statement for searching?
Let us consider a scenario; I have a table with column name data. What query will we use if we want to search for the name ‘smith’ in the data column, basically, we use the command below.

The above query is efficient for the above scenario, but what if you're not looking for an exact match? FTS has some better algorithms for matching data, as does some better statistics on variations of names. Therefore, FTS can provide better performance for matching Smith, Smythe, Smithers, etc., when you look for Smith. In such a case, FTS provides better results compared to the traditional like method.
When to use FTI over the LIKE statement?

    A word or phrase close to the search word or phrase
    When the result size is several hundred thousand
    Millions of rows, each with a string like "wordAwordBwordC..."
    Any word derived from a particular root (for example, run, ran, or running)

How to Create a Full-Text Index?
Now, I will explain how to create a full-text index. But, first, we will read two methods to create the full-text index, using manually and using the SQL command.

Create Full-Text Index Manually
The following steps are performed to create the Full Text Index.
    Create a Full-Text Catalog
    Create Full-Text Index
    Populate the Index

1. Create a Full-Text Catalog
The full-text catalog is used for the full-text index. If we don’t specify the full-text catalog, then SQL Server will use the default catalog. So now we have learned how to create a full-text catalog.

To create a full-text catalog, select your database, go to the Storage folder, right-click on Full-Text Catalog, and select the New Full-Text Catalog option.

Now provide a name for the full-text catalog.

You can see that a new catalog has been created in the Storage folder.

2. Create Full-Text Index
To create a full-text index choose your table and right-click on that table and select the “ Define Full-Text Index” option.

Now select Unique Index. It is compulsory that for “Full-Text Index” table must have at least one unique index.

Select columns name and language types for columns. You can only select character-based and image-based columns.


Select change tracking.


Now select the full-text catalog for the index.


The last image confirms that the full-text index is created successfully. Now we populate this full-text index.

3. Populate the Index
To populate the index, right-click on the table and select the “Start Full Population” option.


Create Full-Text Index using SQL Command
Use the following command syntax to create the Full Text Index.

Syntax
CREATE FULLTEXT INDEX ON table_name
[ ( { column_name
[ TYPE COLUMN type_column_name ]
[ LANGUAGE language_term ]
[ STATISTICAL_SEMANTICS ]
} [ ,...n]
) ]
KEY INDEX index_name
[ ON<catalog_filegroup_option> ]
[ WITH [ ( ] <with_option> [ ,...n] [ ) ] ]
[;]

<catalog_filegroup_option>::=
{
fulltext_catalog_name
| ( fulltext_catalog_name, FILEGROUP filegroup_name )
| ( FILEGROUP filegroup_name, fulltext_catalog_name )
| ( FILEGROUP filegroup_name )
}

<with_option>::=
{
CHANGE_TRACKING [ = ] { MANUAL | AUTO | OFF [, NO POPULATION ] }
| STOPLIST [ = ] { OFF | SYSTEM | stoplist_name }
| SEARCH PROPERTY LIST [ = ] property_list_name
}

Parameters

Parameter Description
table_name Define the name of the table
column_name Define the name of the column included in the full-text index.
TYPE COLUMN type_column_name Define the type of column(exavarchar,varbinary)
LANGUAGE language_term Define the language of the data stored in column_name.
STATISTICAL_SEMANTICS Creates the additional keyphrase and document similarity indexes that are part of statistical semantic indexing.
KEY INDEX index_name Define the name of the unique key index on table_name. 
fulltext_catalog_name Define the full-text catalog used for the full-text index.
FILEGROUP filegroup_name Creates the specified full-text index on the specified filegroup. 
CHANGE_TRACKING [ = ] { MANUAL | AUTO | OFF [ , NO POPULATION ] } Specifies whether changes(updates, deletes, or inserts) made to table columns that are covered by the full-text index will be propagated by SQL Server to the full-text index.
STOPLIST [ = ] { OFF | SYSTEM | stoplist_name } Associates a full-text stop list with the index. 
SEARCH PROPERTY LIST [ = ] property_list_name  Associates a search property list with the index.

Example

CREATE FULLTEXTCATALOG New_CatalogASDEFAULT;
CREATE FULLTEXTINDEX ON dbo.Employee(EmployeeName TYPECOLUMN varchar LANGUAGE 1033,EmpSalary TYPECOLUMN varchar LANGUAGE 1033)
KEY INDEX UN_Pankaj
ON
New_Catalog


After creating the FULL Text Catalog and Full Text Index, we now learn how to use these in search queries for better performance. There are four principal T-SQL functions that allow one to interact with your Full-Text indices:

CONTAINS and  FREETEXT Method
CONTAINS and FREETEXT functions return a boolean value, meaning we could use them directly in a WHERE clause. The remaining two return a two-column table—KEY and RANK, allowing one to manage ranked searches.

FREETEXT

FREETEXT T-SQL function performs predicate searches for values that match the meaning and not just the exact wording of the words in the search condition. When FREETEXT is used, the full-text query engine internally performs the following actions on the freetext_string, assigns each term a weight, and then finds the matches:

  • Separates the string into individual words based on word boundaries (word-breaking).
  • Generates inflectional forms of the words (stemming).
  • Identifies a list of expansions or replacements for the terms based on matches in the thesaurus.

Example
SELECT TOP 10 tmski.Keyword_TextFROMdbo.TblMaster_Searching_Keyword_Infotmski
WHERE
FREE TEXT(Keyword_Text,'Hotel Above')


Output


CONTAINS
CONTAINS searches for precise or fuzzy (less precise) matches to single words and phrases, words within a certain distance of one another, or weighted matches in SQL Server. It is similar to the Freetext but with the difference that it takes one keyword to match with the records, and if we want to combine other words as well in the search, then we need to provide the “and” or “or” in search.

CONTAINS can search for
    A word or phrase.
    The prefix of a word or phrase.
    A word near another word.
    A word is inflectionally generated from another (for example, the word drive is the inflectional stem of drives, drove, driving, and driven).
    A word that is a synonym of another word using a thesaurus (for example, the word "metal" can have synonyms such as "aluminum" and "steel").

Example
SELECT TOP 10 tmski.Keyword_TextFROMdbo.TblMaster_Searching_Keyword_Infotmski
WHERE
CONTAINS(Keyword_Text,'Hotel OR Above')

Use FULL-Text Index search when you have a large volume of data, and you want to perform a search for textual data columns for specific words and phrases. Full-Text Index can be used to search words, phrases, and multiple forms of a word or phrase using FREETEXT (), CONTAINS () with “and” or “or” operators (FREETEXT, CONTAINS).

HostForLIFEASP.NET SQL Server 2019 Hosting


About HostForLIFE

HostForLIFE is European Windows Hosting Provider which focuses on Windows Platform only. We deliver on-demand hosting solutions including Shared hosting, Reseller Hosting, Cloud Hosting, Dedicated Servers, and IT as a Service for companies of all sizes.

We have offered the latest Windows 2019 Hosting, ASP.NET 5 Hosting, ASP.NET MVC 6 Hosting and SQL 2019 Hosting.


Month List

Tag cloud

Sign in