European Windows 2019 Hosting BLOG

BLOG about Windows 2019 Hosting and SQL 2019 Hosting - Dedicated to European Windows Hosting Customer

European SQL Server 2022 Hosting :: How to check if SQL table is temporal?

clock October 30, 2023 10:49 by author Peter

There are two methods for determining whether a SQL table is temporal: Examine the table definition. There are two system-versioned period entries in temporal tables: sys_start_time and sys_end_time. These columns include the beginning and end dates of the time period for which the row is valid. A table with these two columns is a temporal table.

The OBJECTPROPERTY() function should be used. The OBJECTPROPERTY() function returns information about a database object, such as whether it is a temporal table. To determine whether a table is temporal, use the SQL statement:

SELECT OBJECTPROPERTY(object_id('table_name'), 'IsTemporalTable');

If the query returns a value of 1, the table is temporal. Otherwise, the table is not chronological. For instance, the following SQL statement will determine whether the Products table is temporal:

SELECT OBJECTPROPERTY(object_id('Products'), 'IsTemporalTable');

If the result of the query is 1, then the Products table is temporal. Otherwise, the Products table is not temporal.

Note: Temporal tables are only supported in Microsoft SQL Server 2016 and later versions.

Here are some additional things to keep in mind about temporal tables:

  • Temporal tables can be either system-versioned or history-table versioned. System-versioned temporal tables are managed by the database engine, while history-table versioned temporal tables are managed by the user.
  • Temporal tables can be used to store both current and historical data. Current data is stored in the table, while historical data is stored in a history table.
  • Temporal tables can be used to query both current and historical data. The FOR SYSTEM_TIME clause can be used to specify the time period for which the data should be returned.

HostForLIFEASP.NET SQL Server 2022 Hosting


European SQL Server 2022 Hosting :: SQL Server optional parameters

clock October 27, 2023 07:50 by author Peter

This article will teach you about optional parameters and how to use them in stored procedures.

Parameters that are optional
Optional parameters are a sort of parameter in which you can declare a default value, and if that parameter is not passed, the default value is used.
By using several examples, let's establish a "Employees" database and learn how to write a stored method with Optional Parameters.

CREATE TABLE Employees (
EMPID INT PRIMARY KEY,
EMPName VARCHAR (50),
EMPAddress VARCHAR (Max),
ContactNumber VARCHAR (10),
EMPSalary INT
)

--Inserting multiple records in one table.

INSERT INTO Employees (EMPID, EMPName, EMPAddress, ContactNumber, EMPSalary)
VALUES (101, 'Peter', 'London', NULL, 65000),
(102, 'Scott', 'Manchester', 1234567809, 55000),
(103, 'Laura', 'Leeds', NULL, 95000),
(104, 'Samuel', 'Liverpool', 1234506789, 35000)

Now check the table by running a select query.
SELECT * FROM Employees;

Now create stored proc, which inserts records in the table with mandatory parameters.
CREATE OR ALTER PROCEDURE usp_InsertEmployeesRecords
@EMPID INT PRIMARY KEY,
@EMPName VARCHAR (50),
@EMPAddress VARCHAR (Max),
@ContactNumber VARCHAR (10),
@EMPSalary INT
AS
BEGIN
    INSERT INTO Employees VALUES (@EMPID, @EMPName, @EMPAddress, @ContactNumber, @EMPSalary)
    SELECT * FROM Employees                     --Checking if all the records inserted in Employee table or not.
END


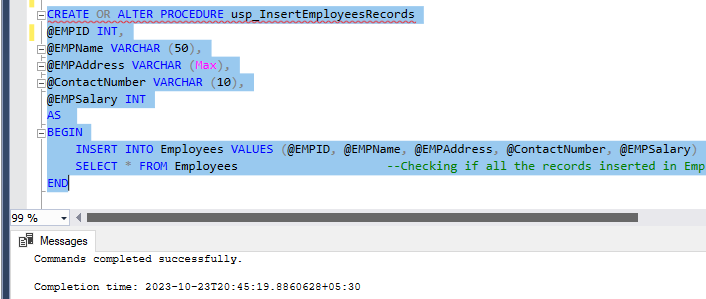
The stored procedure “usp_InsertEmployeesRecords” was created
Now let’s execute the same procedure and see the output.

EXECUTE usp_InsertEmployeeRecords 105, 'Maria', 'Leeds', 1203456789, 70000

As you can see above, all records are inserted in the table as values passed for all mandatory parameters.
Now let’s go with another scenario when a user doesn’t have all the information and inserts records in the table for example missing contact number.
Executing the same procedure again.

EXECUTE usp_InsertEmployeesRecords @EMPID = 106, @EMPName = 'Ricky', @EMPAddress = 'London', @EMPSalary = 80000;

After executing the procedure, we got the following error, which means we had created proc with mandatory parameters, and we have not passed the values for all the parameters.

Now to overcome with above error, let's create the proc with an optional parameter.

CREATE OR ALTER PROCEDURE usp_InsertEmployeesRecordsOptParam
@EMPID INT PRIMARY KEY,
@EMPName VARCHAR (50),
@EMPAddress VARCHAR (Max),
@ContactNumber VARCHAR (10) = 'NULL',
@EMPSalary INT
AS
BEGIN
    INSERT INTO Employees VALUES (@EMPID, @EMPName, @EMPAddress, @ContactNumber, @EMPSalary)
    SELECT * FROM Employees                     --Checking if all the records inserted in Employee table or not.
END

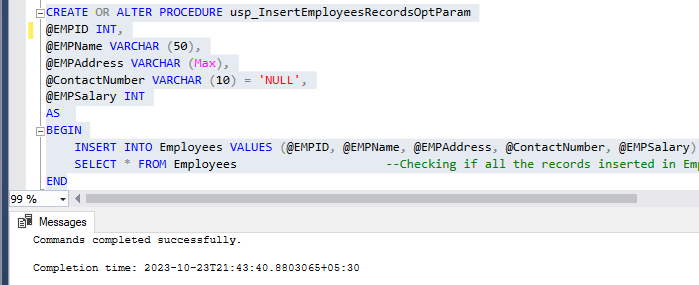
The stored procedure “usp_InsertEmployeesRecordsOptParam” was created, as you can see in the above screenshot.


HostForLIFEASP.NET SQL Server 2022 Hosting


European SQL Server 2022 Hosting :: What exactly is a temporal table?

clock October 17, 2023 09:35 by author Peter

A temporal table is a sort of database table that is intended to track changes over time without the need for sophisticated custom programming or triggers. It accomplishes this by including system-generated columns in the table that reflect each row's valid time period. System-Versioned Temporal Tables are another name for them.

Temporal Tables with System Verification

The system automatically tracks changes to the data over time in this form of temporal table by creating a new version of each row every time it is modified or removed. The original row is kept with its valid time period, and a new version with its own valid time period is created. This enables you to view the table's history at any moment and query it as if it were a snapshot of the data at that time.

CREATE TABLE dbo.MyTemporalTable (
Id INT PRIMARY KEY,
Name VARCHAR(50),
EffectiveStartTime DATETIME2 GENERATED ALWAYS AS ROW START,
EffectiveEndTime DATETIME2 GENERATED ALWAYS AS ROW END,
PERIOD FOR SYSTEM_TIME (EffectiveStartTime, EffectiveEndTime)
) WITH (SYSTEM_VERSIONING = ON (HISTORY_TABLE = dbo.MyTemporalTable_History));


How to query the temporal table?
Temporal tables, like database tables, can be queried. To query data across the main and history tables, a new clause FOR SYSTEM_TIME with five temporal-specific sub-clauses has been added. This new SELECT statement syntax is usable on a single table, via multiple joins, and via views on top of several temporal tables.

The five sub-clauses
AS OF <DateTime>
FROM <EffectiveStartTime> TO <EffectiveEndTime>
BETWEEN <EffectiveStartTime> AND <EffectiveEndTime>
CONTAINED IN (EffectiveStartTime, <EffectiveEndTime>)
ALL

-- AS OF (EffectiveStartTime<= date_time AND EffectiveEndTime> date_time)
SELECT * FROM dbo.MyTemporalTable FOR SYSTEM_TIME AS OF '2023-03-10 T10:00:00.0000000'

-- FROM (EffectiveStartTime< date_time AND EffectiveEndTime > date_time)
SELECT * FROM dbo.MyTemporalTable FOR SYSTEM_TIME FROM '2022-01-01' TO '2022-12-31'

--BETWEEN (EffectiveStartTime<= date_time AND EffectiveEndTime > date_time)
SELECT * FROM dbo.MyTemporalTable FOR SYSTEM_TIME BETWEEN '2022-01-01' AND '2022-12-31'

--CONTAINED (EffectiveStartTime>= date_time AND EffectiveEndTime <= date_time)
SELECT * FROM dbo.MyTemporalTable FOR SYSTEM_TIME CONTAINED IN ('2023-01-01', '2023-02-28')

--ALL (All rows)
SELECT * FROM dbo.MyTemporalTable FOR SYSTEM_TIME ALL

How to drop the temporal table?
Dropping a temporal table is similar to dropping any other table in your database. However, we need to consider a few things before dropping a temporal table to avoid data loss and ensure that the cleanup process is handled correctly.

Here are the general steps to drop a temporal table.

Drop the dependent objects: Before dropping the temporal table, you should first drop any dependent objects, such as triggers, indexes, or foreign keys that reference the temporal table.

Disable temporal feature: Disable the temporal feature of the table by running the ALTER TABLE statement to remove the system-versioning or application-time period specification.
ALTER TABLE dbo.MyTemporalTable SET (SYSTEM_VERSIONING = OFF);

Drop the temporal table: After removing all dependent objects and disabling the temporal feature of the table, drop the table using the DROP TABLE statement.
DROP TABLE IF EXISTS dbo.MyTemporalTable;

Limitations of temporal table

  • Storage requirements: System-versioned temporal tables require additional storage to maintain historical versions of the data. The size of the history table can grow quickly, especially for tables with many updates or deletes, which can impact performance and increase storage costs.
  • Query performance: Querying a temporal table can be more complex than querying a regular table, especially if you need to retrieve data from both the current and historical versions of the data. Depending on the database system, query performance may be slower for temporal tables than for regular tables.
  • Configuration complexity: Setting up a temporal table requires some additional configuration steps compared to a regular table. This can make it more complex to create and maintain the table, especially if you are not familiar with the temporal table syntax.
  • Compatibility: Not all database systems support temporal tables. While SQL Server, Oracle, and PostgreSQL all support temporal tables, other systems may not. This can limit your ability to use temporal tables if you need to migrate to a different database system in the future.
  • Migration complexity: If you have an existing table that you want to make temporal, you may need to perform a data migration to move the existing data to the history table. This can be complex and time-consuming, especially for large tables.

Advantages of temporal table
The main advantage of a temporal table is that it allows you to maintain a full history of changes to your data over time. This provides several benefits, including:

  • Auditing: With a temporal table, you can easily track changes to your data over time. This is useful for auditing purposes, as you can see when and how data was modified, deleted, or added.
  • Compliance: Many industries have regulatory requirements that mandate data retention policies. By maintaining a full history of changes to your data, you can ensure compliance with these requirements.
  • Recovery: In the event of data loss or corruption, a temporal table can be used to recover lost data. You can restore the table to a previous point in time and recover data that was lost or corrupted.
  • Analysis: A temporal table can be used for trend analysis, as you can see how data has changed over time. This can be useful for identifying patterns, trends, and anomalies in your data.
  • Data versioning: With a temporal table, you can easily maintain multiple versions of your data. This is useful if you need to maintain different versions of a record for different users or if you need to create a new version of a record without overwriting the previous version.

Overall, the temporal table provides a powerful mechanism for maintaining a full history of changes to your data. This can be useful for a variety of purposes, including auditing, compliance, recovery, analysis, and data versioning. By understanding the limitations of temporal tables, you can make an informed decision about whether they are the right solution for your needs.


European SQL Server 2022 Hosting :: How to Dynamic Sorting in SQL Server?

clock October 11, 2023 12:09 by author Peter

Dynamic sorting in SQL Server allows you to dynamically and flexible sort the result set of a query depending on one or more columns. This means that rather than hardcoding the sorting order of the result set in the query, you can determine it at runtime.

There are various approaches to implementing dynamic sorting in SQL Server, but the most frequent is to utilize the ORDER BY clause with a variable containing the column name(s) to sort on.

Here’s an example
DECLARE @SortColumn NVARCHAR(50) = 'LastName'
DECLARE @SortOrder NVARCHAR(4) = 'ASC'

SELECT *
FROM Customers
ORDER BY
  CASE WHEN @SortOrder = 'ASC' THEN
    CASE @SortColumn
      WHEN 'FirstName' THEN FirstName
      WHEN 'LastName' THEN LastName
      WHEN 'City' THEN City
    END
  END ASC,
  CASE WHEN @SortOrder = 'DESC' THEN
    CASE @SortColumn
      WHEN 'FirstName' THEN FirstName
      WHEN 'LastName' THEN LastName
      WHEN 'City' THEN City
    END
  END DESC


In this example, the @SortColumn variable determines which column to sort on, and the @SortOrder variable determines whether to sort in ascending or descending order. The CASE statements in the ORDER BY clause dynamically generate the sort expression based on the values of these variables.

Note that dynamic sorting can be potentially risky, as it can expose your database to SQL injection attacks. It’s important to validate and sanitize any user input that is used to determine the sorting order.

HostForLIFEASP.NET SQL Server 2022 Hosting


European SQL Server 2022 Hosting :: Data Transfer from One Table to Another Across Databases

clock October 6, 2023 08:40 by author Peter

The migration of data from one database to another is a regular job performed by a Database Administrator. This scenario frequently occurs when businesses need to integrate data from several sources, migrate data to a data warehouse, or do data analytics on a collection of data held in various databases. Ingesting data from one table in a database to another table in a different database is a common scenario, especially when both tables have identical columns. with this article, we'll go over how to do this efficiently with SQL Server Management Studio.

Create the Database Connection
Before you can transfer data between tables in different databases, you must first ensure that you have the required permissions and connectivity to both databases, which frequently entails defining connection settings such as server addresses, authentication credentials, and database names.

Recognize the Tables
It is critical that you have a thorough understanding of both the source and destination tables. The tables in our case share the same columns, which simplifies the operation. You should still double-check that the column names, data types, and constraints are consistent between the two tables. Any inconsistencies can cause data integrity difficulties during the transmission.

Create and run the SQL query
To transfer the data, create a SQL query with the INSERT INTO... function. SELECT the typically used statement for that purpose. The source table, the fields to be transferred, and the destination table should all be specified in the query. After you've written the SQL query, click the Execute button to run it. In our case, we wish to move the data from the SalesData database's DimCustomer table to the data warehouse database's DimCustomer table. The table structure in both tables is the same.

We wrote a simple query in the screenshot below to retrieve all of the records from that table. In the next screenshot below, we switched to the destination database: DataWarehouse, and we selected all the columns in the dimCustomer table without any data ingested thus far. This is necessary to verify the structure of the destination table.

SELECT * FROM DimensionCustomer;

In the following snapshot, we went to the destination database, DataWarehouse, and selected all of the columns in the dimCustomer table with no data ingested thus far. This is required to validate the destination table's structure.

In the next screenshot below, we wrote and executed the query, and from the message displayed, a total of 18,484 records were inserted into the destination table.

INSERT INTO DataWarehouse.dbo.DimCustomer (
    CustomerKey,
    FirstName,
    LastName,
    BirthDate,
    MaritalStatus,
    Gender,
    EmailAddress,
    AnnualIncome,
    NumberofChildren,
    EducationalLevel,
    Address,
    PhoneNumber,
    FirstTransactionDate
)
SELECT
    CustomerKey,
    FirstName,
    LastName,
    BirthDate,
    MaritalStatus,
    Gender,
    EmailAddress,
    AnnualIncome,
    NumberofChildren,
    EducationalLevel,
    Address,
    PhoneNumber,
    FirstTransactionDate
FROM SalesData.dbo.DimensionCustomer;

Verify the Results
After the query execution is complete, it's essential to verify the results. To verify, we executed a simple below mentioned query, and all the records were returned.
SELECT * FROM dimCustomer;

HostForLIFEASP.NET SQL Server 2022 Hosting


About HostForLIFE

HostForLIFE is European Windows Hosting Provider which focuses on Windows Platform only. We deliver on-demand hosting solutions including Shared hosting, Reseller Hosting, Cloud Hosting, Dedicated Servers, and IT as a Service for companies of all sizes.

We have offered the latest Windows 2019 Hosting, ASP.NET 5 Hosting, ASP.NET MVC 6 Hosting and SQL 2019 Hosting.


Month List

Tag cloud

Sign in